
XJR Mark 2


Thread Starter
|
Senior Member

Joined: Dec 2011
Posts: 511
Likes: 173
From: Avon, Connecticut USA
Has anyone else tackled an XJR transplant similar to the Beachem Mark 2? I've been following the Primaz LS1 project and noticed a few folks mentioned they were undertaking or planning the XJR approach. I would love to exchange some project details as the hurdles are substantial and frequent. I acquired a rust-free CA car (not sure if the picture attached) and X-308 accident victim this winter, so there's no turning back now. Please let me know if there's any other interest out there.

Senior Member
Joined: Dec 2011
Posts: 346
Likes: 58
From: GRIMSBY.
Hi
i have a daimler mk2, and an 4.2 stype and doing the same,
i also have a beechems file on how to do it,
i have my engine, but have cut the inner wings and fire wall out,
seemed the right thing to do at the time,
my AC pump had to come off,
and have put the stype hubs onto the mk2 were the stubs would have been,

Veteran Member


Joined: Jun 2011
Posts: 1,113
Likes: 315
From: California
Has anyone else tackled an XJR transplant similar to the Beachem Mark 2? I've been following the Primaz LS1 project and noticed a few folks mentioned they were undertaking or planning the XJR approach. I would love to exchange some project details as the hurdles are substantial and frequent. I acquired a rust-free CA car (not sure if the picture attached) and X-308 accident victim this winter, so there's no turning back now. Please let me know if there's any other interest out there.
I would love to see your project and pictures. Regardless of what v8 engine your are putting in, we share much of the same issues. I think you will find jaguarforums.com a more open group of people to help in your project than other sites that are all snobs about changing even the most minor aspect of a Jag

Thread Starter
|
Senior Member
Joined: Dec 2011
Posts: 511
Likes: 173
From: Avon, Connecticut USA
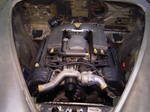
Daimler guy - it's nice to know there's at least 1 other idiot out there. It sounds like you're well into your project - would love to see any pics and hear more details. I believe the 4.0 and 4.2 motors are essentially the same block so fitment issues should be the same. Here are a few shots of what I've done to date. I cut the motor mount perches out of the donor car using a hole saw and fit and welded them to the frame rails after reinforcing the top with plate. The XJR mounts are rather large oil-filled units that I wanted to retain for their good isolating qualities. This required cutting down the box sections that run from the upper bulkhead to the frame rails to get the necessary clearance. Like you I opened up the inner fenders just forward of the motor mounts for clearance and access. We should be able to raise the AC compressor enough with a simple bracket to clear the left frame rail. On the 4.0 the oil filter fouls the right frame rail - a simple remote filter adapter should do the trick there.
My Mark 2 was an automatic so I had no clearance issues at the bulkhead or tunnel. The XJR trans mount bolted directly into the frame rails. I opened these up from above with small cutouts in the floorpan to install backing plates with captive nuts and then welded the floor shut.
I'm currently working on fitting the XJR rear suspension to the Mark 2 tub. Lots of issues here but unlike the S Type there was no IRS to work with and the live axle and leaf springs have to go. Let me know if you (or anyone else) decide to go this route and I'll share what I've learned.
Primaz - I have some of that snob DNA in me. We spent years restoring and showing a few old English cars and met a lot of great people. They're fanatics just like us only it's all about originality and condition instead of big sticky rubber and blowing the doors off some poor unsuspecting guy in a German sled. Just different ways of celebrating the cars. What's really special for me is that we build these cars so we can drive them every day - something the showboys can't or won't do - and I'll take driving these beauties any day. Thanks for your encouragement.
Last edited by GGG; Aug 28, 2013 at 12:59 PM. Reason: recover images
Veteran Member
Joined: Jun 2011
Posts: 1,113
Likes: 315
From: California
Doug,
I am like you, cars are meant to be driven on the street. Even my one of a kind 240z while it was a show car and won many awards yet I drove the crap out of it on the street and now it is going through a major restoration but when done it will again be driven hard yet still be show ready. It has some road chips on the hood due to drving it over 165 mph on the old lacquer paint job. The new paint job will still be mirror black but a more modern paint hopefully able to take hard driving a bit longer before chipping?
My 3.8s Jaguar will be my daily driver and I plan on not only putting a lot of miles on it but to drive it hard as well and surprise some M5's and other new sports sedans.
Once it is done you will get a kick out of the crazy mobile office set up going into the Jaguar. It will have not only my current set up in my Lexus which is: laptop car mount like the police use, wifi speaker phone, lazer jet color network printer, high speed scanner, pro-hole punch and binding machine, and always connected to the internet; it will also be sporting a compact microwave, rugged frig/freezer in the trunk. This will be powered by a 3000 watt pure sine wave inverter connected to a powerful separate battery and the car will have a battery isolator also connected to another battery just for the car starting and lights, etc.
Normally I'm a stickler for originality, but I love you what you guys are doing with your Jags. I had a stock Daimler 250 V8 or whatever it's called and can only imagine that your mods will make the car better and better to drive.
Thread Starter
|
Senior Member
Joined: Dec 2011
Posts: 511
Likes: 173
From: Avon, Connecticut USA
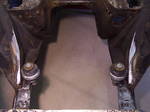
The transplant continues with the rear suspension install almost complete. This required narrowing the XJR carrier along with the half shafts and lower control arms, plus new mounting points on the Mark 2 tub. Just waiting on the shortened drive shaft to install the center bearing.
The XJR fuel tank with its internal high pressure fuel pumps seemed a logical path so I narrowed this 2" to fit behind the rear seat between the wheel wells - this is the location in the XJR. I had a radiator shop acid wash and neutralize the tank before cutting and welding. The higher tank position required relocating the fill to the upper fender. When the body work is done I think it will look like it belongs there. Here are a few pics of the progress.
With the drivetrain complete I'll tackle the firewall next. This will require a bumpout in the center to accommodate the XJR AC/heater core box, as I want to retain all of the XJR's climate control functions. The left and right bulkheads will require mods to fit the pedal box/master cylinder and main engine ECU box from the XJR. The fun continues.
Trending Topics
Senior Member
Joined: Jan 2013
Posts: 595
Likes: 68
From: Florida
Doug,
Could you repost your first three images of the motor mounts and the motor install? In our initial post I could not click on them to enlarge. Don't know if others had that problem or not.
Love your work.
Lin
Could you repost your first three images of the motor mounts and the motor install? In our initial post I could not click on them to enlarge. Don't know if others had that problem or not.
Love your work.
Lin
Senior Member
Joined: Dec 2011
Posts: 346
Likes: 58
From: GRIMSBY.
have you done your rack yet,
I got an x type for mine and cut the control arms down a bit,
I have the rear sub frame to do,but with mine being from an s type its not like yours,
should have got an xj8,but s type was a good price.
I got an x type for mine and cut the control arms down a bit,
I have the rear sub frame to do,but with mine being from an s type its not like yours,
should have got an xj8,but s type was a good price.
Thread Starter
|
Senior Member
Joined: Dec 2011
Posts: 511
Likes: 173
From: Avon, Connecticut USA
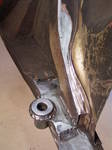
Lin, I didn't keep the engine mount pics I posted earlier so I shot these, along with some closeups of the rear suspension mount. This is simply a length of 1 1/2" square tube that ties into the box section that forms the inner wheel well plus the box section that extends to the rear of the car. The mounting brackets were simply removed from the XJR tub (pics show the driver side mount - upside down on the rotisserie - I think)
Daimler Guy, I decided to farm out my front suspension carrier to a guy who fabricates custom chassis for modifieds (funny looking race cars here in the States). The center of the cross beam had to be cut down to provide clearance for the V8 sump, and since that's a major structural issue I wanted a professional doing the design and work. While he has it he's installing the steering rack (XJR rack is too wide for the Mark 2 so I used one from an X300 - this is the one Beacham uses). Your X Type rack should be narrow enough to avoid any bump steer issues. He's also modifying the spring turrets to accommodate longer coil-over shocks. Beacham also does this and I think it's key to using a more compliant spring and getting a decent ride out of the old beast. I'll post some pics when I get the carrier back, which should be in a week or two.
Your X Type rear end should require less narrowing than the XJR. The half shafts are easily turned down and sleeved but the lower control arms can be problematic depending upon their construction. If you'll post some pics of the X Type rear I'd be pleased to take a peek and offer any suggestions.
Finally I included a shot of the driveshaft bearing mount (drive train done!), plus the bulkhead mods I mentioned last week. I finished the firewall by tack welding a flat sheet over the original to eliminate all the old holes - so I can drill a bunch of new ones. And the fun continues.
Senior Member
Joined: Dec 2011
Posts: 346
Likes: 58
From: GRIMSBY.
Hi Doug,
very good pics, its an s type I have as a doner,for the mk2,
I have just used the x type rack,
I seem to have cut more away than you have in your engine bay,dont no why,
yes I will post some pics up,but you are far more on than me,
but have done the front cross member same as you cut it down for the sump,
Thread Starter
|
Senior Member
Joined: Dec 2011
Posts: 511
Likes: 173
From: Avon, Connecticut USA
Just a quick update. Progress has been slow but for a good reason. The Daimler Guy had me questioning the strength of my rear suspension mounts which tied directly into the existing box sections. I ended up removing everything and reinforcing the boxes with 1/4" plate from the spring boxes to the trunk box sections before welding in the cross members for the diff and coil overs. That advice was greatly appreciated as it makes for a much stronger setup.
The AC/heater box and dampers went into the center dash with a lot of tweaking and coaxing. With the blowers mounted in the upper footwells and fresh air ducted from I don't know where yet the HVAC system should work as designed.
Finally I finished up the fuel tank intallation and front seat cross members. One step at a time...lots of time. Here are a few pics.
Senior Member
Joined: Jan 2013
Posts: 595
Likes: 68
From: Florida
Hi Doug,
Congrats on your progress! Let me back up a post or two. I am going to use a Tremec T5 gearbox in my Mk2. The box works great in the XKE but it is very short with not much of a tail. In the MK2 that is a little problematic, because it creates a need for a very long driveshaft. I notice in your photos that your driveshaft is two pieces with a joint. Doing something like that may be the solution to my problem. Did your drive shaft and mounting bracket come from the XKR? I will need to have my drive shaft(s) made to fit, but I am interested in the bracket and how it was done on your car. Thanks for our thoughts.
Lin
Thread Starter
|
Senior Member
Joined: Dec 2011
Posts: 511
Likes: 173
From: Avon, Connecticut USA
Lin, the driveshafts and center bearing were carried over from the XJR, with the forward shaft shortened a bit. On this setup both the diff end and trans end have large flexible (rubber) couplings, so I believe the center bearing is critical for stabilizing the assembly. I'm not certain that's the case with your setup, which I assume will use conventional u-joints at both ends. I'd talk to a good driveline shop (they'll know what they're talking about). On my last Mark 2 project I installed a 700R4 automatic and used a single driveshaft with no issues, but I can't recall the unit's length relative to the original slush box. As for the center bearing mount the XJR tunnel is much larger than the Mark 2 so I had to fabricate from scratch - simple L brackets the length of the bearing bracket welded to the tunnel sides with 4 captive nuts. Since clearance is tight and I want to get the shaft as high as possible into the tunnel I'll reinforce the tunnel radius above the bearing from inside the car with a curved plate welded to the tunnel. Hope this helps.
Veteran Member

Joined: Jan 2013
Posts: 5,250
Likes: 3,509
From: Calgary, Canada
There is a Mark 2 in Victoria, BC where the owner took the floorpan of a 6 cylinder XJR, shortened and narrowed, and grafted a Mark 2 body onto it. Basically the only thing Mark 2 is the outer skin, every other piece of sheet metal is XJR. It looks amazing, he did a fantastic job on it.
He usually has it at the Jaguars On The Island show each year, put on by the Jaguar Car Club of Victoria. It was at the end of July, so you've missed it for this year.
He usually has it at the Jaguars On The Island show each year, put on by the Jaguar Car Club of Victoria. It was at the end of July, so you've missed it for this year.
Last edited by Jagboi64; Aug 15, 2013 at 10:52 PM.
Thread Starter
|
Senior Member
Joined: Dec 2011
Posts: 511
Likes: 173
From: Avon, Connecticut USA
Another update on the beast. I was finally able to get the steering column and pedal box into their proper position (more difficult than it sounds). Decided on the rear spring angle and got the coil-over cross member welded in. Since the spare tire well was removed to fit the rear suspension carrier I decided to transplant the one from the XJR - much wider than the Mark 2 unit but without the fuel tank under the floor there was plenty of room. This will accommodate the large battery and fuse/relay/ecu box from the XJR, as well as the much wider spare. Finally I decided to transplant the sunroof which is not for the faint of heart - at least not for one who doesn't know much about body work. I took the time to fabricate cutout templates out of 3/16 plate for bending the opening edge - lots of work but everything stayed straight and looks like it should. Lots of folks worry about leaks but these units are not meant to be water tight as they have an integral pan with drain tubes that run down the A and C pillars. At least that's the plan... The XJR rear seat frames and arm rest had to be narrowed 3" - I had an upholsterer rework the leather as it is in great shape. Finally I'm now trying to lay out the engine compartment accessories - too little space and too much stuff! Here are a few pics.
Veteran Member
Joined: Jun 2011
Posts: 1,113
Likes: 315
From: California
Doug,
Do you have any pictures of how you narrowed the rear seats? I have pics of a Vadenplas rear seat narrowed to fit my 3.8s but he did not save any pics of the process just the completed seats. Any information on narrowing the rear seats would be appreciated.
thanks,
Do you have any pictures of how you narrowed the rear seats? I have pics of a Vadenplas rear seat narrowed to fit my 3.8s but he did not save any pics of the process just the completed seats. Any information on narrowing the rear seats would be appreciated.
thanks,
Thread Starter
|
Senior Member
Joined: Dec 2011
Posts: 511
Likes: 173
From: Avon, Connecticut USA
Primaz, here are the only other shots I have of the narrowed rear seats from the XJR. The back was pretty simple as the foam can be separated from the frame by cutting a few hog rings - it was simply a matter of removing 3" of metal from the center and rewelding (you can see the welds in the first pic). The armrest on the XJR has an ABS plastic core surrounded by molded foam - I simply laid this on my table saw and removed a 3" strip from the center and glued the sides together. Aldridge Trimming in England was able to match the XJR's Oatmeal vinyl to make up new door panels - fortunately I bought some extra vinyl from them for various interior panels. The upholsterer used a piece to replace the center section of the seatback top which had a cutout for a center seatbelt which I will eliminate in the Mark 2.
The seatbottom was a little more problematic as the wire framework is imbedded in molded foam. This framework did not fit the contour of the Mark 2 seat pan, so it was a matter of modifying the pan or the framework. I attacked the seat frame by removing about a 2" x 2" section of foam across the leading edge of the lower seatbottom to expose the frame wire that fouled the tub. After cutting out the wire I bent and drilled some heavy sheet and welded the wire to it to tie everything back together. It fits and sits really well. Hope this helps.
The seatbottom was a little more problematic as the wire framework is imbedded in molded foam. This framework did not fit the contour of the Mark 2 seat pan, so it was a matter of modifying the pan or the framework. I attacked the seat frame by removing about a 2" x 2" section of foam across the leading edge of the lower seatbottom to expose the frame wire that fouled the tub. After cutting out the wire I bent and drilled some heavy sheet and welded the wire to it to tie everything back together. It fits and sits really well. Hope this helps.