

**official** intake elbow group buy thread

Veteran Member
Joined: Oct 2008
Posts: 2,475
Likes: 129
From: Pittsburgh, PA
Finally uploaded some pics of my Mafioso install with the T-clamps.
The clamps are rotated in a manner that allows the hood to close and the plastic engine cover to be refitted. There is very minimal contact with the T-clamp and insulating hood liner - I noticed two little slits in the liner from the top of the clamps on the manifold side. To address this, I simply flattened the top of the T-clamps. They have sharp little protrustions on each side, a few quick taps with a mallet and they are flat and no longer poke the insulation.
I also added a hose clamp to provide additional security for the PCV hose barb connection on the valve cover.
So far very pleased with the intake! Looks good, sounds great.
Veteran Member
Joined: Oct 2008
Posts: 2,475
Likes: 129
From: Pittsburgh, PA
I'm on the fence about the clamps. Trimmed up would be better for sure.
The only one that I wouldn't put a worm drive clamp on is the top one on the manifold side - it mates the oval shaped manifold intake to the round Mafioso intake. It took a good bit of crankin' on that T clamp to make me satisfied it was a good sturdy connection.
I might paint the clamps black.
The only one that I wouldn't put a worm drive clamp on is the top one on the manifold side - it mates the oval shaped manifold intake to the round Mafioso intake. It took a good bit of crankin' on that T clamp to make me satisfied it was a good sturdy connection.
I might paint the clamps black.
Member
Joined: Mar 2010
Posts: 58
Likes: 2
From: Gilbert, AZ
Looking good, Chris X! Are we all sure there's no air leaks around the manifold intake due to the oval/round mating - especially at WO throttle? Mafioso? Also, which hose you talking about that you put extra clamps on? Can't wait for mine!
On the fence whether I like the plastic cover on or off...pffft.
On the fence whether I like the plastic cover on or off...pffft.
Veteran Member
Joined: Oct 2008
Posts: 2,475
Likes: 129
From: Pittsburgh, PA
Looking good, Chris X! Are we all sure there's no air leaks around the manifold intake due to the oval/round mating - especially at WO throttle? Mafioso? Also, which hose you talking about that you put extra clamps on? Can't wait for mine!
On the fence whether I like the plastic cover on or off...pffft.
On the fence whether I like the plastic cover on or off...pffft.

I am very confident there are no air leaks with these T-clamps. The clamping force is very good, the clamps are wide, and the rubber connectors are very snug on the intake and manifold sides even without the clamps. If there is any unmetered air sneaking in there, it ain't enough to do anything IMHO.
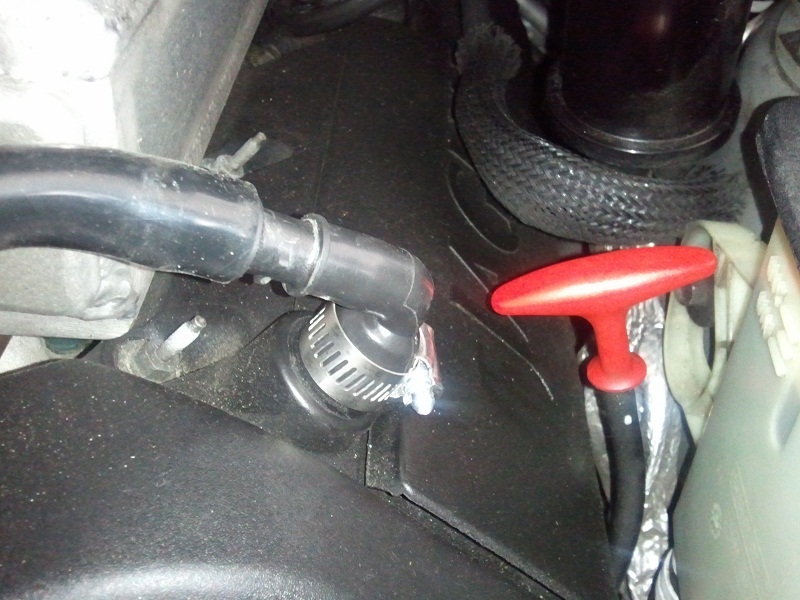
I put a worm drive hose clamp on the vac line from the valve cover to the intake. This is where some had reported the rubber fitting had split.
You can see the fitting in this pic on the right hand side. It has a zip tie on it in this pic, but I replaced it with a hose clamp later on.
Veteran member
Joined: Sep 2010
Posts: 2,327
Likes: 251
From: Bowling Green, KY
thanks for posting the pic!!

Thread Starter
|
Veteran Member
Joined: Feb 2010
Posts: 1,080
Likes: 43
From: Carrollton TX
Im trying to get another thread started with the requests, so I can keep track properly.

Member
Joined: Nov 2010
Posts: 65
Likes: 2
From: Los Angeles, CA
Mafioso, im also interested in a "best" intake.. i noticed a member received a very bright red one... are custom colors xtra?? if so, how much? id like mine in Dodger Blue please  .. please keep me posted. thanks.
Member
Joined: Mar 2010
Posts: 58
Likes: 2
From: Gilbert, AZ
Got mine this afternoon! Thanks, Mafioso! I want to do this myself but anybody know how to remove that black plastic engine cover? I searched on here and couldn't find anything. I'm thinking it's pretty simple, right? Thanks in advance!
Veteran Member

Joined: May 2010
Posts: 1,445
Likes: 218
From: Atlanta, GA
Should just lift up. Its not bolted or anything just slips in some tabs. Gentle pull got mine off. Its hanging in the garage now like the looks without it.
Veteran Member
Joined: May 2010
Posts: 1,445
Likes: 218
From: Atlanta, GA
Yea I've heard a few people that its a little tight cause the little rubber piece that it slips into will swell a little making you think its bolted or something so just pull it a little harder and it will eventually come off.
Veteran Member
Joined: May 2010
Posts: 1,445
Likes: 218
From: Atlanta, GA
[quote=StypeR]Hey Vance,
In case anyone else is having trouble with remove this hose here are some pics that hopefully will help people. There is a ring at the bottom part of it. You have to squeeze each side of it to get the other two sides to clear the lip on the valve cover its the same on the intake side. If you look at these pics there is a ribbed portion that if you push those it will let the tabs clear the lip.
Here you can see the 2 tabs that lock it in place.

Here is the indents that you need to push.

This is how you would squeeze and it will make that ring oval letting the tabs clear then you should be able to pull up.

In case anyone else is having trouble with remove this hose here are some pics that hopefully will help people. There is a ring at the bottom part of it. You have to squeeze each side of it to get the other two sides to clear the lip on the valve cover its the same on the intake side. If you look at these pics there is a ribbed portion that if you push those it will let the tabs clear the lip.
Here you can see the 2 tabs that lock it in place.
Here is the indents that you need to push.
This is how you would squeeze and it will make that ring oval letting the tabs clear then you should be able to pull up.
Member
Joined: Mar 2010
Posts: 58
Likes: 2
From: Gilbert, AZ
Here's mine installed. Waiting on the rest of the T-clamps (thanks Mafioso!). Butt dyno feels a better throttle response and faster revs. Will try to get a video soon.
All in all, workmanship is excellent on the product - if there is one thing to nitpick on is that maybe the weld on the tube could be on the underside? But like I said, that's just nitpicking and looks great as it it. I cannot believe how "complicated" that OEM intake is.
I'm open to suggestions whether to paint it or leave it as it is. And still back and forth as to whether to put the plastic valve cover back.
