When you click on links to various merchants on this site and make a purchase, this can result in this site earning a commission. Affiliate programs and affiliations include, but are not limited to, the eBay Partner Network.
Can the plastic pieces be swapped out? where can I get them? I am a newbie to this and would really prefer to repalce the plastic pieces instead of buying a whole new one. My regulator still runs just the pieces are broke.
What is the window reset procedure? I replaced my battery and now my driver side front window goes too far down (I hear "thunk" when it hits bottom) and the auto up feature does not work. I've tried resetting the auto up by holding the window up button for two seconds causing the auto up to work again, but if the window goes all the way down the auto up does not work anymore. Any ideas?
a) a 'crunchy' sound when moving windows up down can be a sign of bad cables. In this case: cables might be compromised. In most cases, the cables lost their tension when they jumped off the guide pulleys. If not willing to take the door panels off for a more detailed analysis (and then get what you need) and planning a 'fix in one stop' (and not minding the cost): get a complete regulator on hand. Even then: I would take the needed parts off the aftermarket (Dorman for example is EXCLUSIVELY made in China) regulator and keep the OEM parts (metal guides, etc)
b) if glass moves down and up (with help of hands), the clips are the likely cause.
In 90% of all cases, the plastic clip fails. The plastic (POM, selected for its superior wear resistance and low coefficient of friction) naturally ages, and becomes brittle over time. It is not so much a question IF they break, just WHEN. This applies to ALL models I know of (Audi, VW, BMW, Jaguar, Ford, GM/Opel, Chrysler, Mercedes, Dodge).
The labor to change the clips is equivalent to the labor for changing the regulator (on most cars; on some, replacement the entire regulator requires additional drilling out of rivets, and putting new rivets in).
My recommendation: where there are 2 clips (front doors), replace them BOTH when 'in there.
Hi there. I have a 2001 S type v8 4.0l. My drivers side rear regulator is out. I bought a new plastic clip like the Standard clips. I got the new replacement clip installed onto the old motor and regulator. Put the two pins in the glass. Slid the glass down onto the plastic clip. I was not lined up and broke the new clip. Ugh. What position is the regulator clip in when the glass is slid down? The clip appeared to be at the wrong angle to the window. Then it broke. I'm at a loss as to why the pin would not line up and click into the clip.
Hi there. I have a 2001 S type v8 4.0l. My drivers side rear regulator is out. I bought a new plastic clip like the Standard clips. I got the new replacement clip installed onto the old motor and regulator. Put the two pins in the glass. Slid the glass down onto the plastic clip. I was not lined up and broke the new clip. Ugh. What position is the regulator clip in when the glass is slid down? The clip appeared to be at the wrong angle to the window. Then it broke. I'm at a loss as to why the pin would not line up and click into the clip.
John, did you possibly have the wrong clip? I am unfamiliar with your MY. Have a look at the link I provided. A couple of Jag Techs and a well respected DIY'er (Gus), have graciously provided information pertaining to the rear window regulator.
Again I would replace the entire regulator. Forget about trying to limp along by replacing the plastic pieces.
Your just wasting time and effort. The entire regulator is not that expensive.
To answer the question above. Yes the Lincoln LS and the Jaguar S Type shared the window regulators for SOME years. As always the early cars were very much the same while the cars from 2003 and up have many more differences.
So for the guy that asked the question above again you did NOT put any car details in so I really can't give you a better answer.
It's ABSOLUTELY critical that we know your car details!!
.
.
.
Hi all. Thanks for the tips. Yea I'm done. Bought a new Euro Spares from Parts Geek. Fit and finish is fine. Dropped on the motor. Works great. The problem with the prior ebay clips was that the angle of the clip to the window was wrong. Labeled Ford Escort, possibly got the wrong part. However, I did learn how to change the clips.
Parts Geek: 2001 Jaguar S Type Window Regulator Price: $61.73 Core: $0.00 Extended Warranty: $0.00 Qty: 1 Part #: XR848085
Ebay 30 pack Lincoln/Jaguar for clips.
30pcsNylon Door Trim Panel Clip for 2000-2005 Ford Excursion Lincoln Town Car $8.46
I've seen a lot of discussion on regulator changing but very few pictures and the pics I have seen are of the pre-facelift cars.
As was changing mine today I thought I'd post up some pictures and info that may help someone. the pictures have not come out as well as I would have liked but you will get the idea.
K
First job is to remove the door card, there are two phillips screws below the rubber mat in the grab well for door closing.
the surround behind the door handle needs to come out if you work around it with a small scredriver or something similar it will come out quite easily, take care not to damage the panel. Attachment 171387
There is a small oval opening in the center of the door covered with a round piece of tape, remove the cover and align the plastic gripper section of the regulator until the locating pin can be seen.
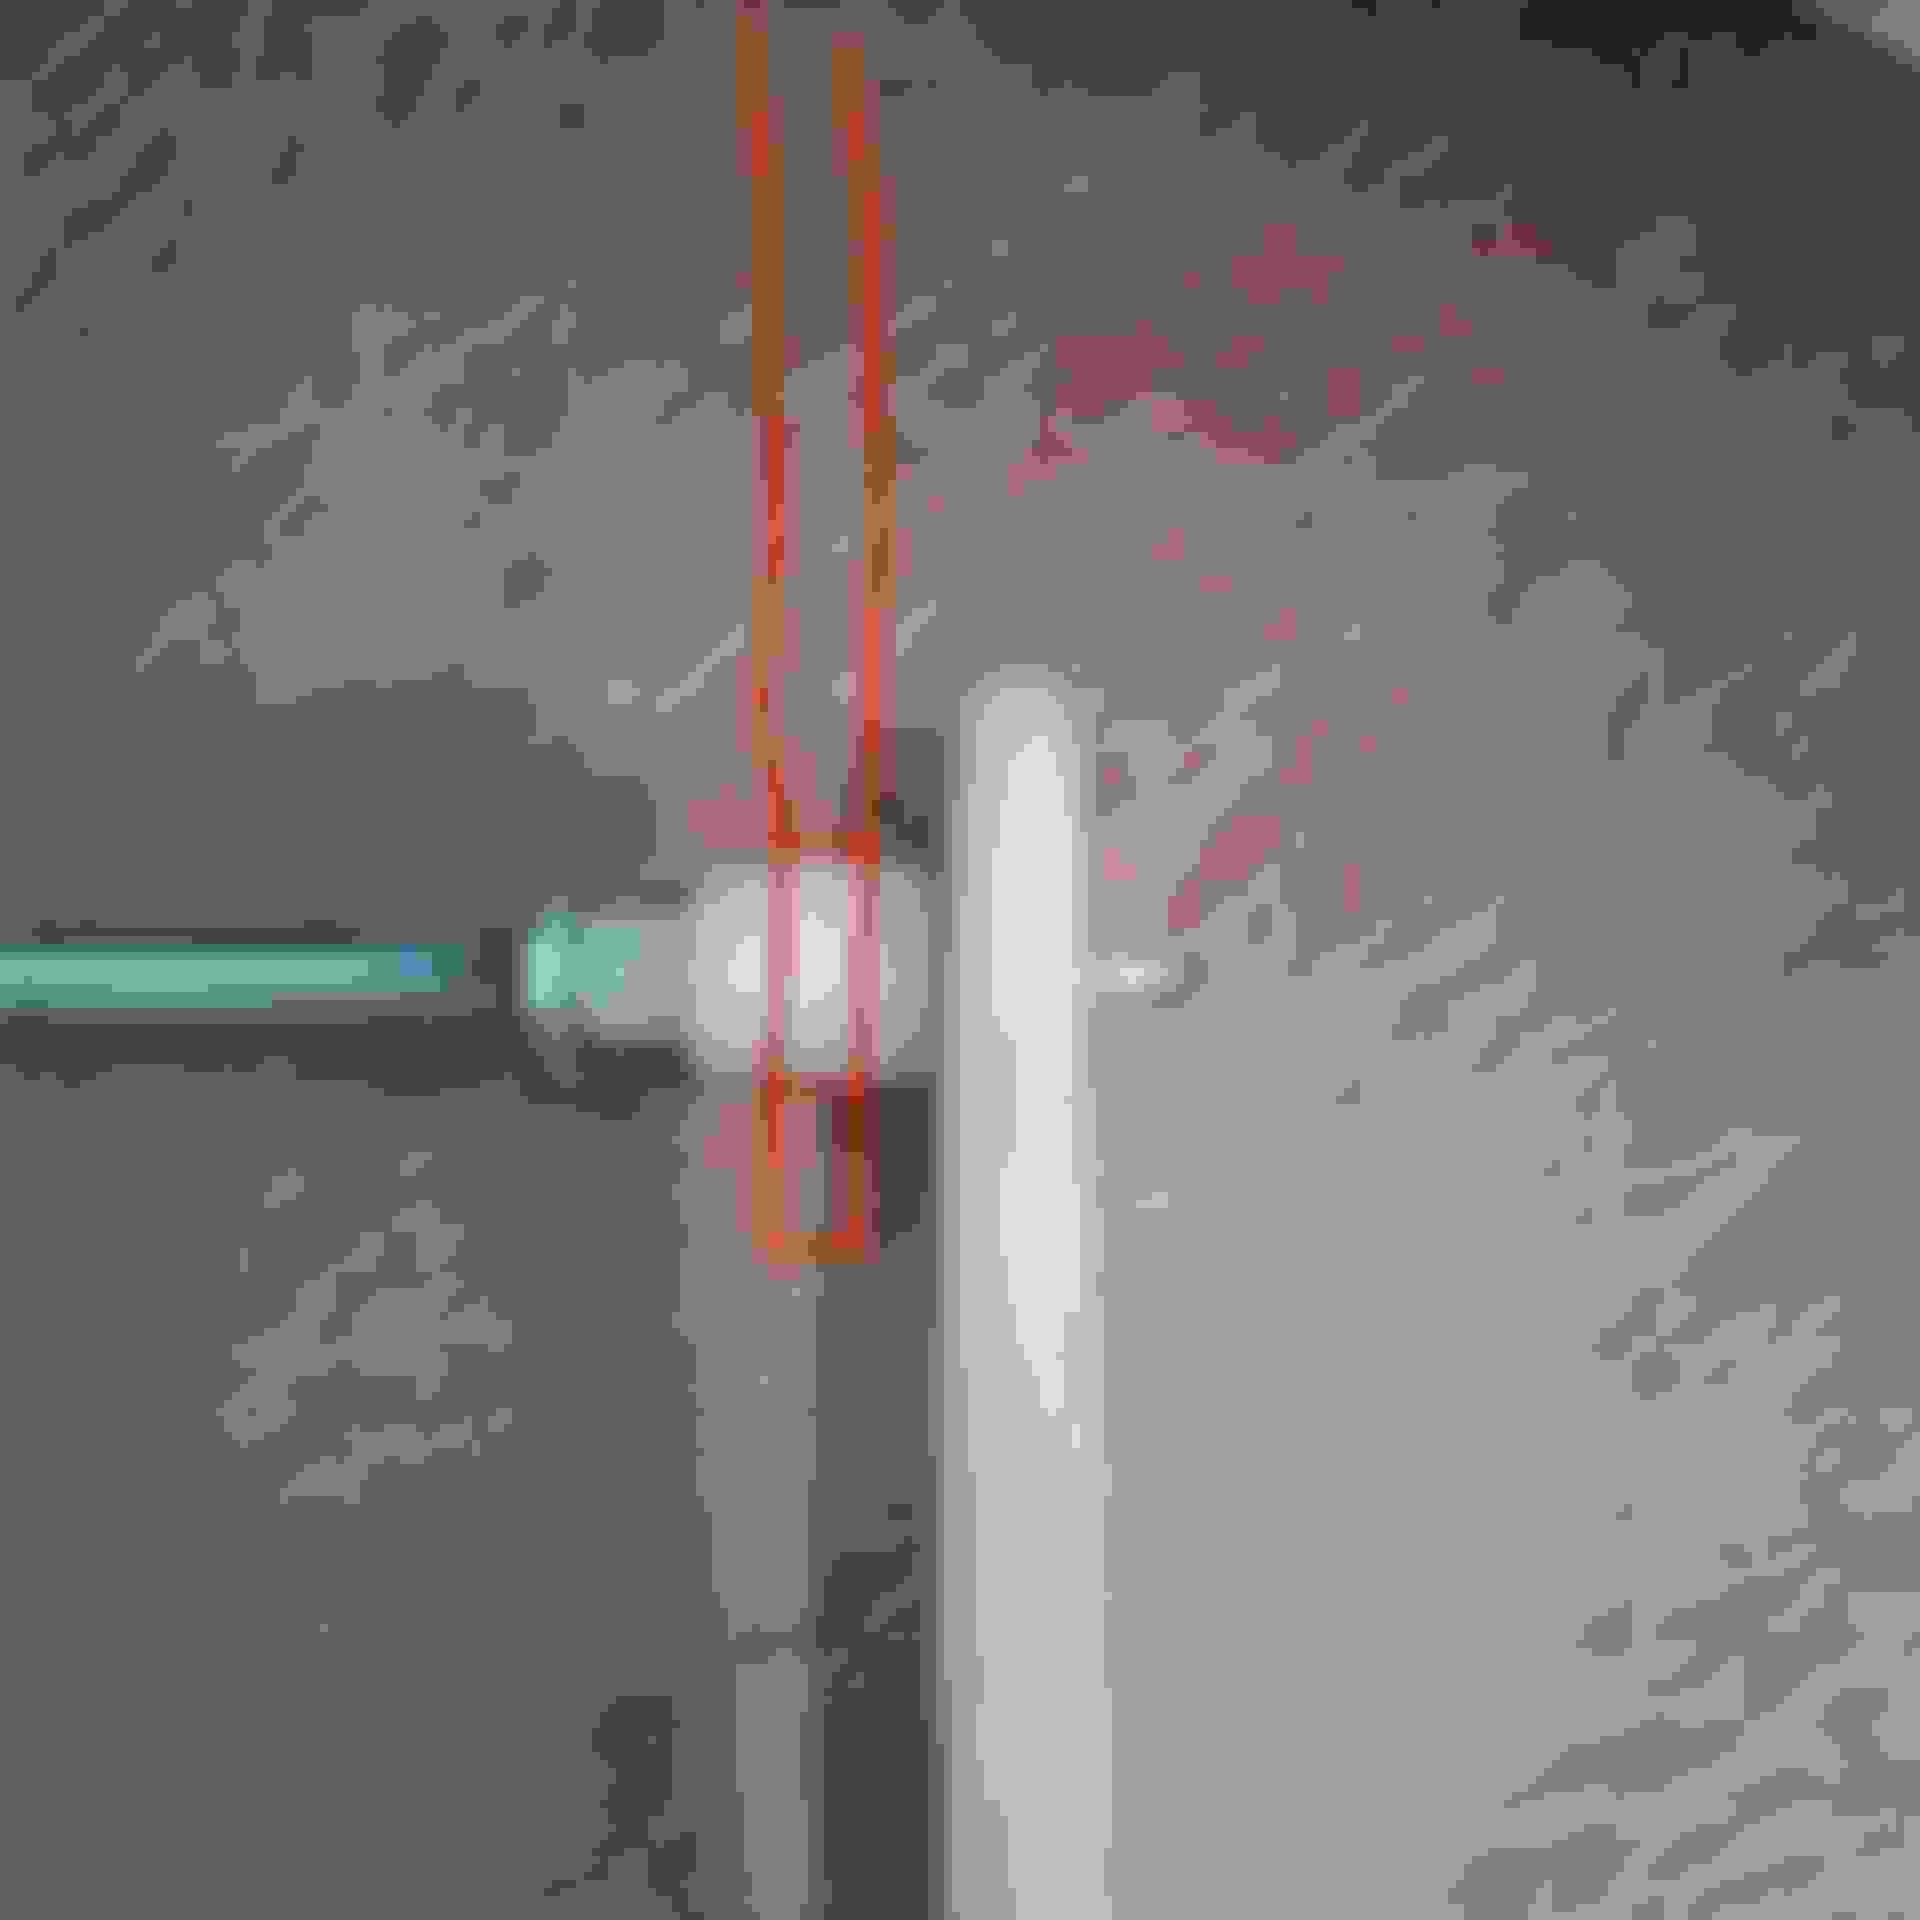
You will see the plastic pin that goes through the plastic part of the regulator and the window with a smaller pin in the center, using a suitable punch drive the center pin out, take care not to hit the glass! Then drive out the outer part both of these will fall into the bottom of the door and will need to be fished out later. Attachment 171393
These are the pins, sorry about the picture quality.
When the pins are out pull the window all the way up and secure it again.
I removed the speaker to get more access and to reach the pins in the bottom of the door. Attachment 171394
And three bolts at the bottom, the third bolt is above and to the left of these. Attachment 171396
When these are removed it is possible to wriggle the regulator around enough to disconnect the motor electrical plug and then remove the unit entirely.
The motor needs to be switched over to the new regulator, it is fixed with 3 torx screws and is a simple switch, unless the ***** who made it forgot to tap the holes.
After a quick trip to Harbor freight the holes were tapped and the motor was on.
Installation is the reverse procedure except you should put the plastic pins into the glass before the regulator is installed then push the window down into the holder until it clicks into place.
The window is working fine now and completing the reset procedure got the one touch closing back in operation.
The whole thing took me a couple of hours including the trip to Harbor Freight and it was bloody hot - 110deg.
I'd guess if I did the other side tomorrow it would be well under an hour.
hi ,
was wondering if you could help me out I got a 99 stype se I have changed the complete front window regulator , however I now have to do rear one and I�m a bit stuck !
I cant get the pin out I do have a punch tool but I�m changing complete unit and struggling to get this pin out I dropped window as I figured it�s not like the front one where by I easily took whole window out . But the pin the plastic but is not visable as even when I drop window I can see the plastic slider it�s atrached to the arm but how do you punch it through ? It�s difficult from rear to front as the mental arm is In way n I can�t see how did you do it ? Don�t wanna break my window , am I doing something wrong ? As the slider is visible but the Plato. Two part pin that hold the window isn�t easy to access or see ?
please help as I kinda stuck as it�s all stripped and sitting here ... front one was easy , I�ve disconnect speaker aswell just to get my hand In the door for Suppourt I�m a small lady so it�s not hard just getting this pin out is driving me crazy I know it�s simple but do you remember how you took pin out did you pinch it from back to forwards or some other way ?? Thankyou any input is invaluable just wanna get it sorted
thanx ... Or if anyone else can help get in touch .
Welcome to the forum Kibla Kibla, please post an intro in the new members section when you can.
The centre part of the pin drives out and lets the outer part collapse enough to slide out, you may need to raise or lower the glass to get it in a good position for access.
The motor needs to be switched over to the new regulator, it is fixed with 3 torx screws and is a simple switch, unless the ***** who made it forgot to tap the holes.
Getting ready to replace my right rear regulator and the holes aren't tapped. Do you remember the size tap you used?
Thanks for the great help . There is a plastic pin that goes through the glass at the bottom of the window that holds the glass in tight and that was my question as to if it went through the glass and it does. I punched out the centre of the plastic pin and the larger piece comes out then. ( was worried I was punching to up against the glass) but you're not as there is a hole in the glass that the pin goes through.
The rest seems pretty straight forward however I only have one rail that comes out in the 01S type. Now to fine the part and re-install.
I am in the process of doing this on the left rear. My aftermarket regulator wasn't tapped for the motor mount Torx screws, but they are M6 X 1.0 and I had the tap on hand.
So far a fairly easy job.
My S-Type Jag is an '05 and has the auto full up/down feature, so my biggest worry on this whole project is timing the motor with the new regulator to get it synchronized without bottoming out or going too high or straining the regulator.
This is a great write up. Thank you!
All went well, but my big problem was tapping the nylon center pin with a punch in the outer sleeve in the window hole. The glass just shook around no matter how I supported it. Just a really tight fit and didn't want to break the glass.
So, I made a tool to draw the pin in by taking a thin, but strong strip of wood, pilot drilling a hole for a wood screw that was long enough and thin enough to slide in the hole of the center pin. Used a flat washer to help evenly make both pins flush with each other. Lubed the center pin a bit with grease and it drew in nice, smooth and flush. Plenty of room behind the window for the wood when the window was at that oval. The red lines are the window.
I just push the large bushing into the glass, then use a pair of Channel Locks, with the jaws on either side to pull the center pin into the bushing, takes less than a minute