When you click on links to various merchants on this site and make a purchase, this can result in this site earning a commission. Affiliate programs and affiliations include, but are not limited to, the eBay Partner Network.
My 4.0L S type 2002 with 5R55N auto box experiences a delay when selecting Drive from the Park position. My instinct is to replace the Forward engagement spring, although other sources suggest I should re-program the PCM to the latest calibration level, others suggest a cable problem. Any advice most welcome as to do this by trial and error looks costly and time consuming.
I did take the car to an auto gearbox specialist who checked the fluid level was OK and said as it goes smoothly and quickly into reverse it isn't likely to be a fluid issue. They said to diagnose/fix it would require the gearbox out and that would be �1000+ which is more than I paid for the car
I don't want to write her off yet though. I've done a bit more research and it sounds like the forward engagement control spring could be the issue - https://www.sonnax.com/parts/2250-fo...control-spring - which I believe can be changed without removal of the gearbox, just the valve body.
This can prove to be an expensive guess. I certainly hope the auto gearbox specialist understands the correct way to check the fluid level.
If you have any DTCs stored, such as P0745, and engine flare on the 1 - 2 upshift, there is probably wear to gearbox casing for the overdrive servo. When the pan is removed for replacing the spring in the valve body, have them look for any brass coloured metal flakes in the fluid, pan and on the solenoid pack as this can be an indication of a more serious condition. Also, when the valve body is removed, they can inspect the forward engagement valve for wear as well as the bore it rides in.
@abonano - Thanks - I had tried that procedure previously with not much luck. It does speed up the engagement while doing it but next time the box has been unused for a few hours its back to a very long engagement time. Engagement time is around 30 seconds at worse, so I don't think its just a case of it not being calibrated properly.
@NBCat - There are no P codes stored, I checked these with an OBDLink MX reader and Torque app and the gearbox specialist also confirmed there were no codes stored. This is not my daily car so I have plenty of time and I like learning about things - so I'm happy to take it apart my self and check the springs so the only wasted expense would be the cost of the springs. I'll also check for metal flakes in the fluid.
I did also adjust the gear cable slightly as when I got the car it would only engage drive (after a long delay) from the 2 position on the J Gate, it now engages from the D position. Could a worn/stretched cable cause the delay?
It is possible an incorrectly adjusted or stretched cable could cause the gearbox to not engage properly. Usually when there is a delay engaging D or R, it's due to a pressure problem caused by low fluid, sticking or stuck valves in the valve body, or a worn pump.
The biggest problem with the 5R55E/N/S/W gearboxes is bore wear of the case causing shifting problems, or causing either the intermediate or overdrive band to break.
It's certainly going to be interesting to see what you find whilst removing the valve body.
Last edited by NBCat; 08-12-2018 at 12:48 PM.
Reason: Add missing word.
It is possible an incorrectly adjusted or stretched cable could cause the gearbox to not engage properly. Usually when there is a delay engaging D or R, it's due to a pressure problem caused by low fluid, sticking or stuck valves in the valve body, or a worn pump.
From my VERY limited experience with automatic transmissions, low fluid affects both D and R engagement. Not sure if this applies to the 5R55N, so interpret this at your own risk.
From distant memory with other automatics, if slow to engage, try putting your left foot on the brake pedal and rev the engine slightly with your right. This boosts the output pressure from the pump. If it now engages right away, that would help isolate a pressure-related issue, be it a worn pump or sticky valves needing higher pressure to operate.
Also, have you tried using Sport mode? Not sure what effect that might have on initial engagement (perhaps none), but if there is a change, that would be a big clue.
Re: the shift cable - On the J-Gate, is the D illuminated when the transmission is misbehaving? If not, that might point to a misadjusted/stretched cable. I believe the P, R, N, and D are illuminated by feedback from the transmission itself, not the position of the lever at the J-Gate.
You had also mentioned a specialist wanted big money just to diagnose the fault. The 5R55N isn't some exotic unit. It's a run-of-the-mill Ford unit, variants of which have been in used in several bazillion vehicles. It shouldn't be that hard for a pro to diagnose.
The place I took it too agreed with you that a fluid level problem would affect R and D. I believe they also checked the fluid level although I didn't actually see them do this.
Yes, a small rev of the engine helps it engage. When cold it takes a long time (30 seconds+) to engage, but once warmed up it will go in by its self after 10 seconds or so, or almost immediately with a little rev (to say 1100rpm). It clunks in quite hard with a rev so I tend to leave it unless I'm blocking traffic
All lights on the J Gate illuminate correctly.
The specialist didn't want big money to diagnose the fault - they didn't actually charge anything for the advice they gave. However they said to fix, it it may need the gearbox out and they wouldn't know until they'd started taking it apart. They didn't want to just do a fluid/filter change as they couldn't guarantee it would improve the issue, and I didn't want to risk a bill more than the car was worth if it need removal/inspection/bigger parts replacing.
I've ordered a 56947J-S1 4-3 Pre-Stroke Spring and 56947J-S6 Forward Engagement Control Spring just in case they are broken and I'll take it apart once I've found a safe way to get the car level and raised off the ground. There are some nice videos on YouTube of removal of the valve body from the 5R55N while its still in the car. I'll update here as I go!
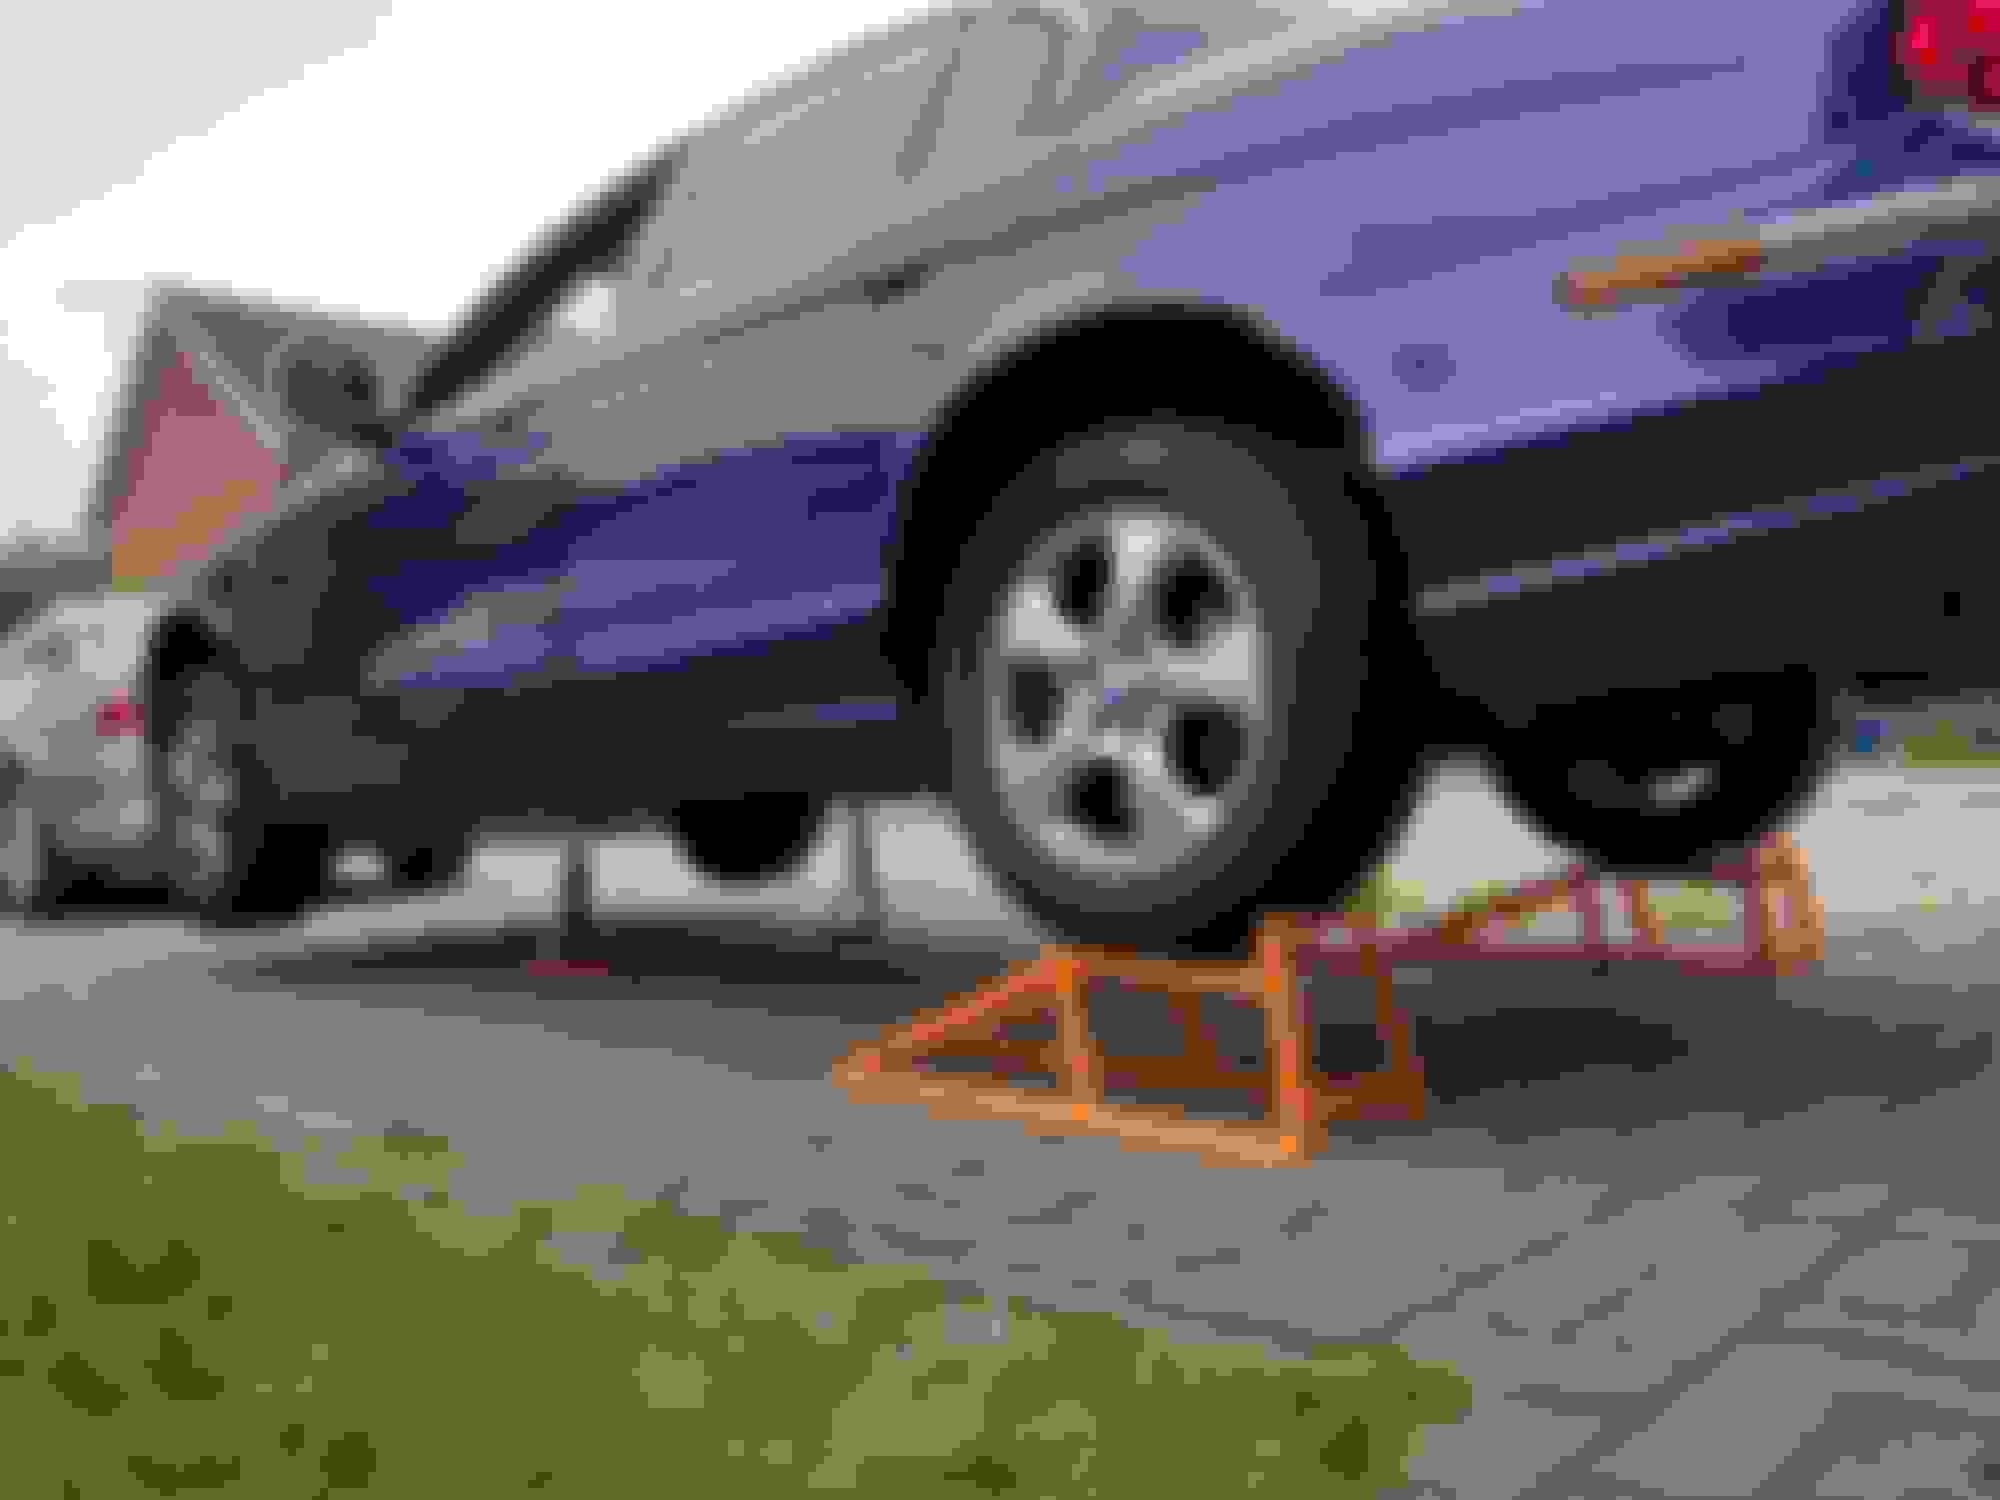
Quick update on this - I have the car raised and level. I have put some supports under the front wheels now just in case - but it felt solid on just the ramps and axle stands.
I drained the gearbox and removed the sump. The level check screw I rounded off with a Torx T30 bit and it looks like it hadn't been touched in a long time. Is it possible to replace just the level check screw without the whole drain plug as jaguar classic parts want �60+ for it, or I can get one from the US for �30ish delivered but it will take a week+ to get here.
I also snapped the head off one of the 16 bolts holding the sump on. Hopefully I can remove what's left of it with a screw extractor.
This is what the sump looked like:
The oil was still clear and red, and there was about 2-3mm of very very fine metal sludge on the magnet, but no larger bits of metal anywhere, or anything brass coloured.
Does this look normal?
Next job is to remove the valve body and check springs and for any other signs of wear. Any tips for getting the solenoid pack electrical connector off? I believe it has a 10mm hex bolt on it but I cant work out how I'm going to get a spanner to it. Will a flexible head ratchet spanner work?
Any tips for getting the solenoid pack electrical connector off? I believe it has a 10mm hex bolt on it but I cant work out how I'm going to get a spanner to it. Will a flexible head ratchet spanner work?
There wasn't a lot of room to swing the wrench. If I were to do it again, I'd sacrifice an inexpensive ratcheting box end wrench and cut it in half. That would let the wrench turn further each time.
I also snapped the head off one of the 16 bolts holding the sump on. Hopefully I can remove what's left of it with a screw extractor.
First thing, put your screw extractors in a lockable metal box. Put the key on a string and suspend it into the middle of a gallon milk jug filled with water. Put the jug in the freezer and leave it there. Any time you are considering using a screw extractor, it will take at least an hour to melt the ice and retrieve the key. This will give you plenty of time to determine if you should be using a screw extractor for the problem at hand.
I don't mean to be adding insult to injury, but screw extractors are only appropriate for removing a free-running fastener. If a bolt was seized bad enough to break off the head, you won't be able to apply enough torque with a screw extractor. You'll end up with a broken screw extractor in the stuck bolt. Don't go from bad to worse. I'm not sure what the answer may be, but this scenario is about the worst for a screw extractor.
Can you just leave it as is and just skip that bolt? The pan is fairly rigid due to the deep side right next to the flange. It may not leak at all with one bolt missing.
Do you have a drill press, or access to one? If so, make a guide to drill out the broken shank. Resist the temptation to free hand it. You'll need better accuracy than that. I'm thinking a 3/4" square steel bar, long enough to pick up the two adjacent bolt holes. You'll have to lay out the dimensions very carefully and drill the three holes. Use long bolts to secure the guide to the two adjacent bolt holes. Voila! You've got a drill guide perfectly centered over the damaged bolt. Use a left hand bit. Sometimes you get lucky and the bit grabs enough and the broken shank backs out. Then clean up the threads with a tap.
From the "It's Dark Under There and Nobody Will See" department, if the broken shank resists drilling, and the transmission leaks without that bolt, you've still got a couple of options. Is there any room above the broken bolt on the transmission flange? Put a small C-clamp on there and you're good. Perfect? Not really. Perfectly adequate? You betcha!
Or make a crutch device, similar to the drill guide. It would be a length of bar stock, and is secured using long bolts to the adjacent bolt holes. In the middle, over the broken bolt, drill and tap a hole for a setscrew. Machine a recess for a small disc to distribute the clamping force from the setscrew. Bolt the device in place at each end and then tighten the setscrew. The disc will clamp against the pan, just like the original bolthead. If that sounds hokey, I've used a very similar device in aviation, on the engines for the 727 and early 737. It saved having to replace an otherwise good engine, and was authorized to remain installed as long as needed.
Thanks for the comments and advice regarding the broken screw. I drilled it out by hand (before reading your advice not to!) but didn't get it all out. Worst case I think will be that I will drill out and tap a M8 thread and put a bigger bolt in, or maybe try a helacoil repair to get back to M6 size. It's a bolt on a corner so that makes any kind of guide/clamp tricker, but not impossible. Doing it upside-down on my back under the car isn't fun either!
I got the solenoid pack electrical connector bolt out with a stubby 10mm 12 point spanner, using the closed end with one finger on top to keep it in place, and the other hand to twist and manipulate the spanner. It took about 30 mins. I'd already removed the 8 torx bolts holding the solenoid pack in place, so when the electrical connector bolt did come out the solenoid pack dropped into the container next to my head which was full of ATF, splashing it all over me.
Once the valve body was out - I noticed a spring on the 'other side' of it which looks like it shouldn't be there:
Also the gaskets on the valve body weren't in great shape so I'm going to replace them. Is it just a case of positioning the new ones correctly or do they need to be glued to the plate somehow?
It's hard to see on the above photos, but it looks like there are ridges in the gasket which may have been creating pathways where there should not have been, or at least leaking fluid.
Next job is to take the valve body apart, inspect and and check/replace springs.
Another quick update on this and to answer my own question...
The spring above is the 'Intermediate Tube Seal and Spring' and is in the correct place - I'll make sure it goes back there.
I managed to sort out the broken bolt on the sump. I drilled out as much of it as I could with a 4mm HSS drill bit being careful not to damage the threads too much, and then re-tapped the M6 1.0 thread which was hopefully just cleaning out the remaining bits of the bolt. It seems to have worked.
I purchased new upper and lower gaskets as well as one for the plate which bolts on the under side of the valve body. When I went to remove the old upper/lower gaskets they were well stuck in places, so I gave up and have ordered an bonded assembly plate - that answers my above question about gluing them (https://globaltransmissionparts.com/...xw4z-7z490-ab/).
I replaced the Forward Engagement Control Spring as well as a 4-3 Pre-stroke spring in the valve body as I'd already bought spares of these. The old ones looked in OK condition. The 4-3 end plug come out fairly easily but the Forward Engagement end plug took a bit of work, and a slightly scratched the end face of it but I don't believe this will cause any problems.
Make sure the valves move smoothly within their respective bores or there is still going to be a shifting issue. A scratch on the flat end of the piston is not going to affect its performance.
Yes, the two valves I took out and the manual valve moved smoothly. I couldn't see any signs of problems elsewhere. Some of the bolts holding the valve body in place weren't very tight at all, and one of the bolts holding the plate on top I was able to remove with just my fingers. The gasket wasn't in good shape at all so I'm hopeful that installing new gaskets and torquing up the bolts correctly will fix the shift issue. The bands I can see through the bottom of the gearbox also look OK.
Is it worth adjusting the external adjusters for each of the bands (like the one which can be seen in the last photo) while I'm doing this?
Thanks for the link to the manual. Very useful for showing which bolts go where when putting the valve body back in.
Everything is now back together, torqued up correctly and fluid re-filled correctly with new filter. Unfortunately the delayed engagement problem persists.
Any suggestions as to what to try next? I didn't adjust the bands - is that likely to be causing delayed engagement? Once it's driving it drives and shifts perfectly.
I may just have to cut my losses and sell the car as 'spares or repair' on eBay...

 05-04-2013, 12:06 PM