

Collision Repair Photos


Thread Starter
|
Senior Member
Joined: Feb 2011
Posts: 422
Likes: 43
From: Pittsburgh
More photos. Few days between other jobs so I started on the bumper yesterday.

Not pretty yet but all in one piece. All the cracked paint has been removed. Next is a coat of plastic adhesion promoter, then epoxy primer. It will need some more filler in places. Regular polyester filler will adhere to the epoxy. Then a couple coats of high build primer surfacer, final sanding and paint. Ordinarily, the cost of labor would outweight just replacing this. But it's a Jag and a cover lists for 800 bucks & change.

This got delivered today. Fender had a small ding in it but the hood is absolutely perfect. Not even any stone chips and looks to be original paint. Someone messed up cause I never ordered the grill. Someone asked about a tally. So far......
650.00 hood with hinges, strikers ect
150.00 fender
350.00 headlight
335.00 plastic dealer items
00.00 grille unless someone misses it.
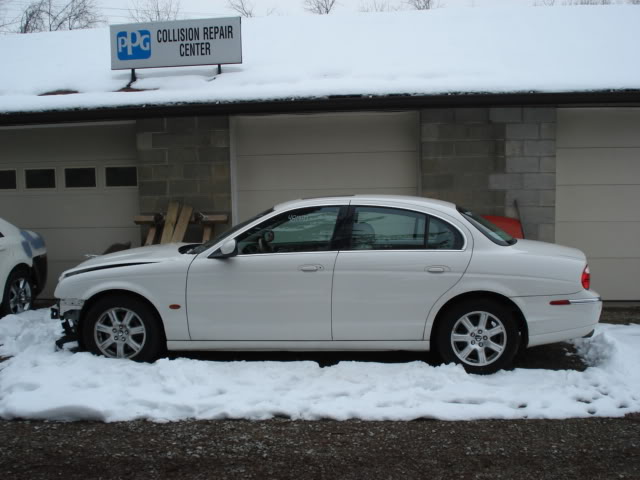
Thought I'd toss in a shot of the good side. White cat in the snow.
Not pretty yet but all in one piece. All the cracked paint has been removed. Next is a coat of plastic adhesion promoter, then epoxy primer. It will need some more filler in places. Regular polyester filler will adhere to the epoxy. Then a couple coats of high build primer surfacer, final sanding and paint. Ordinarily, the cost of labor would outweight just replacing this. But it's a Jag and a cover lists for 800 bucks & change.
This got delivered today. Fender had a small ding in it but the hood is absolutely perfect. Not even any stone chips and looks to be original paint. Someone messed up cause I never ordered the grill. Someone asked about a tally. So far......
650.00 hood with hinges, strikers ect
150.00 fender
350.00 headlight
335.00 plastic dealer items
00.00 grille unless someone misses it.
Thought I'd toss in a shot of the good side. White cat in the snow.
Last edited by Bodyman; Feb 24, 2011 at 03:33 PM.

Senior Member
Joined: Feb 2011
Posts: 363
Likes: 19
From: Ohio
I love white cats, you are doing great..if your bumper doesn't turn out the way you like it here a r type front, man that would look sweet!
http://cgi.ebay.com/ebaymotors/00-04...Q5fAccessories
http://cgi.ebay.com/ebaymotors/00-04...Q5fAccessories
Thread Starter
|
Senior Member
Joined: Feb 2011
Posts: 422
Likes: 43
From: Pittsburgh
I love white cats, you are doing great..if your bumper doesn't turn out the way you like it here a r type front, man that would look sweet!
http://cgi.ebay.com/ebaymotors/00-04...Q5fAccessories
http://cgi.ebay.com/ebaymotors/00-04...Q5fAccessories
Thanks. I know it looks like crap right now but trust me...it will be fine. The right glue works wonders. I went through 60 dollars worth of Fusor but it won't go anywhere. Well unless it gets hit again.
Veteran Member
Joined: Dec 2006
Posts: 2,964
Likes: 507
From: Hamilton, NJ
More photos. Few days between other jobs so I started on the bumper yesterday.
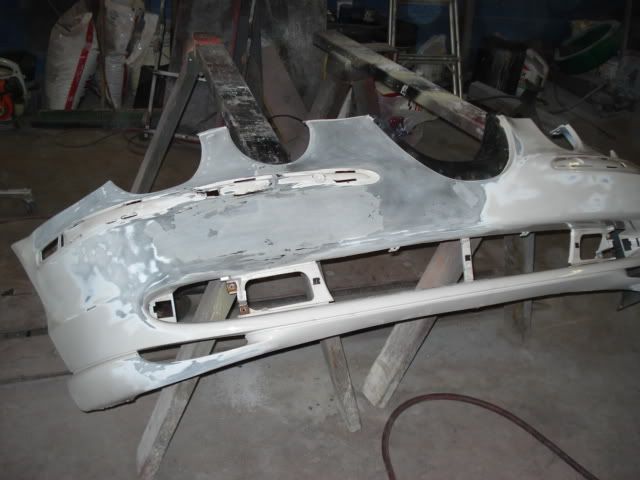
Not pretty yet but all in one piece. All the cracked paint has been removed. Next is a coat of plastic adhesion promoter, then epoxy primer. It will need some more filler in places. Regular polyester filler will adhere to the epoxy. Then a couple coats of high build primer surfacer, final sanding and paint. Ordinarily, the cost of labor would outweight just replacing this. But it's a Jag and a cover lists for 800 bucks & change.
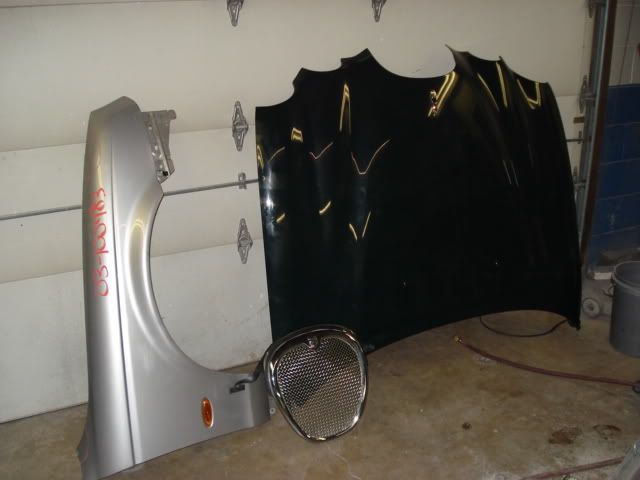
This got delivered today. Fender had a small ding in it but the hood is absolutely perfect. Not even any stone chips and looks to be original paint. Someone messed up cause I never ordered the grill. Someone asked about a tally. So far......
650.00 hood with hinges, strikers ect
150.00 fender
350.00 headlight
335.00 plastic dealer items
00.00 grille unless someone misses it.
Thought I'd toss in a shot of the good side. White cat in the snow.
Not pretty yet but all in one piece. All the cracked paint has been removed. Next is a coat of plastic adhesion promoter, then epoxy primer. It will need some more filler in places. Regular polyester filler will adhere to the epoxy. Then a couple coats of high build primer surfacer, final sanding and paint. Ordinarily, the cost of labor would outweight just replacing this. But it's a Jag and a cover lists for 800 bucks & change.
This got delivered today. Fender had a small ding in it but the hood is absolutely perfect. Not even any stone chips and looks to be original paint. Someone messed up cause I never ordered the grill. Someone asked about a tally. So far......
650.00 hood with hinges, strikers ect
150.00 fender
350.00 headlight
335.00 plastic dealer items
00.00 grille unless someone misses it.
Thought I'd toss in a shot of the good side. White cat in the snow.

Take care,
George
Senior Member
Joined: Feb 2011
Posts: 363
Likes: 19
From: Ohio
You gotta use that grill (it's Mesh) if they ask for the grill back send then the non mesh one........lol
forget what I just said I went back and saw that you already had a mesh grill...lucky you.. If only it would fit mine I would try and deal you out of it
forget what I just said I went back and saw that you already had a mesh grill...lucky you.. If only it would fit mine I would try and deal you out of it
Last edited by achysklic; Feb 24, 2011 at 04:38 PM.
Veteran Member
Joined: Dec 2006
Posts: 2,964
Likes: 507
From: Hamilton, NJ
Achyslic: Are those all the parts you have? I'm looking for a set of the 4 parking light lenses next to the trim strips in the bumper.
Let me know,
George
Thread Starter
|
Senior Member
Joined: Feb 2011
Posts: 422
Likes: 43
From: Pittsburgh
Yeah it's identical to the one on the car. Actually one of the legs on mine is cracked but It would be an easy fix as it is a clean break. That's what I was planing until this windfall.
Veteran Member
Joined: Dec 2006
Posts: 2,964
Likes: 507
From: Hamilton, NJ
Take care,
George
Thread Starter
|
Senior Member
Joined: Feb 2011
Posts: 422
Likes: 43
From: Pittsburgh
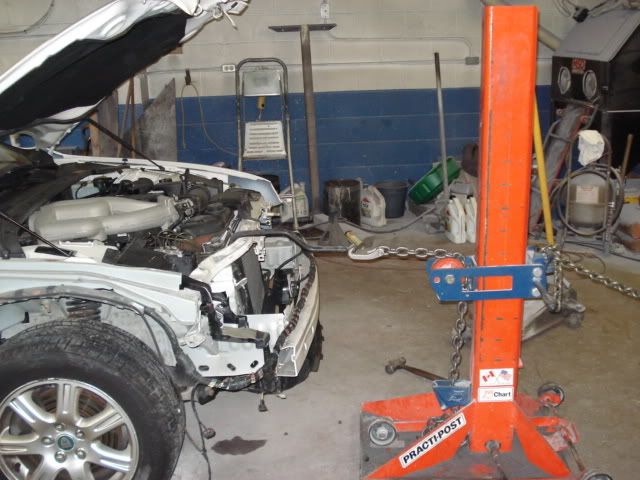
Pulling the rad supt/tiebar.

Looks a lot better. I'll have to check the alignment with the new hood and a little cosmetic work but looks like I saved $450.

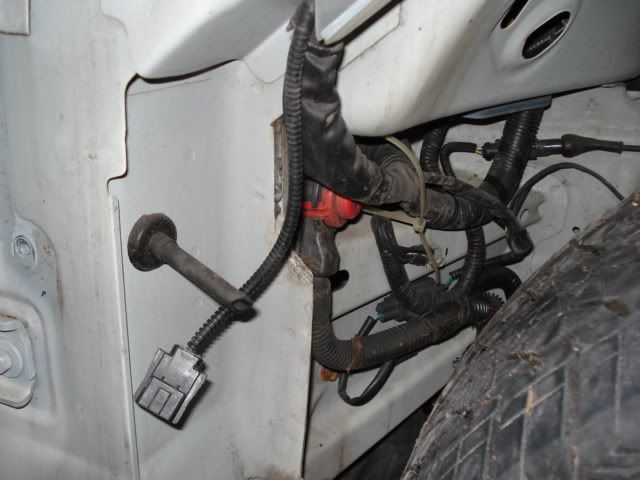
Ever wonder what's behind the plastic inner fender?

That red thing appears to be a main power feed junction. Real nice how they put it right under where the water drains out of the cowl.
Looks a lot better. I'll have to check the alignment with the new hood and a little cosmetic work but looks like I saved $450.
Ever wonder what's behind the plastic inner fender?
That red thing appears to be a main power feed junction. Real nice how they put it right under where the water drains out of the cowl.
Last edited by Bodyman; Feb 26, 2011 at 12:31 PM.
Veteran Member
Joined: Dec 2006
Posts: 2,964
Likes: 507
From: Hamilton, NJ
Pulling the rad supt/tiebar.
Looks a lot better. I'll have to check the alignment with the new hood and a little cosmetic work but looks like I saved $450.

Ever wonder what's behind the plastic inner fender?
That red thing appears to be a main power feed junction. Real nice how they put it right under where the water drains out of the cowl.
Looks a lot better. I'll have to check the alignment with the new hood and a little cosmetic work but looks like I saved $450.
Ever wonder what's behind the plastic inner fender?
That red thing appears to be a main power feed junction. Real nice how they put it right under where the water drains out of the cowl.
The red junction is indeed the main power junction, it's where the battery cable coming from the trunk terminates, and then it splits off into cables for the fuse box, alternator, starter relay etc.
In theory the housing is waterproof, I haven't heard of anyone having any real problem with it so I guess it's ok....
Take care,
George


Maybe the leaves/debris keep the flow rate to a minimum, preserving the contact?
Bodyman,
Nice thread. Looks like it is coming along nicely. Yours is very clean, supporting your "li'l old lady kept it in the gargage" theory. Usually a lot of leaves, pine-straw, etc. just above that battery terminal....and it's a tough cubby to clean out...
Thread Starter
|
Senior Member
Joined: Feb 2011
Posts: 422
Likes: 43
From: Pittsburgh
Didn't take much since it's just tin. I didn't even bother to mount the car on the anchors. I just hooked a tie down chain to the chassis anchor on the right side. Pulling damage on the main rails takes a lot more force and the car has to be firmly anchored. The posts are rated for 10 tons and can be multiplied with a chain pulley attachment. I've only had to use that once.
I suppose that connection is well sealed. Just seemed kinda stupid to me. My TR8 has a trunk battery with a similar junction. But it's inside on the other side of the firewall.
I suppose that connection is well sealed. Just seemed kinda stupid to me. My TR8 has a trunk battery with a similar junction. But it's inside on the other side of the firewall.
Thread Starter
|
Senior Member
Joined: Feb 2011
Posts: 422
Likes: 43
From: Pittsburgh
George,
Maybe the leaves/debris keep the flow rate to a minimum, preserving the contact?
Bodyman,
Nice thread. Looks like it is coming along nicely. Yours is very clean, supporting your "li'l old lady kept it in the gargage" theory. Usually a lot of leaves, pine-straw, etc. just above that battery terminal....and it's a tough cubby to clean out...
Yeah, forgot to mention that. Bunch of rotted leaves in there. Can you flush that out with the wiper shroud removed?
Veteran Member
Joined: Dec 2006
Posts: 2,964
Likes: 507
From: Hamilton, NJ
Btw, check your car for two oil leaks while you have it this torn down, plus a couple things I would advise. I know the car only has 20k, BUT it's till 8 years old.
First at the back of the intake manifold, there are two "IMT" valves - about 3" round black valves each held in with 2 8mm bolts.
They each seal into the intake with a ring gasket on the inside of the valve that is notorious for failing. The new sealing rings are less than $5 each from Jaguar, and are redesigned to not leak. When it leaks it causes a vacuum leak and it drips oil onto the exhaust heat shield.
Search IMT O-Rings for more info than you could ever need, and part #'s etc. I would definitely do them while the cowl etc is off, it's a 10 min job working slowly.
Second, check the oil pan for leaks or signs of leakage. Another notoriously leak prone gasket. This one is a bit more of a PITA. You have to drop the alternator, and AC compressor, as well as lower the steering rack, and undo the motor mounts to raise the motor to get the pan to clear off. It's only a $26 gasket though, but if it's not leaking yet it will.
Third pressure test the cooling system. The expansion tanks are notorious for cracking and leaking. Either at the plastic seam, OR at the nipple with the little hose on it on top.
Lastly look at the DCCV - dual climate control valve. Basically the heater control valve. Its attached by 1 8mm bolt to the bottom of the rad support on the passenger side. If you see any signs of external leakage, dried coolant etc, change it out. Look in the cross reference thread, you can use a ford / motorcraft part (still the same Bosch valve in a ford box) BUT at 1/3 the price of what Jaguar wants for it.
Take care,
George
Senior Member
Joined: Feb 2011
Posts: 363
Likes: 19
From: Ohio
BTW Awesome work so far Bodyman
Veteran Member
Joined: Dec 2006
Posts: 2,964
Likes: 507
From: Hamilton, NJ
Here's some light reading about those valves:
https://www.jaguarforums.com/forum/s...hlight=o-rings
It's not the hood that gets in the way, it's the cowl, and the metal brace going across the two strut towers.
Take care,
George
https://www.jaguarforums.com/forum/s...hlight=o-rings
It's not the hood that gets in the way, it's the cowl, and the metal brace going across the two strut towers.
Take care,
George

