When you click on links to various merchants on this site and make a purchase, this can result in this site earning a commission. Affiliate programs and affiliations include, but are not limited to, the eBay Partner Network.
I have searched and can't find any instructions to help me with how to change the rear axle oil seals. I have dropped the rear end to refurbish it, as these Canadian cars get rusty from our salted roads. Any help with changing the seals appreciated. All ready for refurbishment.
You just need to disconnect one of the control arms, so you have room to pop the cv axle back and pull it out of the diff. Then just get a seal removal tool to pop the seals out. As for the pinion seal, there are some special tools, but you should be able to find an alternate tool to complete the job.
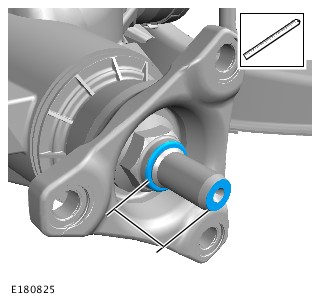
This is for the half shaft oil seals:
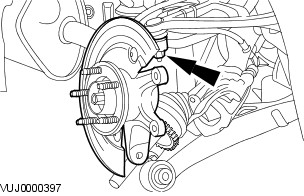
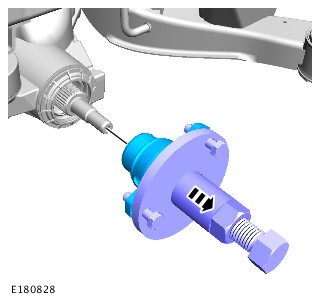
Remove the wheel knuckle assembly.
CAUTION:
To avoid damage to the halfshaft constant velocity (CV) joints and boots, do not allow the CV joints to exceed 18 degrees of travel.
NOTE:
The halfshaft is retained in the axle assembly by a retaining clip.
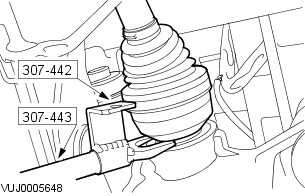
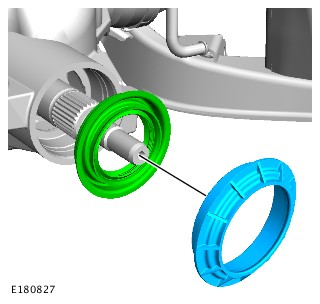
Using the special tools, remove the halfshaft.
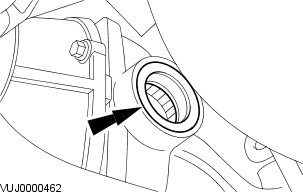
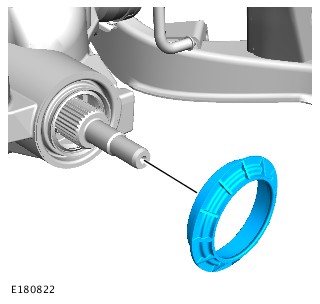
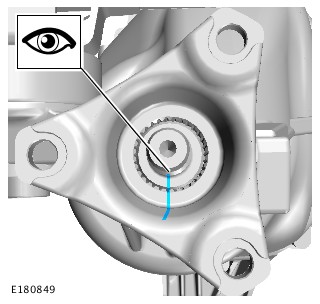
Remove the halfshaft seal.
This is for the pinion oil seal
This step must be carried out to make sure that the drive pinion nut is correctly tightened on assembly.
Measure the depth of the pinion nut on the pinion shaft, note the measurement for installation.
CAUTION:
This step must be carried out to make sure that the drive pinion nut is correctly tightened on assembly.
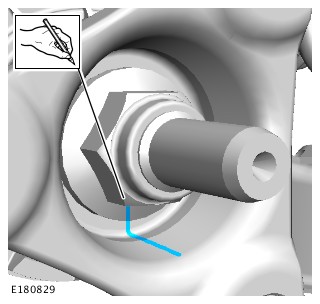
Accurately scribe a line to mark the drive pinion shaft to the drive pinion nut.
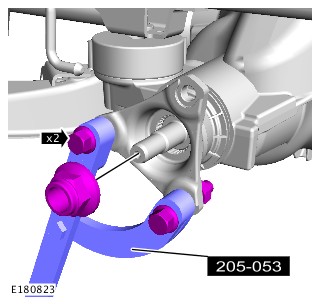
Using the special tool, counter hold the drive pinion flange and remove the drive pinion nut.
Note the number of turns for installation.Special Tool(s): 205-053
CAUTION:
This step must be carried out to make sure that the drive pinion nut is correctly tightened on assembly.
Accurately scribe a line to mark the drive pinion shaft to the drive pinion flange.
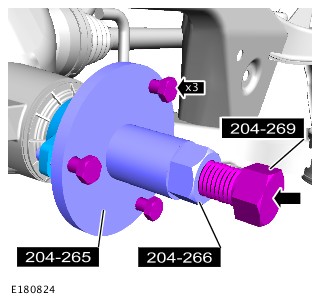
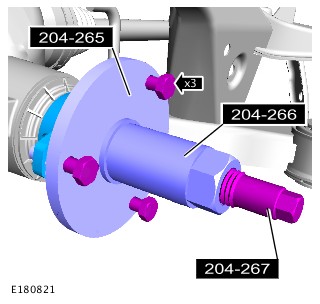
Using the special tools, remove the drive pinion flange.Special Tool(s): 204-265, 204-266, 204-269
Using a suitable tool, remove the drive pinion seal dust cover and the drive pinion seal.
Installation
CAUTION:
If the drive pinion seal becomes misaligned during the installation, remove it and install a new one.
NOTE:
Check the rear drive axle pinion flange, rear axle housing and drive pinion splines for damage.
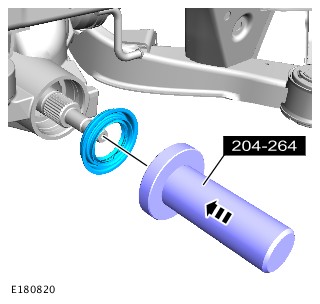
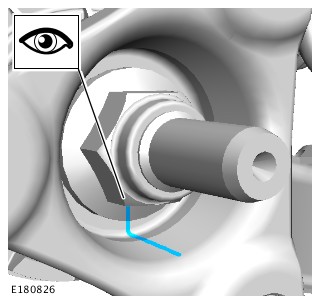
Using the special tool, install the drive pinion seal.Special Tool(s): 204-264
Install the drive pinion seal dust cover
CAUTION:
This step must be carried out to make sure that the drive pinion nut is correctly tightened on assembly.
Install the drive pinion flange to the noted position.
CAUTION:
Only use the correct special tools to install the drive pinion flange.
Using the special tools, install the drive pinion flange.Special Tool(s): 204-267
CAUTIONS:
Make sure the drive pinion flange scribed marks are aligned.
Make sure the scribed mark on the drive pinion nut is no more than 5 degrees past the scribed mark on the drive pinion flange.
Using the special tool, counter hold the drive pinion flange and remove the drive pinion nut.
Install the nut to the previously noted number of turns.
CAUTION:
Make sure the mark on the drive pinion nut is never tightened short of the scribed mark on the drive pinion flange.
Note the position of the drive pinion flange nut.
Measure the depth of the pinion nut on the pinion shaft.
Check and top up the axle assembly fluid level as required.
Install a new fluid level filler plug, torque to 34Nm.Refer to: Specifications - 2.7L V6 - TdV6/3.0L NA V6 - AJ27/V8 4.2L Petrol/V8 S/C 4.2L Petrol (205-02, Specifications)
You just need to disconnect one of the control arms, so you have room to pop the cv axle back and pull it out of the diff. Then just get a seal removal tool to pop the seals out. As for the pinion seal, there are some special tools, but you should be able to find an alternate tool to complete the job.
This is for the half shaft oil seals:
Remove the wheel knuckle assembly.
CAUTION:
To avoid damage to the halfshaft constant velocity (CV) joints and boots, do not allow the CV joints to exceed 18 degrees of travel.
NOTE:
The halfshaft is retained in the axle assembly by a retaining clip.
Using the special tools, remove the halfshaft.
Remove and discard the retaining clip.
Remove the halfshaft seal.
This is for the pinion oil seal
This step must be carried out to make sure that the drive pinion nut is correctly tightened on assembly.
Measure the depth of the pinion nut on the pinion shaft, note the measurement for installation.
CAUTION:
This step must be carried out to make sure that the drive pinion nut is correctly tightened on assembly.
Accurately scribe a line to mark the drive pinion shaft to the drive pinion nut.
Using the special tool, counter hold the drive pinion flange and remove the drive pinion nut.
Note the number of turns for installation.Special Tool(s): 205-053
CAUTION:
This step must be carried out to make sure that the drive pinion nut is correctly tightened on assembly.
Accurately scribe a line to mark the drive pinion shaft to the drive pinion flange.
Using the special tools, remove the drive pinion flange.Special Tool(s): 204-265, 204-266, 204-269
Using a suitable tool, remove the drive pinion seal dust cover and the drive pinion seal.
Installation
CAUTION:
If the drive pinion seal becomes misaligned during the installation, remove it and install a new one.
NOTE:
Check the rear drive axle pinion flange, rear axle housing and drive pinion splines for damage.
Using the special tool, install the drive pinion seal.Special Tool(s): 204-264
Install the drive pinion seal dust cover
CAUTION:
This step must be carried out to make sure that the drive pinion nut is correctly tightened on assembly.
Install the drive pinion flange to the noted position.
CAUTION:
Only use the correct special tools to install the drive pinion flange.
Using the special tools, install the drive pinion flange.Special Tool(s): 204-267
CAUTIONS:
Make sure the drive pinion flange scribed marks are aligned.
Make sure the scribed mark on the drive pinion nut is no more than 5 degrees past the scribed mark on the drive pinion flange.
Using the special tool, counter hold the drive pinion flange and remove the drive pinion nut.
Install the nut to the previously noted number of turns.
CAUTION:
Make sure the mark on the drive pinion nut is never tightened short of the scribed mark on the drive pinion flange.
Note the position of the drive pinion flange nut.
Measure the depth of the pinion nut on the pinion shaft.
Check and top up the axle assembly fluid level as required.
Install a new fluid level filler plug, torque to 34Nm.Refer to: Specifications - 2.7L V6 - TdV6/3.0L NA V6 - AJ27/V8 4.2L Petrol/V8 S/C 4.2L Petrol (205-02, Specifications)
Hope this helps.
Thank you, I don't know what I would without people like you. Drive my wife's Hyundai I guess.
You're welcome. That's why I joined the forum, being a tech for 15 years ( still going ), just enjoy helping others when and where I can, as everyone on here does.
I got the cover off the diff but was confused that I couldn't find any retaining clip. I also saw the retaining clip as a part described as a 28mm. clip. It seems that on the 2008 model this clip is not present, so I just pulled the axel. New seal went in with no special tool, I just used a flat piece of steEl and tapped it home. I do have the rear cover off and everything is nice and clean inside with no metal bits on the magnetic filler plug. It looks very good for a car with 112,000 miles. I got a coat of POR 15 on the subframe today so it is all coming together nicely. I am trying to figure out a way to repair the thin aluminum heat shields around the mufflers and the gas tank. Every mounting holes is corroded to the size of the steel washers that held them in. You would think that engineer's that could build a Jaguar had heard of galvanic corrosion. Sure hope they figured it out on all aluminum cars. <img src="https://cimg4.ibsrv.net/gimg/www.jaguarforums.com-vbulletin/2000x1504/80-20170504_111813_1f2eb54865f1e516d20a101210e2c0ba01 4bb87e.jpg"/><em>Differential is nice and clean.</em>
Yea the axles pop in quite easy, most of the time you don't really need the special tools when assembly, just something that wont damage the item being installed. The picture you posted isn't showing up on my end. Glad to hear that things inside are clean. I don't really recall any issues with the diff's on the S-Types at all.
Just make sure when you put the park brake motor assembly back together, the cables are positioned correctly, if they are run incorrectly, it will stretch the cable, and damage the motor inside. You'll need to reprogram the park brake motor as well when put it all back together.
I hear ya on the galvanic corrosion, but you will still get some when living in areas using salt on the roads. Although I was living in Texas, and now NZ, don't really come across this much. You would think that the engineers at Jaguar would do a lot of things, trust me, I've wanted to contact them on many occasions, but it is what it is sometimes.