

Back boxes


I've just saw another "next" project after I refinish the other set of wheels, finish the dye touch up on the interior, repaint the calipers and clean the wheel wells, and at some point buy and fit the upper n lower mesh grilles
 [&:]
[&:]
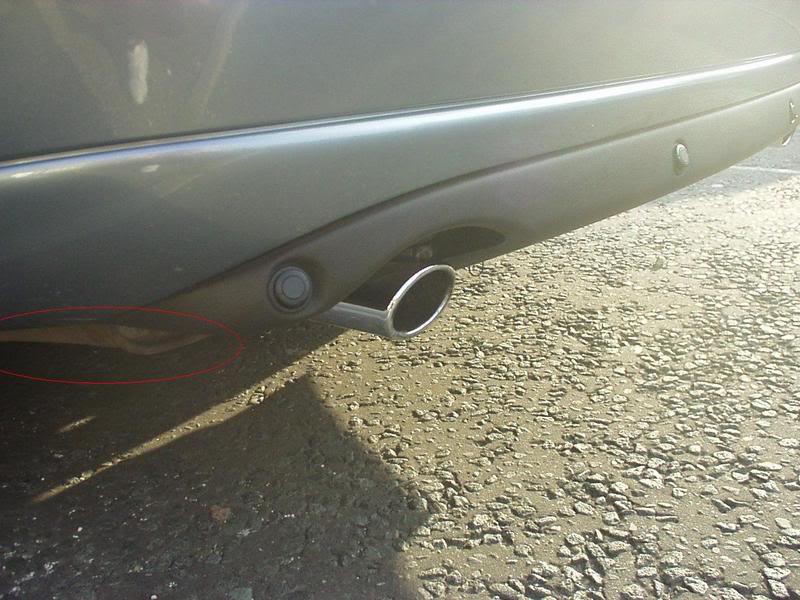
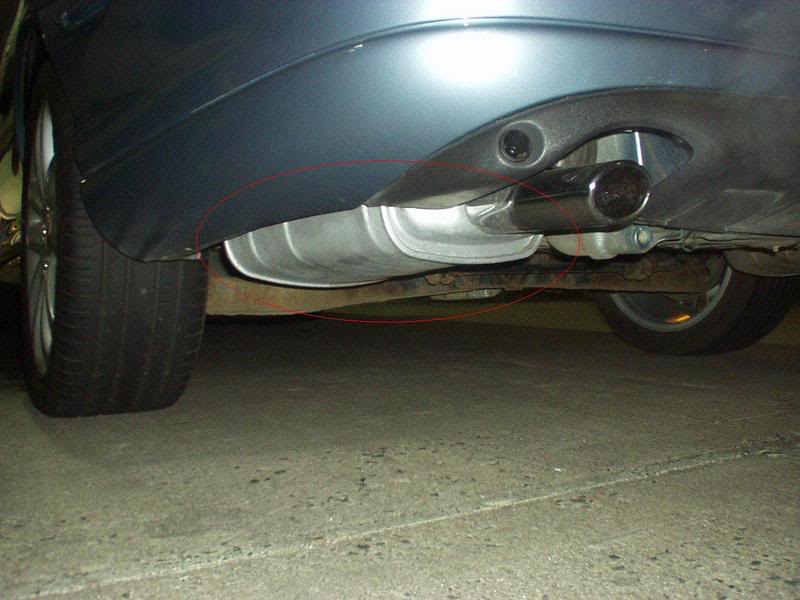
Looking at the tailpipes which are really nice n shiny, there's one thing that wastes the whole look.
The back boxes which are old n burnt n rusty looking[&:]
I'm thinkin its time for some attention ( sorry - no pics, cameras gave up with all the use its had lately...lol )
I'm considering giving these the wire brush treatment followed by some fine sanding and them painting them with heat resistant silver.
It'll really make a big difference.........to me anyway. Probably most people lookin at the car would never notice, but how many times have you looked at a great lookin car and studied it only for your eyes to be drawn to some little imperfection that takes away from the whole look???
Thoughts anyone?
Jim

ORIGINAL: BuckMR2
I know what you mean Jim and agree the back boxes do look crap compared to the tailpipe finishers and you can see this.
I know what you mean Jim and agree the back boxes do look crap compared to the tailpipe finishers and you can see this.
If so, please do it first and please do a write up on it complete with pics and products used to make it easier for me
 ..lol
..lolJim

Veteran Member
Joined: Oct 2006
Posts: 1,921
Likes: 65
From: UK
ORIGINAL: JimC64
Do you think thats sumthin you'd consider doin Buck?
Jim
Do you think thats sumthin you'd consider doin Buck?
Jim
.

ORIGINAL: BuckMR2
Not on my list at the moment Jim but looking forward to seeing the great job I am sure you will do with yours now that you've got the bee in your bonnet about it.
ORIGINAL: JimC64
Do you think thats sumthin you'd consider doin Buck?
Jim
Do you think thats sumthin you'd consider doin Buck?
Jim
.
If so, please do it as soon as possible with complete write up, products used and pictures so that when Buck and I do it, we've got sumthin to work too.....lol[sm=goodidea.gif][sm=goodidea.gif]
Jim

ORIGINAL: bigdreams05
LOL! Excellent. Pair of bums...lol! Just kidding. You guys are true geniouses and I can't wait to see the job that ya'll will do.
LOL! Excellent. Pair of bums...lol! Just kidding. You guys are true geniouses and I can't wait to see the job that ya'll will do.
Jim
Trending Topics


I'm still thinkin about gettin this job done....I will try to take some pics of my back boxes to show you exactly what I mean, but in the meantime, dont take my word for it......check your own the next time your cleaning your car or walking towards it from a distance away and you 'll see what I mean!
I'm thinkin a good brush down with a wire brush and clean them up first, then applying Hammerite Smooth Silver paint. I've used it before and its excellent stuff. Its also brush on which I think will be better to avaoid all the off spray involved with aerosols in that region.
See the review below : -
Hammerite smooth is the bee's knees of metal paints. So good in fact that I would suggest that you never leave home without it.
As with most paints to bare metal it is always best to fully prepare the metal surface prior to starting the painting. Hammerite provide concise instructions on their tins to give you maximum guidance when using their products. Rather than quoting the entire tin here is a quick summary.
Clean the surface from dirt, rust etc and Paint
I usually clean up the metal with a wire brush or sanding block before I paint. If there has been large amounts of rust I will then coat the metal with Hammerite anti rust treatment prior to painting properly.
When applying Hammerite you don't actually need that much paint on the brush. The stuff is so thick that it is hard not to make a good job of it. It's a rare occasion when you have to apply 2 coats so 1 coat should suffice. Depending on how thick you apply your paint coat often seems to vary the time it takes to dry. From my experience, if you apply a moderate coat the your looking at overnight to dry, probably erring towards 24 hours.
Uses for Hammerite smooth are virtually limitless. I have painted many things over the years, from my garden gate to tools to the sills of an old car. I also find that it has good heat capabilities as I also use it to paint up the brake callipers on my car. Last year I painted the base of my table sun shade with the bronze colour and it still looks as good as the day I painted it. The other good point is that Hammerite doesn't tend to smell to bad, like all paints you should always paint it in a nice and airy place but there is no heavy after smell.
Hammerite smooth comes in a multitude of colours; Black, white, red, blue, bronze, green, silver. There are a few others but these are the ones that I can find uses for.
As a paint Hammerite is a good all rounder for both internal and external uses. You get a tough, durable and weatherproof quality finish so its worth the extra few pounds to get the right effect.
Jim

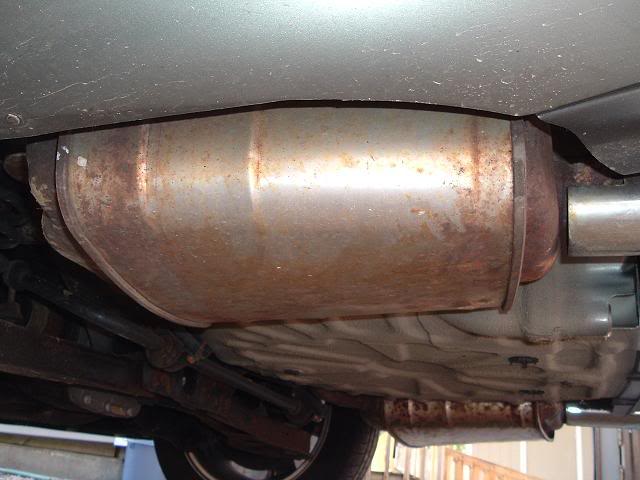
Well, after repainting my calipers n hubs today I decided to use the caliper paint and clean up my back boxes as previously mentioned. Have a look at yours from a distance away and you'll see what I mean[&:]
It was starting to get dark so I only had time for a very quick coat and only really the parts that can be seen, not the whole thing. However, I think for sure its sumthin I'll revisit as it makes a big difference to the general appearance of the car
See for yourself :-
Rusty old tired lookin back box
Clean fresh "new" lookin version
I'll keep an eye on it over the next few days / weels or so, but I think it should be fine.
Another coat or two all over and it'll be good for quite a while I reckon!
Jim

Senior Member
Joined: May 2007
Posts: 351
Likes: 72
From: Louisville, KY
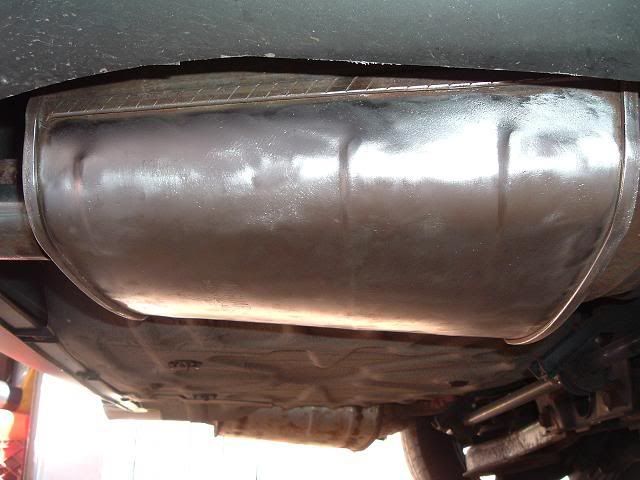
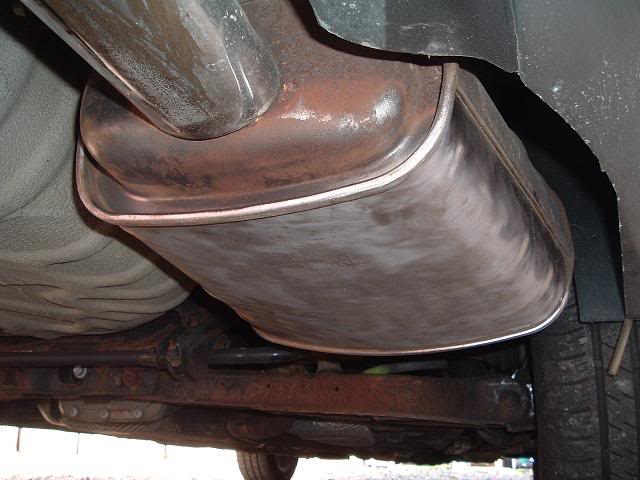
Instead of starting a new thread for this, I thought I'd just tack this on here.
I worked on my boxes the others day (or 'mufflers,' as we call them over here in the colonies.. ) I used a wire wheel on a drill, and some sand paper here and there. I think they look a lot better, but after seeing Jim's I think I'm going to spend some more time on them and paint them with some suitable paint. I need to get under there and see what it takes to get them off.. I'd really like to do it with them off of the car.
Before:
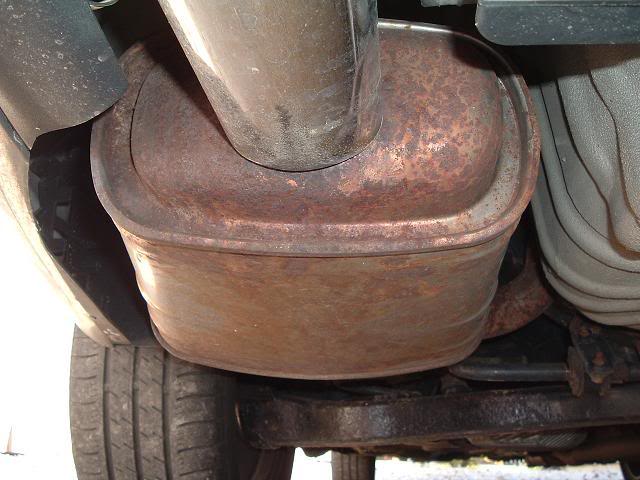
After:
I worked on my boxes the others day (or 'mufflers,' as we call them over here in the colonies.. ) I used a wire wheel on a drill, and some sand paper here and there. I think they look a lot better, but after seeing Jim's I think I'm going to spend some more time on them and paint them with some suitable paint. I need to get under there and see what it takes to get them off.. I'd really like to do it with them off of the car.
Before:
After:

Hey 310........outstanding job mate
Looks like a real good finish too
I'd say you have a fantastic base if you wanna paint them, but, as you have already done so much work on them and they look so good. Why not do a little more, maybe apply some polish n really buff those bad boys up
The only problem I can see is really getting into all the little crevices here n there, but maybe you can manage sumthin?
Excellent job!
Jim

Veteran Member
Joined: Feb 2007
Posts: 3,780
Likes: 45
I remember doing this on my 240sx and it really doesn't look too good in person. The mufflers' metal doesn't polish up too well. I'd paint them up mate! Good job and you've proven to be a valuable asset to the forum already. Glad to have you on.
Senior Member
Joined: May 2007
Posts: 351
Likes: 72
From: Louisville, KY
Thanks guys! I think I'm going to throw a little polish on there and see what happens. If I like the result, I think I'll stick with the bare metal. But after talking with a buddy of mine who works at an exhaust shop, I think paint will be the best bet. He says that even if you use high temp paint, it will flake off and the rust will eventually come through. However, if you stay ontop of it and touch it up as needed it will look great.

ORIGINAL: bigdreams05
100% agreed! Gotta touch it up every few months, but that's OK!
100% agreed! Gotta touch it up every few months, but that's OK!
Jim
