

How to access and change your X type glove box lock

Thread Starter
|
Member
Joined: Feb 2015
Posts: 49
Likes: 10
From: Uk
It was a bit of a struggle finding info on this subject so i figured i'd put some pictures up of the strip down.
At first it may seem you have to pry the inner large black hinged panel from the colour coded outer with the risk of damaging the outer trim.
What you need to remove and is the separate inner black panel , which for a short time had me thinking it was one complete inner moulded panel.
The pictures say it all.
Once you've got the panel off the lock removal is self explanatory.


Thread Starter
|
Member
Joined: Feb 2015
Posts: 49
Likes: 10
From: Uk
Once to handle assembly is out it can be difficult to access the top lock barrel tab. Whilst the black latch mechanism can be removed it can be a bit of a chinese puzzle trying to get it back together.
What worked for me was placing a largish flat blade screwdriver on the inner face of the lock barrel and applying gentle pressure to push the lock barrel out
while using a very small screwdriver to unclip the top lock tab ( just visible from the side of the latch aperture )
Then the lower lock tab.
What worked for me was placing a largish flat blade screwdriver on the inner face of the lock barrel and applying gentle pressure to push the lock barrel out
while using a very small screwdriver to unclip the top lock tab ( just visible from the side of the latch aperture )
Then the lower lock tab.
Last edited by Old Auto; Mar 14, 2015 at 02:59 AM.
I purchased a new glove box for my wife's 2002 X Type and wanted to keep the same locking mechanism from the old box. There are a lot of references on getting the glove box out, but not so much about the lock cylinder itself. Many seem to just "know how things work", but I like pictures..
Step 1 - Remove glove box from dash
(a) Open the glove compartment door - There are two (2) Star screws in the upper back portion of the glove box - remove these screws
(b) With the door still open you will see two smaller star screws in the upper face of the glove box - they will be inside the two small rubber "bumpers" at the top of the box - remove these screws
(c) Close the glove box door - but do not latch the door closed
(d) There are three (3) phillips-head screws at the base of the glove compartment door in the door hinge- remove these screws
(e) Pull the glove compartment out of the dash holding onto the door and bottom side of the compartment (from under the dash) for leverage.
NOTE: there are already good U-Tube videos on exactly how to accomplish this.
Step 2 - Remove The Door From The Compartment Case
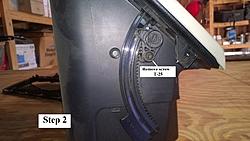

(a) Remove the screw holding the damper mechanism and remove the damper mechanism by pulling it straight out (See photo below)
(b) Remove the door from the compartment case by flexing the arms out slightly to bypass the stops as you pull the arms through the front of the casing.
Step 3 - Remove The Back of The Door
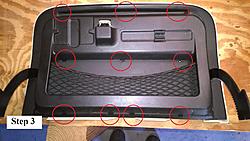
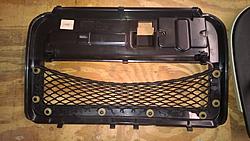
(a) Using an appropriate prying device - pry the back shell of the door off the door housing. There are ten (10) tabs holding the back shell to the housing. I started at the bottom, pried the 4 tabs free, then moved up the side and freed the 3 tabs in the center of the shell, then finally moved to the top and freed the 3 hidden tabs at the top of the shell/housing. (See photos)
Step 4 - Remove The Handle Mechanism From The Door
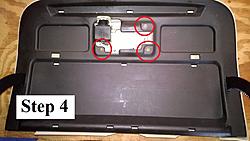
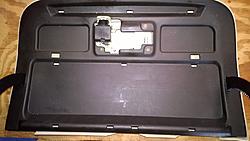
(a) Removed the three (3) star screws holding the handle mechanism to the door casing and pull handle mechanism out the front of the door casing (See photo)
Step 5 - Remove The Lock From The Handle Mechanism
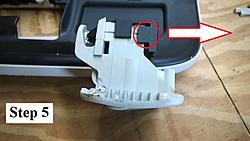
(a) Gently pry one of the bottom tabs on the handle mechanism to free one side of the latch spring housing. Now pry the tab on the other side of the housing and pull the spring housing shell piece down and away from the rest of the handling mechanism. This will allow access to the lock cylinder for its removal.

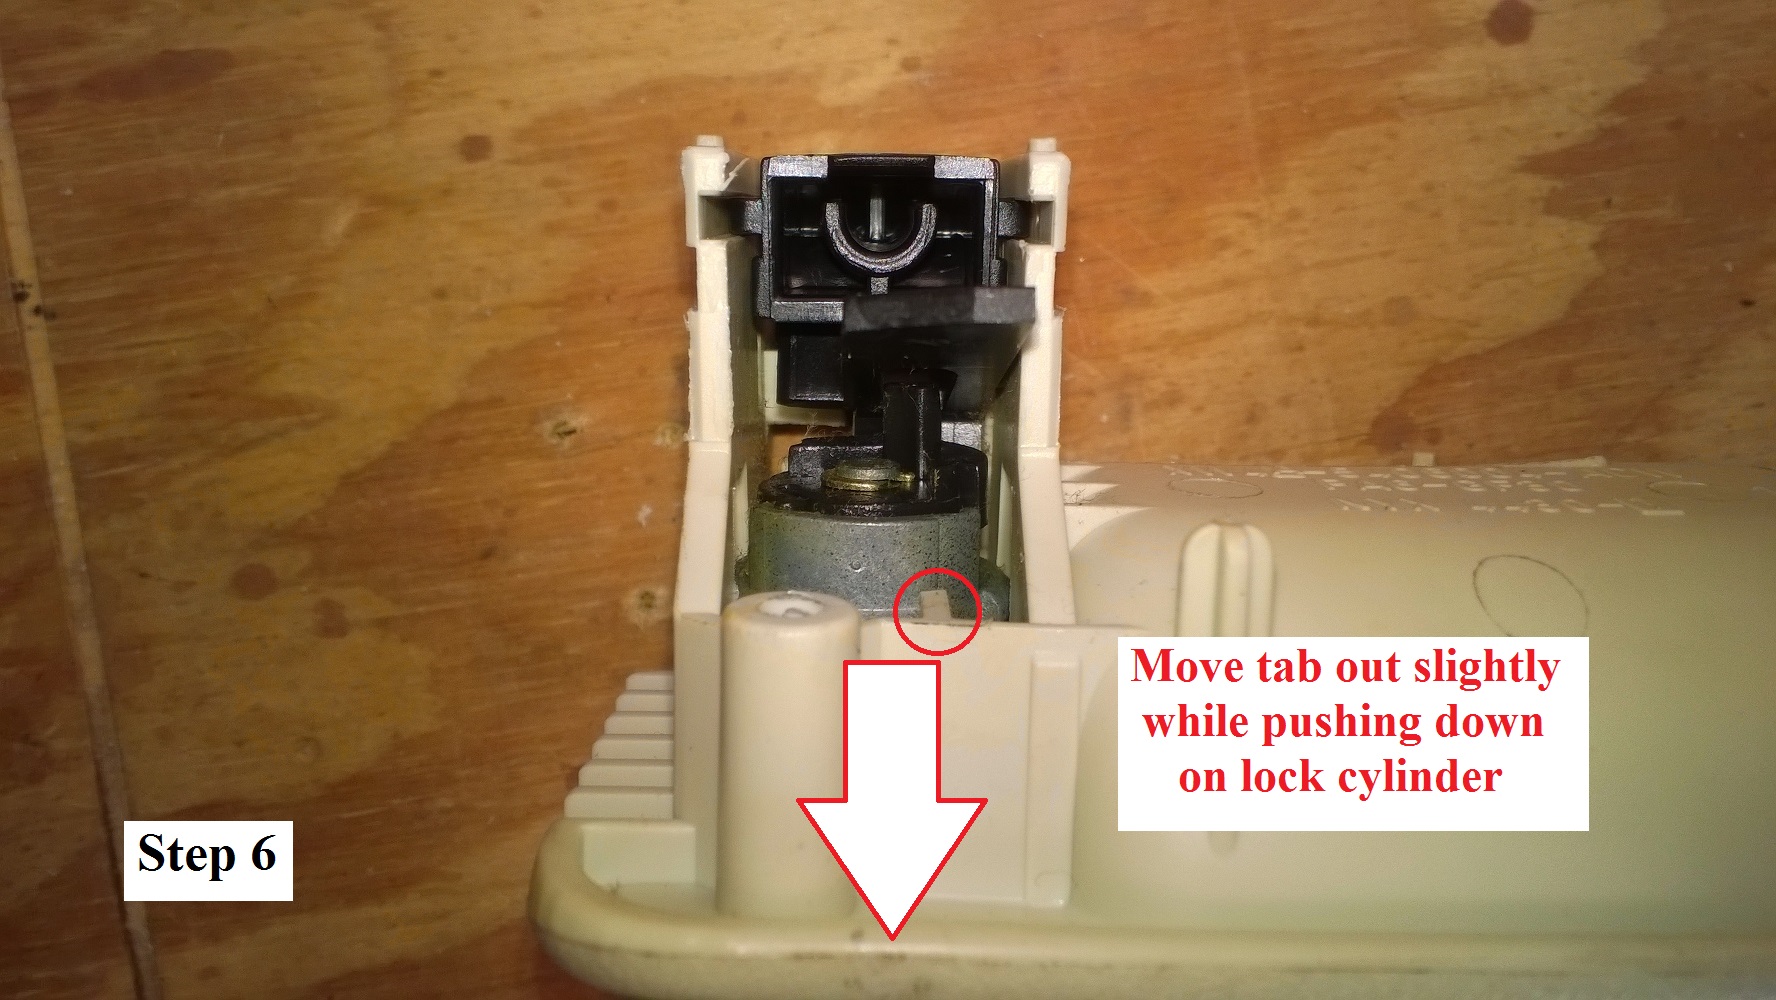
(b) Once the lock cylinder is accessible, gently pry out on the small tab holding the cylinder to the handle housing while pressing down on the cylinder itself. The cylinder should move enough that you can then remove the cylinder by pulling it out the front of the handle housing with your fingers.
(c) Once you have the cylinder out, note that the cylinder housing is designed such that it can only go into the handle housing in the correct orientation - that is, the locking tab of the cylinder will fit back into the slot in the latch pull bar of the handle as it should.
Step 6 - Reassemble
Reverse the steps above to reassemble. When replacing the back shell onto the door housing, I found it easiest to insert the 4 bottom tabs first and the remaining middle and upper tabs fall into place easily.
Hope this helps someone in the future!!
Step 1 - Remove glove box from dash
(a) Open the glove compartment door - There are two (2) Star screws in the upper back portion of the glove box - remove these screws
(b) With the door still open you will see two smaller star screws in the upper face of the glove box - they will be inside the two small rubber "bumpers" at the top of the box - remove these screws
(c) Close the glove box door - but do not latch the door closed
(d) There are three (3) phillips-head screws at the base of the glove compartment door in the door hinge- remove these screws
(e) Pull the glove compartment out of the dash holding onto the door and bottom side of the compartment (from under the dash) for leverage.
NOTE: there are already good U-Tube videos on exactly how to accomplish this.
Step 2 - Remove The Door From The Compartment Case
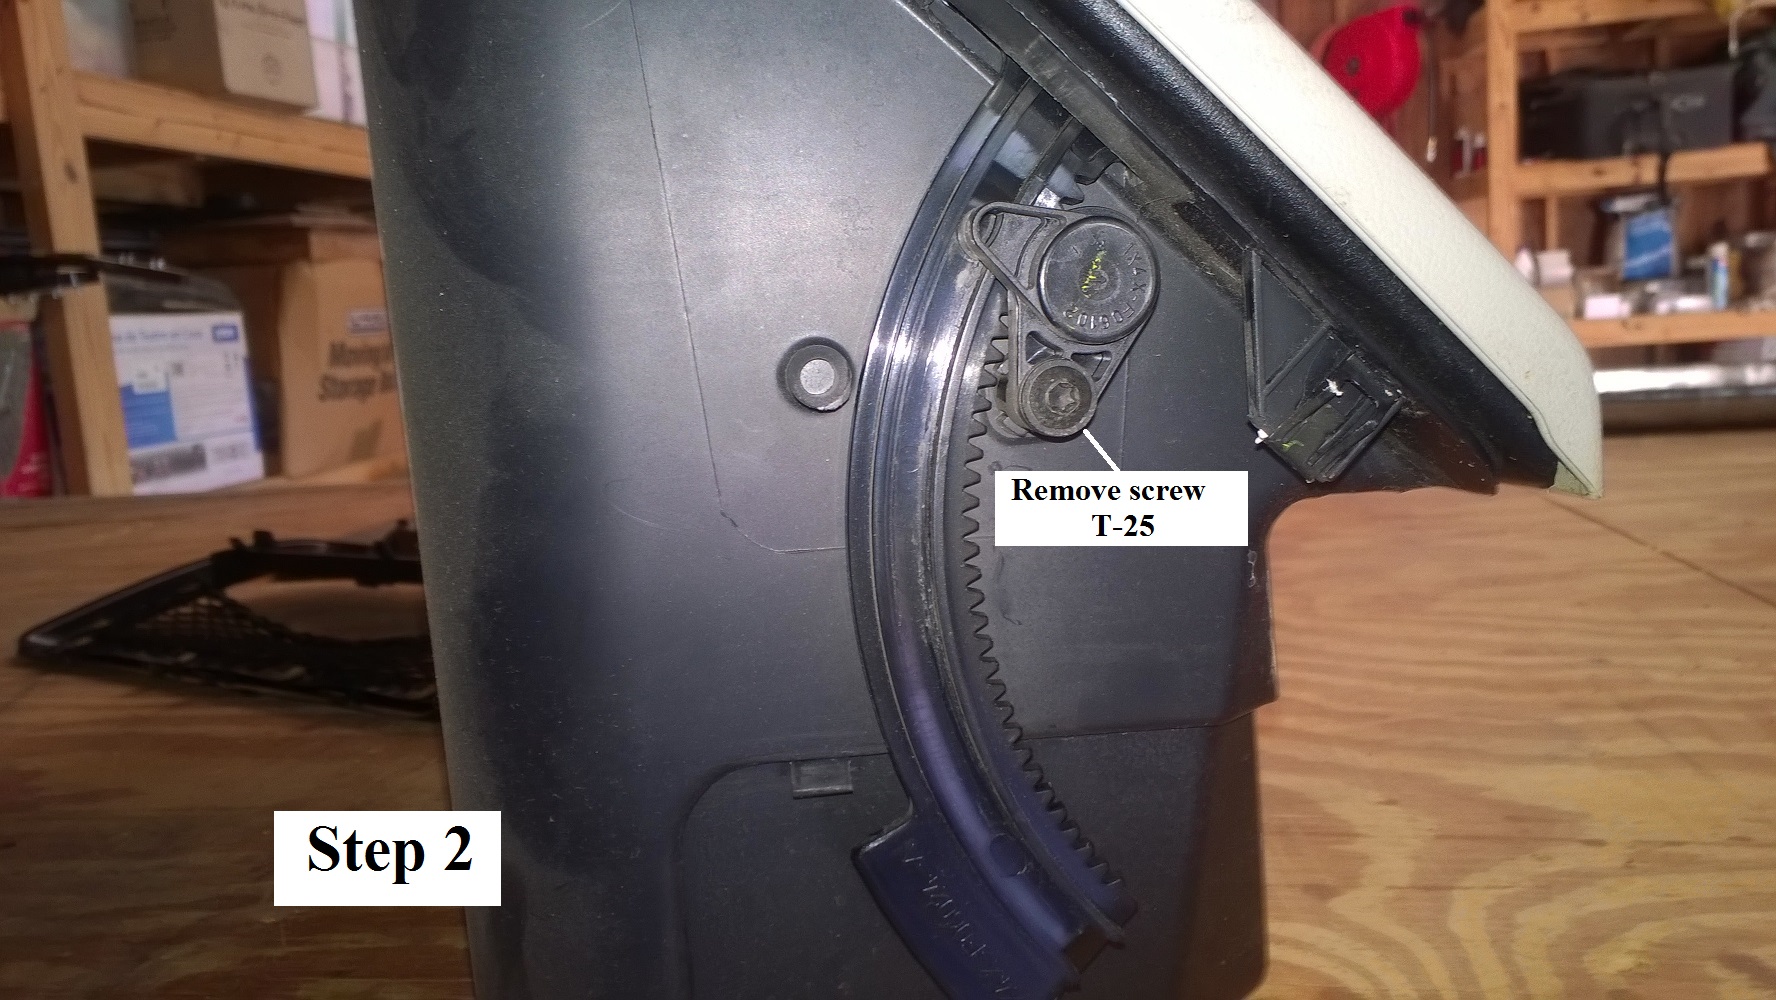
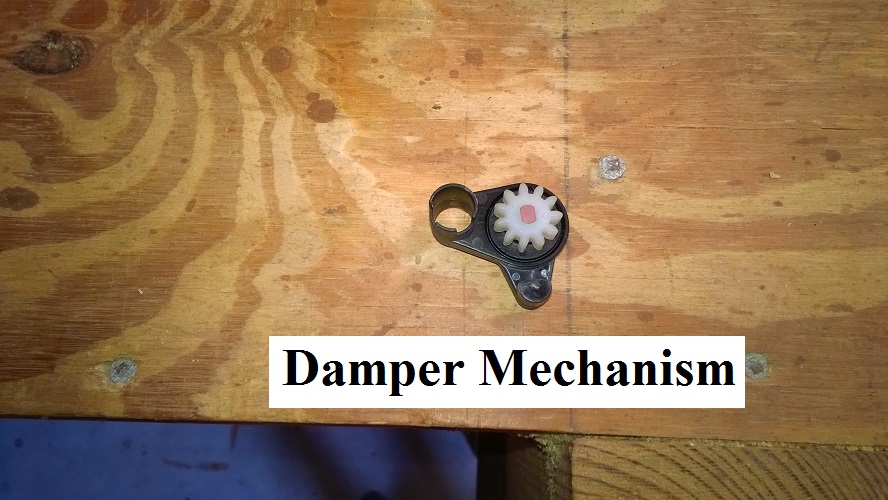
(a) Remove the screw holding the damper mechanism and remove the damper mechanism by pulling it straight out (See photo below)
(b) Remove the door from the compartment case by flexing the arms out slightly to bypass the stops as you pull the arms through the front of the casing.
Step 3 - Remove The Back of The Door


(a) Using an appropriate prying device - pry the back shell of the door off the door housing. There are ten (10) tabs holding the back shell to the housing. I started at the bottom, pried the 4 tabs free, then moved up the side and freed the 3 tabs in the center of the shell, then finally moved to the top and freed the 3 hidden tabs at the top of the shell/housing. (See photos)
Step 4 - Remove The Handle Mechanism From The Door

(a) Removed the three (3) star screws holding the handle mechanism to the door casing and pull handle mechanism out the front of the door casing (See photo)
Step 5 - Remove The Lock From The Handle Mechanism

(a) Gently pry one of the bottom tabs on the handle mechanism to free one side of the latch spring housing. Now pry the tab on the other side of the housing and pull the spring housing shell piece down and away from the rest of the handling mechanism. This will allow access to the lock cylinder for its removal.
(b) Once the lock cylinder is accessible, gently pry out on the small tab holding the cylinder to the handle housing while pressing down on the cylinder itself. The cylinder should move enough that you can then remove the cylinder by pulling it out the front of the handle housing with your fingers.
(c) Once you have the cylinder out, note that the cylinder housing is designed such that it can only go into the handle housing in the correct orientation - that is, the locking tab of the cylinder will fit back into the slot in the latch pull bar of the handle as it should.
Step 6 - Reassemble
Reverse the steps above to reassemble. When replacing the back shell onto the door housing, I found it easiest to insert the 4 bottom tabs first and the remaining middle and upper tabs fall into place easily.
Hope this helps someone in the future!!


Senior Member
Joined: Aug 2012
Posts: 820
Likes: 436
From: Mechanicsville, Virginia, USA
Resurrecting this old thread as suits my 2007 X-Type interior replacement project.
PanamaJag's Lock Cylinder Replacement With Pics is recommended for the X-Type sticky page.
Thank you PanamaJag! I hope that this post finds you well.
best regards,
Bill
PanamaJag's Lock Cylinder Replacement With Pics is recommended for the X-Type sticky page.
Thank you PanamaJag! I hope that this post finds you well.
best regards,
Bill

Thread
Thread Starter
Forum
Replies
Last Post
stanjag
S-Type / S type R Supercharged V8 ( X200 )
4
Dec 29, 2024 08:26 PM
Currently Active Users Viewing This Thread: 1 (0 members and 1 guests)