

My engine removal thread FAQ

Thread Starter
|
Senior Member
Joined: May 2007
Posts: 351
Likes: 72
From: Louisville, KY
Thanks for the sticky, Jim.
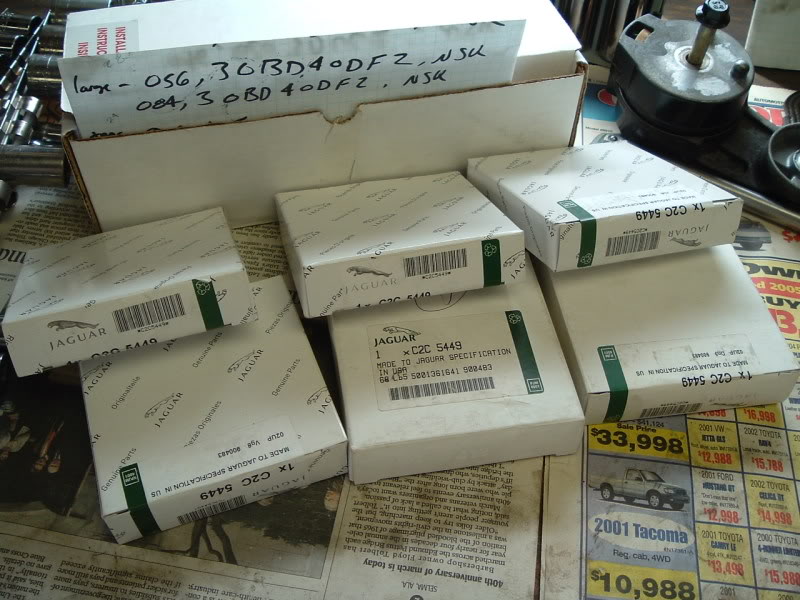
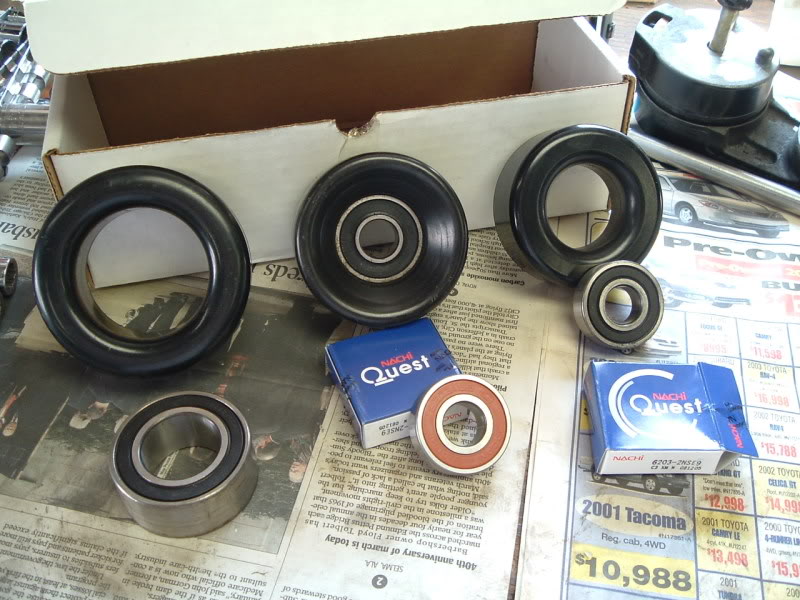
I get the block, heads, pistons, and crank back tomorrow. Things should start to get interesting over the next few days. I'm already anxious to get it back on the road. I went and picked up my piston rings and an oil filter from the dealer today, and went to a bearing specialty shop to pick up some new bearings for a couple idler pullies that felt pretty rough.
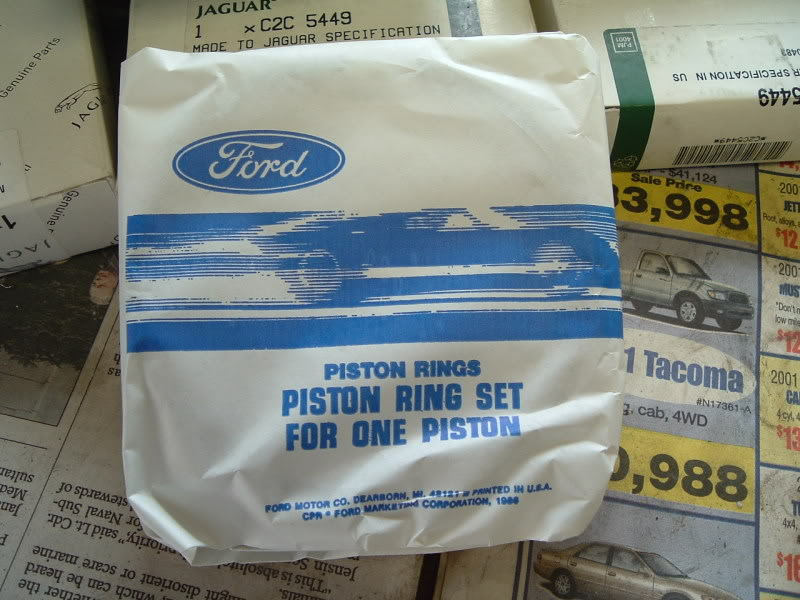
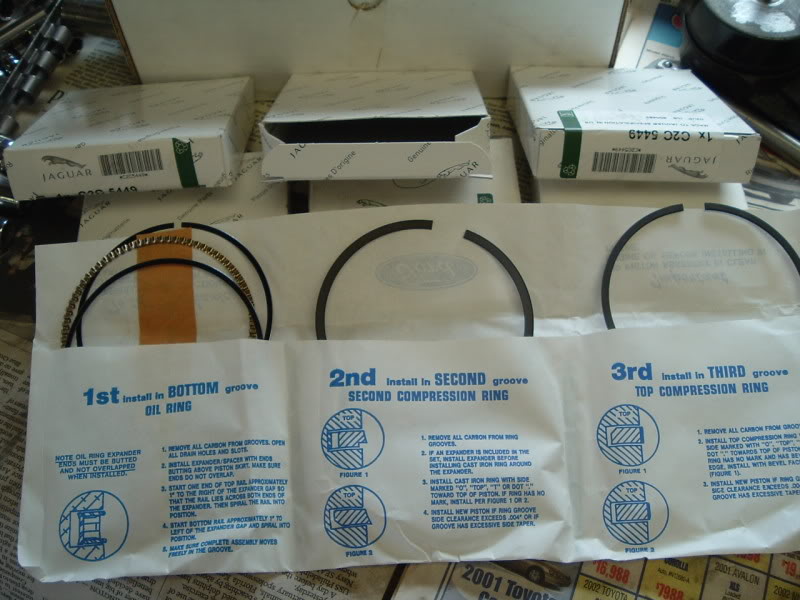
I do want to say that when I opened the $350 set of piston rings, I was pretty disappointed to see them in Ford paper wrappers, just stuffed into a Jaguar box. This means that there is a Ford cross reference for the rings, and hopefully a cheaper alternative. I'm going to try to get to my Ford dealer tomorrow and see if they can match them up to something (Lincoln LS?...).
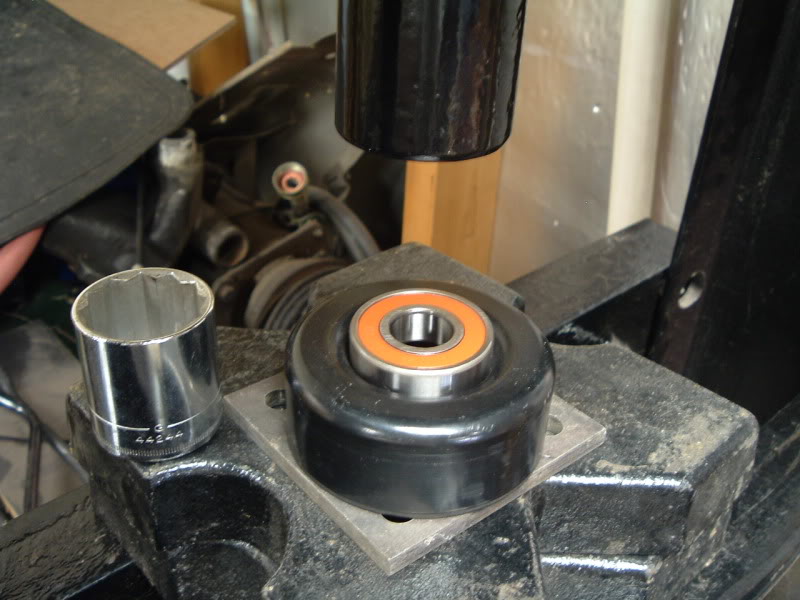
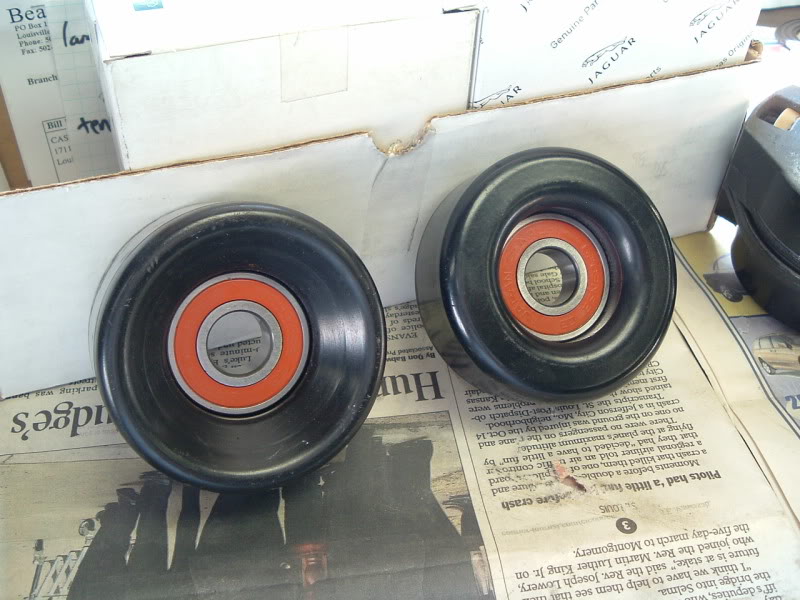
I only wanted to replace the bearings in the idler pullies to try and keep things cheap. The bearing themselves were dirt cheap, only $6 each! That's pennies compared to what the new idler itself costs. It was really easy to press the old ones out and the new ones in. I do have a press, but it's certainly do-able without one. The black ones are the old ones, and the new ones are orange.

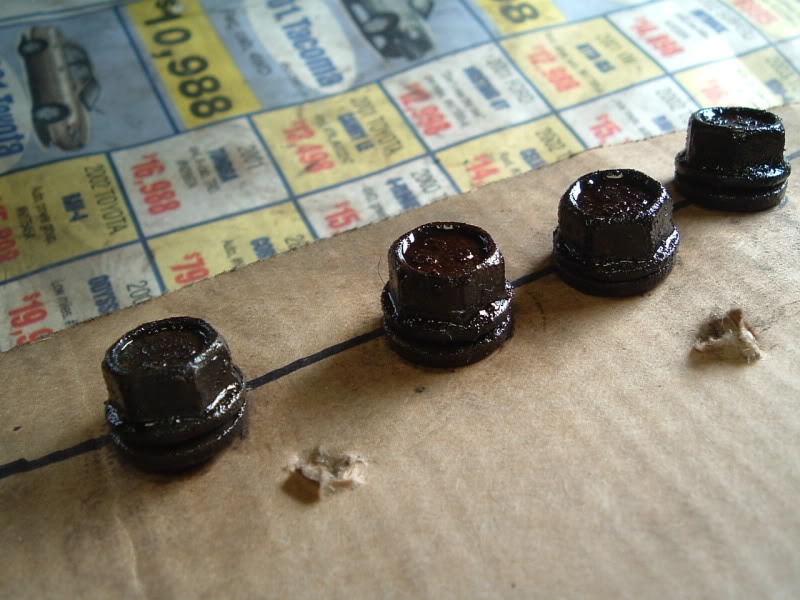
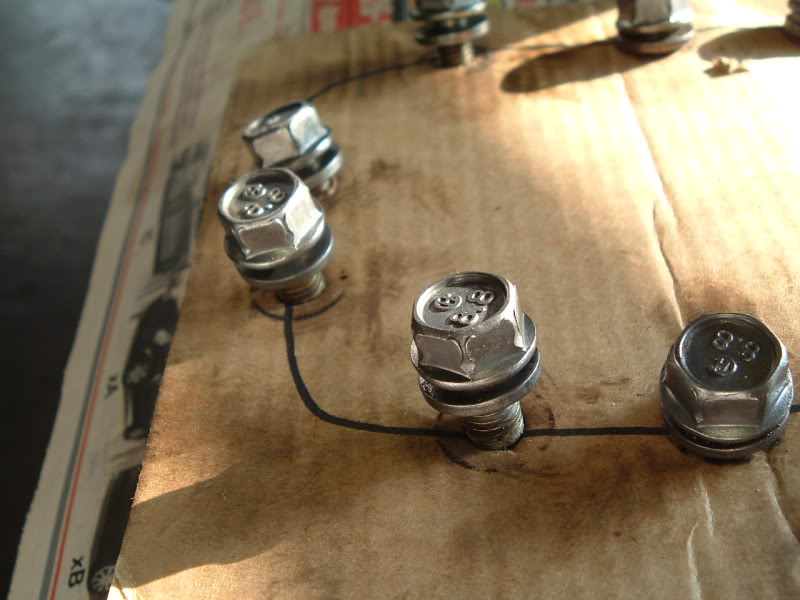
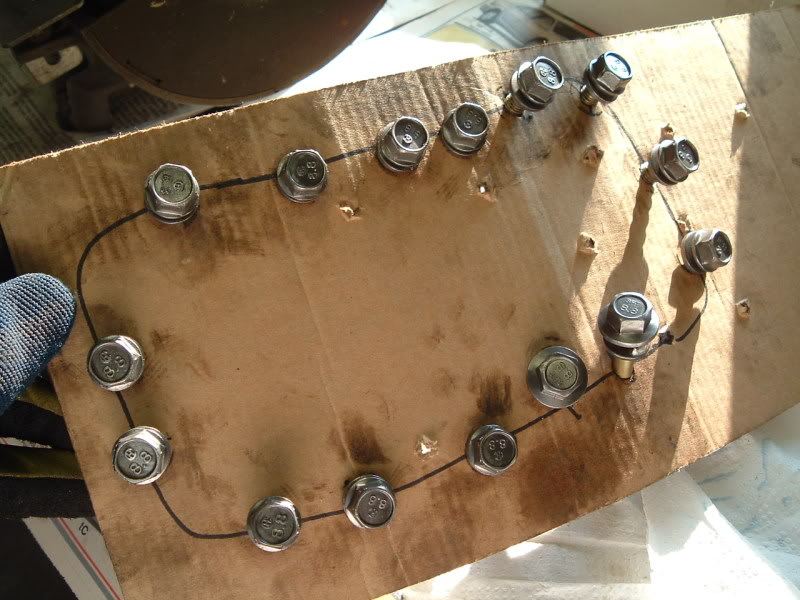
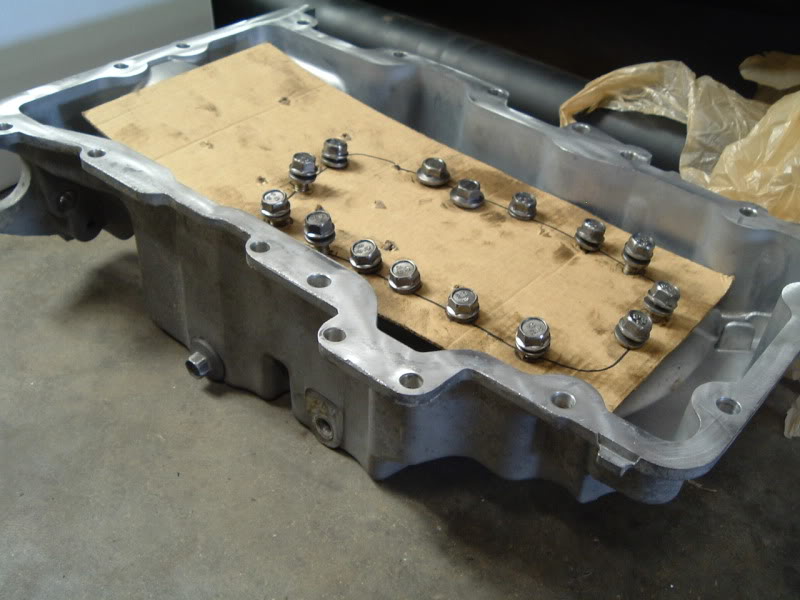
...And here's what I've been doing for the past week. Cleaning/wire wheeling bolts and brackets and painting various things. This is just a small sample of the process. These are the oil pan bolts, before and after. Pretty much every bolt on the bottom half of the motor was filthy. It's going to be a real gem when it's all put back together.

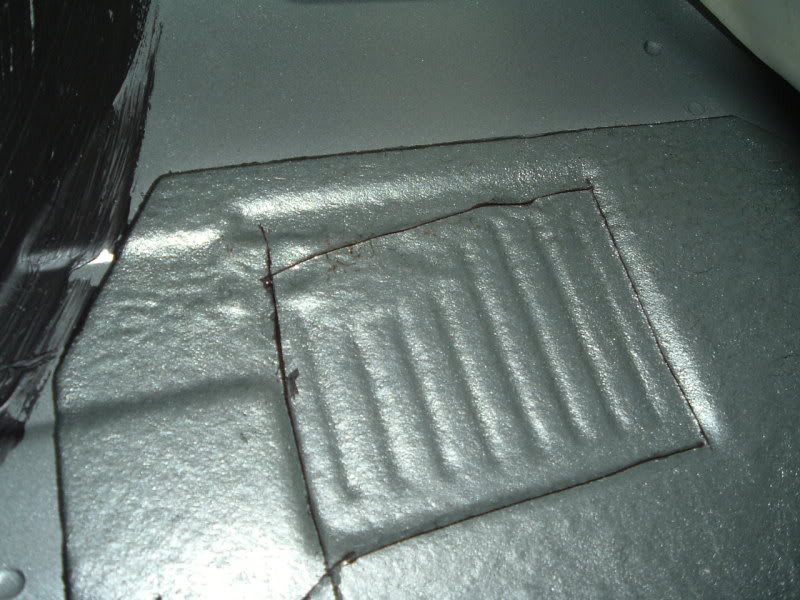
Ok, one more thing. Here's another mini project within this giant pain in the butt. As mentioned earlier, the two rear bolts that hold the subframe to the body were seized into the captive nuts up in the body, and when backing them out, they froze, and broke the welds holding the captive nuts in place. Here's what you have to do to get to them.
Driver's side floorboard

Pull back the carpet, and black rubberized pad underneath to find this

Using a razor knife, score around the outside edge of the rectangle that looks like it has bars under it.
Chisel/scrape away the undercoating. It comes off surprisingly easy in big chunks.
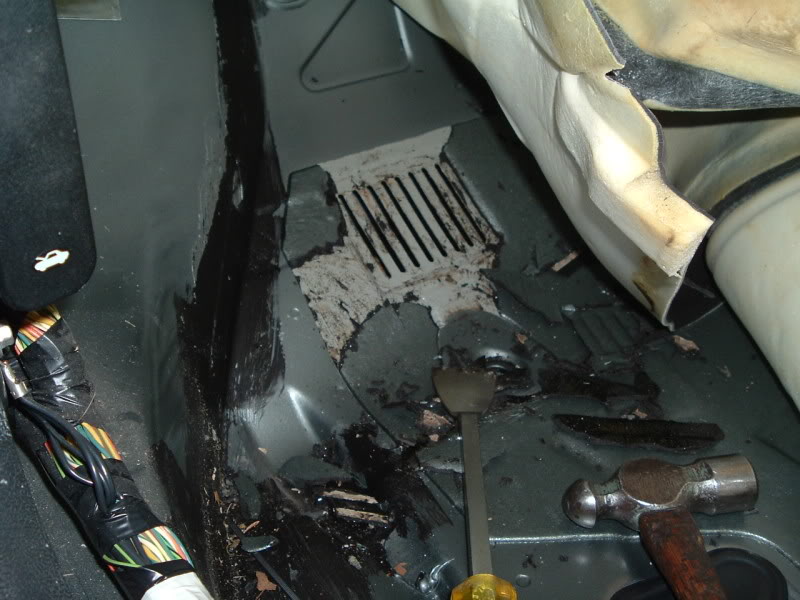

Connect the holes on one end, pry up and out of the way. I used an air-chisel to do the job quickly, although that was probably overkill. You have to get them as high as you can so a deepwell socket/extension can get in there.
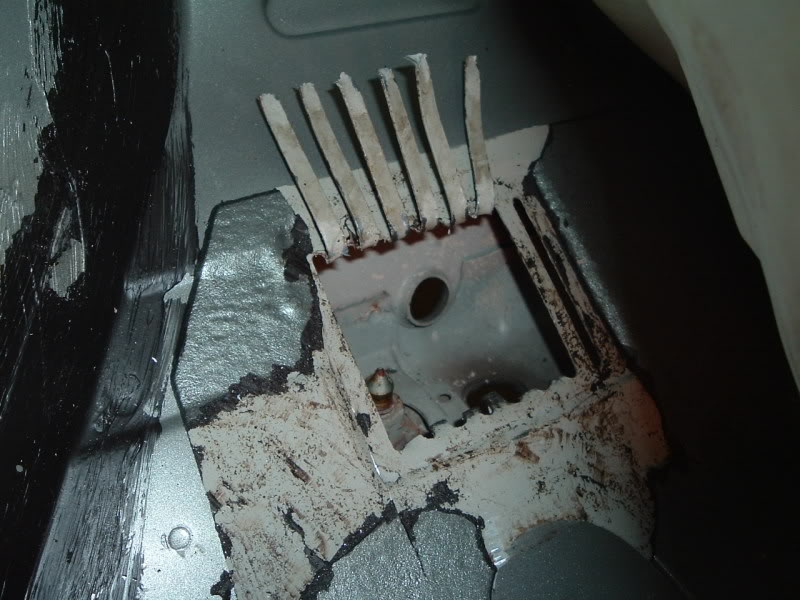
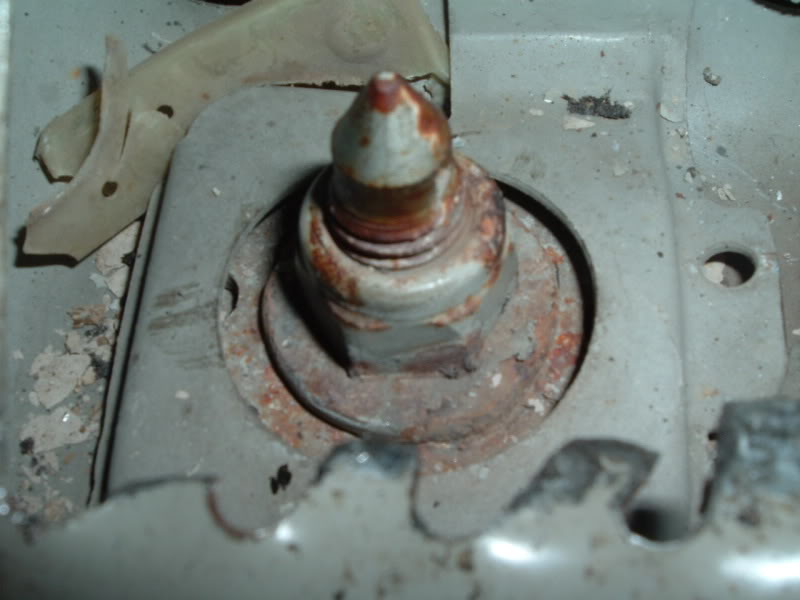
The nut
I get the block, heads, pistons, and crank back tomorrow. Things should start to get interesting over the next few days. I'm already anxious to get it back on the road. I went and picked up my piston rings and an oil filter from the dealer today, and went to a bearing specialty shop to pick up some new bearings for a couple idler pullies that felt pretty rough.
I do want to say that when I opened the $350 set of piston rings, I was pretty disappointed to see them in Ford paper wrappers, just stuffed into a Jaguar box. This means that there is a Ford cross reference for the rings, and hopefully a cheaper alternative. I'm going to try to get to my Ford dealer tomorrow and see if they can match them up to something (Lincoln LS?...).
I only wanted to replace the bearings in the idler pullies to try and keep things cheap. The bearing themselves were dirt cheap, only $6 each! That's pennies compared to what the new idler itself costs. It was really easy to press the old ones out and the new ones in. I do have a press, but it's certainly do-able without one. The black ones are the old ones, and the new ones are orange.
...And here's what I've been doing for the past week. Cleaning/wire wheeling bolts and brackets and painting various things. This is just a small sample of the process. These are the oil pan bolts, before and after. Pretty much every bolt on the bottom half of the motor was filthy. It's going to be a real gem when it's all put back together.
Ok, one more thing. Here's another mini project within this giant pain in the butt. As mentioned earlier, the two rear bolts that hold the subframe to the body were seized into the captive nuts up in the body, and when backing them out, they froze, and broke the welds holding the captive nuts in place. Here's what you have to do to get to them.
Driver's side floorboard
Pull back the carpet, and black rubberized pad underneath to find this
Using a razor knife, score around the outside edge of the rectangle that looks like it has bars under it.
Chisel/scrape away the undercoating. It comes off surprisingly easy in big chunks.
Connect the holes on one end, pry up and out of the way. I used an air-chisel to do the job quickly, although that was probably overkill. You have to get them as high as you can so a deepwell socket/extension can get in there.
The nut
Last edited by 310jag; Mar 16, 2009 at 10:44 PM.
Senior Member
Joined: Feb 2009
Posts: 119
Likes: 40
From: OKLAHOMA, USA
Jag310,
Good report as usual! It never crossed my mind about the Pulley bearings, Good insurance. I researched the 3.0L Ford Duratec at great lengths and have concluded that the entire lower end, below the heads, is identical to the Lincoln LS and a cross to Ford/Lincoln is a match. I purchased my rings for, I'm ashamed, for $26.00 shipped. These were the ones from the eBay link I sent you. Size-same, I will do compression test once installed. I also am using the “LS” head bolts from Felpro, $36.00 per head. The heads for a Duretec come in 2 flavors, Push-Rod & Tap-It or bucket. There are also slight variations in the head designs for specific vehicles. The VVT is one difference. I will try to go into more detail on the other post on the rebuild and re-install thread.
I ran into some sloppy mechanic work. On my Left Valve cover, the one with the "oil spout", I found a valve cover bolt hole that was gouged out on the underside and cracked/separated in the middle of the hole. These "holes" appear to be some sort of insert into the aluminum. I ordered a new one for $158, there have been 5 re-designs of this cover alone, and a fresh set of bolts/boltseals for both sides. I have been using the Davis Automotive Group, Cleveland Ohio on the web as JaguarParts.com. They are still 50% cheaper than my local dealer.
The final few parts have not arrived yet, expect delivery later this week. No assembly has been started. In the mean time I have serviced my Tranny. I have also researched this item and came up with service manuals and a company that sells components. All I did was drain Tranny & Torque Converter and replace seals on the input and output. Fluid was “dark red”, you could tell it was red to begin with, not black. Odor did not smell burned. This Tranny was replaced in 04 under Warranty somewhere around 45K ago. I would recommend 50k drain/refill. I also found a company that sells “test strips” that can test your oils to determine if it still has life in it. The Transfer Case fluid, about 16oz came out or 475cc. Color was still “light honey” with a brown tint and it had several “black” carbon like pieces come out. Overall I would say the fluid was still healthy.
Wheel bearings are next and then the exhaust “wrap” after that.

310....it had to be made a sticky, what a great thread. Between Jfenley and yourself I'd say one of the best on the site and will be FAQ when finished

I guess truly though, as an "engine removal thread" its really finished.
How about between the 2 of you, you open up 2 new threads.
"Engine assembly" or sumthin similar
and
" Engine re install" or similar??
These would both be made stickys until completed and then Faq'D if anywhere near as complete and indepth with regard to the write ups and pics.
Just a thought


Joined: Mar 2008
Posts: 2,521
Likes: 71
From: Powell, Ohio U.S.A. 43065
Hey guys,
I don't speak X Type, but I came across this on eBay and it looks like an X Type kit from the photos. The factory part number of XR853850 is superceded by C2S46348, but I don't have access to anything at the moment to identify the application...neither does the seller.
http://cgi.ebay.com/ebaymotors/ws/eB...3372&viewitem=
I've bought from this guy before, he doesn't know Jag parts and he has had this kit listed for a long time. If the parts suit your needs, he'd probably take a low offer. That's as much as I know, hope it helps.


Senior Member
Joined: Jun 2007
Posts: 421
Likes: 9
From:
Brilliant work guys! I haven't been able to get online for a couple months with school, but had kept this thread in the back of mind.
I am going to throw out a curveball here, but from what I understand the 3Ls are non-VVT, correct? So what is stopping someone from dropping a 3L Duratec from the Ford Taurus/Sable/Escape? From my understanding and from some of these pictures it's teh same engine with the same head.
The most significant perk of this is cost. You can pick up a 3L from junker yards in the States w/~15-20k miles for like $300-500.
Now I know this would be a nightmare to figure out if it would bolt up properly, but I am just throwing an idea out there for others.
Anyways, keep up the good work.
Last edited by ancientsanskrit; Apr 4, 2009 at 01:43 PM.
Senior Member
Joined: Feb 2009
Posts: 119
Likes: 40
From: OKLAHOMA, USA
The 3l duratec in the Jag DOES have VVT and has similarities to the Tarus/Sable but is not even close once above the block, it changes. Also I beleive the exhaust is routed differently. A CLOSE match on the Jaguar AJ-Duratec is the Lincoln LS motor. This is a very close match. Just about ALL the "Block" parts are interchangable. Above the the block there are a few differences also. SEE my engine re-build / re-install thread for more details.
Senior Member
Joined: Jun 2007
Posts: 421
Likes: 9
From:
The 3l duratec in the Jag DOES have VVT and has similarities to the Tarus/Sable but is not even close once above the block, it changes. Also I beleive the exhaust is routed differently. A CLOSE match on the Jaguar AJ-Duratec is the Lincoln LS motor. This is a very close match. Just about ALL the "Block" parts are interchangable. Above the the block there are a few differences also. SEE my engine re-build / re-install thread for more details.
Ahh that's too bad; I always wondered about that option, but it seems as though it's a no-go. Seems as if you've done some extensive homework.


Junior Member
Joined: Nov 2010
Posts: 10
Likes: 0
From: indiana
I thought it was ready to go but I was wrong
I got it all plugged back in, went to go start it and idled very poorly and died, sounds like the timing is off. I set the timing according to JTIS? Is the information on that program correct? I read in another forum someone had the same problem but never posted if it was fixed. Did you guys set your timing to their specs? Any info would be greatly appreciated.
Senior Member
Joined: Feb 2009
Posts: 119
Likes: 40
From: OKLAHOMA, USA
What I found was a very complicated JITS procedure and it did not work. I tried and tried to configure like the JITS but the marks would not line up as PRE-TEAR DOWN state. It was a good thing I snapped plenty of pics of those timming marks before taking off the chains. So here is my experience with the timming. This will work every time.

My timing marks are 180 from JTIS. My key was at 3 O'clock not 9. I tried but could not ever get the "First Cylinder" on the crank to be at TDC when marks align at 9. I tried and tried. So I figured that I should document this for when I rebuild. I may be wrong and be at the exhaust stroke and not compression, however it really doesn't matter as long as the chains go back the same way.
I ended up with #2, the Second Cylinder on the Crank, and #5, the Fifth Cylinder on the Crank at TDC. I was MOSTLY intrested in getting my CAM marks to line up with the JTIS pictures. I could ONLY acheive this under these positions. You will notice the "link" is just after the 3 O'clock mark. The same is true with the CAM marks, yellow dot. I counted 33 links CW to the 11 O'clock cam mark and 15 links between cams and then 22 from the 5 O'clock cam. (maybe 4 O'clock)

Chain link mark just AFTER the 3 O'clock key position. Piston #2 of Crank is at TDC and Piston #5 on the crank is TDC

PLEASE NOTICE the background for camera angles. This angle is square with floor.

I tried to make it look like JTIS so I squared camera with the VVT cross brace.

Mark on Intake CAM about 5 O'clock (maybe closer to 4 O'clock). As You can see it has just come away from the chain


This is the RIGHT SIDE CAM set-up

SAME as LEFT side CAM set-up
I now have ALL my parts back from the Shop. I was told after a month that they just do not feel comfortable re-building this motor. The problem was that they are European specialist, LandRover, BMW but they have not done ANY of these Jaguar engines. They were not interested enough to download the JTIS and "Assemble" the motor. Just as well, I feel pretty confident I can do this. I have been over it in the manual many times. I even created an assembly document that I created for the shop. I am involved in another project for the next couple weeks but the weekend of the 10th I will resume with project.
Those of you who think you can do this, as I did, need to re-think it. The COST really begins to add-up. I had to pay $30 for a bolt and you need 5 of them. I recently paid $480 for all the "lower-end" bolts. These hold the Mains on, the "bed" ,as they call it, to the other half of the block and the ones that are used to hold the Oil Pan baffle. Add that to the $120 in head bolts. Then you get into decisions like "do I replace the oil pump or the water pump while it's apart. Then you have the entire gasket issue/cost. There is also about $680 in Rings, main bearings and rod bearings. Then there are about $200 in o-rings. It seems like the $$$$ continue to flow out of your pocket. I am doing this because I consider it relaxing and I plan to keep the vehicle for many more years.
As an alternative there is a company called EverDrive http://www.everdrive.com/ that will sell you low mileage motors with 3 year unlimited mileage for about $3500, shipping not included.
My timing marks are 180 from JTIS. My key was at 3 O'clock not 9. I tried but could not ever get the "First Cylinder" on the crank to be at TDC when marks align at 9. I tried and tried. So I figured that I should document this for when I rebuild. I may be wrong and be at the exhaust stroke and not compression, however it really doesn't matter as long as the chains go back the same way.
I ended up with #2, the Second Cylinder on the Crank, and #5, the Fifth Cylinder on the Crank at TDC. I was MOSTLY intrested in getting my CAM marks to line up with the JTIS pictures. I could ONLY acheive this under these positions. You will notice the "link" is just after the 3 O'clock mark. The same is true with the CAM marks, yellow dot. I counted 33 links CW to the 11 O'clock cam mark and 15 links between cams and then 22 from the 5 O'clock cam. (maybe 4 O'clock)
Chain link mark just AFTER the 3 O'clock key position. Piston #2 of Crank is at TDC and Piston #5 on the crank is TDC
PLEASE NOTICE the background for camera angles. This angle is square with floor.
I tried to make it look like JTIS so I squared camera with the VVT cross brace.
Mark on Intake CAM about 5 O'clock (maybe closer to 4 O'clock). As You can see it has just come away from the chain
This is the RIGHT SIDE CAM set-up
SAME as LEFT side CAM set-up
I now have ALL my parts back from the Shop. I was told after a month that they just do not feel comfortable re-building this motor. The problem was that they are European specialist, LandRover, BMW but they have not done ANY of these Jaguar engines. They were not interested enough to download the JTIS and "Assemble" the motor. Just as well, I feel pretty confident I can do this. I have been over it in the manual many times. I even created an assembly document that I created for the shop. I am involved in another project for the next couple weeks but the weekend of the 10th I will resume with project.
Those of you who think you can do this, as I did, need to re-think it. The COST really begins to add-up. I had to pay $30 for a bolt and you need 5 of them. I recently paid $480 for all the "lower-end" bolts. These hold the Mains on, the "bed" ,as they call it, to the other half of the block and the ones that are used to hold the Oil Pan baffle. Add that to the $120 in head bolts. Then you get into decisions like "do I replace the oil pump or the water pump while it's apart. Then you have the entire gasket issue/cost. There is also about $680 in Rings, main bearings and rod bearings. Then there are about $200 in o-rings. It seems like the $$$$ continue to flow out of your pocket. I am doing this because I consider it relaxing and I plan to keep the vehicle for many more years.
As an alternative there is a company called EverDrive http://www.everdrive.com/ that will sell you low mileage motors with 3 year unlimited mileage for about $3500, shipping not included.
Thread Starter
|
Senior Member
Joined: May 2007
Posts: 351
Likes: 72
From: Louisville, KY
Wow, I just randomly checked this forum today and was surprised to see this thread still going. I'm glad it's helpful to somebody!
And Mr. Fenley is right about the timing. The JTIS istructions are garbage, and ended up putting my rear bank 180* out. This is how I ended up doing this whole remove/install thing twice.
Study his pictures closely, and they will get you there.
If you have any questions, feel free to shoot me a PM. I'm glad to help in any way I can.
Good luck!

Junior Member
Joined: May 2011
Posts: 17
Likes: 0
From: London
310jag
Wonderful thread. I am new on this site. So hello to everyone.
I've joined up just in response to your thread and the other thread by jfenly.
I am inspired by how you have dealt with the problems facing a rebuilder
ie lack of information, lack of parts at fair prices and using the tools you have as opposed to breaking bank.
Your photos and text were excellent. Youve done well with the Fuji A210.
If anyone in London, UK is rebuilding an engine and needs a pair of hands and some specialist tools to assist, I am available.
Apart from the rebuild, my interest is in taking pictures to document the story.
Its hard to press on with the rebuild and take good pictures at the same time.
Danny
Wow, I have to say I'm impressed with the pictures and the commentary. I work for Nemak, we make motors for a lot of companies except Jaguar. Right now I'm working at GM in Tennessee building the Ecotech for the new Equinox in Spring Hill. Y'all have taught me quite a bit, but I have a question ? Why is it that the motor cannot be removed from the top? I don't have enough room, I don't think, to come out the bottom. it just might be the easiest way to go. Any ideals?
Thanks danny
Thanks danny
I thought the same thing. I had a 2.5l duratech. The first thing i noticed is the oil pump is mounted externally on the duratech and of inside on ours. That was the first thing, next was the ECM, and the wiring is different. someone else told me a lot of other differences. Needless to say I was stuck with a perfectly good 2.5 duratech with nothing to put it in. But the Lincoln mentioned in another post, I told was a near perfect match. Either 2.5 or 3.0 will fit the 2.5 x-type. But remember I'm not a mechanic but an inspector for Nemak. Please get better advice from these mechanics. They have done a wonderful job posting all of this information. If anybody here gets a chance I've got a post in the x-type section about my problem. All advice is very very welcome.
Thanks Danny
Thanks Danny
Senior Member
Joined: Feb 2009
Posts: 119
Likes: 40
From: OKLAHOMA, USA
Why is it that the motor cannot be removed from the top?
If you attempt to remove from the top. You would need to remove the "half shafts" if you pulled the tranny & engine which means much more labor involved, strut towers, wheels, tie rods and the list piles up.
If you try to separate the engine from the tranny and pull the engine alone this too presents many issues. The main one is bolt/tool access. Not much room and needless to say plugging the engine back into the Tranny lined-up would take a fair amount of luck. Also there are going to be clearance issues with accessories attached to the block itself
If you remove the Sub-frame, Engine and Tranny the removal becomes much more simple. A set of bolts for the motor mounts, sub-frame, steering column, and exhaust. Then raise the chassis and out it comes. Of course you need to disconnect the ECM.
This is why you remove it from the bottom. Labor, ease, and access to mounting bolts.
Thanks for your interest.
There are many more great articles on this site. Explore and enjoy
Senior Member


Joined: Jun 2010
Posts: 676
Likes: 57
From: Scottsdale, AZ
JFeneley wrote: Those of you who think you can do this, as I did, need to re-think it. The COST really begins to add-up.
As an alternative there is a company called EverDrive Everdrive.com that will sell you low mileage motors with 3 year unlimited mileage for about $3500, shipping not included.
Jfenley, I would never try this, it looks like you have put a lot of work and money into this, but I can appreciate the joy of working on your JAG and reaping the rewards of a smooth running JAG.
It appears that you rebuilt the motor to stock, and did not bore our the cylinders, or put more aggressive cams in it for more power. Are you not interested in more power, or would those type of things even be feasible with this motor? I guess the ECM would be all confused Lol!
Senior Member
Joined: Jun 2010
Posts: 676
Likes: 57
From: Scottsdale, AZ
For instance, have you considered headers? I guess it depends on how far down the rabbit hole you want to go.

[Stave Hannes Jag Motor Project blog]
Below is the stock exhaust manifold - [310JAG]

[Stave Hannes Jag Motor Project blog]
Below is the stock exhaust manifold - [310JAG]