

My engine removal thread FAQ

Thread Starter
|
Senior Member
Joined: May 2007
Posts: 351
Likes: 72
From: Louisville, KY
So, here's the reason I'm doing this:
https://www.jaguarforums.com/forum/s...ad.php?t=10670
Also, a big thanks to jfenley for his pointers. They've been much appreciated. Check your PMs, buddy.
This thread isn't necessarily meant to be a "how to," but just a place for me to share these pics. I think they could be very beneficial to anyone else who may need/want to do this. However I am glad to go into whatever detail is needed to help anyone else out, so don't be shy.
Needless to say this isn't a job for the mechanically challenged, or those who only have a 120 piece tool set. Not knocking those guys, but this is a major, major job. Lots of time, space, and tools are required.
Anyway, the pics should say a lot, but I'll add comments here and there where needed. Feel free to ask any questions or point anything out.
Cheers
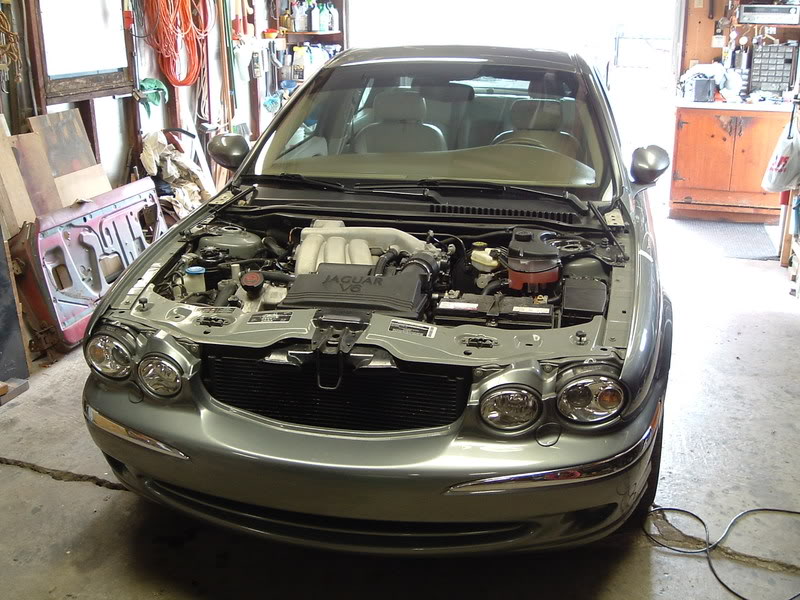
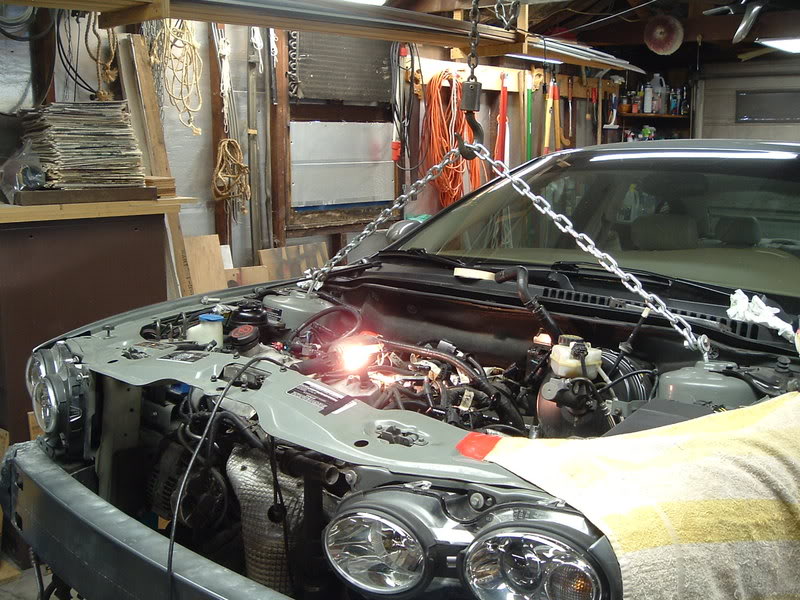
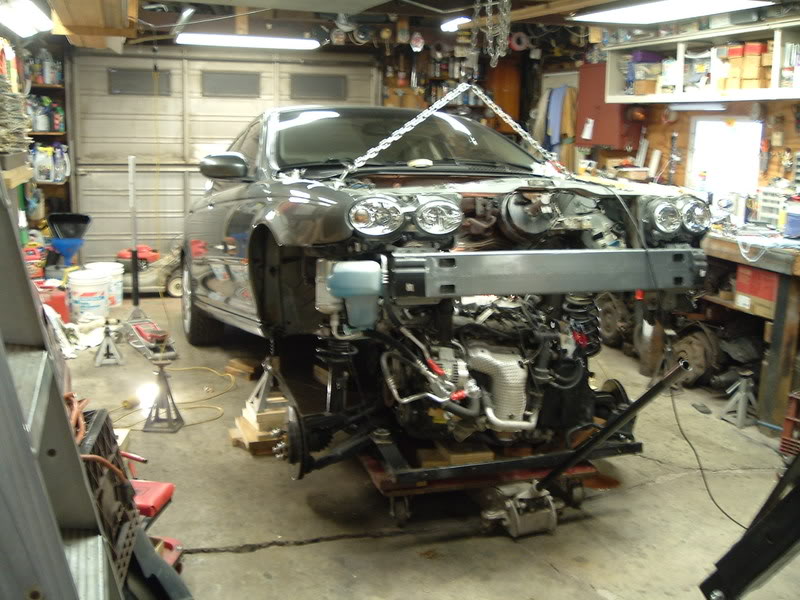
Entering the garage, carefully positioned in the center, with a chain hoist between the shock towers (for use later..)
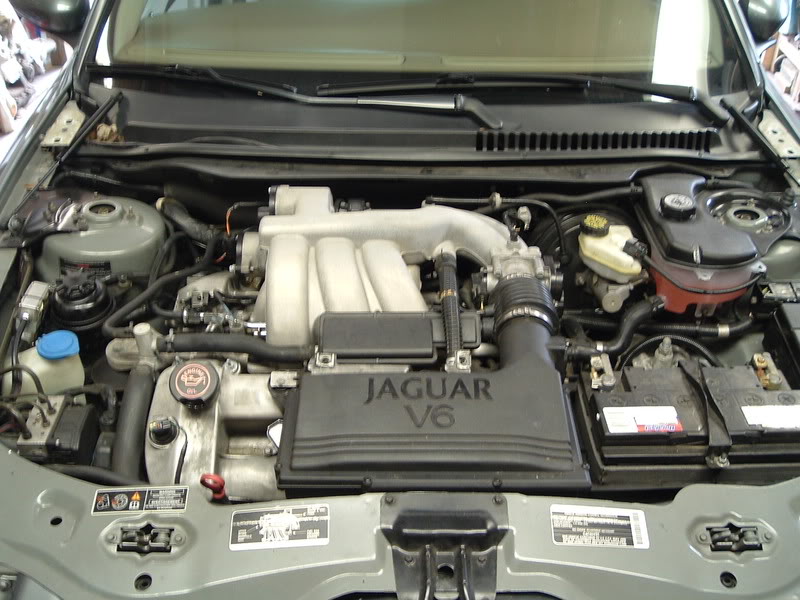
A sight I'm sure you all are familiar with
On stands
Left side of bay
Right side of bay
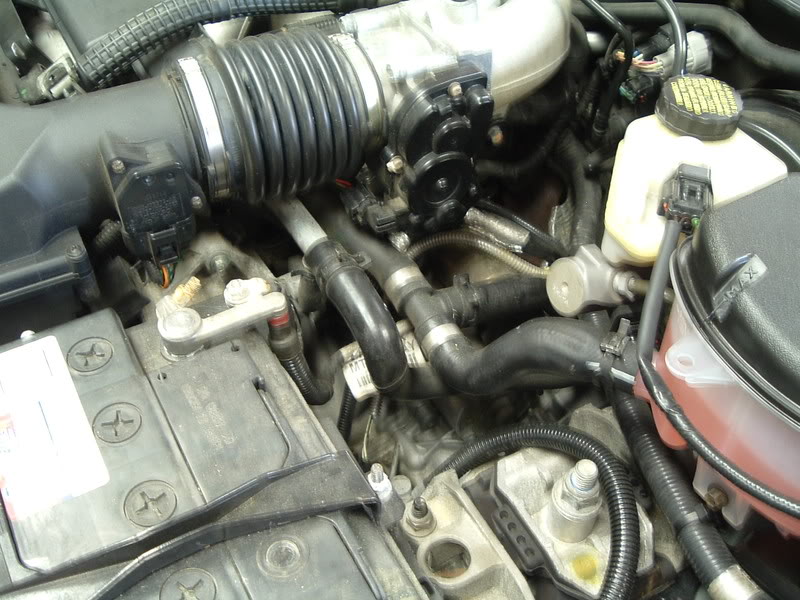
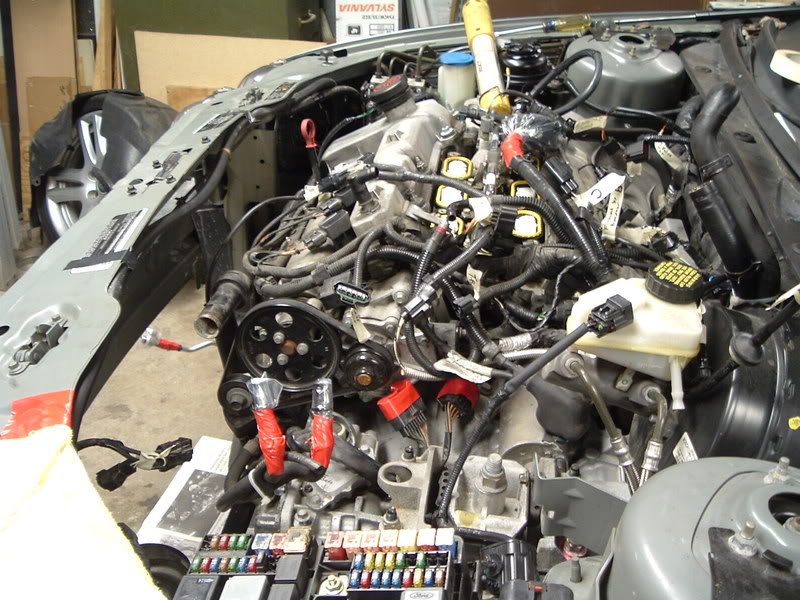
Battery out, coolant header tank, and various other bits removed
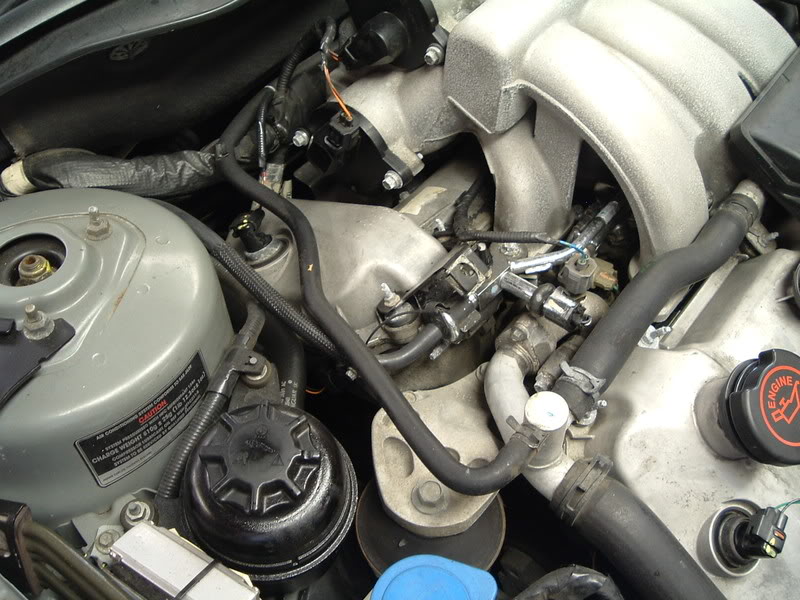
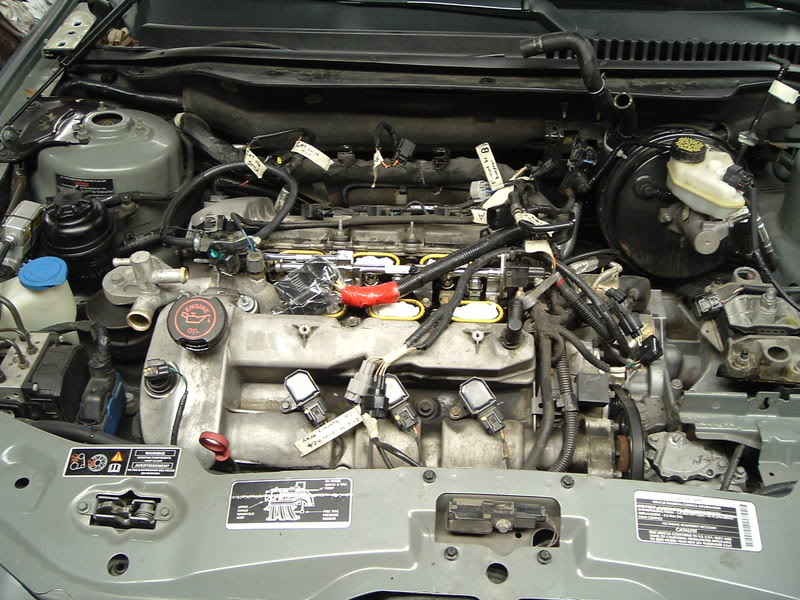
Manifold off
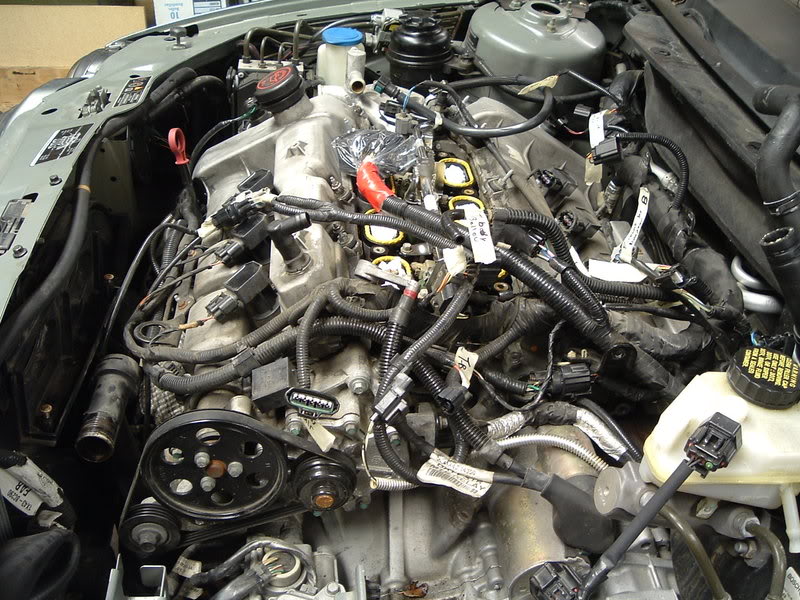
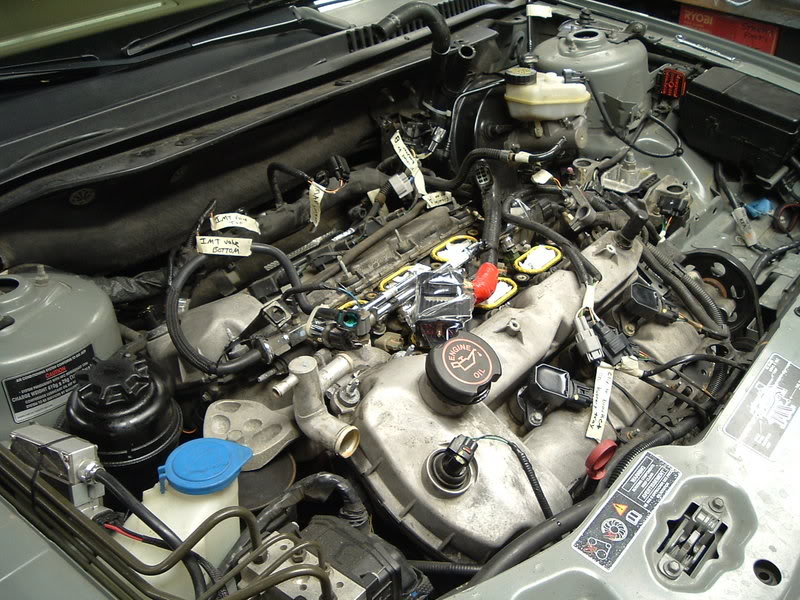
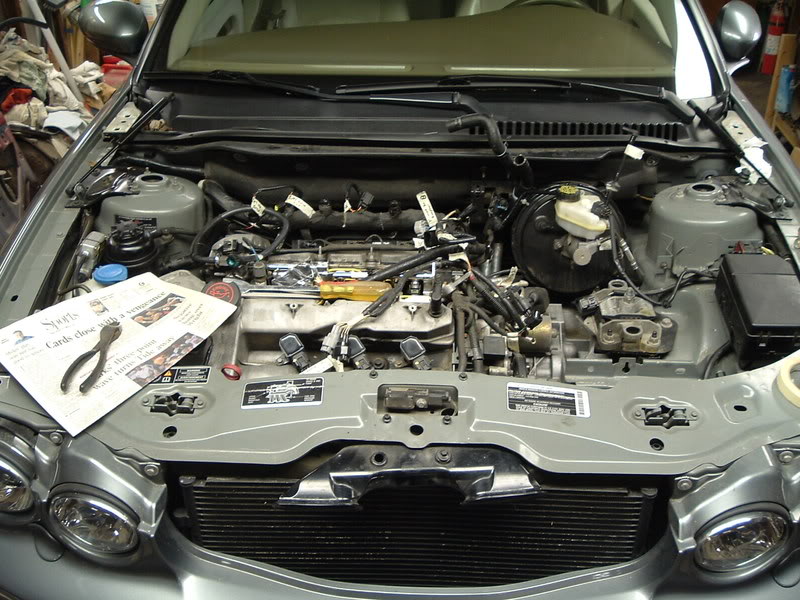
Harnesses/plumbing disconnected and labeled

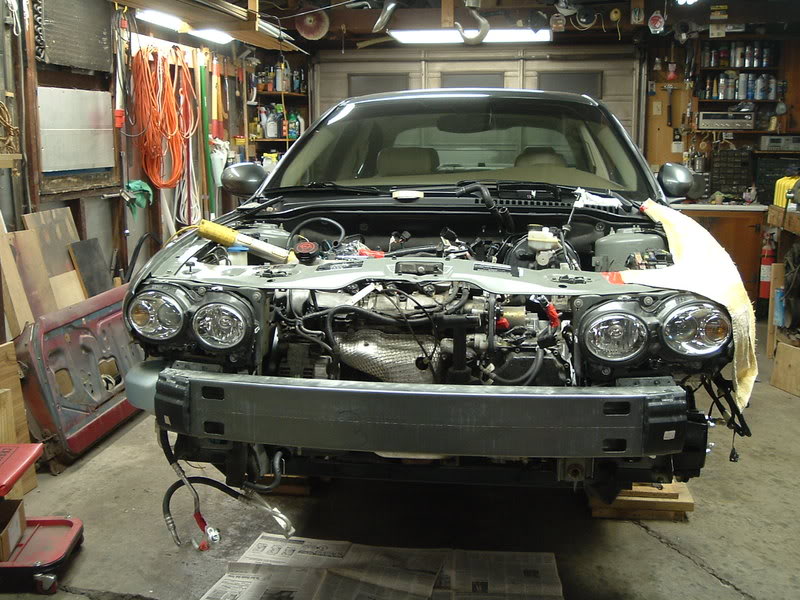
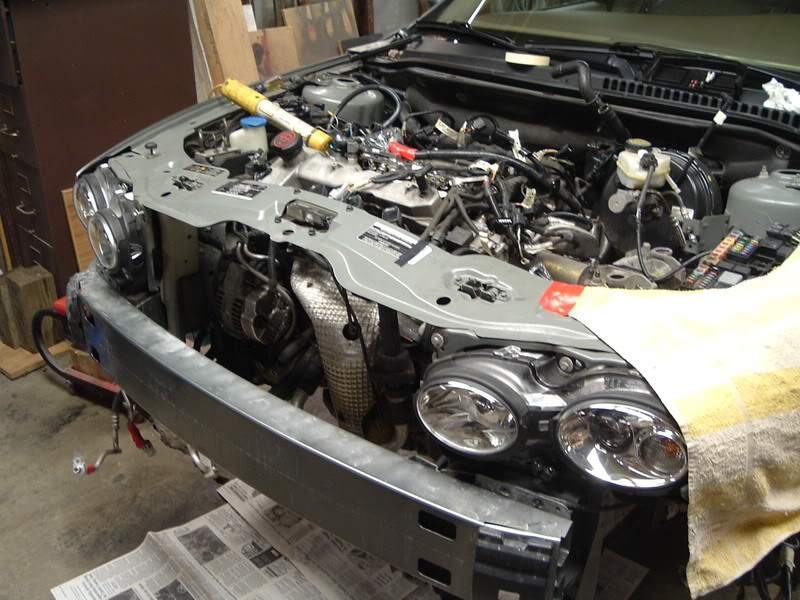
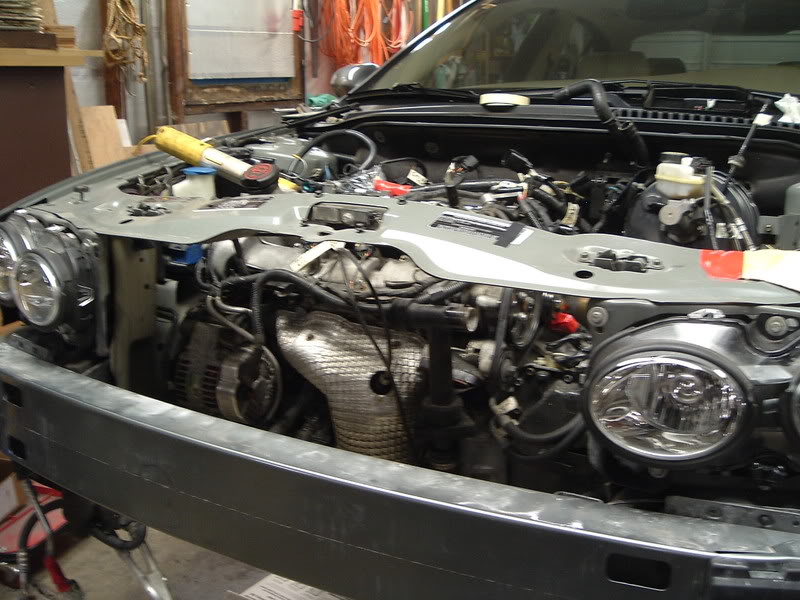
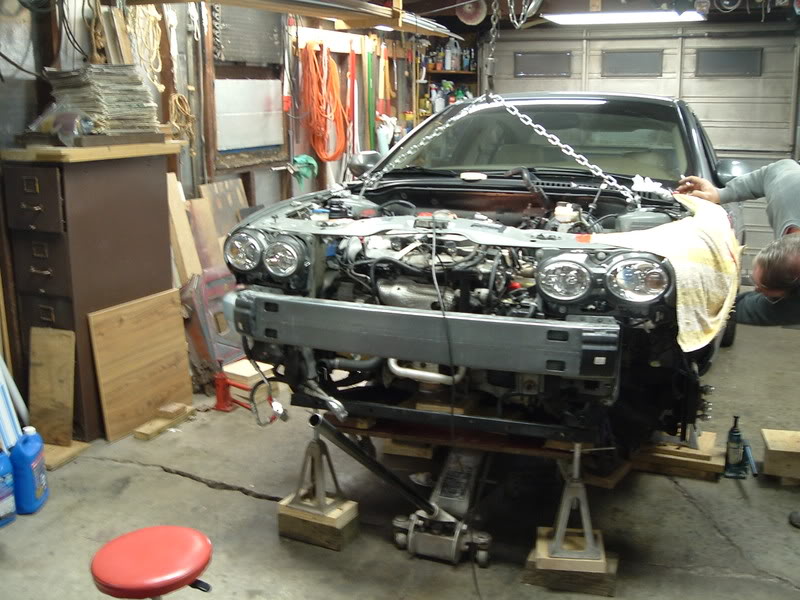
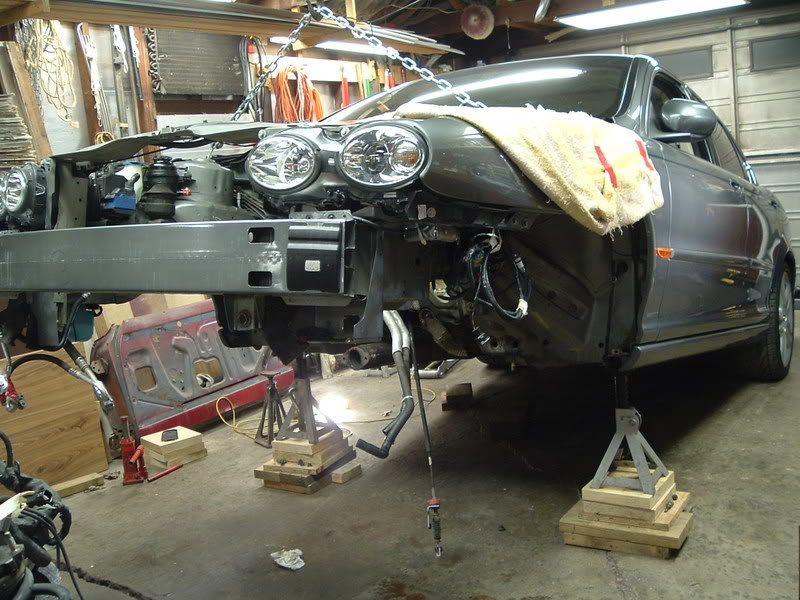
Now it gets scary. Bumper, radiator (including ac condenser, tranny cooler, and power steering cooler) removed.
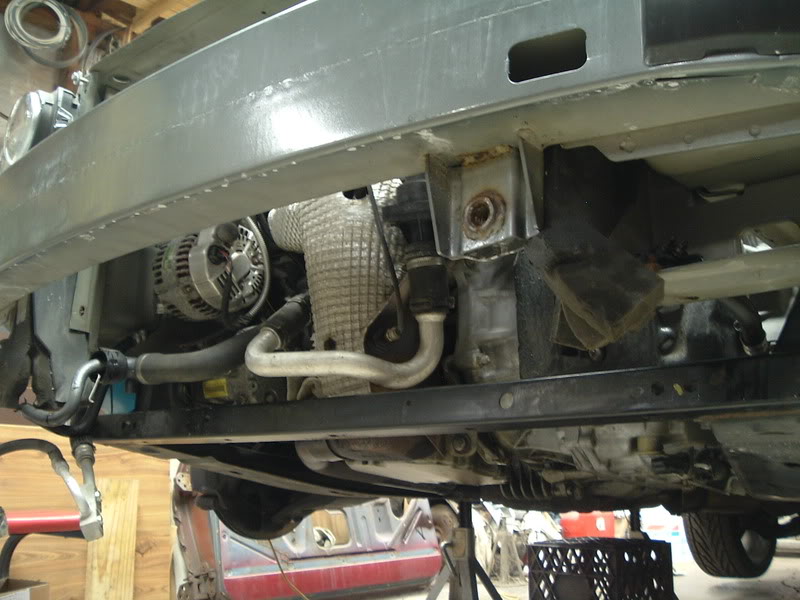
I'm getting close to removal. The driveshaft is out, exhaust mid section removed, and I'll remove the calipers and hang them in the wheel wells tomorrow, along with disconnecting the steering column from the rack.
I'm still a little undecided on how I'm going to lower the entire assembly. I had hoped to remove the subframe with the front suspension, steering rack, and a few other bits, leaving the engine/trans/tc case hanging on the two main motor/tranny mounts. Then, hooking a cherry picker to the engine/trans, removing the mounts, and then lowering them onto a cart of some kind.
However, part of the subframe loops over the top of the tc case, making the removal of the subframe itself (without the engine/trans) look difficult, if possible at all. Can anyone comment on this? Can the subframe can be removed while the powertrain is still in the car..?
Either way, I'll raise the car high enough to pull everything aside via a home made strut tower brace that will connect the two shock towers and have a hook/ring in the middle of it. Using a chain hoist (seen in some of the pics just above engine bay) I'll hook to it and lift.. being very careful about the change in weight of the car, and how stable it will be on stands. I plan on moving the rear jack stands as far back as possible to try to keep things balanced.
Any advice?
Anyway, I'm beat. I'm barely awake, and it's time for bed.
https://www.jaguarforums.com/forum/s...ad.php?t=10670
Also, a big thanks to jfenley for his pointers. They've been much appreciated. Check your PMs, buddy.
This thread isn't necessarily meant to be a "how to," but just a place for me to share these pics. I think they could be very beneficial to anyone else who may need/want to do this. However I am glad to go into whatever detail is needed to help anyone else out, so don't be shy.
Needless to say this isn't a job for the mechanically challenged, or those who only have a 120 piece tool set. Not knocking those guys, but this is a major, major job. Lots of time, space, and tools are required.
Anyway, the pics should say a lot, but I'll add comments here and there where needed. Feel free to ask any questions or point anything out.
Cheers
Entering the garage, carefully positioned in the center, with a chain hoist between the shock towers (for use later..)
A sight I'm sure you all are familiar with
On stands
Left side of bay
Right side of bay
Battery out, coolant header tank, and various other bits removed
Manifold off
Harnesses/plumbing disconnected and labeled
Now it gets scary. Bumper, radiator (including ac condenser, tranny cooler, and power steering cooler) removed.
I'm getting close to removal. The driveshaft is out, exhaust mid section removed, and I'll remove the calipers and hang them in the wheel wells tomorrow, along with disconnecting the steering column from the rack.
I'm still a little undecided on how I'm going to lower the entire assembly. I had hoped to remove the subframe with the front suspension, steering rack, and a few other bits, leaving the engine/trans/tc case hanging on the two main motor/tranny mounts. Then, hooking a cherry picker to the engine/trans, removing the mounts, and then lowering them onto a cart of some kind.
However, part of the subframe loops over the top of the tc case, making the removal of the subframe itself (without the engine/trans) look difficult, if possible at all. Can anyone comment on this? Can the subframe can be removed while the powertrain is still in the car..?
Either way, I'll raise the car high enough to pull everything aside via a home made strut tower brace that will connect the two shock towers and have a hook/ring in the middle of it. Using a chain hoist (seen in some of the pics just above engine bay) I'll hook to it and lift.. being very careful about the change in weight of the car, and how stable it will be on stands. I plan on moving the rear jack stands as far back as possible to try to keep things balanced.
Any advice?
Anyway, I'm beat. I'm barely awake, and it's time for bed.
Last edited by 310jag; Feb 16, 2009 at 10:46 PM.

Joined: Mar 2008
Posts: 2,521
Likes: 71
From: Powell, Ohio U.S.A. 43065
Just a few comments, but I don't have any X Type expertise to share...
The first photo explains alot, you must have been racing and someone blew your doors off....
Nice job on the pics!
My roller cart for XJ8 front crossmember/ engine/ transmission assemblies is from a department store: or at least, from their parking lot. I chopped a shopping cart off its base, and used the top bars as supporting gussets welded in place. Those casters are great, heavy duty ones were priced at $50 each new, and I can roll the complete front end around the shop on it.
Best wishes with your project!
Thread Starter
|
Senior Member
Joined: May 2007
Posts: 351
Likes: 72
From: Louisville, KY
I'm hoping this is just some kind of facetious sarcasam I'm not picking up on...
Senior Member
Joined: Feb 2009
Posts: 119
Likes: 40
From: OKLAHOMA, USA
OK, the weather finally was a little warmer so I took half a day off and finished pulling my powertrain and sub-frame. Here is how I did it.
FIRST support your sub-frame on jack stands. Then use a 21mm 6pt socket and break loose the 4 sub-frame bolts and run them out until they turn pretty freely. You will also remove the 4 bracket bolts, 2 on the left and 2 on the right, at the rear of the sub-frame.


side view
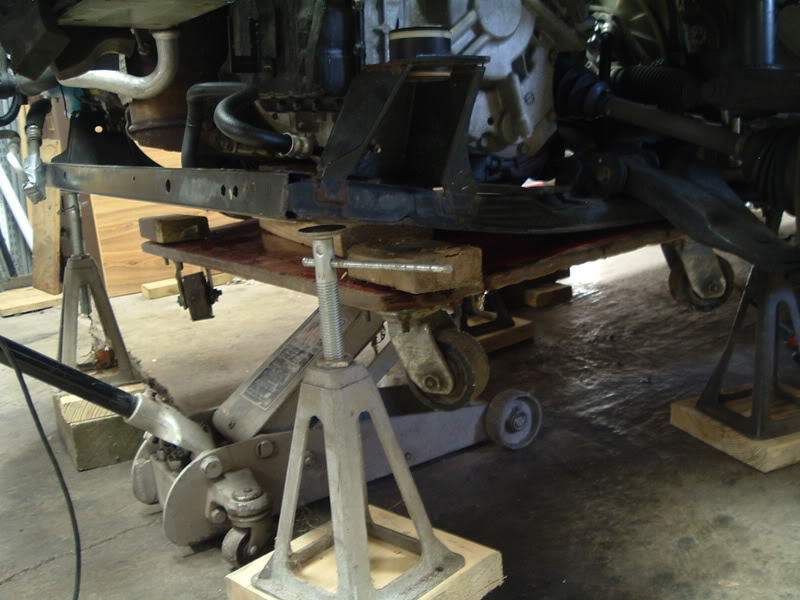
Next, I used a floor jack with a 12 x 8 x 3/4" plywood piece resting on the jack plate and lifted on the the motor/tranny until the sub-frame was no longer resting on the jack stands.

After that, lower the subframe onto HEAVY DUTY furniture dollys. DO NOT REMOVE JACK. Light pressure on motor.

Then, string up your cat and get ready to hear her squeal. This is a 2-ton come-a-long attached to a 4 x 12 beam.

After many lever actions

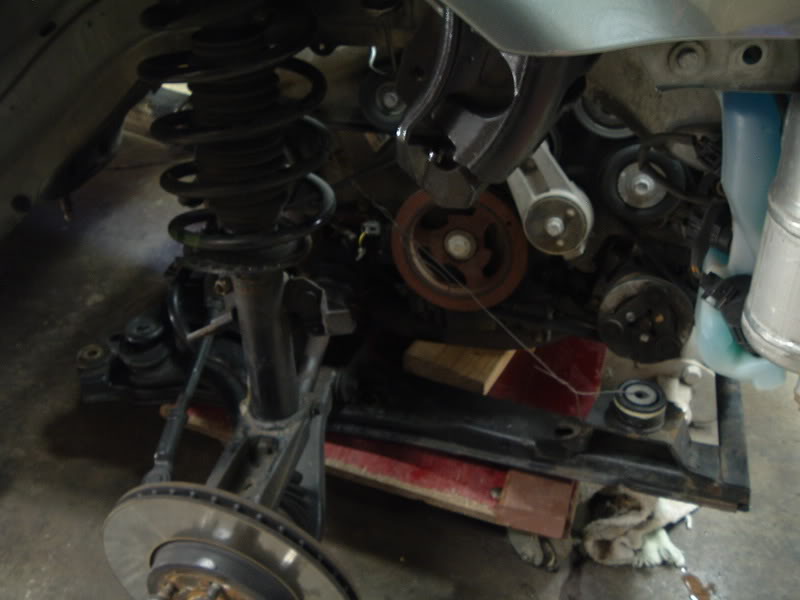
Watch for problems, Note: the strut has shifted to the rear of the wheel well. You will need to reposition it toward the front.

Repositioned strut tower toward the front of vehicle.

LIFT AWAY

VERY HEPFUL ITEM

Ready to move complete subframe & powertrain

raise jack just enough to allow you to pull the handle and minipulate this mass.
It wasn't eligant but it sure was fun!!

Now I can find out what that rattle/knock noise was all about.
FIRST support your sub-frame on jack stands. Then use a 21mm 6pt socket and break loose the 4 sub-frame bolts and run them out until they turn pretty freely. You will also remove the 4 bracket bolts, 2 on the left and 2 on the right, at the rear of the sub-frame.
side view
Next, I used a floor jack with a 12 x 8 x 3/4" plywood piece resting on the jack plate and lifted on the the motor/tranny until the sub-frame was no longer resting on the jack stands.
After that, lower the subframe onto HEAVY DUTY furniture dollys. DO NOT REMOVE JACK. Light pressure on motor.
Then, string up your cat and get ready to hear her squeal. This is a 2-ton come-a-long attached to a 4 x 12 beam.
After many lever actions
Watch for problems, Note: the strut has shifted to the rear of the wheel well. You will need to reposition it toward the front.
Repositioned strut tower toward the front of vehicle.
LIFT AWAY
VERY HEPFUL ITEM
Ready to move complete subframe & powertrain
raise jack just enough to allow you to pull the handle and minipulate this mass.
It wasn't eligant but it sure was fun!!
Now I can find out what that rattle/knock noise was all about.

Personally speaking 310 / jfenley.....I think both your posts with write up and c/w pics look awesome

I can't imagine even nearly doing sumthin like that!!
Lovin the way 310 labelled all the hoses, connectors etc for ease of assy later....nice one.
Dunn if there'll be any further posts or maybe a separate engine installation thread as a follow up or not, but thanks for takin the time n effort to share.
Trending Topics

Senior Member
Joined: Jun 2007
Posts: 421
Likes: 9
From:
Excellent documentation!!!
Stupid question, but why not remove it through the top? Would seem a lot easier w/o having to mess with the subframe.
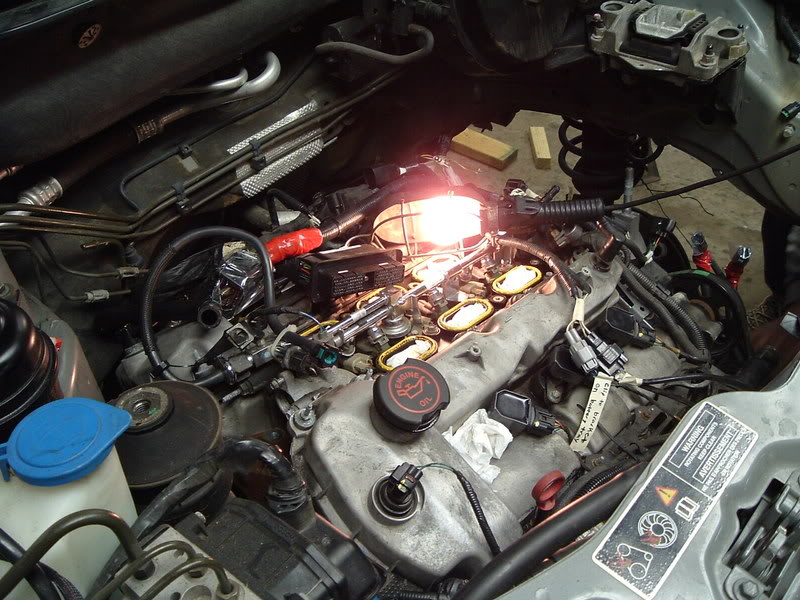
Secondly, first time I've seen these engines w/the UIM off. Damn, and here I thought it would be quite similar to the Duratec 2.5s/3s from the Taurus and Contour family...I was wrong...Seems like an electrical nightmare!
Stupid question, but why not remove it through the top? Would seem a lot easier w/o having to mess with the subframe.
Secondly, first time I've seen these engines w/the UIM off. Damn, and here I thought it would be quite similar to the Duratec 2.5s/3s from the Taurus and Contour family...I was wrong...Seems like an electrical nightmare!
Senior Member
Joined: Feb 2009
Posts: 119
Likes: 40
From: OKLAHOMA, USA
Excellent documentation!!!
Stupid question, but why not remove it through the top? Would seem a lot easier w/o having to mess with the subframe.
Secondly, first time I've seen these engines w/the UIM off. Damn, and here I thought it would be quite similar to the Duratec 2.5s/3s from the Taurus and Contour family...I was wrong...Seems like an electrical nightmare!
The engine compartment wiring harness is not like any harness I have worked with in the past. It is very rigid and the routing is straight forward. It is a simple re-install if you do not flex it alot. It sounds brittle, lots of poping and cracking sounds as you remove the harness. The Fuel Injector harness has connector to the main harness and I reccommend you disconnect it before removing the main harness. Once out the main harness has a "shape" to it and does not want to come out of that shape. I suspect that the harness is brittle from the heat and that is why you hear cracks. This is not a good thing! If the harness has cracks in the tape/tubing then you will get fluid, moisture and water in the harness. I plan to re-wrap my harness and possibly use something a little more durable to the heat under the hood. So what does the harness actually connect to? Watch for more posts on the engine tear-down and then re-install.


Senior Member
Joined: Feb 2009
Posts: 119
Likes: 40
From: OKLAHOMA, USA
OK now that she is out what do you do? Here are some lessons learned the hard way. 1st before disconnecting the battery or any other cable Brake the Wheel Heb bolts loose if you plan to remove them later so "bearings" can be replaced or you plan to service/renew the Tranny and TC seals. The reason for this is the "Half-shafts" which drive the front wheels. I will tell you up front you will need a very strong jawed pulley puller or the "jaguar special tool" the shafts are secured via a tapered spline joint and pulled tight by that wheel hub nut. When pressing the shaft out of the hub it will go slow the whole way until about the last 1/4".
If you are not going to service the Tranny/TC/Wheel Hub then all you will have to do is crack the tranny/engine. Lesson her was to remove Torque converter bolts before lowering sub-frame. Also to remove ALL lower exhaust pipes. This is the oil pan cross over and the dual pipe collector. Basically everything from the CATs back. Another thing was that there are a couple of tranny bolts under there you should go ahead and remove.
Remember you will be about 6" off the ground, not much access. If you end up hoisting into the air, as I had to do, you will find that the job 1 is a little un-nerving, 800+ lbs hovering over you on a chain and some hooks. 2 you loose all leverage as the motor wants to twist and turn.
LESSON LEARNED!!!! The reason a dealer gets $$$$ for this job is because 1 special tools are required to do the job properly and safely, like the special jack that holds the sub-frame, Tranny and Engine. 2 they have vehicle lifts that make the job easier. 3 and most important, they have EXPERIENCE, training and colleague support, which is what you are paying for. I have had this Tranny replace, in recall, and a brake job on this car from local dealer. During my dismantle I have found a couple bolts missing and a couple rounded flats. As for me I choose to do the work 1 because I don't mind the enormity of the task and 2 I am doing something I can and will be proud of, A JOB WELL DONE! 3 I have tools. But let's face it NO ONE can do a job, you want to do, better than you. I spent almost 2 months and about 180 to 200 hrs studying up on this task. I am no expert but I can do the work. Ok how about some more pics to finish us off.
See the "TRANNY" mounting bracket, the Strut tower is resting on it. There is plenty of clearence under it to thread a hoist chain. I used this location along eith the followinf front location to hoist the engine/tranny off the subframe. This was after I removed the wheel hubs and half-shafts whis is not pictured. If you plan to simply service the engine see following pics. You will simply use different chain location.

This is whats left on my sub-frame. Maybe I can figure a way to put zerk fittings on those Tie Rod ends and the Wheel Hub ball joints.

I found these #60 hooks at harbor freight. They are good for 395lbs. This was my front hook location.

This was the location in the rear of the motor. Note: starter has already been removed. Tranny is still attached.

Prepared to hoist engine. Note ALL Tranny bolts are out and the 4 Torgue Converter bolts are removed.

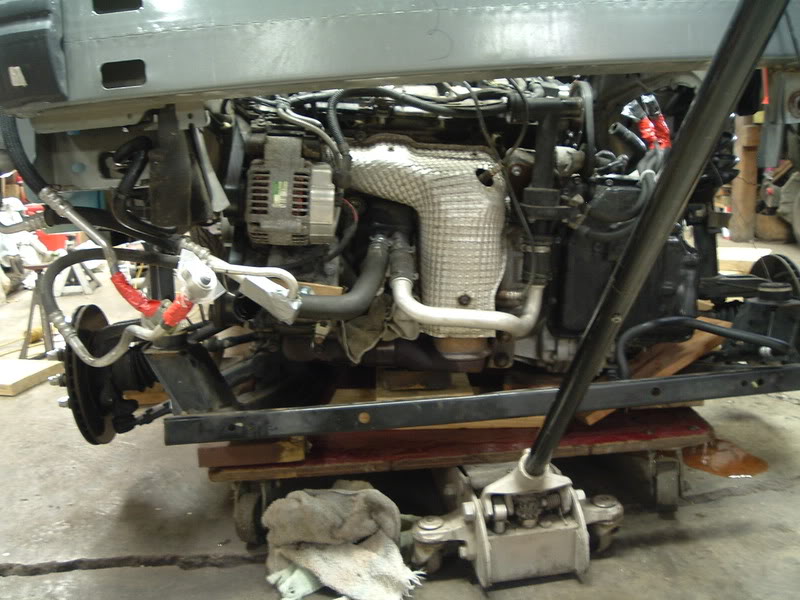
The business end of the Powertrain. Note the shaft sticking out of the Transfer Case. In both the Lft & Rt half-shafts I used my pully puller and a slide hammer to Pop the CV joint boot off and left the shaft intact. Both TC and TRANNY are still full of fluid.

Houston, acknowledged, seperation GO!
I am going to do a thread on the rebuild of this motor later. So what happened? I first heard a little chain rattle one cold morning. Cat sleeps outside. Rattle stopped shorlty after starting motor. I said to my self cold, sluggish oil. Drove to work 12 miles. Went to lunch, temps had warmed up and still had rattle at start up. Checked oil?? Maybe a quart low. Added a quart. Drive home, rattle at start and while in park, but not while in gear. On the drive home a faint Knock began and dissapeard. Checked oil. Fine, with car running and in park poured oil down spout rattle went away and no knock. Next morning, this is after approx 25 miles after hearing FIRST time rattle, The rattle was present again. I figured Chain Tensioner going out. I continued and drove to work, morning driving speed 45 to 65 stop and go traffic, about mid-way to work the knock was back but faint. That evening after work start car with rattle and now a faint knock, on the way home in drive I could hear chain rattle and rod knock but not bad. About mid-way home the ROD KNOCK was getting louder and I knew it was not good. I babied it home the last 6 miles and parked it until I could do the repairs. Here's what I found.


SILVER OIL!!!!!!

About a 1/2" piece.


Bearing shot.....Lobe still good

Bearing chewed up from "silve oil"

Rear of the motor. CAUSE of the "Rattle" then "Knock". Rattle cause as oil pressure dropped due to bearing tolerance failure. This would allow the chain tensioner to "relax" somewhat and could produce a rattle sound. This is only about 25 miles driven after first hearing the "rattle" sound.

TOTAL BEARING FAILURE. This is what a Spun Bearing looks like. The two pieces have become one and a gap was produced. As the Rod moves and the oil is pressurized the bearing will spin like a pin wheel.

This is a shot of the Crank "Lobe", without the bearing. Has been gaulled but not scratched or scared. I think it can be polished good a new.
If you are not going to service the Tranny/TC/Wheel Hub then all you will have to do is crack the tranny/engine. Lesson her was to remove Torque converter bolts before lowering sub-frame. Also to remove ALL lower exhaust pipes. This is the oil pan cross over and the dual pipe collector. Basically everything from the CATs back. Another thing was that there are a couple of tranny bolts under there you should go ahead and remove.
Remember you will be about 6" off the ground, not much access. If you end up hoisting into the air, as I had to do, you will find that the job 1 is a little un-nerving, 800+ lbs hovering over you on a chain and some hooks. 2 you loose all leverage as the motor wants to twist and turn.
LESSON LEARNED!!!! The reason a dealer gets $$$$ for this job is because 1 special tools are required to do the job properly and safely, like the special jack that holds the sub-frame, Tranny and Engine. 2 they have vehicle lifts that make the job easier. 3 and most important, they have EXPERIENCE, training and colleague support, which is what you are paying for. I have had this Tranny replace, in recall, and a brake job on this car from local dealer. During my dismantle I have found a couple bolts missing and a couple rounded flats. As for me I choose to do the work 1 because I don't mind the enormity of the task and 2 I am doing something I can and will be proud of, A JOB WELL DONE! 3 I have tools. But let's face it NO ONE can do a job, you want to do, better than you. I spent almost 2 months and about 180 to 200 hrs studying up on this task. I am no expert but I can do the work. Ok how about some more pics to finish us off.
See the "TRANNY" mounting bracket, the Strut tower is resting on it. There is plenty of clearence under it to thread a hoist chain. I used this location along eith the followinf front location to hoist the engine/tranny off the subframe. This was after I removed the wheel hubs and half-shafts whis is not pictured. If you plan to simply service the engine see following pics. You will simply use different chain location.
This is whats left on my sub-frame. Maybe I can figure a way to put zerk fittings on those Tie Rod ends and the Wheel Hub ball joints.
I found these #60 hooks at harbor freight. They are good for 395lbs. This was my front hook location.
This was the location in the rear of the motor. Note: starter has already been removed. Tranny is still attached.
Prepared to hoist engine. Note ALL Tranny bolts are out and the 4 Torgue Converter bolts are removed.
The business end of the Powertrain. Note the shaft sticking out of the Transfer Case. In both the Lft & Rt half-shafts I used my pully puller and a slide hammer to Pop the CV joint boot off and left the shaft intact. Both TC and TRANNY are still full of fluid.
Houston, acknowledged, seperation GO!
I am going to do a thread on the rebuild of this motor later. So what happened? I first heard a little chain rattle one cold morning. Cat sleeps outside. Rattle stopped shorlty after starting motor. I said to my self cold, sluggish oil. Drove to work 12 miles. Went to lunch, temps had warmed up and still had rattle at start up. Checked oil?? Maybe a quart low. Added a quart. Drive home, rattle at start and while in park, but not while in gear. On the drive home a faint Knock began and dissapeard. Checked oil. Fine, with car running and in park poured oil down spout rattle went away and no knock. Next morning, this is after approx 25 miles after hearing FIRST time rattle, The rattle was present again. I figured Chain Tensioner going out. I continued and drove to work, morning driving speed 45 to 65 stop and go traffic, about mid-way to work the knock was back but faint. That evening after work start car with rattle and now a faint knock, on the way home in drive I could hear chain rattle and rod knock but not bad. About mid-way home the ROD KNOCK was getting louder and I knew it was not good. I babied it home the last 6 miles and parked it until I could do the repairs. Here's what I found.
SILVER OIL!!!!!!
About a 1/2" piece.
Bearing shot.....Lobe still good
Bearing chewed up from "silve oil"
Rear of the motor. CAUSE of the "Rattle" then "Knock". Rattle cause as oil pressure dropped due to bearing tolerance failure. This would allow the chain tensioner to "relax" somewhat and could produce a rattle sound. This is only about 25 miles driven after first hearing the "rattle" sound.
TOTAL BEARING FAILURE. This is what a Spun Bearing looks like. The two pieces have become one and a gap was produced. As the Rod moves and the oil is pressurized the bearing will spin like a pin wheel.
This is a shot of the Crank "Lobe", without the bearing. Has been gaulled but not scratched or scared. I think it can be polished good a new.

Joined: Jun 2007
Posts: 2,076
Likes: 40
From: Pompino Beach , FL
this is why people shouldnt skip oil changes.. i just rebuilt a supercharged engine .. just a question how much are the new rod bearings? on my engine they were about $55 a half moon so thats more then $880 .. luckily i got them for free .
jeez, i thought internal parts on the 580 in the race car were expensive.....my custom pistons 8 of em didnt cost that, and that was a 18k engine to build from scratch
Thread Starter
|
Senior Member
Joined: May 2007
Posts: 351
Likes: 72
From: Louisville, KY
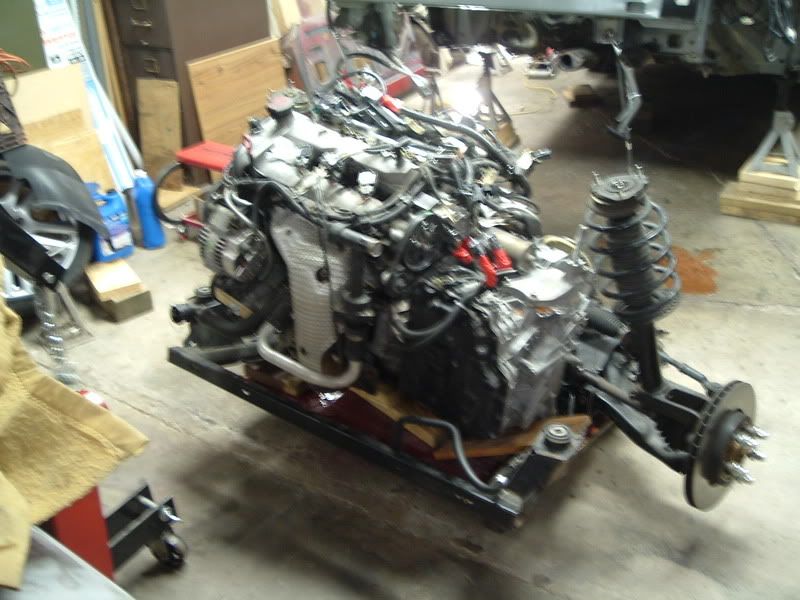
Well, I got my engine and stuff out this afternoon. It went pretty smooth, but is NOT something I ever want to do again.
Me and jfenley used pretty much the same method, but instead of lifting the car from the front bumper, I used a chain hoist connected to the shock towers. I lowered the subframe just enough to get the shocks down about 2 inches, and snuck in a 3x3" steel plate with a nut on the backside, and threaded an eye-bolt down into it, and connected the two sides with a short run of chain.
Also, in place of his two dollies, I used one large one that I put the floor jack under, and raised it up to meet the package.
Enjoy
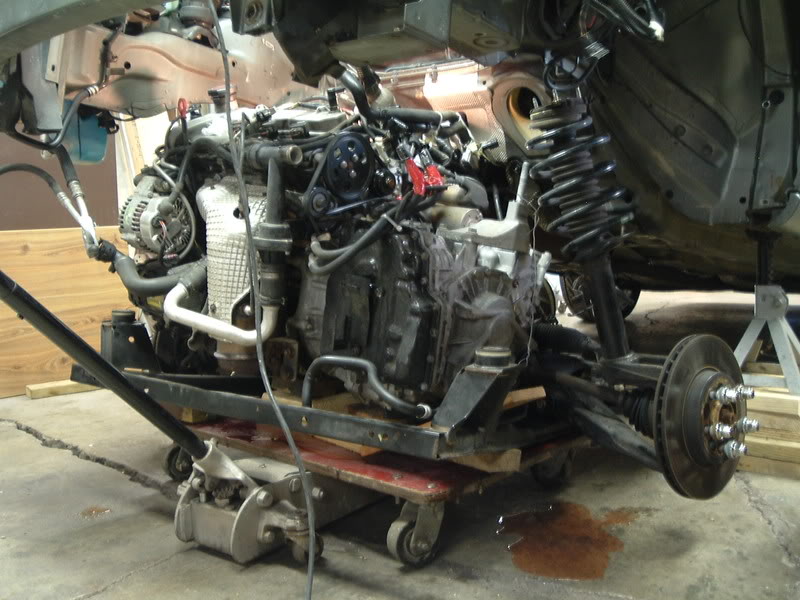
That's all the pics I have so far. I've got the car back down to it's normal ride height.. I had another strong dolly that I bolted a ~44", 4x4 beam to and slid it under car just behind the firewall, and lowered the car onto it. It's resting comfortably on the two "frame rails." Now I'm able to move the car around, and angle it to the side to allow for more room for further disassembly.
However.. I've got one big, BIG problem. The two rear subframe mount bolts did not come out as planned. The force of the impact broke them loose and backed them out about 1/4", and then they seized. The impact continued to do it's job, but broke the welds (I assume) that hold the captive nuts up inside pockets inside the body. There are two small (5/8"?) holes these nuts can be seen through, but there's no way to get to them without cutting into the body... at least no way that I'm aware of.
I ended up having to drill out one of the bolts, and cut the head off the other with with a cut off wheel. What gets me is that the nuts and the ends of the bolts that are still in them are pristine. No rust, no crud, nothing. I honestly have no idea how I'm going to get to these to resecure them for the reinstallation.
Here's the best shot I have of these areas.
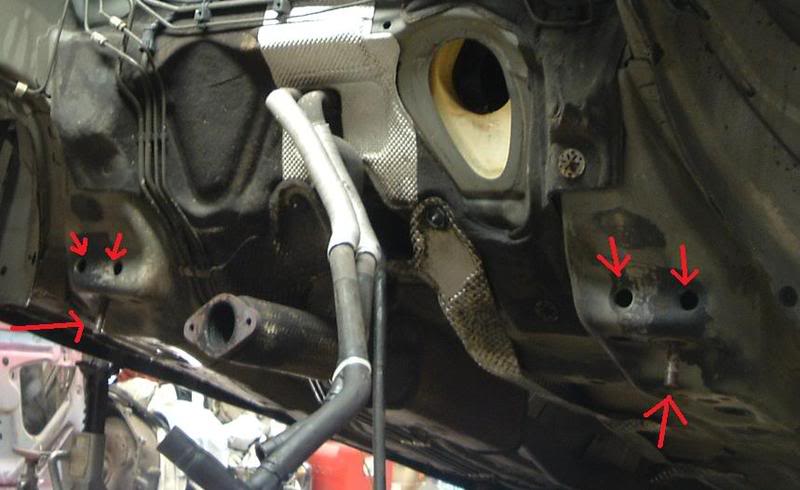
Anyway, there's where I am. Later tonight I'll start stripping the powertrain down and get the engine on a stand. I'm anxious to get the oil pan off. I have a feeling I'm going to find the same sight you did, j.
Me and jfenley used pretty much the same method, but instead of lifting the car from the front bumper, I used a chain hoist connected to the shock towers. I lowered the subframe just enough to get the shocks down about 2 inches, and snuck in a 3x3" steel plate with a nut on the backside, and threaded an eye-bolt down into it, and connected the two sides with a short run of chain.
Also, in place of his two dollies, I used one large one that I put the floor jack under, and raised it up to meet the package.
Enjoy
That's all the pics I have so far. I've got the car back down to it's normal ride height.. I had another strong dolly that I bolted a ~44", 4x4 beam to and slid it under car just behind the firewall, and lowered the car onto it. It's resting comfortably on the two "frame rails." Now I'm able to move the car around, and angle it to the side to allow for more room for further disassembly.
However.. I've got one big, BIG problem. The two rear subframe mount bolts did not come out as planned. The force of the impact broke them loose and backed them out about 1/4", and then they seized. The impact continued to do it's job, but broke the welds (I assume) that hold the captive nuts up inside pockets inside the body. There are two small (5/8"?) holes these nuts can be seen through, but there's no way to get to them without cutting into the body... at least no way that I'm aware of.
I ended up having to drill out one of the bolts, and cut the head off the other with with a cut off wheel. What gets me is that the nuts and the ends of the bolts that are still in them are pristine. No rust, no crud, nothing. I honestly have no idea how I'm going to get to these to resecure them for the reinstallation.
Here's the best shot I have of these areas.
Anyway, there's where I am. Later tonight I'll start stripping the powertrain down and get the engine on a stand. I'm anxious to get the oil pan off. I have a feeling I'm going to find the same sight you did, j.
supposidle you can access these from the top though the floor board. Ice always jammed a pointed pry bar in the hold the captured nut when i tighten with an impact and its works everytime so far.....And we dont deal with salty roads much but do have northern market cars that come in. Plus Gulf coast cars that live along the coast and suffer the same problems...maybe Real tech can help more
Thread Starter
|
Senior Member
Joined: May 2007
Posts: 351
Likes: 72
From: Louisville, KY
Thanks for the advice. I did pull the trim/carpet in the passenger side floorboard to see if I could get to one, but there's nothing. The floor pan is a few inches higher than where the nuts are, so they've got to be in a small chamber of sorts. I guess you could cut through the floor board, but I'd rather do any cutting/welding on the outside of the car
I'll try to jam them through the holes, but I hate to get this whole package jacked up into the engine bay, only to have to drop it all again because I couldn't get the nut wedged tight enough to tighten the bolt.
I have a feeling I'm going to be doing some cutting and welding.
I'll try to jam them through the holes, but I hate to get this whole package jacked up into the engine bay, only to have to drop it all again because I couldn't get the nut wedged tight enough to tighten the bolt.
I have a feeling I'm going to be doing some cutting and welding.
Thread Starter
|
Senior Member
Joined: May 2007
Posts: 351
Likes: 72
From: Louisville, KY
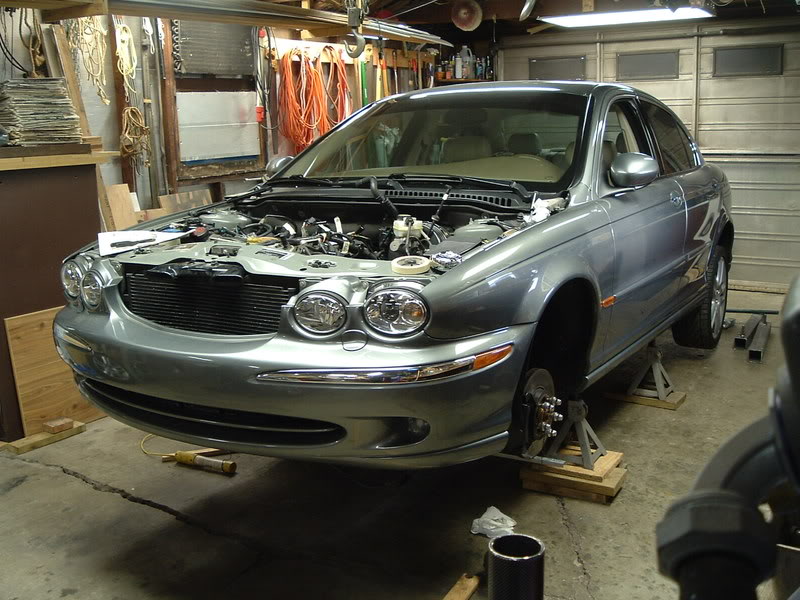
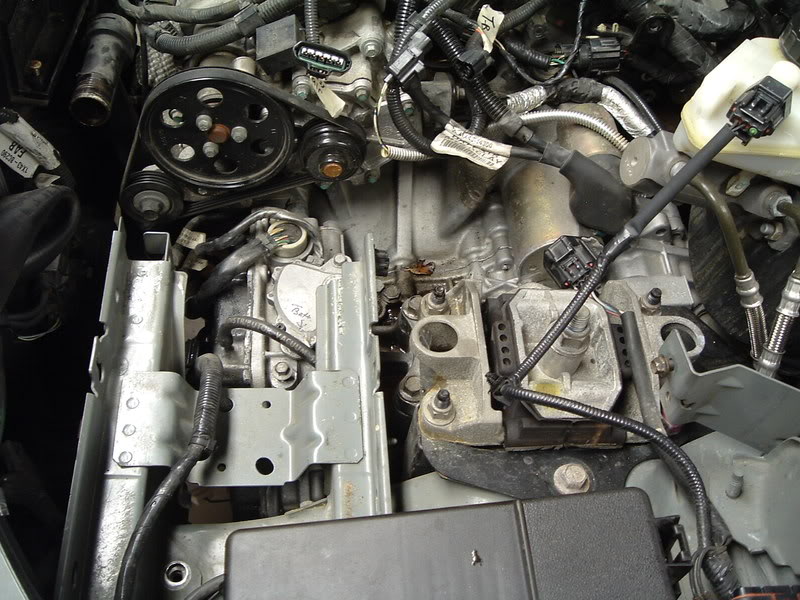
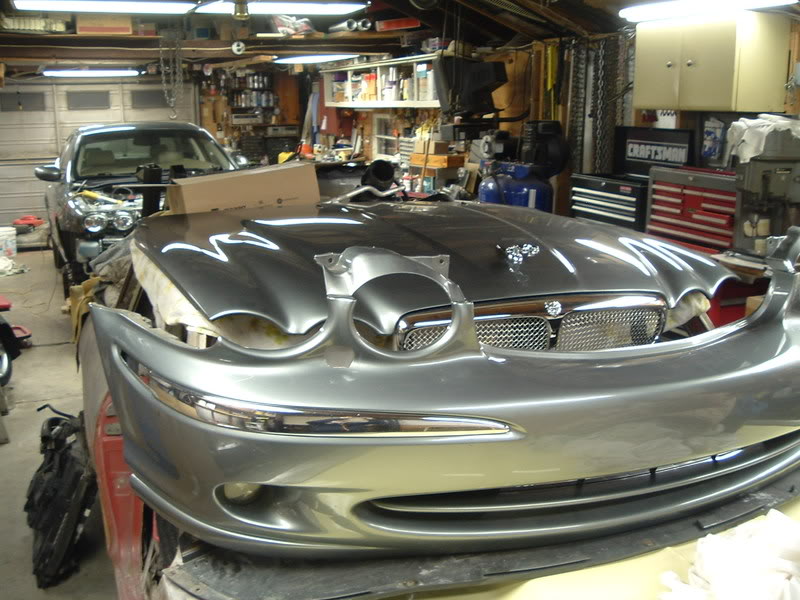
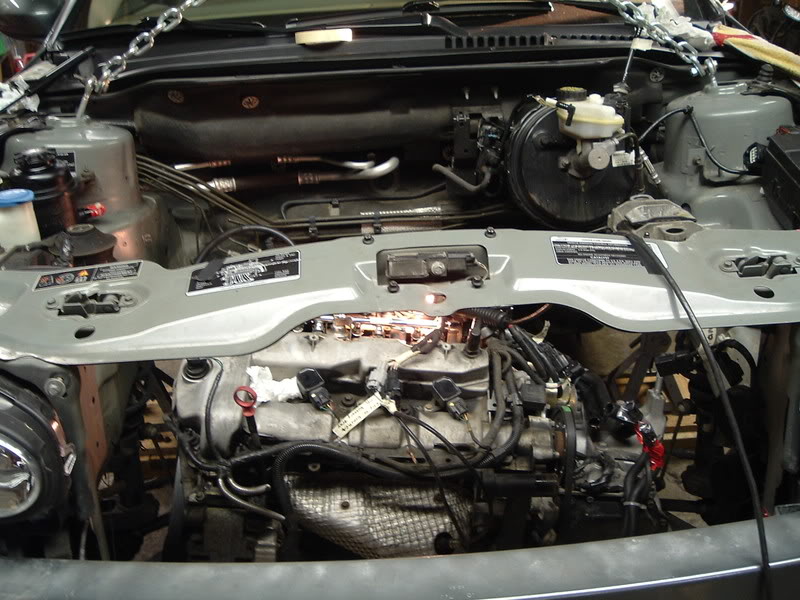
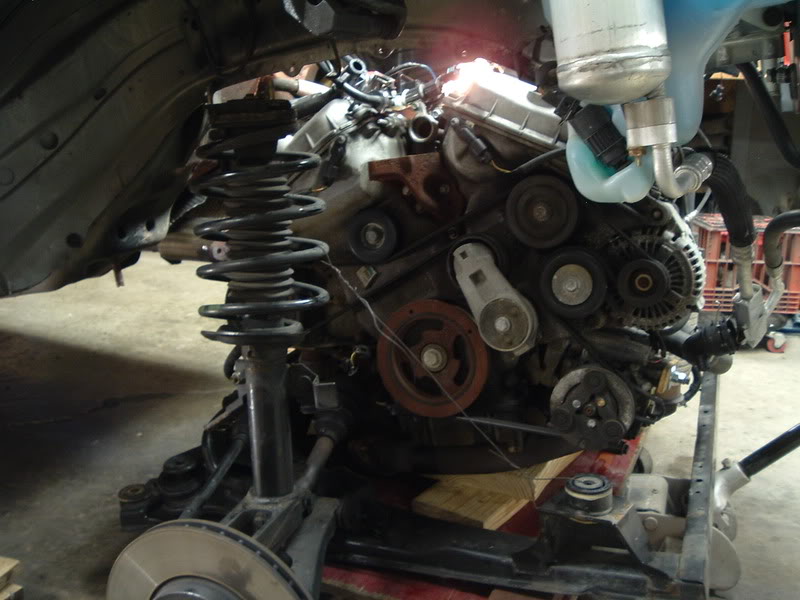
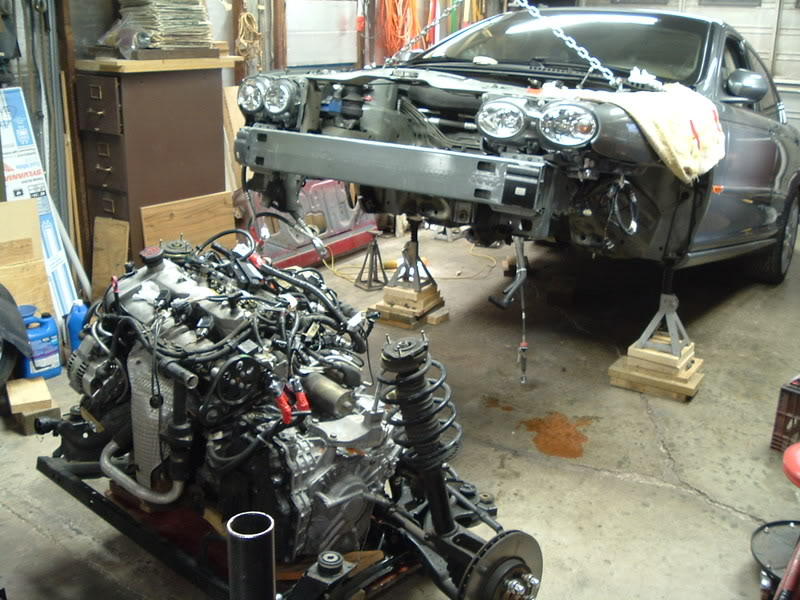
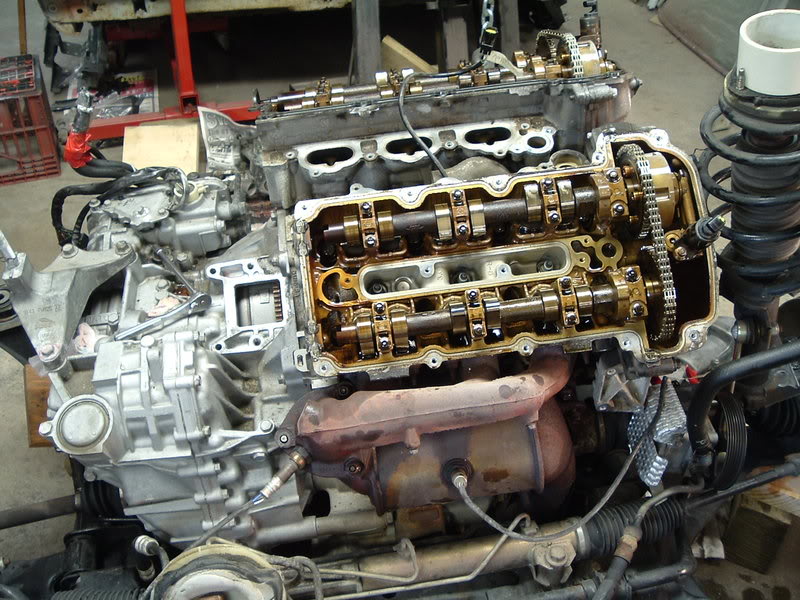
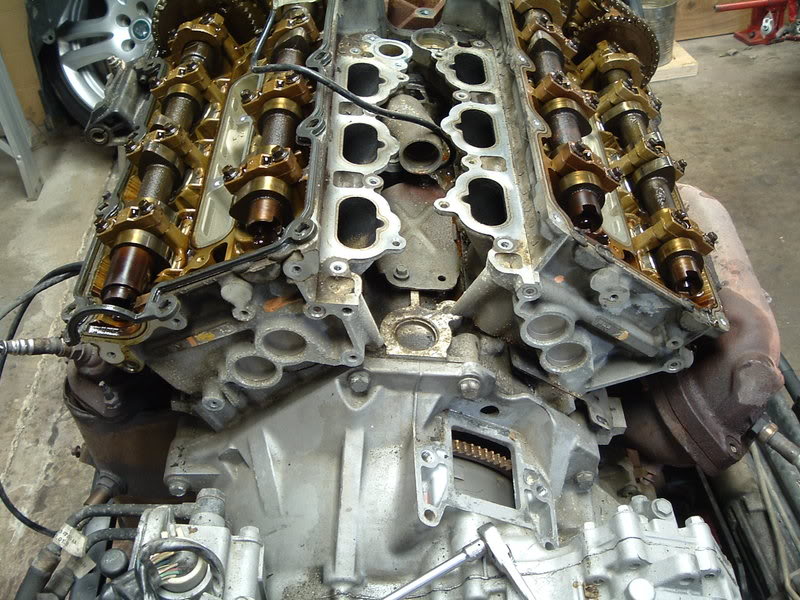
Didn't get as much done today as I wanted to, but still made good progress. All of the wiring and plumbing is removed, as are the pullies on the front of the motor althought not shown in the pics.
I did find that my rear bank timing chain is just as tight as the front. There is very little to no slack in them, so I guess my problem is in the bearings. I'm still approaching now I want to remove the engine from the subframe... whether or not I want to disassemble the hubs to get them out of the way and leave the halfshafts floating, or try to break the engine/trans apart and leave as much of the subframe assembly in tact as I can. The exhaust is going to be a bear to remove. It will be the main focus of tomorrows work.
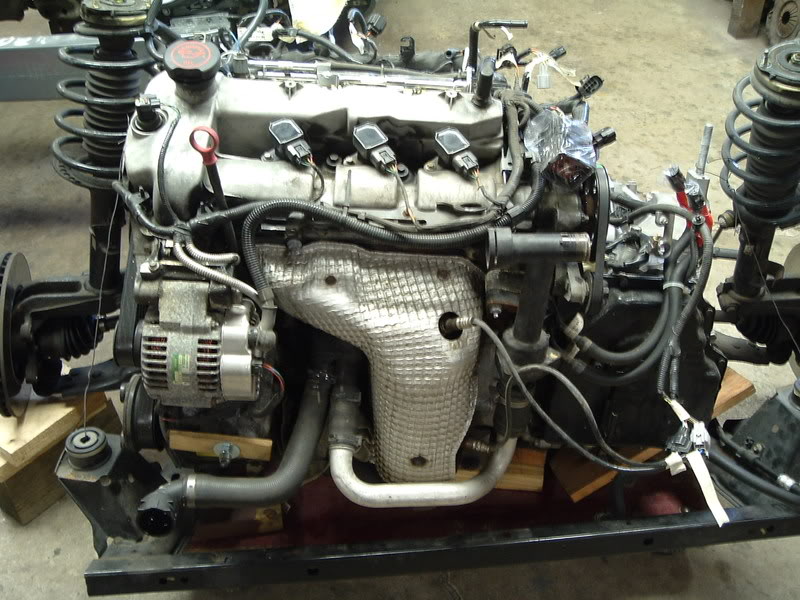
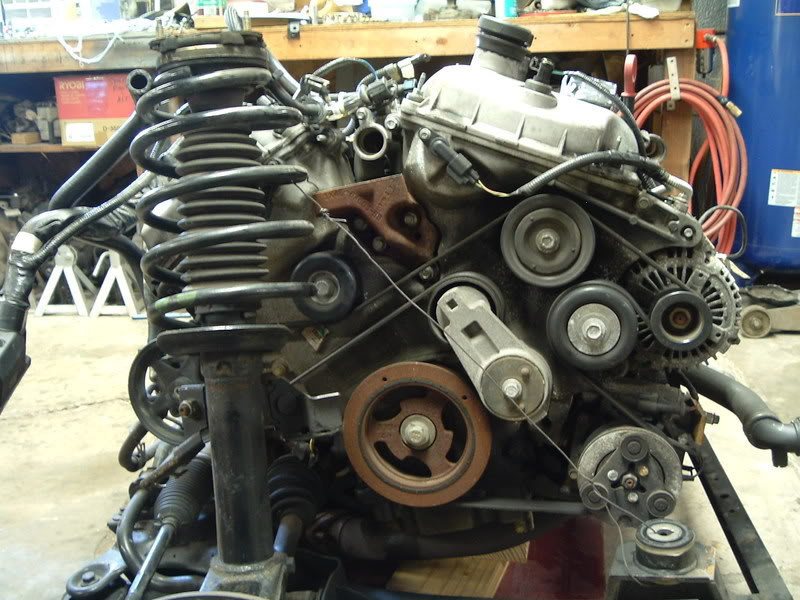
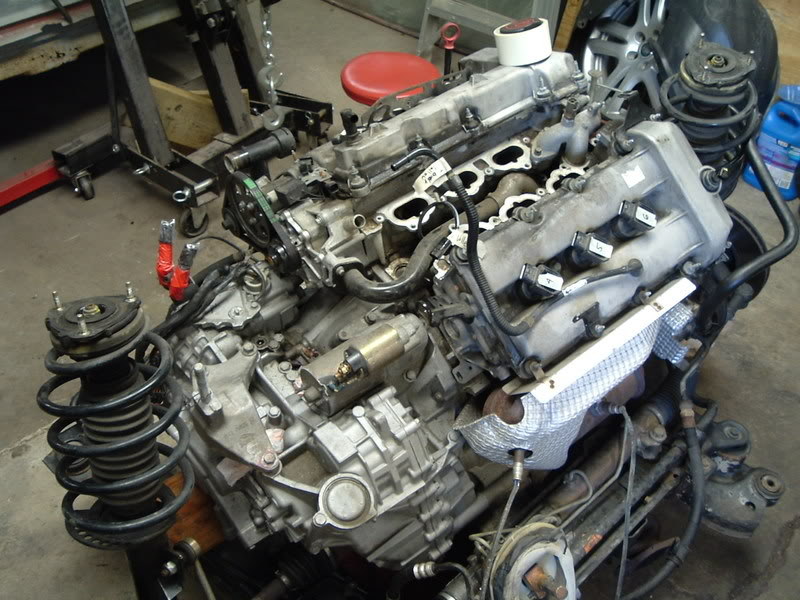
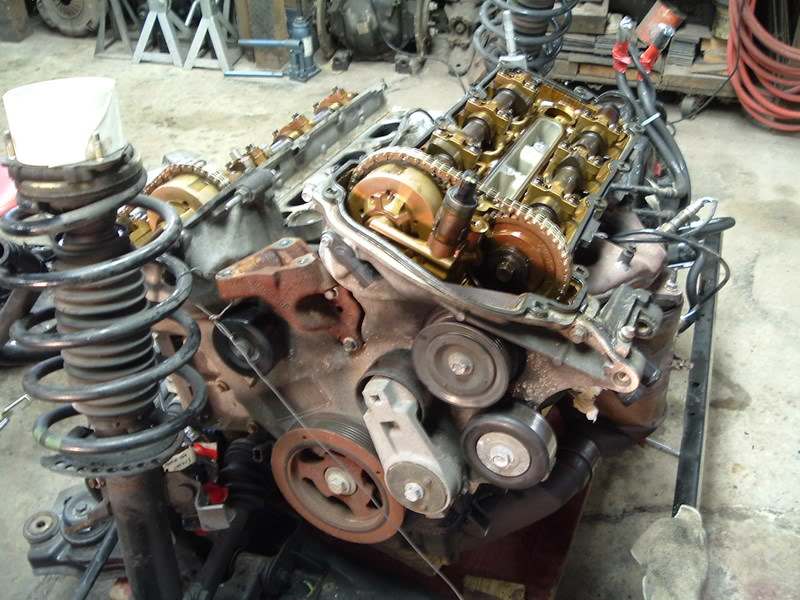
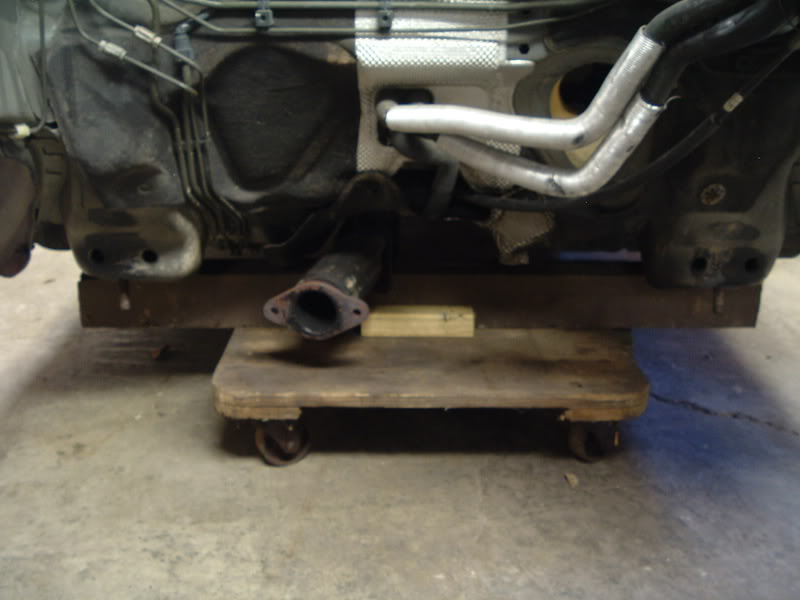
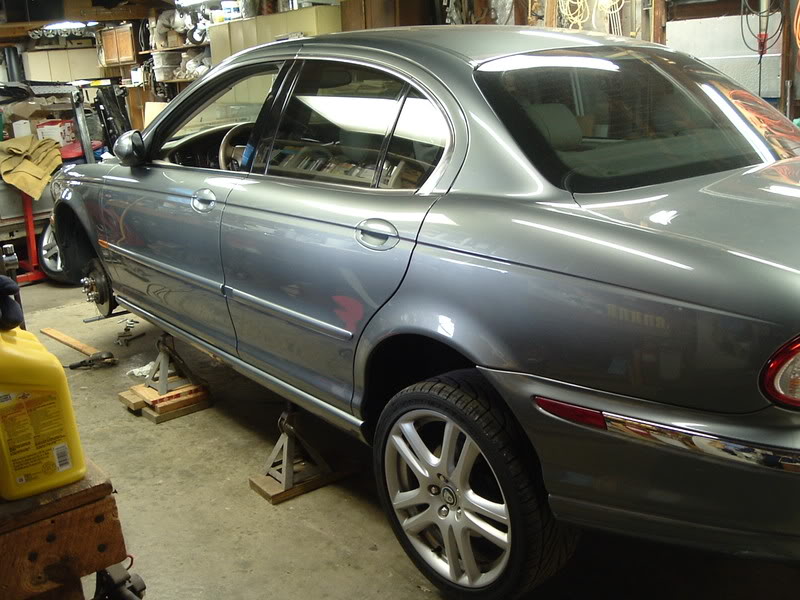
That last pic is a shot of the cart I made to rest the front end on. It's done the job well, and has allowed me to push the car back and to the side to allow for much more work room.
I did find that my rear bank timing chain is just as tight as the front. There is very little to no slack in them, so I guess my problem is in the bearings. I'm still approaching now I want to remove the engine from the subframe... whether or not I want to disassemble the hubs to get them out of the way and leave the halfshafts floating, or try to break the engine/trans apart and leave as much of the subframe assembly in tact as I can. The exhaust is going to be a bear to remove. It will be the main focus of tomorrows work.
That last pic is a shot of the cart I made to rest the front end on. It's done the job well, and has allowed me to push the car back and to the side to allow for much more work room.