X-Type ( X400 ) 2001 - 2009
Sponsored by:
Sponsored by:

Step by step door panel removal!

Thread Tools
 
Search this Thread
 
  #21  
Old 02-06-2007, 08:30 PM
Join Date: Sep 2006
Location:
Posts: 572
Likes: 0
Received 0 Likes on 0 Posts
Default RE: Step by step door panel removal!

Has anybody tried to take the rear door panels off?? I tried once and it didnt feel as smooth as the fronts so I stopped before I broke any clips!! Any Advice??
 
  #22  
Old 05-14-2007, 01:56 PM
IronCobra's Avatar
Thread Starter
Join Date: Nov 2006
Location:
Posts: 144
Likes: 0
Received 4 Likes on 2 Posts
Default RE: Step by step door panel removal!

bump
 
  #23  
Old 05-14-2007, 03:01 PM
bigdreams05's Avatar
Veteran Member
Join Date: Feb 2007
Posts: 3,780
Likes: 0
Received 45 Likes on 15 Posts
Default RE: Step by step door panel removal!

What are you bumping IC? If you're asking about the rear panel, it comes off exactly the same as the fronts!
 
  #24  
Old 05-14-2007, 10:48 PM
IronCobra's Avatar
Thread Starter
Join Date: Nov 2006
Location:
Posts: 144
Likes: 0
Received 4 Likes on 2 Posts
Default RE: Step by step door panel removal!

Oh, I bumped it for the guy who had the door panel issue. Easier for him to find.
 
  #25  
Old 05-15-2007, 09:45 AM
aquill1's Avatar
Veteran Member
Join Date: Sep 2006
Posts: 5,671
Likes: 0
Received 4 Likes on 4 Posts
Default RE: Step by step door panel removal!

Hey ironcobra you do it yet? I was curious also if you've ever heard of mdsound or previously mdx sound or konaki seeing as you said you had some years of experience in car audio...I enjoy doing car audio stuff but never done anything for a living...
 
  #26  
Old 05-15-2007, 11:04 AM
bigdreams05's Avatar
Veteran Member
Join Date: Feb 2007
Posts: 3,780
Likes: 0
Received 45 Likes on 15 Posts
Default RE: Step by step door panel removal!

I had a couple of MTX subs before on my Nissan and they sounded beautiful and never blew on me despite the heavy pounding I gave them with my 1600 watt amp!
 
  #27  
Old 05-15-2007, 01:07 PM
aquill1's Avatar
Veteran Member
Join Date: Sep 2006
Posts: 5,671
Likes: 0
Received 4 Likes on 4 Posts
Default RE: Step by step door panel removal!

Oh I was asking him because those are the car audio brands I can get!
 
  #28  
Old 04-28-2009, 07:04 PM
Jessy's Avatar
Senior Member
Join Date: Jul 2008
Location: canada
Posts: 134
Likes: 0
Received 0 Likes on 0 Posts
Default

Where did u get new clips? where they the ones stuck onto the door not the pannel?
 
  #30  
Old 02-10-2010, 03:54 AM
Cadillac's Avatar
Veteran Member
Join Date: Mar 2007
Location: Planetarium
Posts: 11,380
Received 637 Likes on 439 Posts
Default

You should find them at those :
Nalley Jaguar, www.motorcarsltd.com
www.jagbits.com
 
  #31  
Old 02-10-2010, 01:50 PM
BuckMR2's Avatar
Veteran Member
Join Date: Oct 2006
Location: UK
Posts: 1,921
Received 63 Likes on 39 Posts
Default

Another place you can mount the tweeters as you're a good installer is in the triangular section on the inside of the door mirror.
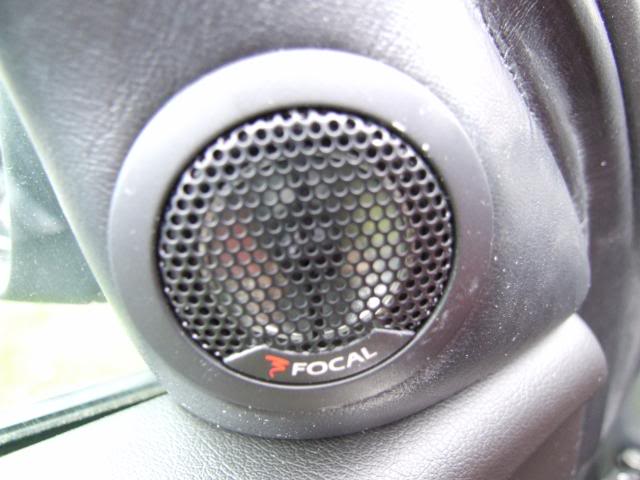
Name:  DSCF0954.jpg
Views: 3956
Size:  41.9 KB
More here
https://www.jaguarforums.com/forum/s...ead.php?t=4556
 
The following users liked this post:
Stuart Beattie (04-21-2014)
  #32  
Old 10-24-2012, 06:04 PM
Boss_Fury's Avatar
Member
Join Date: Mar 2012
Location: New York
Posts: 76
Received 3 Likes on 3 Posts
Default

Do the same steps apply for the rear doors?
My rear pas. side door sometimes locks up and wont even open.

Thanks
~Boss.
 
  #33  
Old 01-15-2015, 10:36 AM
Djey11's Avatar
Junior Member
Join Date: Jan 2015
Location: brussels
Posts: 1
Likes: 0
Received 0 Likes on 0 Posts
Default

i m logged in but can't see the photos, i just have to retire the door panel because the door isn't posible to open by exterior, why can't i see the photos?
 
  #34  
Old 01-15-2015, 01:11 PM
clyons's Avatar
Veteran Member
Join Date: May 2011
Location: Waterford, MI
Posts: 1,230
Received 155 Likes on 128 Posts
Default

It appears that the photos haven been removed from their original location or the account that saved them has been deleted or deactivated in some way.

This youtube video may help
 
  #35  
Old 01-17-2015, 05:24 AM
hicat's Avatar
Member
Join Date: Feb 2013
Location: Maui
Posts: 47
Received 0 Likes on 0 Posts
Default

I can't get the images to display. This is what i see -->
 
  #36  
Old 01-19-2016, 03:43 AM
wigneys's Avatar
Junior Member
Join Date: Jan 2016
Location: Frenchs Forest (Sydney)
Posts: 1
Likes: 0
Received 0 Likes on 0 Posts
Default

Hi,
Wondering if you can help me with:

"Step 2... Using a small and short flat head screw driver, remove the screw cover behind the arm rest and remove the screw."

I'm actually doing the reverse, as this screw is missing and I need to replace it to fix the door trim in place....I have obtained part C2S6858 but despite "looking" like the right part, it doesn't seem to seat properly (seems to big for the hole in the trim). I manually trimmed it down, but still no go. Is this the right part? Am I just being dim or clumsy? I am not the most mechanically gifted individual....

2007 X-type 400 - rear door (passenger)...

thanks!
Steve.
 
  #37  
Old 06-14-2018, 04:01 PM
new mexico's Avatar
Senior Member
Join Date: Aug 2015
Location: new mexico
Posts: 183
Received 11 Likes on 10 Posts
Default Speakers

Originally Posted by IronCobra
Here are the steps! Beware, it is possible to damage a few of the door clips. They are $9.95ea for themale pieces (the part that attaches to the door panel)and $2.95ea for the female pieces (the part that attaches to the door). Most Jaguar dealers have several of them in stock. I snapped 2 of them while removing the panel. There are about 7 clips total. If you snap 1 or 2 than you can simply move some around and they will work just fine. I ordered new ones though.

Step 1... Remove the two screws from the bottom of the door panel.


Step 2... Using a small and short flat head screw driver, remove the screw cover behind the arm rest and remove the screw.


Step 3... Use a medium size flat head screw driver and pry door panel away from the door carefully. (I wrapped the tip of the screw driver with a cloth to avoid scratching the metal).


Step 4...Usingyour hands, work your way around the doorpanel pullingit away from the door.


Step 5... Pull the panel away from the door about 3" and disconnect the door locking cable by lining it up with the hinge it is on and pulling up (you'll see when you look at it. very easy).


Step 6... Done! (total time about 5 minutes tops)
Where can I shop for front speaker replacements, mine sound terrible ?

Walter
 
  #38  
Old 06-14-2018, 04:11 PM
Dell Gailey's Avatar
Veteran Member
Join Date: Mar 2017
Location: Utah
Posts: 4,492
Received 708 Likes on 633 Posts
Default

A lot of members have posted good luck with this firm in replacing, upgrading, changing entire systems =

https://www.crutchfield.com/S-l0W3AT...-Speakers.html
 
  #39  
Old 06-15-2018, 02:35 PM
new mexico's Avatar
Senior Member
Join Date: Aug 2015
Location: new mexico
Posts: 183
Received 11 Likes on 10 Posts
Default speakers

Thanks for the Info.

Walter
 
  #40  
Old 12-31-2018, 07:44 PM
Join Date: Aug 2016
Location: Los Angeles
Posts: 43
Received 0 Likes on 0 Posts
Default

I don't want to remove my door panel. I just want to tighten the driver's side front door where the panel is loose - at the top left corner.
Any ideas would be appreciated.


Quick Reply: Step by step door panel removal!


All times are GMT -5. The time now is 05:30 PM.