
2010 XF Drive Selector will not come up (intermittent)

Thread Starter
|
Junior Member
Joined: Mar 2013
Posts: 4
Likes: 0
From: Milton NC
I hope someone can help on this issue. My drive selector will not come up at times and I have to shift while it is down. The dealer wants to charge 1400.00 for a new one. I found one on Ebay (used) that came off a 2011 XF. It arrived in very good condition and I hope it will work. My question is this. My Jag is a 4.2L and this drive selector obviously came off a 5.0 because it has "Dynamic Mode" characterized by a checkered flag. Will it still work on a 4.2L?

Yes, the 5.0 selector will work on a 4.2. I had the same issue on my 2009 XF which was a 4.2. I am not sure what else needs to be done for the installation, any kind of programming.
Dynamic mode will not work however. If you select it, the system will tell you "special modes not available".
Dynamic mode will not work however. If you select it, the system will tell you "special modes not available".
Senior Member
Joined: Mar 2016
Posts: 859
Likes: 322
From: Auckland NZ/ Houston, TX
These have to be programmed to the vehicle - have never used one from 4.2L to 5.0L though.
The buttons will be different, and connectors and pin locations for certain features may be different between 4.2L and 5.0L variants.
I'd proceed with caution....
As for removal - see below
Published: 11-May-2011
2010.0 XF (X250), 307-05
Automatic Transmission/Transaxle External Controls - V6 N/A 3.0L Petrol/V8 N/A 4.2L Petrol/V8 S/C 4.2L Petrol
Transmission Control Switch (G979431)
REMOVAL AND INSTALLATION
close
Loading...
Removal
NOTE:
Removal steps in this procedure may contain installation details.
The buttons will be different, and connectors and pin locations for certain features may be different between 4.2L and 5.0L variants.
I'd proceed with caution....
As for removal - see below
Published: 11-May-2011
2010.0 XF (X250), 307-05
Automatic Transmission/Transaxle External Controls - V6 N/A 3.0L Petrol/V8 N/A 4.2L Petrol/V8 S/C 4.2L Petrol
Transmission Control Switch (G979431)
REMOVAL AND INSTALLATION
- 44.15.06
- Hand Selector Lever Knob - Renew
- All Derivatives
- 0.1
- USED WITHINS
close
Loading...
Removal
NOTE:
Removal steps in this procedure may contain installation details.
- Refer to: Battery Disconnect and Connect (414-01 Battery, Mounting and Cables, General Procedures).
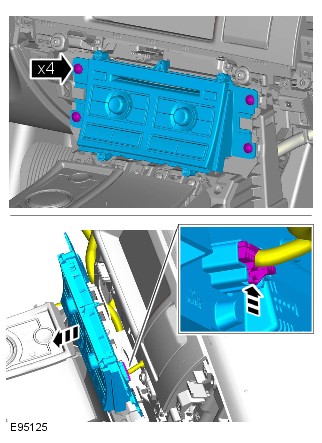
- Refer to: Audio and Climate Control Assembly (415-01A Information and Entertainment System, Removal and Installation). Published: 11-May-2011
2010.0 XF (X250), 415-01
Information and Entertainment System
Audio and Climate Control Assembly (G1005947)
REMOVAL AND INSTALLATION
- 82.20.12
- Combined Temperature And Air Flow Control Switch Assembly - Front - Renew
- All Derivatives
- 0.4
- USED WITHINS
close
Loading...
Removal
NOTE:
Removal steps in this procedure may contain installation details.
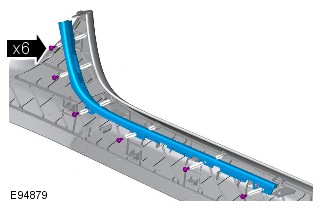
- Remove both floor console side trim panels.Refer to: Floor Console Side Trim Panel (501-12 Instrument Panel and Console, Removal and Installation). Published: 11-May-2011
2010.0 XF (X250), 501-12
Instrument Panel and Console
Floor Console Side Trim Panel (G1001140)
REMOVAL AND INSTALLATION
- 76.25.02
- Console Side Casing - Renew
- All Derivatives
- 0.5
- USED WITHINS
close
Loading...
Removal
NOTE:
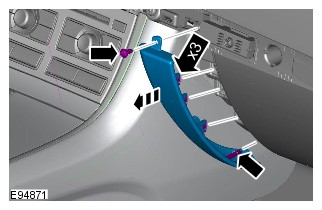
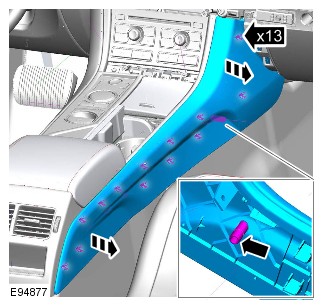
LHD right-hand floor console side trim panel shown, LHD left-hand and both RHD floor console side trim panels are similar.
- Recline the front seats and move to the rear most position.
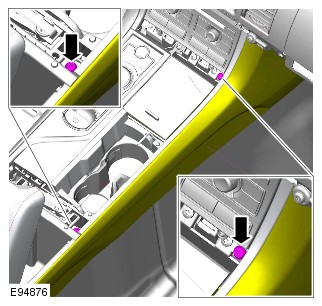
- NOTE:
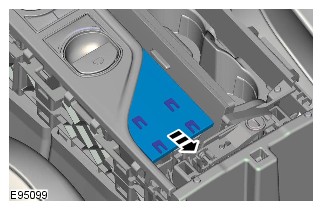
When removing the component, some of the clips may remain attached. These clips should be removed and returned to their original positions in the instrument panel.
-
-
-
-
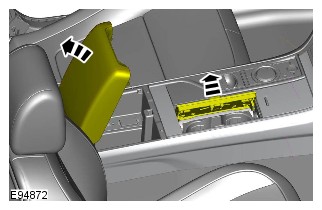
- NOTE:
When removing the component, some of the clips may remain attached. These clips should be removed and returned to their original positions in the center console.
-
-
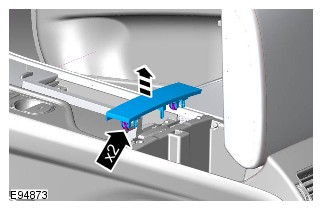
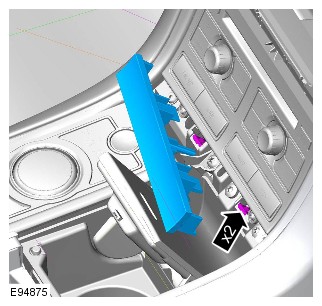
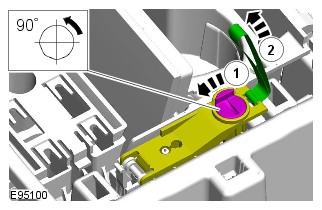
- NOTE:
Do not disassemble further if the component is removed for access only.
-
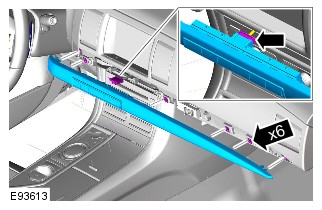
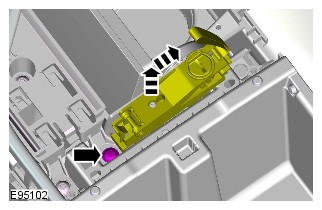
Installation- NOTE:
Make sure that the veneer trim panel is correctly installed and secured.
To install, reverse the removal procedure.
-
Torque: 4 Nm
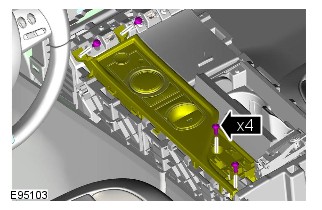
Installation- To install, reverse the removal procedure.
-
-
-
Torque: 4 Nm -
Torque: 4 Nm -
Torque: 4 Nm -


Thread
Thread Starter
Forum
Replies
Last Post
Tman
S-Type / S type R Supercharged V8 ( X200 )
2
Aug 23, 2015 06:56 AM
AristoCat
US Northwest
5
Apr 18, 2015 07:48 AM
Currently Active Users Viewing This Thread: 1 (0 members and 1 guests)

