
Replacing sunvisor's liner to match headliner

Thread Starter
|
Senior Member


Joined: Mar 2012
Posts: 100
Likes: 85
From: France
I am on my way for replacing the (sagging) headliner on a XJ8 LWB and I have chosen to use "suede" fabric rather then the original fabric.
I would like to replace as well the liner on the top center console, the sunroof panels, and the sunvisors so that everything matches again.
Has anyone tried to replace the liner on the sunvisors? Can they be disassembled? Is there some hidden screws or tabs behind the courtesy mirror/lamps?
I have also a question regarding the sunroof panel. The trim panel is actually in two pieces to allow sunroof tilt opening. I am able to remove the larger trim piece (pulling rearward through the aperture in the roof) after tilting the sunroof. What about the remaining little piece of trim that slides under the headliner? Does the sunroof mechanism needs to be teared down to pull this remaining small trim panel out of the car? (I haven't removed the main headliner yet, the solution might become clearer once I have done that).
Any help appreciated. This is my second headliner. First one was on a new beetle. I was partially satisfied of the result. Problem is that the new beetle headliner is very uneven around the sunvisors/center console. Since I starting gluing the fabric from the rear (as recommended), I discovered I had to stretch the fabric very much when I arrived in the front area in order to fit into the various recesses for sunvisors and center console. For the Jag. the recesses are smother so that sould be easier. Also I may start from the front center console area and maybe I will glue only one side to allow repositioning.
Thread Starter
|
Senior Member
Joined: Mar 2012
Posts: 100
Likes: 85
From: France
Finally decided to jump into it. I changed all the fabrics coordinated with the headliner including:
- headliner
- small and large sunroof interior panels
- roof console
- sunglass storage box
- 2 sunvisors
- 4 door pockets
Since I was replacing everything, I changed from the original fabric and used suede fabric that looks a little nicer.

One of the challenges was to de-assemble the sunvisors. Removing the lighted mirror was quite easy, see the 5 little tabs at the bottom of the mirror casing. The piece that clips to the center side of the roof is removed after extracting a long nail with niddle nose pliers. The fabric is pinched into a slot on the edge of the sunvisor. The fabric is not glued.
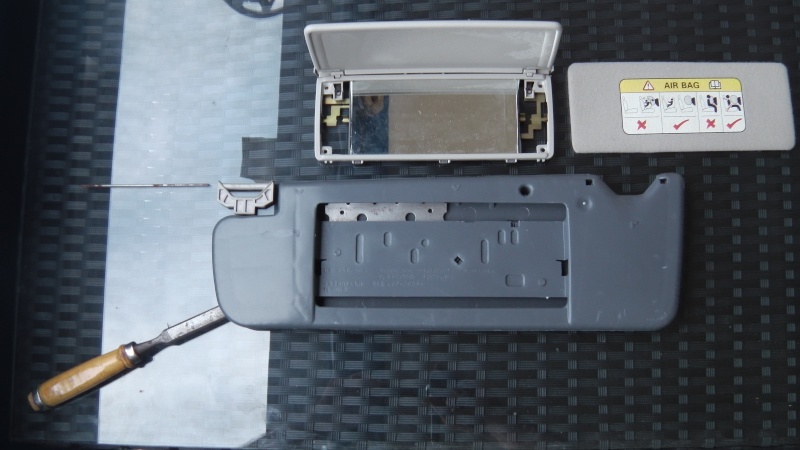
I completely opened the first sunvisor with chisel and mallet. The 2 walls are glued together. They have to be glued back together after putting the new fabric in place. I decided to glue the new fabric on the sunvisor.

For the second sunvisor, I was able to put the new fabric in place without even opening it. I pushed the fabric in the recess with one chisel while enlarging the recess aperture with another chisel:

In order to put this piece back into position, you need to carefully cut the fabric in a "star" shape and fold all the little star branches in the inside. Be careful not to cut too much.

Same approach gor the axle, lots of little cuts in a "Star" shape and fold on the inside. The axle can be pulled out a couiple of centimeters but not much otherwise the spring will jump out of the axle on the inside and the only solution will be to completely open the sunvisor to put it back in place.

There is a glued aluminum foil that needs to be wraped with new fabric as well on top of the mirror cover. Note the awfull security warnings have disappeared from the mirror flap.

The center console is also a piece of patience. The sunglass holder is in 3 parts glued together. The 3 parts can be separated with a thin cuter and glued back together afterward. If you know how to sew, there is a little piece of fabric on the inside as well that can be changed to be coordinated. It keeps the glasses from falling on the armrest when opened. Be very carefull which side to put the microphone back. There is one hole on both side (UK or rest of the world) on the console frame. I put the microphone on the wrong side and have had to redo the console again!

Here a little mistery solved. There is a litle fastener keeping the smaller part of the sunroof liner into place. This is only visible while the entire headliner has been moved out of the car.

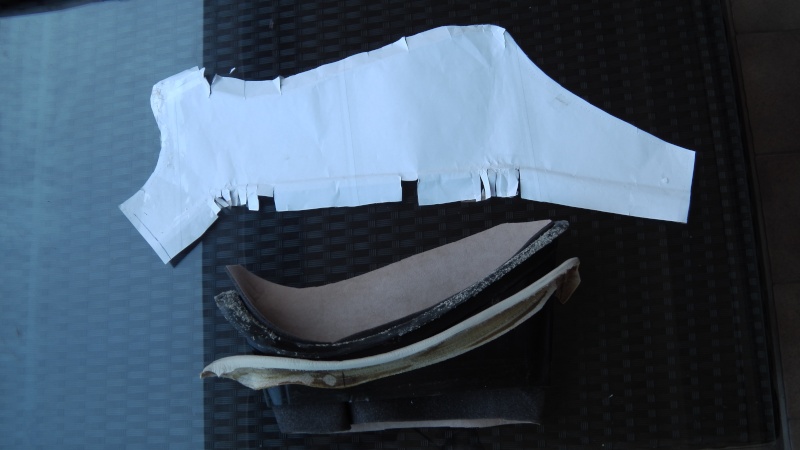
Finally, I found that my door panel pockets were also ruined. It involved making a pattern with a large piece of paper to be able to cut the fabric with the right shape.

I scanned the paper pattern into a scale 1 pdf available to anyone who would like to reuse.
It took me 4 evenings to sew back together the fabric with the band of "ivory" leather and rebuild the original Daimler finishing:

I used these tools:

- headliner
- small and large sunroof interior panels
- roof console
- sunglass storage box
- 2 sunvisors
- 4 door pockets
Since I was replacing everything, I changed from the original fabric and used suede fabric that looks a little nicer.
One of the challenges was to de-assemble the sunvisors. Removing the lighted mirror was quite easy, see the 5 little tabs at the bottom of the mirror casing. The piece that clips to the center side of the roof is removed after extracting a long nail with niddle nose pliers. The fabric is pinched into a slot on the edge of the sunvisor. The fabric is not glued.
I completely opened the first sunvisor with chisel and mallet. The 2 walls are glued together. They have to be glued back together after putting the new fabric in place. I decided to glue the new fabric on the sunvisor.
For the second sunvisor, I was able to put the new fabric in place without even opening it. I pushed the fabric in the recess with one chisel while enlarging the recess aperture with another chisel:
In order to put this piece back into position, you need to carefully cut the fabric in a "star" shape and fold all the little star branches in the inside. Be careful not to cut too much.
Same approach gor the axle, lots of little cuts in a "Star" shape and fold on the inside. The axle can be pulled out a couiple of centimeters but not much otherwise the spring will jump out of the axle on the inside and the only solution will be to completely open the sunvisor to put it back in place.
There is a glued aluminum foil that needs to be wraped with new fabric as well on top of the mirror cover. Note the awfull security warnings have disappeared from the mirror flap.
The center console is also a piece of patience. The sunglass holder is in 3 parts glued together. The 3 parts can be separated with a thin cuter and glued back together afterward. If you know how to sew, there is a little piece of fabric on the inside as well that can be changed to be coordinated. It keeps the glasses from falling on the armrest when opened. Be very carefull which side to put the microphone back. There is one hole on both side (UK or rest of the world) on the console frame. I put the microphone on the wrong side and have had to redo the console again!
Here a little mistery solved. There is a litle fastener keeping the smaller part of the sunroof liner into place. This is only visible while the entire headliner has been moved out of the car.
Finally, I found that my door panel pockets were also ruined. It involved making a pattern with a large piece of paper to be able to cut the fabric with the right shape.
I scanned the paper pattern into a scale 1 pdf available to anyone who would like to reuse.
It took me 4 evenings to sew back together the fabric with the band of "ivory" leather and rebuild the original Daimler finishing:
I used these tools:
Last edited by bballarin; May 20, 2013 at 09:18 AM.
Veteran Member


Joined: Oct 2008
Posts: 4,880
Likes: 1,431
From: Sunny Southport UK
did this a couple of years ago, good work! If it went together, it comes apart. I would leave the mic where it is, it's placement isn't that important tbh. Unless you like working on it....

Junior Member
Joined: Aug 2014
Posts: 1
Likes: 0
From: Waikoloa, HI, USA
Do you still have the PDF for the pocket door fabric template available? Would be very grateful if you could send it! chris_hollyman@yahoo.com
Thread Starter
|
Senior Member
Joined: Mar 2012
Posts: 100
Likes: 85
From: France
Hi Chris,
I made it available here in both A4 or Letter page size:
https://drive.google.com/open?id=0B3...aFE&authuser=0
Cheers,
Bruno
I made it available here in both A4 or Letter page size:
https://drive.google.com/open?id=0B3...aFE&authuser=0
Cheers,
Bruno
Thread Starter
|
Senior Member
Joined: Mar 2012
Posts: 100
Likes: 85
From: France
Hi Bcrary3,
I got the suede fabric with the foam back, at this place:
60" Wide Suede Headliner "Beige"
Cheers,
Bruno
I got the suede fabric with the foam back, at this place:
60" Wide Suede Headliner "Beige"
Cheers,
Bruno
Trending Topics

Senior Member
Joined: Feb 2015
Posts: 537
Likes: 60
From: Janesville WI
Hi Bcrary3,
I got the suede fabric with the foam back, at this place:
60" Wide Suede Headliner "Beige"
Cheers,
Bruno
I got the suede fabric with the foam back, at this place:
60" Wide Suede Headliner "Beige"
Cheers,
Bruno
Thread Starter
|
Senior Member
Joined: Mar 2012
Posts: 100
Likes: 85
From: France
If you have the sunroof, you need 4 yards. This is because the cut for the sunroof aperture can't be reused for the sunroof panels (too small). With 4 yards, I had enough to do everything including the door pockets.
Cheers,
Bruno
Cheers,
Bruno
Senior Member
Joined: Feb 2015
Posts: 537
Likes: 60
From: Janesville WI
On the illuminated ones, would it be at all similar?
Thread Starter
|
Senior Member
Joined: Mar 2012
Posts: 100
Likes: 85
From: France
Both driver and passenger sunvisors shown in the above posts are illuminated. Each sunvisor features 2 bulbs and lenses (not shown on the pictures) on each side of the mirror. You can see the electrical circuit exposed on each side of the mirror, as well as the electrical connector on the end of the sunvisor arm. I assume you should get the exact same sunvisors on a VdP.

Thread
Thread Starter
Forum
Replies
Last Post
FS[Western US]: XJS Lock Set with Keys- Doors, trunk, glove, gas, and ignition
XJsc-guy
PRIVATE For Sale / Trade or Buy Classifieds
6
Nov 23, 2015 01:56 PM
FS[Western US]: XJS Wiper Motor Upgrade- 76-88 - Electrolux Style
XJsc-guy
PRIVATE For Sale / Trade or Buy Classifieds
0
Sep 2, 2015 11:43 AM
Currently Active Users Viewing This Thread: 1 (0 members and 1 guests)