
Water pump change instructions


Thread Starter
|
Junior Member
Joined: Oct 2018
Posts: 8
Likes: 1
From: Mesa, AZ
Hi, after some searching, I downloaded the Service and Repair manual from the forum stickies thread for my 2014 XJ 3.0. Seeing no table of contents or effective search for "water pump" and "coolant pump" I also downloaded for $19.95 the "Jaguar XJ Series X351 Workshop Manual 2014 from one of the pay sites a forum member recommended. This is essentially the same document, only now with a much better table of contents. Sooo am I missing something? There is every topic under the sun included, so it was worth the $19.95 price and I will use it in the future I am sure. BUT, THERE IS NO SECTION ON ENGINE COOLING??? What the hell? There is even a detailed section on just the supercharger cooling pump, piping and operation with its separate radiator, but I cannot seem to find any instructions or diagrams for the main engine cooling system including the radiator, water pump and all the piping? What am I missing here?
Senior Member
Joined: Mar 2016
Posts: 859
Likes: 322
From: Auckland NZ/ Houston, TX
You'll need to get the belts off first
1.
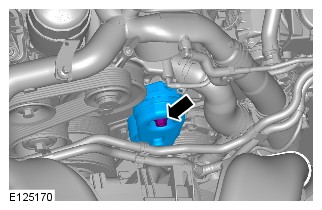
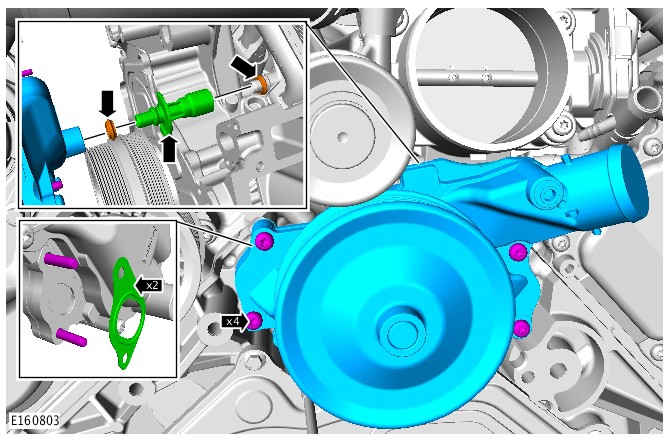
INSTALLATION
1.
Torque: 10Nm
Torque: 47Nm- WARNING:Fluid loss is unavoidable, use absorbent cloth or a container to collect the fluid.
CAUTION:Engine coolant will damage the paint finished surfaces. If spilt, immediately remove the coolant and clean the area with water.
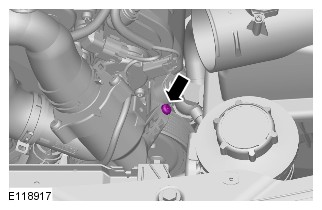
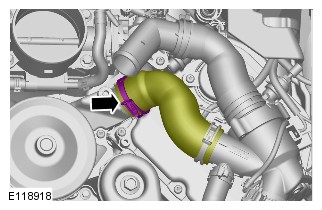
The Green Pipe shown below - I HIGHLY recommend replacing this along with the o-rings. You'll need to get them from the dealer
Torque: 12Nm

INSTALLATION
- CAUTIONS:
- Make sure that the gaskets are correctly located.
- Install new o-ring seals.
- Install all the bolts finger tight before final tightening.
NOTE:Install new gaskets.
To install, reverse the removal procedure.
Renew Part: Oil cooler O-ring seals Quantity: 2.
Renew Part: Engine coolant pump gasket Quantity: 2. - Make sure that the gaskets are correctly located.
Thread Starter
|
Junior Member
Joined: Oct 2018
Posts: 8
Likes: 1
From: Mesa, AZ
Thank you VERY much JB. That is actually looking a lot easier than I thought. I did get all of the air filter and ducting out of the way and can now clearly see the parts and the bolts in the drawings. Changing the water pump may not be bad at all. For under $100 for a new pump, I am going to replace it now anyway, but unfortunately, I do not now think that is the actual problem, I think there is a leak in the plastic crossover pipe at the back of the engine! (Stopping by Autozone on the way home to rent a pressure tester and buy a fluorescent dye kit.) I got frustrated after spending over an hour last night trying to re-fill the system with water, I cannot believe there is not an actual radiator cap or fill spot. Are you really supposed to refill the entire system with 10+ liters after a water pump change by simply filling the overflow tank and letting it trickle in?
Thanks again, the pictures and step by step help a ton. I cannot believe they are not in the "workshop manual!"
Thanks again, the pictures and step by step help a ton. I cannot believe they are not in the "workshop manual!"

Veteran Member


Joined: May 2009
Posts: 12,078
Likes: 3,362
From: home
Yes seems to be a number of workshop manuals out there and I have several with differing amounts of info in them. Plus they are so huge it's not easy to even find what your looking for!
You can fill it from the upper tank but most shops now use a vacuum filler. Not too expensive and does really help getting all the air pockets out. Some people have had much trouble bleeding the air out.
I have found several heat cool cycles and topping the tank off works fine.
.
.
.
You can fill it from the upper tank but most shops now use a vacuum filler. Not too expensive and does really help getting all the air pockets out. Some people have had much trouble bleeding the air out.
I have found several heat cool cycles and topping the tank off works fine.
.
.
.
Senior Member
Joined: Mar 2016
Posts: 859
Likes: 322
From: Auckland NZ/ Houston, TX
There is a vacuum tool that is used to bleed the system, this procedure is recommended by Jaguar.
However, before this process was introduced, I've always bled the system by filling through coolant tank till its full. Start the vehicle and turn heater on high ( temp ) and let it run to operating temp. Keep an eye on the coolant tank and top off as necessary to keep at FULL line. Make sure the heater is working at this stage. You may need to take a short test drive, doing some left and right turns ( this helps any air bubbles move towards the tank ). Let it sit and cool, then restart to operating temp and recheck level.
The pictures I posted are directly from topix, if you need any info just let me know

Thread
Thread Starter
Forum
Replies
Last Post
Currently Active Users Viewing This Thread: 1 (0 members and 1 guests)