another air suspension fault
#1
 01-05-2013, 02:50 AM


i have received the "air suspension fault" from my 05 XJR with 90k miles,,
i pulled over and found the rear left lowered and heard the air hissing out the wheel well,,
the front is still ok and after 5 days of parking,, i got the rear right also lowered,, do i have the rear pair gone?
i pulled over and found the rear left lowered and heard the air hissing out the wheel well,,
the front is still ok and after 5 days of parking,, i got the rear right also lowered,, do i have the rear pair gone?
#2
01-05-2013, 04:46 AM
Veteran Member
after 5 days of parking,, i got the rear right also lowered,, do i have the rear pair gone?
#3
01-05-2013, 04:55 AM
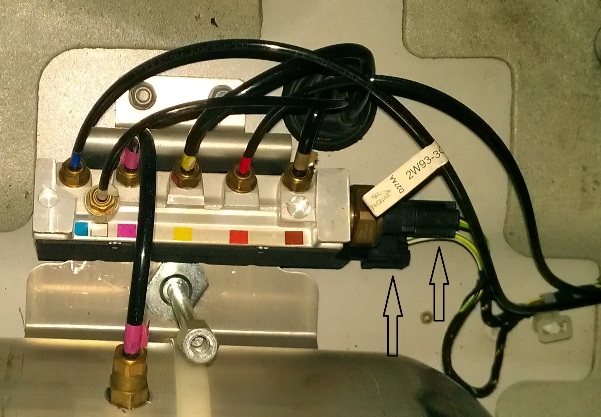
You may verify a leak by disconnecting the 2 connectors at the manifold, located under the spare tire.
1. Allow the suspension to fully inflate.
2. Turn-off ignition/remove key.
3. Remove the spare tire and air tank foam cover.
4. Disconnect the 2 connectors.
5. Wait a few hours (dependent on severity of leak) for the bad side to lower.
With the connectors disconnected, only the bad side will lower as the system will not be able to auto-level itself.
I had to let it sit about 4 hours, others have waited over-night.
#4
01-05-2013, 05:24 AM
You may verify a leak by disconnecting the 2 connectors at the manifold, located under the spare tire.
1. Allow the suspension to fully inflate.
2. Turn-off ignition/remove key.
3. Remove the spare tire and air tank foam cover.
4. Disconnect the 2 connectors.
5. Wait a few hours (dependent on severity of leak) for the bad side to lower.
With the connectors disconnected, only the bad side will lower as the system will not be able to auto-level itself.
I had to let it sit about 4 hours, others have waited over-night.
1. Allow the suspension to fully inflate.
2. Turn-off ignition/remove key.
3. Remove the spare tire and air tank foam cover.
4. Disconnect the 2 connectors.
5. Wait a few hours (dependent on severity of leak) for the bad side to lower.
With the connectors disconnected, only the bad side will lower as the system will not be able to auto-level itself.
I had to let it sit about 4 hours, others have waited over-night.
The following users liked this post:
JagDaniel (07-15-2014)

#6
01-05-2013, 07:46 AM
#7
01-05-2013, 08:33 AM

Sorry but I think it's the shock too. Seems that this is the time of year for shrinking and cracking of rubber stuff. If it were the distribution block you'd hear it in the boot. One possibility is a loose connector where the air line goes into the shock but I'm guessing the cold and wear just got to the shock. reman. shocks are around for < half the price of dealer.
Trending Topics
#8
01-06-2013, 12:12 PM
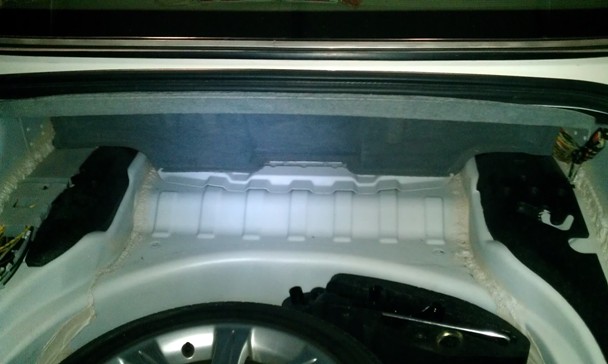
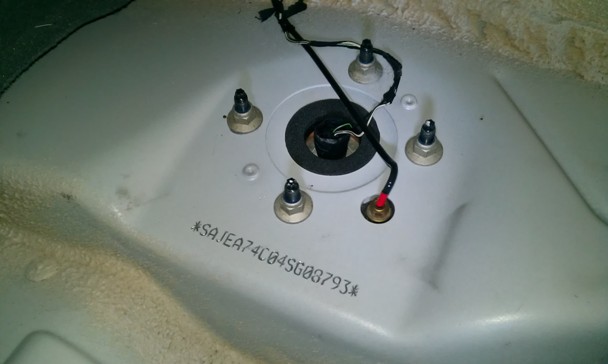
I believe it is your shock, the airlines are connected to the shock in the boot. If you are hearing air from the wheel well then it is the shock. You still have one more easy verification you may do:
Remove the left side trunk/boot liner and check the airline fitting on top of the shock.
Note: the attached documents show the right side shock.
#1 the boot liner being removed.
#2 the wrench is at the airline fitting.
Remove the left side trunk/boot liner and check the airline fitting on top of the shock.
Note: the attached documents show the right side shock.
#1 the boot liner being removed.
#2 the wrench is at the airline fitting.
Last edited by reyesl; 01-06-2013 at 12:16 PM.
The following users liked this post:
JagDaniel (07-15-2014)

#11
01-08-2013, 12:35 AM
#12
01-08-2013, 12:37 AM
I believe it is your shock, the airlines are connected to the shock in the boot. If you are hearing air from the wheel well then it is the shock. You still have one more easy verification you may do:
Remove the left side trunk/boot liner and check the airline fitting on top of the shock.
Note: the attached documents show the right side shock.
#1 the boot liner being removed.
#2 the wrench is at the airline fitting.
Remove the left side trunk/boot liner and check the airline fitting on top of the shock.
Note: the attached documents show the right side shock.
#1 the boot liner being removed.
#2 the wrench is at the airline fitting.
thanks a lot for the attached,,
#14
01-09-2013, 09:40 PM
I don't know how the manual states this, but this is the easiest way I found on removing the liners:
1. Remove the floor liner - (2 ea T-30 screws)
2. Remove the left side liner- (3 ea Push-Pins/Trees

3. Remove the right side liner - (2 ea Push -Pins/Trees
4. Remove the Foam covers protecting the shocks.
5. Conduct tests or replacement
6. Reverse order to re-install liners.
1. Remove the floor liner - (2 ea T-30 screws)
2. Remove the left side liner- (3 ea Push-Pins/Trees
3. Remove the right side liner - (2 ea Push -Pins/Trees
4. Remove the Foam covers protecting the shocks.
5. Conduct tests or replacement
6. Reverse order to re-install liners.
Last edited by reyesl; 01-10-2013 at 09:47 PM.
The following users liked this post:
JagDaniel (07-15-2014)

Thread
Thread Starter
Forum
Replies
Last Post
Mugatu
XJ XJ6 / XJ8 / XJR ( X350 & X358 )
22
06-23-2020 01:50 PM
Guy-Pierre Boucher
XJ XJ6 / XJ8 / XJR ( X350 & X358 )
7
09-16-2015 05:55 PM
Currently Active Users Viewing This Thread: 1 (0 members and 1 guests)