When you click on links to various merchants on this site and make a purchase, this can result in this site earning a commission. Affiliate programs and affiliations include, but are not limited to, the eBay Partner Network.
For reference should anyone wonder how this is done on the x350. Jaguar does not sell the inner tie rod as a service item, and want you to replace the entire rack. Could not be a simpler job--1 hour doing this at a leisurely pace. Helps to have a 2nd set of hands for measuring the front toe to get it reset after the repair.
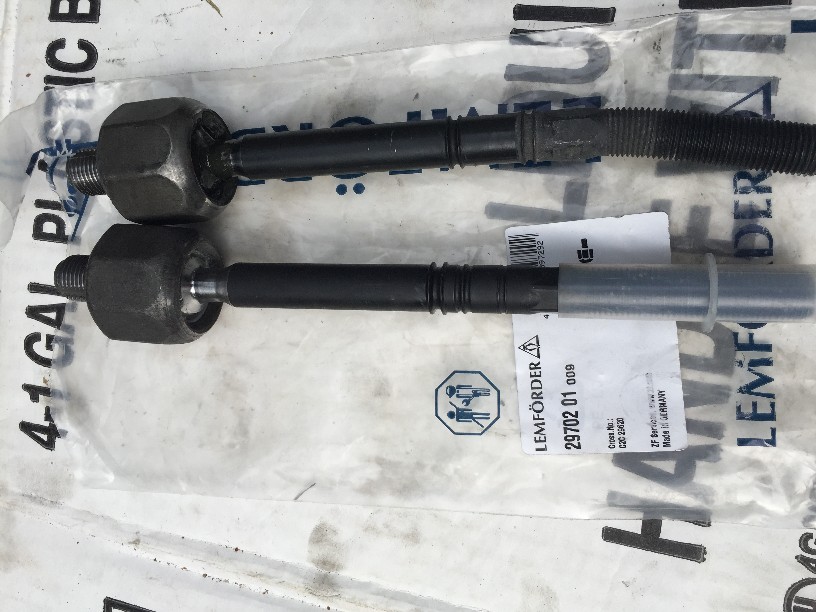
Replacement part (left or right) is Lemforder 29702 01. I bought mine from RockAuto searching just the part number (without the space); it's not in the catalog for these cars by year/make/model.
1. Jack up front end and support subframe on jackstands.
2. Before removing tie rods, with steering straight ahead get a helper and measure front toe from tire-to-tire, so you can get it set reasonably close. Do one side at a time, if doing both tie rods, and measure between each tie rod replacement.
3. Remove tire, remove caliper and tie up out of the way. Remove outer tie rod end from steering knuckle. Remove outer tie rod from the threaded shaft. Remove the lock nut.
4. Remove the small boot clamp. Carefully release the band clamp from the rack end. If careful you can reuse this and crimp it back together with the correct tool.
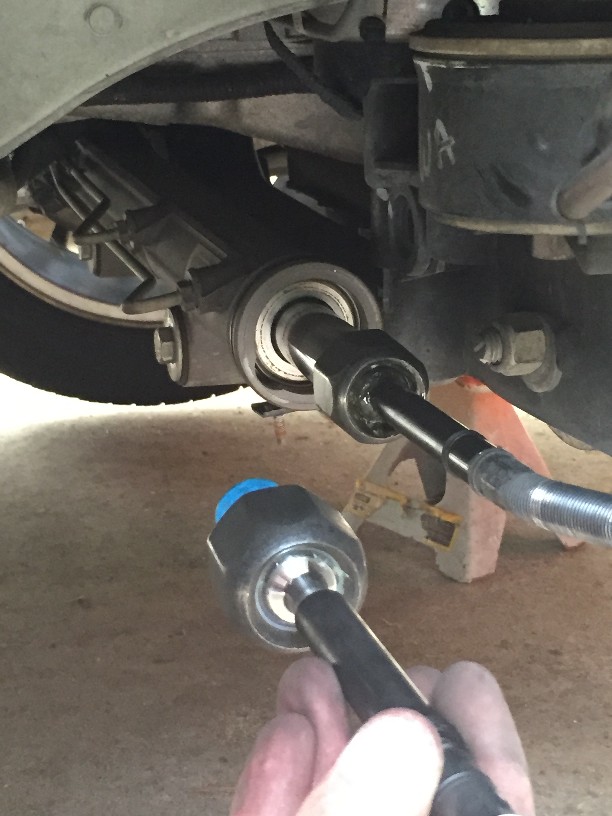
5. Remove boot and now the tie rod is exposed. You'll need a 1.5" (38mm) open end wrench or adjustable wrench.
6. Simply loosen the inner tie rod, and install the new one with a small bit of blue LockTite.
7. Reinstall the boot, secure the clamp, and install the lock nut and outer tie rod. Don't tighten the lock nut just yet.
8. Reinstall the outer tie to the steering knuckle, install caliper, and install tire.
9. With the tire reinstalled, measure back to your other tire and set the toe to the same measurement as before. This should get you very close to where it was--although you may want an alignment either way (especially if it was out of spec before).
Also, be very sure to heed the Lemforder warning mark and only use this part if you're wearing overalls, a hat and have a large wrench
Thanks for the excellent information and for taking the time to take photos and upload them for the benefit of the rest of us!
One additional tip is that if you count the number of turns as you are unthreading the outer tie rod ends, it will help you get them close to their correct position when you reinstall them on the new inner tie rods.
And one thing to keep in mind is that if an original inner tie rods is bent, as yours appears to be in the last photo, the toe-in will be affected, so even if you measure it before and after installing the new inner tie rods, the toe-in will likely be incorrect, so a full alignment would be prudent if not mandatory.
My pleasure--hopefully others will also find this useful. I had searched to no avail about a year ago when I found I needed the new inner tie rod.
Yes, an alignment is an absolute necessity if you have damage and then replace parts. In my case the alignment was recently completed with the bent rod in place, so the measurement at the tire was correct. However, even with correct toe setting, having the bent tie rod causes the front suspension to react asymmetrically as the wheels rise and fall. If one is only replacing worn out parts that aren't otherwise damaged, the toe should be very close to spec.
Also agree that counting threads can be a good rough gauge to allow you to get the car to the alignment shop. Have done that when no other hands are available. But, with careful measurement from the other tire you can actually get it close to perfect. The thread count method has its shortcoming because you have little chance of getting the threads to catch at exactly the same place you pulled the old one off. A small turn of those threads makes a big change at the edge of the tire.
Recently rebuilt the front end of a Ford Ranger, both control arms and tie rods, measured to put it back together and sent the owner to get an alignment. Results showed that all angles were within spec when he got there. Surprised me that it was that close! But then again, cars were being aligned for many years before laser computer jigs came into vogue.
Yes, an alignment is an absolute necessity if you have damage and then replace parts. In my case the alignment was recently completed with the bent rod in place, so the measurement at the tire was correct.
I'm surprised your shop would even complete an alignment with a bent tie rod. I've read more than a few accounts from owners whose shops would not do an alignment until a bent tie rod was replaced.
How many miles does either generally take to need inner tie rods? What were the signs of needing them? Why would one be bent in your case?
Inner tie rods don't generally wear out with mileage, as they are sealed up nice and clean inside the steering rack boot. I have seen some fail, as there is a nylon bearing surface for the ball joint, but it's not common. It used to be that cars would never need tie rods when you could grease them... the "lubed for life" ball joints are what has driven the need to replace outers so often. If you do have a lot of play in the steering linkage, outer and inner tie rods are always suspected first.
They also don't usually bend unless there's crash damage. In my case, a gravel drive and a jack were an expensive "oops."
I'm surprised your shop would even complete an alignment with a bent tie rod. I've read more than a few accounts from owners whose shops would not do an alignment until a bent tie rod was replaced.
Jaguar did it--I told them it was bent and just do the best they could. The tech got it really close to perfect, surprisingly. I will go back for a fresh alignment after I finish with some other suspension parts.
Lemforder/ZF's online catalog of parts for our cars shows all the appropriate parts for the suspension. It's not just a matching replacement, it is THE original part.
Michael - I find myself once again indebted for information and visuals you provide during DIY repairs.
I am actually about to replace the rear tie rods - also referred to as : Hub Carrier Tie Rod Toe Lateral Adjustment Link. Think I'll go with "tie rod", lol. The outer bushing, at the hub carrier seems to fail on X350's ahead of control arm and other bushing failures. I found it during a brake job, when I noticed obvious play at the hub. This explains the slight wiggle I perceive during high speed lane shifts. I caught it before any obvious uneven tire wear, so much for Continentals "Alignment detection" tread stampings on the DWS line. They actually wore perfectly symmetrical.
Of course having toe changes while in motion may be very different than a constant toe misalignment. In any event, I need to resolve this and have a question. You used measurements taken from the mounted wheels, and had a alignment not long before replacing the front tie rod link. Don B mentioned "counting the number of turns when unthreading the old section. So, I have these methods based on this thread and other research:
1. Measure the old tie rod from threaded mount to the center of the bushing as in this illustration I marked up:
2. Measure from center of tire to opposite center of tire, plus from center of tire to marked point at center of rear subframe.
There is no point in measuring or marking threads on the tie rod since I am replacing both sections.
I would appreciate your thoughts on this. There is a YouTube video of a guy replacing these and the sway bar links. Unfortunately its one of those that he "dicsovers" multiple mistakes he made in the process. It is still helpful to see the components come apart, but not ideal. I also plan to get a 4 wheel alignment afterwards within a week or two. Looks like there is ONLY toe alignment, no camber adjustment that I can tell.
I think the best way to measure is pre-and post replacement from tire to tire. Measure the distance between the tread on both rear tires (just pick a convenient reference point). Change one tie rod (measure approximate length, etc), install the new part. Measure between two tires and adjust the new tie rod to return the tread distance to the original measurement. Then replace the other tie rod and do the same. Should get you very close, but never as perfect as a fresh alignment.
Wish I could figure out my rear end fishtail... replaced those rear tie rods years ago, upper and lower control arms, front tie rods, etc. Car would track straight as an arrow if not for an annoying wag in the rear when going over road discontinuities.
Thanks - That should get me as close as possible until it gets a proper alignment. That fishtailing would annoy me too, but once you tackled all the likely points of failure, and I assume you see no play at the hub or half-shafts I'm not sure what else there is to do.
These cars don't do millisecond shock dampening adjustments, but have you experienced any air-susp quirks? I have a few different behaviors in the 07 VDP from the 06 XJ8L. This car vents the front shocks suddenly not long after parking, for no obvious reason, where my other one didn't, at least not as suddenly and loudly I should clarify. Its not a failure as much as it's different behavior. This cars system seems more active.
One possible clue while jacking the front for brake work. If I lift the car an inch or two with my floor jack, the car will vent the shock. It happens so fast, like the valve opens for 1 second, that I have not been able to tell if its just that corner, or both fronts. It's obviously attempting to level back down. I don't disconnect the battery to jack the car, that feels like overkill for a system that should be able to handle things like a flat tire replacement without disconnecting the battery.
I'm just curious about the way it differs from the previous car. There was a selection of updates in 2006 - from Chassis: G49700, such as trim changes, brake rotor size, throttle bodies, and software modules and format but I am not aware of air suspension behaviour changes. I also never quite understood the switch to a single front height sensor early on (during 04, from G26872) perhaps for tracking they never wanted uneven front geometry.
Thanks again for your thoughts on the measurements.
These cars don't do millisecond shock dampening adjustments, but have you experienced any air-susp quirks? I have a few different behaviors in the 07 VDP from the 06 XJ8L. This car vents the front shocks suddenly not long after parking, for no obvious reason, where my other one didn't, at least not as suddenly and loudly I should clarify. Its not a failure as much as it's different behavior. This cars system seems more active.
One possible clue while jacking the front for brake work. If I lift the car an inch or two with my floor jack, the car will vent the shock. It happens so fast, like the valve opens for 1 second, that I have not been able to tell if its just that corner, or both fronts. It's obviously attempting to level back down. I don't disconnect the battery to jack the car, that feels like overkill for a system that should be able to handle things like a flat tire replacement without disconnecting the battery.
I'm just curious about the way it differs from the previous car. There was a selection of updates in 2006 - from Chassis: G49700, such as trim changes, brake rotor size, throttle bodies, and software modules and format but I am not aware of air suspension behaviour changes. I also never quite understood the switch to a single front height sensor early on (during 04, from G26872) perhaps for tracking they never wanted uneven front geometry.
My '06 is a later VIN so should be the same as your '07. I've not seen any sudden or violent suspension venting. Sounds like something is wrong with the exhaust valve in your suspension compressor. There is supposed to be an orifice in there so the air exits slowly when it's venting. I have seen the car vent after parking to level, but it's very slow (typically vents for 5-10 seconds to lower 1/2")
I typically pull fuse F20 in the rear block to disable the ASM when I jack up the car. With the fuse in, the system should vent air until it realizes the car is being lifted, then stop. But it will end up too low when I set the car down and I can't get the jack out from underneath. Pull the fuse, replace when I'm done and the car levels itself.
THAT seems easy enough. Yep, I have had the jack stuck under there, lol. Only on the front, and I got aound it by opening the drivers door. Once I had to start it, I think.
The venting sounds like it's coming from the shock tower, but I wouldn't bet money on it. In general the air suspension in this car has been completely trouble free for almost 2 years, even in the coldest NC weather - low 20s. Unless it does something untoward, I will probably leave it alone for the present. As my friend says "if it ain't broke, don't break it."
My previous car would have leaks at both front corners in that kind of weather, more when I drove into the mountains I assume because of the thinner air. I put bagpiping Andys PTFE piston ring kit in and that helped, but it was in need of replacement shocks.
Hi Michael - Hoping you see this. Regarding the rear toe links/tie-rods: what the hell was Jaguar thinking the way the inner link is attached to the subframe? I had one side where the retaining nut got harder and harder to turn as it came out till it locked on so tight I broke the 8mm wrench holding the shaft from turning. I was lucky enough to thread the nut back on and plan another attack. I thought it was just the rust building up inside the nut, but I have found a few write ups with the identical issue. One was so bad they had to cut though the nut on one side of the car and cut the threaded rod end right off on the other (after getting the nut out far enough to expose the threaded shaft.
At least the S-Type had plenty of access to the subframe mount for the tie rod.
Not the case with X350: On the drivers side I get perhaps 2 clicks on a ratcheting wrench (Gearwrench) while holding the 8 mm hex head of the shaft. It's between the fram and the spare wheel well with literally no access. Just in case I have my compact reciprocating saw loaded with a fine tooth metal blade. That's assuming I can get the nut out far enough to even get a blade in there. I had to get a 1/2 inch 6 point long socket on each of these with my long ratchet handle - after days of applying penetrant to the inner mount. I have the Sway Bar links ready - I don't anticipate any issue with them.
Note that the Workshop Manuals we have on PDF - X350 - Workshop US003 - 2. Chassis.pdf - covers FRONT Tie Rods, Covers ADJUSTING TOE LINKS - It does NOT have a R/R section for these. Must have been considered permanent mounts.
Here's the guys who cut them off - something I think I will be doing shortly:
They used a hack saw. Not an option on X350 - I could only get the blade in there, but that's a good size rod and I am NOT going at it with a tiny hand saw.
Any thoughts appreciated, Were your this much of a nightmare? Anyone else get these off without cutting them out of the car? This is another case of Jaguar engineering something, then building the car around it. Servicing be dammed! This would not be 1/10th the issue if I didn't have to hold the shaft from turning. I considered looking at the joint on the other side of the mounting flange (on the tie rod) to see if I could immobilize it from there with a clamp, vice grips etc. See Pic below:
If I could hold it from that side, I can put a long socket on the nut, and an extension to get me room to ratchet if off more than 2 clicks at a time. Feeling desperate here.
Thanks Wingrider. I am now halfway there. By cleaning the outer threads really well, then running a nut onto them, this time the sucker came all the way off. The relief when I felt it loosening and knew I had it was palpable.
So, right side done tie-rod and sway bar link... driver side is where the access is almost non-existent, but I will go at it tomorrow with the same approach as I did today. Heres hoping.
I replaced both my rear tie rods recently and had to cut both off
I used a hack saw blade fitted with a single handle and it really didn't take too long.