When you click on links to various merchants on this site and make a purchase, this can result in this site earning a commission. Affiliate programs and affiliations include, but are not limited to, the eBay Partner Network.
I do think that it is some sort of clear coat, and it is definitely metal. However, I don't think that it is normal "paint type" clear coat. This polishing method would have gone right through clear paint very quickly and that didn't happen. My polishing pad never turned black. It worked quite well though. We'll see how long it lasts. It's been over a week now and no signs of dulling.
As far as the black paint goes, my XJR has some of that too. If you look at my pictures above, you can see the metal trim (nearest the green paint) which is attached to the body of the vehicle. Then lower, you can see the shiny black strip (nearest the plastic mirror housing) that is part of the door frame. The B-pillars in between the front and back windows are also black on my car. I like this better as I think the chrome ones look a little OTT. I'm still in the process of detailing the car and fine cut cleaner followed by polish have made the black parts look amazing (like a newly lacquered piano, shiny).
Jim, did you get your kit yet? How has it worked for you?
Hey there, yes, I got my kit thanks, had it for a few weeks now but so much going on very little time to try this at the moment.
I currently have a few issues with my brakes, she's going in tomorrow for paint of front bumper, bonnet, wings and sills as well as rear bumper.
Then I have to get the DA Polisher out and try to detail the rest.
The windows to be clay barred and then treated with Rainex
I have brake caliper kits coming with a view to refurbishing the front calipers, add on doors seals and sound deadening to do too....
So much car, so little time, but I'll get there
Thanks
Jim
Mr White. I your first pick you have a cone shaped pad attached to your tool. Is that stone? If not, what's the material please? Also what speed did you use when applying?
I ask because I have a dremel but don't know if 1/4" will attach and not sure if the rotation on my drill would be fast enough.
How's it holding up?
New (to me) XK150, same problem as before. I would just pull the trim and strip down to the aluminum again like I did on my SV8 but if I screw it up, the XK150 parts are harder and pricier to come by.
Thanks in advance.
Hey Sean, The cone shaped pad is made from some sort of felt like material. It wears away slowly as you use it. By the time I had done all the trim on the windows and the stainless steel trim rings on my sepang wheels, I had completely used up two of the cone pads.
The box said that they had a max RPM of 10,000 and my trim router is adjustable from 10,000 to 20,000 RPM. I set it to it's slowest setting.
My experience has been that dremels take a 1/8" bit. These pads are 1/4". Harbor Freight also sell a cheap-o 1/4" trim router for $20-30. I've never tried theirs, so I cant speak to it's quality, but at that price it's almost disposable.
The job I did is holding up beautifully. When I polished and waxed the car, I made sure to go over the trim with the buffer. Two coats of wax and I'm very happy with it.
Ok had a quick 10 min blast on the window trims on my Audi A6
It was only a quick going over to see what if any difference was made, the pics really don't do it justice, made quite a bit of difference.
See before and after below
Before
After
Now give the Jag a little treatment and see how that goes
Jim
I think that the trick is putting the polisher in a tool that spins it fast enough and also using a light touch. I don't know if a drill will do it. It might, but it might take longer. Do you have a small router to put it in?
I managed to get the driver's side done today. It took longer that I was expecting and I ran out of time. I'll do the passenger side tomorrow.
Use the largest diameter polishing Bob you have if you need a higher rpm tool, this will increase the surface speed across the material you are polishing with
Use the largest diameter polishing Bob you have if you need a higher rpm tool, this will increase the surface speed across the material you are polishing with
For the most part, that is correct. However, the larger polishers in this specific kit are a fabric mop type and have a maximum RPM of 2,800. If you put one of these in the palm router that I used, which has a minimum 10,000 RPM, they would explode. That's why I used the small ones. They also gave me more fine control.
Video looks quite convincing. Removing trim and attacking anodising with sanding paper is too much of a risk I suspect for many of us. There just don't seem to be any really good answers around for this problem across all jag models with anodised aluminium bright window trim. I am very tempted to try this.
Last edited by davidcumbria; Jan 17, 2018 at 06:05 PM.
Video looks quite convincing. Removing trim and attacking anodising with sanding paper is too much of a risk I suspect for many of us. There just don't seem to be any really good answers around for this problem across all jag models with anodised aluminium bright window trim. I am very tempted to try this.
Thought about it, they block feedback on Youtube. They block feedback on their Facebook page as well. Unable to find a single review on the product when I looked a couple years ago. I drilled down a little after this post and if you hunt you can find a few complaints but I didn't find any praise. Money back guarantee? I couldn't find one. All that was enough to make me stay away.
Even through the trims are polish stainless steel, I used Mag and Aluminium polish from Mother brand ($6.00). I simply used a cotton cloth and polish compound, with no other abrasive tool, and it took me only 5 minutes wipe to get off all oxidation one one side. The trims look like new. It was done three years ago and it still look new today. I bought my Jaguar from the original owner that lives in New York.
Even through the trims are polish stainless steel, I used Mag and Aluminium polish from Mother brand ($6.00). I simply used a cotton cloth and polish compound, with no other abrasive tool, and it took me only 5 minutes wipe to get off all oxidation one one side. The trims look like new. It was done three years ago and it still look new today. I bought my Jaguar from the original owner that lives in New York.
The trim is anodized aluminum, not stainless. Once you remove the anodic oxide finish, you can clear it. What your doing with the cloth is commonly done using tranny fluid and hides the cloudiness for short periods.
You can also light sand and clear coat the finish without stripping down to bare metal and it hides well.
Thought about it, they block feedback on Youtube. They block feedback on their Facebook page as well. Unable to find a single review on the product when I looked a couple years ago. I drilled down a little after this post and if you hunt you can find a few complaints but I didn't find any praise. Money back guarantee? I couldn't find one. All that was enough to make me stay away.
I can't find any specific feedback on this product despite searching every which way. Feedback on the company seems generally very positive. He says in the video it may not work in all cases. New trim for an xk is over �1000. Might be worth risking �100. Surprised more people haven't tried. The hours we have all wasted with polishes and wd40 etc !
Even through the trims are polish stainless steel, I used Mag and Aluminium polish from Mother brand ($6.00). I simply used a cotton cloth and polish compound, with no other abrasive tool, and it took me only 5 minutes wipe to get off all oxidation one one side. The trims look like new. It was done three years ago and it still look new today. I bought my Jaguar from the original owner that lives in New York.
I was actually thinking about trying this myself. Glad to see it worked for someone.
I had had reasonable success, by using my drill with a rubbing compound pad and liquid, followed by a good coat of wax with the drill and a waxing pad.
It removes "almost" all of it and the wax helps keep it from returning. I just hit the trim like this each time I wax the car.
Hello gents.
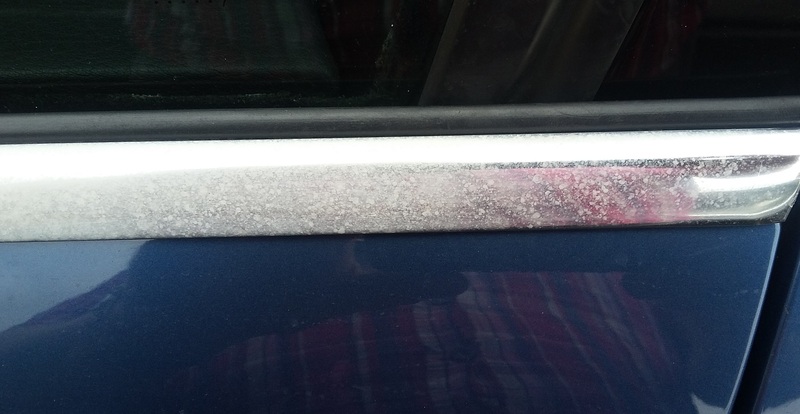
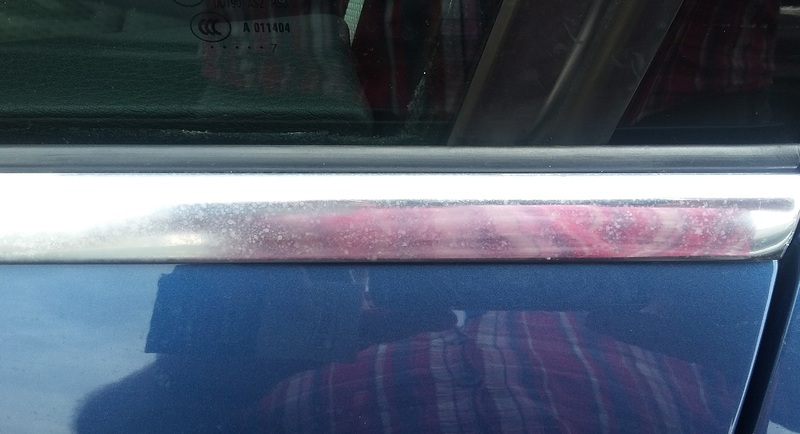
After reading the original post I wanted to give this a shot and see if it would work out�in lieu of the $2k new trim replacement option. While not perfect, I no longer feel the need to replace the trim. Buffing over both sides (upper and lower trim) took roughly 3 - 3.5 hours cumulative. Some areas at the furthermost front (which take a beating at highway speeds) were not quite as easy to bring out but still showed considerable improvement.
Conclusion: If the finish holds up for a significant period I will consider the effort worthwhile. Not good enough for a show car but fine for a road car. Any residual oxidation is not really visible from 3 feet.
Hello gents.
After reading the original post I wanted to give this a shot and see if it would work out�in lieu of the $2k new trim replacement option. While not perfect, I no longer feel the need to replace the trim. Buffing over both sides (upper and lower trim) took roughly 3 - 3.5 hours cumulative. Some areas at the furthermost front (which take a beating at highway speeds) were not quite as easy to bring out but still showed considerable improvement.
Conclusion: If the finish holds up for a significant period I will consider the effort worthwhile. Not good enough for a show car but fine for a road car. Any residual oxidation is not really visible from 3 feet.
- Michael
Thank you for the pics Michael. It would be very helpful if you could separately take pics of the bits you used during the process. The tool itself is rather generic. I've tried several of those bits with zero success. You had good success. Would appreciate an upload of the actual bit(s) used.
The only bit I used was the screw capped one with the larger of the two felt pads attached (white pads in the photo). After finishing all of the window trim the pad did show quite a bit of wear. I simply wiped some of the polish onto the trim and carefully buffed at medium-high speed letting the tool do the work. I did take the time to mask around the metal trim with tape to keep the polish off of any nearby paint/rubber/plastic.
I should have clarified that I did not use any sanding or grinding bits (not yet anyway).
I was quite impressed with the results. Simply waxing the trim helps to a degree, but this process seemed much more effective. HOWEVER, the salient issue is whether it will last . . . Too soon to report on that right now.