When you click on links to various merchants on this site and make a purchase, this can result in this site earning a commission. Affiliate programs and affiliations include, but are not limited to, the eBay Partner Network.
'95 VDP ~ cannot reconnect fuel lines into fuel tank.
Just joined this group and super happy with help so far guys.
Bought my Jag 3-4 months ago~ all was good until the fuel pump gave out.
I have pulled tank and replaced pump, I have also replaced fuel filter. The fuel line from filter needed replacing since part of it was squashed- which I feel may have attributed to pump having to work harder than need be.
I ordered up new fuel line OEM and 2 clips with new seals OEM that fit into back of tank.
My problem now and day 3 of working on this - is that I cannot get the fuel lines to line up and fit into back of tank. I have even removed back seat, and rear speaker which allows me access to them, and still no luck ! I am at a loss as to how they go back in.
One big question regarding the metal clasps that hold fuel lines in ? Do they fit inside receptors in tank and then push lines in OR do they fit on end of lines and then push into back of tank ?
If I could post images that would help explain more.
1. I work a lot and so don't have much time for working on cars like I used to.
2. I have alway worked on my own cars, so taking it to a garage is not an option.
Sorry, if this problem has already been address elsewhere.
The fuel lines disconnect under car above rear suspension there should be two fuel lines. quick disconnects.
Depressurise fuel system. See: Fuel Pressure Release\Service and Repair
Ensure that the radio code is available for resetting the radio after the battery is reconnected.
Remove battery/fuse cover and disconnect the battery.
Remove trunk floor carpet board and front liner.
Remove the rear lamp assembly interior trim finisher.
Remove the trunk seal retainer and left side liner.
Drain fuel tank using approved equipment and observing appropriate safety precautions.
Raise vehicle on "4 Post" ramp.
Disconnect the fuel feed and return pipes from the fuel tank using Jaguar Service Tool JD-203.
Fit plugs to the tank and to the hoses.
Release the clip securing the filler aperture drain pipe and release the pipe from the clip.
Lower the vehicle on the ramp.
Move the in-car entertainment package from the evaporative flange area.
Disconnect the vehicle harness from the evaporative loss flange.
Disconnect fuel gauge tank unit feed wires.
Remove the ratchet strap (1), and the spring band clip (2), to release the filler aperture drain pipe from the fuel tank filler tube and the aperture.
Remove drainpipe from the body grommet.
Using Jaguar Service Tool JD-203 disconnect the under floor vapour pipe from the fuel tank.
Open the flap and remove the fuel filler cap.
Carefully remove the garter spring (3) from the filler neck seal.
Move the seal to the tank filler neck.
Slacken the two retaining strap tensioning bolts (4) at the lower brackets.
Remove the bracket retaining bolts (5), leaving the brackets attached to the straps.
Remove the retaining clip from the left side support strut and detach the the strut from the trunk lid ball pin.
Remove the fuel tank from the vehicle.
Drain the remaining fuel and store the tank using the approved equipment and observing the appropriate safety precautions.
My problem now and day 3 of working on this - is that I cannot get the fuel lines to line up and fit into back of tank. I have even removed back seat, and rear speaker which allows me access to them, and still no luck !
The lines from the tank are accessed from under the car, they come out from above the differential. Removing the seat and speaker won't help you at all. The pump and vent line is on the top, fuel outlet and return are on the bottom of the tank.
Regarding photos, you can always post them to a hosting site like flickr and then post the link.
As Jagboi said, you can only access the pipes from underneth.
Yes the metal tangs/seals need to be in the tank, then the pipe is a simple push fit. The tank connectors should look like this before the pipes are inserted.
Thank you gentleman. Immense help !
The part about back seat and rear speaker was my desperation - although one does get a visual looking through hole where speaker sits.
My problem was that I was not installing the metal tangs in the tank receptors (?) and being a numskull thought they go on end of fuel lines.
Thank you for making it clear and appreciate the advise.
As Jagboi said, you can only access the pipes from underneth.
Yes the metal tangs/seals need to be in the tank, then the pipe is a simple push fit. The tank connectors should look like this before the pipes are inserted.
Thanks for the visual.
Put metal tangs in tank and re installed gas tank back in car.
However, I am unable to get the view you have in pic. It maybe that I do not have a lift and having to do this on my drive is the problem.
When I do slide under Jag all I can see is rear diff and unable to see pipes or back of tank.
However, I am unable to get the view you have in pic. It maybe that I do not have a lift and having to do this on my drive is the problem.
When I do slide under Jag all I can see is rear diff and unable to see pipes or back of tank.
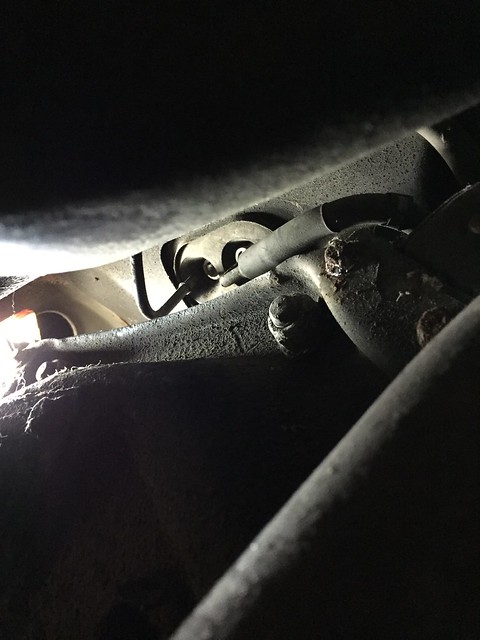
You're close! From the front of the car look towards the rear, above the nose of the differential. It is a help if you can have the rear of the car raised, even on ramps.
This is a view from the left side, looking rearward and upward. I think the dark portion at the top of the photo is the exhaust pipe.
Last edited by Jagboi64; Oct 20, 2016 at 11:56 PM.
You're close! From the front of the car look towards the rear, above the nose of the differential. It is a help if you can have the rear of the car raised, even on ramps.
This is a view from the left side, looking rearward and upward. I think the dark portion at the top of the photo is the exhaust pipe.
Great !
I will raise her on jacks.
Thanks !! It is making more sense now, and just a matter of the right angle to access.
If it doesn't rain, I should get a chance tomorrow before work.
Patience is a virtue with this one. It can definitely be done with diff etc in place, and once you have manoeuvred the pipes into the correct position, it all lines up nicely. A bit of lube on the end of the pipes will help, and it doesn't take a lot of force to engage them in the seals. If you are having to force them, withdraw and try again, as the fittings are easy to damage.