
Ski slope removal in a 1995 XJ6 (X300) FAQ

Thread Starter
|
Senior Member
Joined: Mar 2011
Posts: 298
Likes: 30
From: Blackburn, N.W. England
Hi guys,
As predicted I got out of the body shop yesterday and I had a go at removing the ski slope today with the intention of cleaning a sensor type gizmo that could maybe, possibly be the cause of an engine not firing due to the gear selector not being truly in "P".
There are lots of pictures so I'll start them on the next post rather than having a mahoosice opening post that you need to scroll through every time.
Cheers all
Thread Starter
|
Senior Member
Joined: Mar 2011
Posts: 298
Likes: 30
From: Blackburn, N.W. England
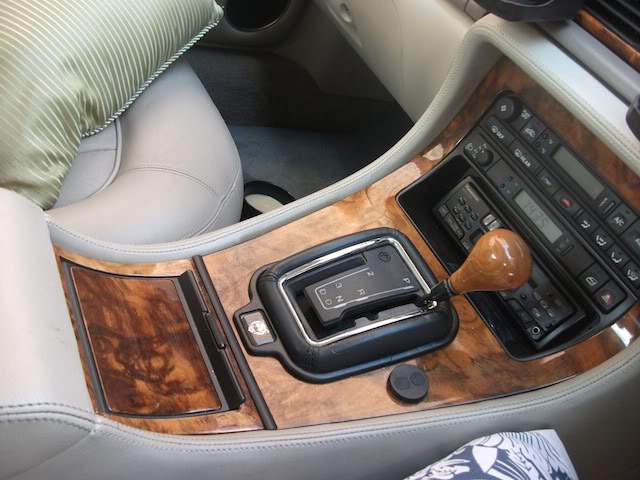
The first bit is simple.
Just lift the centre arm rest and undo the 2 cross-head screws.
Just move the bottom arrow down a bit to the screw head. (DUH)
Just lift the centre arm rest and undo the 2 cross-head screws.
Just move the bottom arrow down a bit to the screw head. (DUH)
Last edited by 5tevie; Jun 30, 2011 at 09:55 AM.
Thread Starter
|
Senior Member
Joined: Mar 2011
Posts: 298
Likes: 30
From: Blackburn, N.W. England
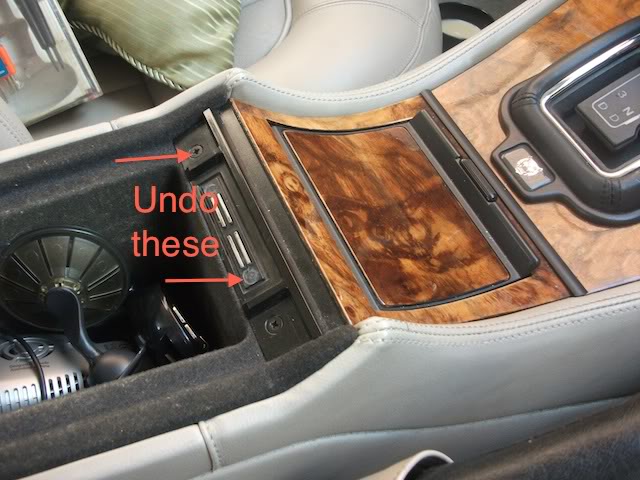
The next bit is trickier.
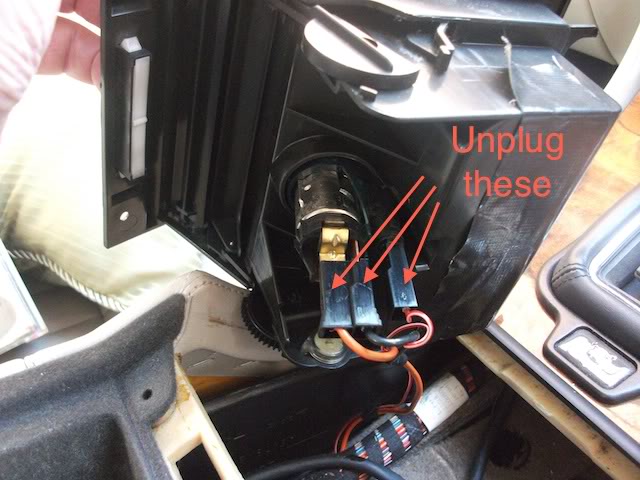
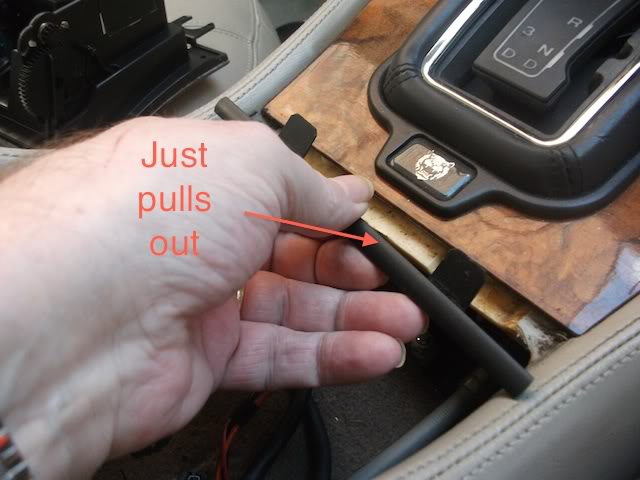
You need to prise up the black bit holding the magnets and screw holes to lift the ash tray away from its seat and then remove the 2 electrical plugs (1 x single + 1 x double) then put the ashtray assembly off to one side and gently pull out the slim black plastic strip
You need to prise up the black bit holding the magnets and screw holes to lift the ash tray away from its seat and then remove the 2 electrical plugs (1 x single + 1 x double) then put the ashtray assembly off to one side and gently pull out the slim black plastic strip
Thread Starter
|
Senior Member
Joined: Mar 2011
Posts: 298
Likes: 30
From: Blackburn, N.W. England
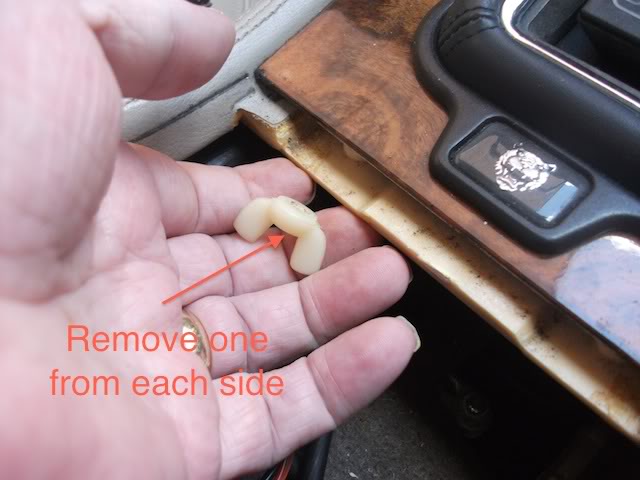
Next job is to unscrew the 2 white wing-nuts, one from each side, from underneath the edge of the ski slope.
Once you have them off, gently prise up the front end of the black plastic trim that surrounds the gear selector gate. Ease it up all the way around until you can remove it. Put it where you put the ashtray so they can have a chat.

Once you have them off, gently prise up the front end of the black plastic trim that surrounds the gear selector gate. Ease it up all the way around until you can remove it. Put it where you put the ashtray so they can have a chat.
Thread Starter
|
Senior Member
Joined: Mar 2011
Posts: 298
Likes: 30
From: Blackburn, N.W. England
OK, getting near the end now.
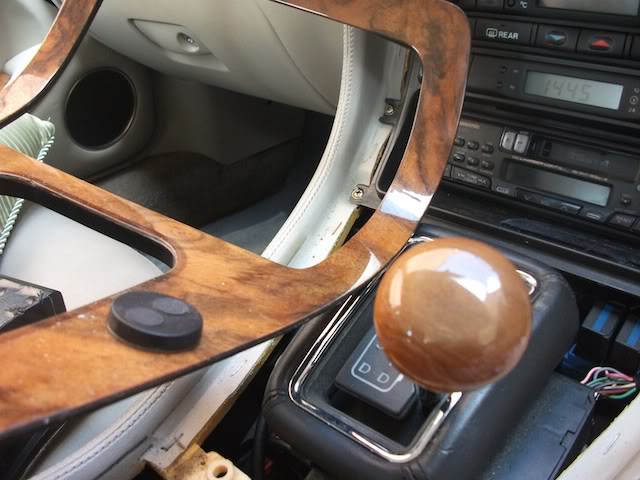
As you start to lift the wood veneer of the ski-slope up from the ash tray end, be careful to remove the studs (from the wing-nuts you removed earlier) or they may fall out and get lost.
Then all you need to do is wiggle the ski-slope about until it comes off altogether.

As you start to lift the wood veneer of the ski-slope up from the ash tray end, be careful to remove the studs (from the wing-nuts you removed earlier) or they may fall out and get lost.
Then all you need to do is wiggle the ski-slope about until it comes off altogether.
Thread Starter
|
Senior Member
Joined: Mar 2011
Posts: 298
Likes: 30
From: Blackburn, N.W. England
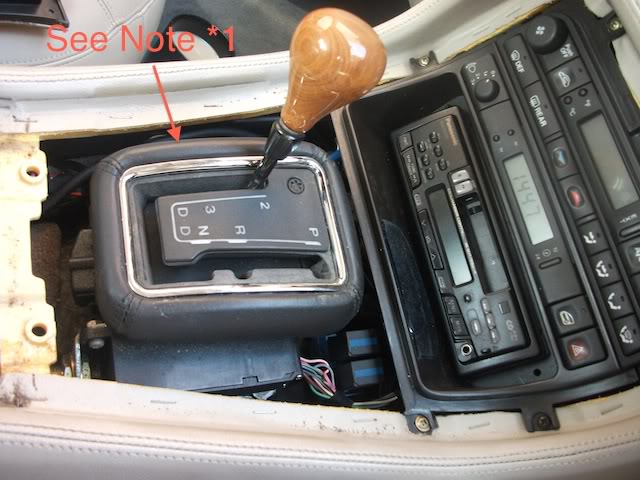
Now that the ski slope is off and technically my job is done, we come to my reason for posting these last 2 pictures.
*1 ..... This padded black leather bit doesn't seem to want to come off. The corner where I have put the gear selector will lift off about an inch but the other 3 corners refuse to move at all. Are there other hidden screws that I am supposed to remove?
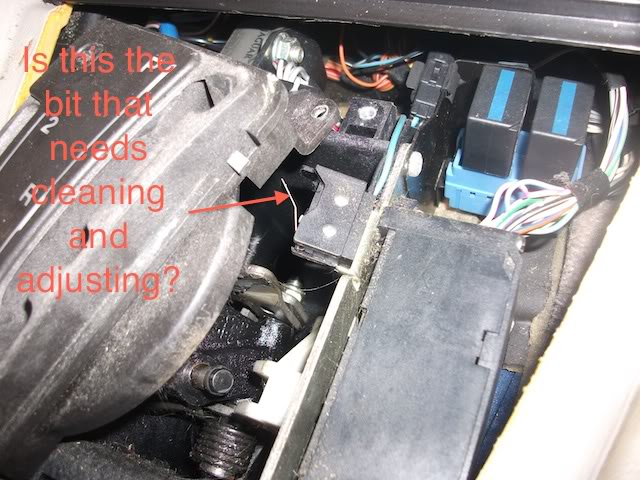
*2 ..... With the ski slope now removed, I half expected to see something that looked like it might need cleaning but I have no idea what I am supposed to do next. Does anybody know which gizmo within these photos is the bit that may or may not cause starting issues with the "P" not lighting when it should?
Cheers all,
Steve
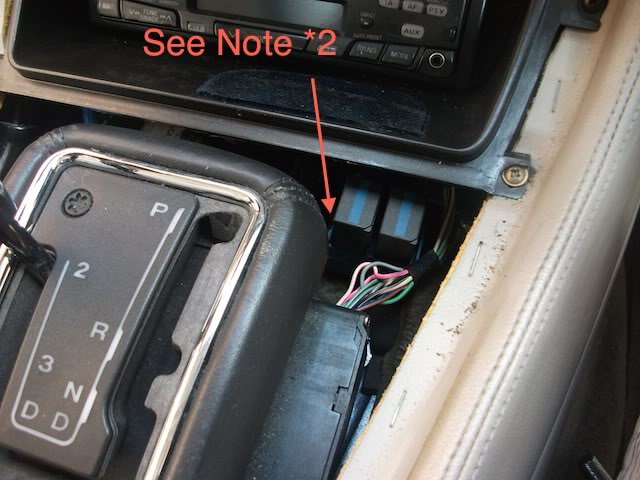
*1 ..... This padded black leather bit doesn't seem to want to come off. The corner where I have put the gear selector will lift off about an inch but the other 3 corners refuse to move at all. Are there other hidden screws that I am supposed to remove?
*2 ..... With the ski slope now removed, I half expected to see something that looked like it might need cleaning but I have no idea what I am supposed to do next. Does anybody know which gizmo within these photos is the bit that may or may not cause starting issues with the "P" not lighting when it should?
Cheers all,
Steve
THE END

Senior Member
Joined: Sep 2010
Posts: 169
Likes: 24
From: Scotland
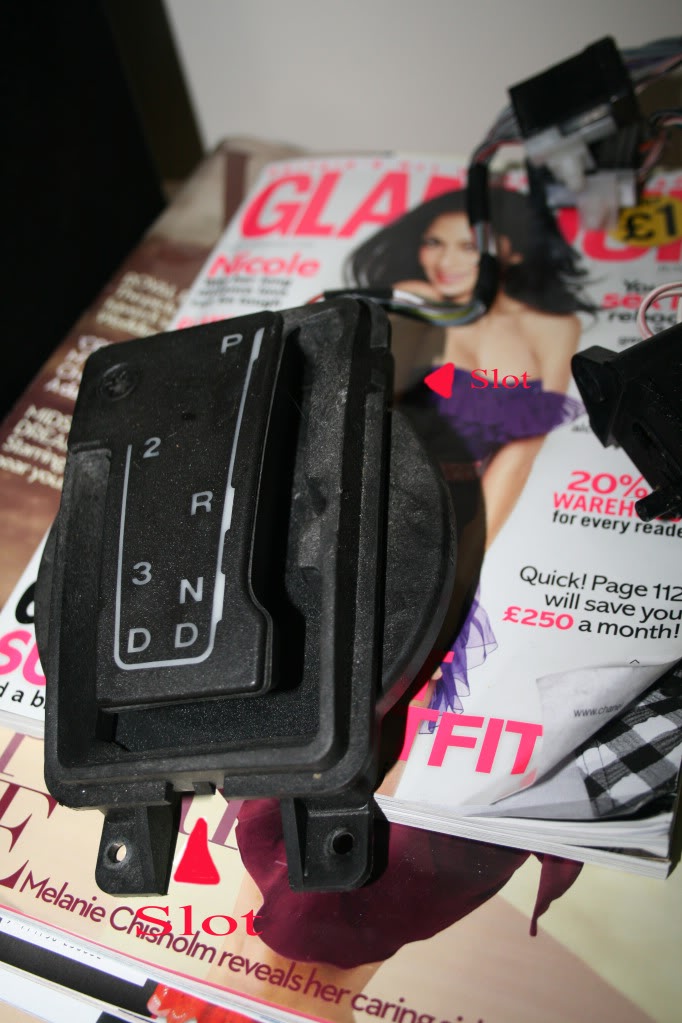
You need to get the plastic chrome trim and leather off Stevie. Here is a photo of the J gate and you can see 2 of the 3 slots that the tangs of the plastic chrom are fixed onto. Slide a thin blade down into each of the slots to prize the chrome tangs off their clips. For clarification, you slide the blades between the chrome and the J gate, ie, inside the chrome rectangle, not outside. Pull up the chrome/leather. So easy to break the tangs by the way.
Trending Topics
Thread Starter
|
Senior Member
Joined: Mar 2011
Posts: 298
Likes: 30
From: Blackburn, N.W. England
Do you mind if I call you DOHC? It feels odd calling you Straight guy. 
Thanks for that extra bit of info. I read it just now and saw that there was still a bit of light in the sky so I went out and had a fiddle.
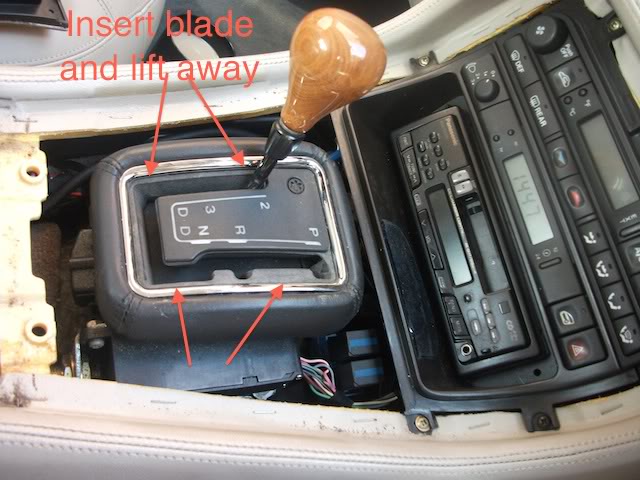
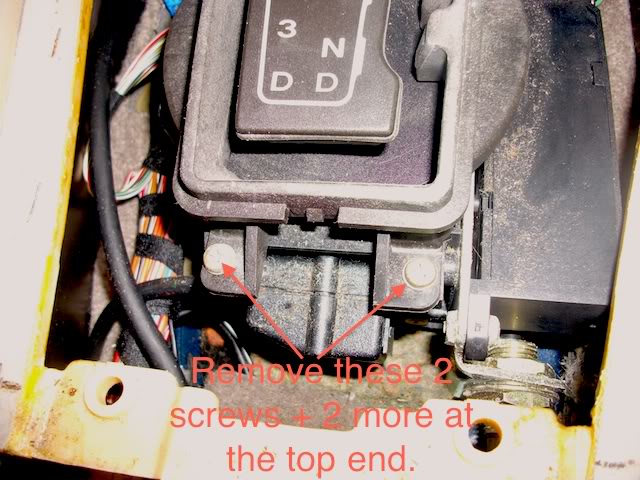
We have seen the first picture before but this time there are extra arrows and info on it.
Inserting the blade in the right place and jiggling the padded bit about a little will soon have it off.
Thanks for that extra bit of info. I read it just now and saw that there was still a bit of light in the sky so I went out and had a fiddle.
We have seen the first picture before but this time there are extra arrows and info on it.
Inserting the blade in the right place and jiggling the padded bit about a little will soon have it off.
Thread Starter
|
Senior Member
Joined: Mar 2011
Posts: 298
Likes: 30
From: Blackburn, N.W. England
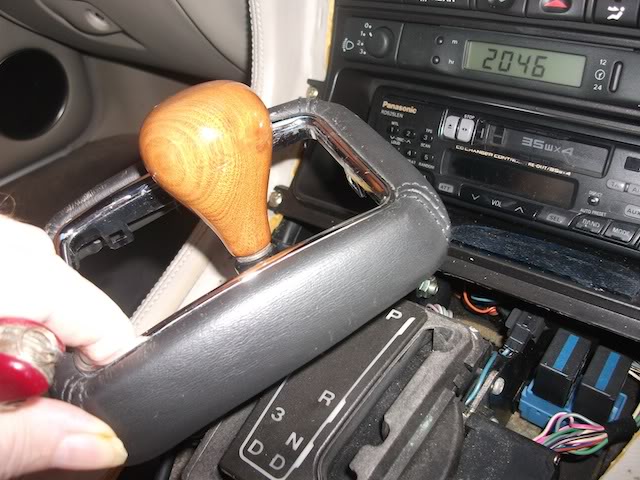
The surround is easy enough to lift off and move out of the way before undoing and removing the 4 screws, 2 arrowed and 2 at the top end of the gate. Be careful not to lose the washers on these screws.
Thread Starter
|
Senior Member
Joined: Mar 2011
Posts: 298
Likes: 30
From: Blackburn, N.W. England
With the gate now lifted slightly (it's still connected by a wiring loom so can't be moved out of the way altogether) you can see a small doofah at the right hand edge. I'd prefer to get that black box with the 2 silver circles out of there to clean it properly but that looks like a lot of trouble.
Unless it just HAS to be done, I'll stick to a lint free cloth, some Contact cleaner spray and a tiny bit of elbow grease.
Is there anything else that I should do while I have it all in bits?
Cheers, m'dears,
Steve
Unless it just HAS to be done, I'll stick to a lint free cloth, some Contact cleaner spray and a tiny bit of elbow grease.
Is there anything else that I should do while I have it all in bits?
Cheers, m'dears,
Steve


Senior Member
Joined: Jun 2011
Posts: 307
Likes: 68
From: Cypress, TX
Steve ... thanks for taking the time to post this, along with the photos.
One of my tasks is to open up the center-shift-console ... whenever I tap the brake pedal, i can hear a solenoid "clicking" in the center console - your procedure is much more than helpful in me getting to a solution ... thanks!
One of my tasks is to open up the center-shift-console ... whenever I tap the brake pedal, i can hear a solenoid "clicking" in the center console - your procedure is much more than helpful in me getting to a solution ... thanks!

Thread Starter
|
Senior Member
Joined: Mar 2011
Posts: 298
Likes: 30
From: Blackburn, N.W. England
Regent .... "Ski slope" had me confuddled when I first saw it on a Jag forum . 
Just to see what happens, before I put it all back together after giving it all a good clean I'm going to give that strip of metal that comes out of the little black box a tweak so that it points more to the East.
Then I'll see what kind of a difference that makes.
I may have to take it apart again to bend it the other way but it's only a 10 minute job.
Seriously, if anybody is reading this and thinking, "It all looks so complicated", it really isn't. I'm no expert mechanic and I bet the last time I worked on a car apart from removing the battery on this Jag, was over 15 years ago.
All I used tool-wise was a cross-headed (Phillips) screwdriver about 8 inches long (better than a short one) and a pen-knife. The only difficult bit was knowing where to put the knife blade to remove the padded bit round the gate. Just don't go at it like a bull in a china shop and it will be easy.
Thread Starter
|
Senior Member
Joined: Mar 2011
Posts: 298
Likes: 30
From: Blackburn, N.W. England
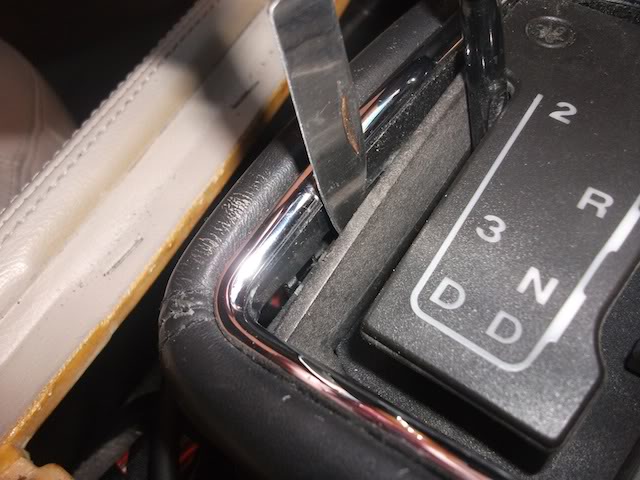
Rumbled, DOH!!!
I took the padded bit completely off and then thought, "Ooops, I didn't take a picture." so I just put it back and stuck the blade down there for cinematic effect.
Anyway, if Alfred Hitchcock can get away with it, so can I .
I took the padded bit completely off and then thought, "Ooops, I didn't take a picture." so I just put it back and stuck the blade down there for cinematic effect.
Anyway, if Alfred Hitchcock can get away with it, so can I .
Senior Member
Joined: Jun 2011
Posts: 307
Likes: 68
From: Cypress, TX
Steve ... thanks for taking the time to post this, along with the photos.
One of my tasks is to open up the center-shift-console ... whenever I tap the brake pedal, i can hear a solenoid "clicking" in the center console - your procedure is much more than helpful in me getting to a solution ... thanks!
One of my tasks is to open up the center-shift-console ... whenever I tap the brake pedal, i can hear a solenoid "clicking" in the center console - your procedure is much more than helpful in me getting to a solution ... thanks!

Thanks 5Tevie.....nice post and one for the FAQ's I believe!
Note - just for future reference Stevie, I've increased the limit so that posts like these can ALL be put into one post for much easier reference for future members!
If you make any similar posts in future it would be worth bearing that in mind as Your post will then become even easier for the reader to enjoy....Thanks so much

Member
Joined: Jun 2011
Posts: 61
Likes: 2
From: mesa, az
wowowowwo Stevie thxxxxxxxxxxxxxxx, thxxxxxxxxxx i've been trying to figure out mine comes apart, i've had the gearshift surround off, and the center console out but never could see the wing nuts... gracia senior keep up the good info
geno
1995 xj6 4.0 184k still going
geno
1995 xj6 4.0 184k still going