
Checking your primary electrical connections

Thread Starter
|
Senior Member
Joined: Nov 2012
Posts: 586
Likes: 243
From: Merseyside, United Kingdom
If you are having starting/charging problems, or getting the ABS/Traction Control fault light illuminating, then it's worth checking the following primary vehicle electrical connectors for corrosion or loose bolts before you start to fault-find further:
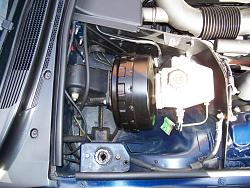
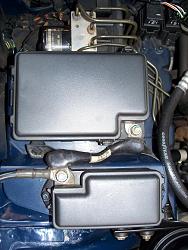
The False Bulkhead connector-under the bonnet & accessed by removing the upper rear RH side plastic trim panel as in the photos:
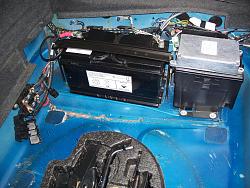
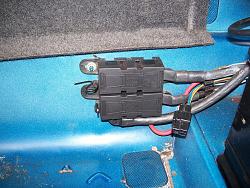
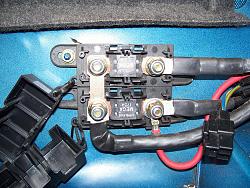
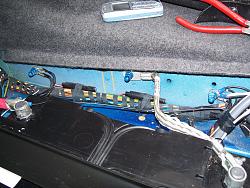
Next, open the boot & remove the boot floor carpet, battery cover & spare wheel. This will expose the 2 big fuses as in the photo-remove the 2 plastic covers for the fuses & this will expose the 4 bolts for the fuses as in the photos:
Check all these bolts for tightness-be VERY CAREFUL if you leave them 'live' whilst tightening them, as if you touch the spanner or wrench to any exposed bodywork then you will witness just how low the electrical resistance of a lead-acid battery really is. Either disconnect the battery earth, or wrap a cloth around the spanner/wrench & wear gloves if you are going to do this 'live'.
These connections 'settle' over the years & benefit from re-tightening to keep the electrical resistance as low as possible. This is the primary electrical path for the very high currents & so needs to be kept in good condition with clean & tight connections. When I did mine there was a noticeable increase in the cranking speed of the starter motor without the occasional ABS/Traction Control fault light illuminating.
By popular demand-they made me do it, your honour
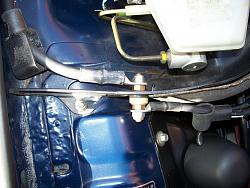
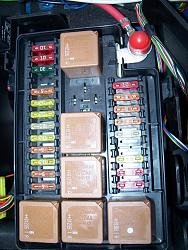
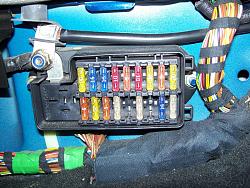
Here are the primary supply connections for all 5 vehicle fuseboxes, starting from the boot & working through to the rear heelboards & then under the bonnet. Remove the rubber cover & tighten the 13mm nut:

These are the ground points to check & tighten, starting with the boot by the battery, and then under the bonnet behind the headlamps:


Give all these points a good check over for corroded connections & then tighten any loose bolts. The ground points are 10mm bolts & the positive connections are 13mm bolts. Take great care with the positive connections if they are live-disconnect the battery for maximum safety, or wear gloves & use a cloth around the spanner or wrench.
The best thing about doing this is that it costs nothing-unless you are careless & have an 'accident' with the Amps
The False Bulkhead connector-under the bonnet & accessed by removing the upper rear RH side plastic trim panel as in the photos:


Next, open the boot & remove the boot floor carpet, battery cover & spare wheel. This will expose the 2 big fuses as in the photo-remove the 2 plastic covers for the fuses & this will expose the 4 bolts for the fuses as in the photos:


Check all these bolts for tightness-be VERY CAREFUL if you leave them 'live' whilst tightening them, as if you touch the spanner or wrench to any exposed bodywork then you will witness just how low the electrical resistance of a lead-acid battery really is. Either disconnect the battery earth, or wrap a cloth around the spanner/wrench & wear gloves if you are going to do this 'live'.
These connections 'settle' over the years & benefit from re-tightening to keep the electrical resistance as low as possible. This is the primary electrical path for the very high currents & so needs to be kept in good condition with clean & tight connections. When I did mine there was a noticeable increase in the cranking speed of the starter motor without the occasional ABS/Traction Control fault light illuminating.
By popular demand-they made me do it, your honour
Here are the primary supply connections for all 5 vehicle fuseboxes, starting from the boot & working through to the rear heelboards & then under the bonnet. Remove the rubber cover & tighten the 13mm nut:


These are the ground points to check & tighten, starting with the boot by the battery, and then under the bonnet behind the headlamps:


Give all these points a good check over for corroded connections & then tighten any loose bolts. The ground points are 10mm bolts & the positive connections are 13mm bolts. Take great care with the positive connections if they are live-disconnect the battery for maximum safety, or wear gloves & use a cloth around the spanner or wrench.
The best thing about doing this is that it costs nothing-unless you are careless & have an 'accident' with the Amps
Last edited by Red October; May 8, 2013 at 07:24 AM.


Thread Starter
|
Senior Member
Joined: Nov 2012
Posts: 586
Likes: 243
From: Merseyside, United Kingdom
Ground points done as requested-although I'm not getting under the car to photograph the ground straps as this is England in summertime, which means wind & rain


Joined: Jan 2013
Posts: 380
Likes: 80
From: Shelby Township MI. USA
Just remember to disconnect the battery before tightening these terminals.
Reminds me of the class idiot when I was doing my last year (1975) at school in Luton, England. During our car mechanics class he thought it was a good idea to check a recently charged battery by placing a screwdriver across the terminals, big flash, blew the top of the battery, he was rushed off to the gym showered down fully clothed and amazingly only suffered slight burns. It was not until later that I noticed that my school blazer had developed white patches which progressed to holes. When I got home I found out that my mum could wack me almost as hard as my dad for ruining my blazer. It�s this wacking I always think of when working on electrics, who said corporal punishment does not work.
Reminds me of the class idiot when I was doing my last year (1975) at school in Luton, England. During our car mechanics class he thought it was a good idea to check a recently charged battery by placing a screwdriver across the terminals, big flash, blew the top of the battery, he was rushed off to the gym showered down fully clothed and amazingly only suffered slight burns. It was not until later that I noticed that my school blazer had developed white patches which progressed to holes. When I got home I found out that my mum could wack
Veteran Member


Joined: Oct 2008
Posts: 1,838
Likes: 459
From: Virginia Beach, VA
This is very good advice. I know I have had grounding / bad connection problems a couple of times and jumped to ridiculous conclusions thinking OMG, it's a Jag and the electrics are sooo complicated I'll never figure it out. I went so far as to replace the braided ground cables with solid ones because the braided ones got a little too warm. Low voltage, bad connections can cause all sorts of weird effects. I have had TRAC/ASC, check rear lights messages due to iffy power connections.

Thread
Thread Starter
Forum
Replies
Last Post
99xk8guy
XK8 / XKR ( X100 )
12
Sep 29, 2025 10:51 PM
OkieTim
S-Type / S type R Supercharged V8 ( X200 )
3
Sep 8, 2015 04:48 PM
02jagstype
S-Type / S type R Supercharged V8 ( X200 )
0
Sep 4, 2015 08:20 PM
Currently Active Users Viewing This Thread: 1 (0 members and 1 guests)