
Help - rear view mirror housing broke

Well this is frustrating as all get out. My wife went to adjust the rear view mirror last night and the housing broke at the joint where it attaches to the mount. I sent the mirror to Sybesma in March so its in perfect working order. Is there a cheaper fix to this than the $300 mirror housing from Jag?
Veteran Member


Joined: Dec 2013
Posts: 3,256
Likes: 1,371
From: Taiwan, R.O.C.
I had the exact same problem with a replacement mirror I bought.
Still had the old one, and gave it a try to make 'one out of two'.
I succeeded.
I guess u buy a broken mirror cheap, and do the same.
Can post some pics tomorrow.
E.
Still had the old one, and gave it a try to make 'one out of two'.
I succeeded.
I guess u buy a broken mirror cheap, and do the same.
Can post some pics tomorrow.
E.
yeah? they pull apart ok? I'd prefer to keep the electronics in there and just replace the plastic housing
Veteran Member
Joined: Dec 2013
Posts: 3,256
Likes: 1,371
From: Taiwan, R.O.C.
Will post some pics and instructions after I am back tomorrow.
Veteran Member
Joined: Dec 2013
Posts: 3,256
Likes: 1,371
From: Taiwan, R.O.C.
Found that I have the pictures also on my phone.
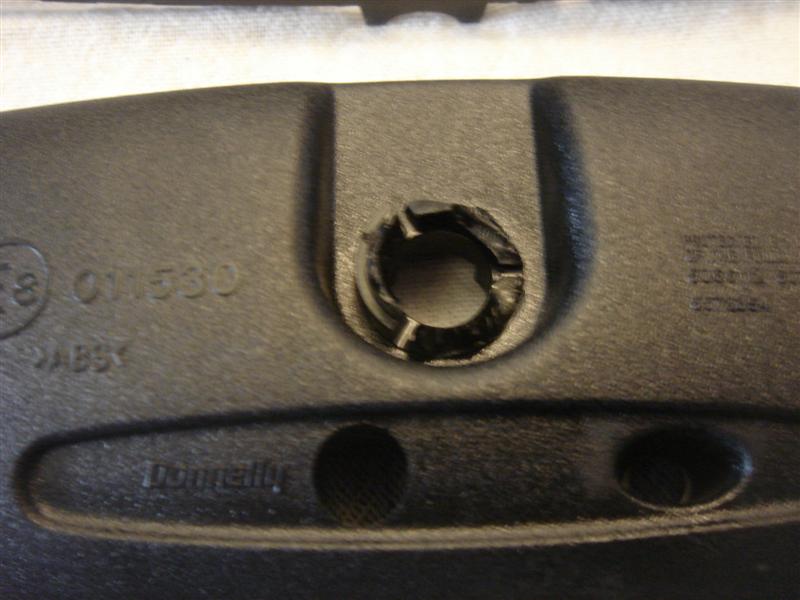
As mentioned, I had a bad mirror in a good housing, and a good mirror, of which the ball-joint broke (I hope for other forum members that this is not going to be the next new problem on these cars ..)
I decided to give it a try on the mirror with the broken housing first, as there was not much to loose there.
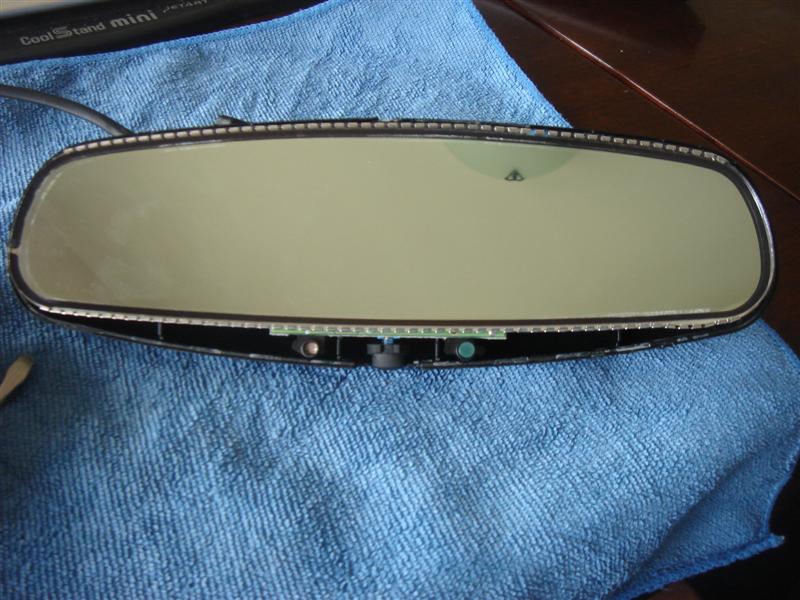
The 2 housing parts are held together by a combination of 2 clips at the outer ends, several locators (lips) around the housing, and what seems to be glue all around.
I put the mirror glass-down on a towel, then carefully pried a small screwdriver between the 2 parts, working from the middle of the top of the mirror slowly outwards.
You will need to find the right movement of the screwdriver, pushing it slowly outwards while turning the bit at the same time.
This way the glue brakes away at 1/4 inch at the time.
Be careful that you limit the imprint of the screwdriver in the relative soft plastic.
It makes terrible noises, and you will surely think several times the whole housing cracks, but in my case it did not.
Slowly work your way to the outer corners, where you have to be very careful as the clips are in the way.
I decided to break them, as you will not need them later on.
Then work your way inwards on the bottom of the mirror.
At a certain point, the mirror will crack open.
If you feel confident enough, and after a little prayer, you can repeat the process on the good housing.
If that is successful, it is just a matter of carefully exchanging and installing the parts, cable, push button, and adjusting knob.
Be careful with the glass though.
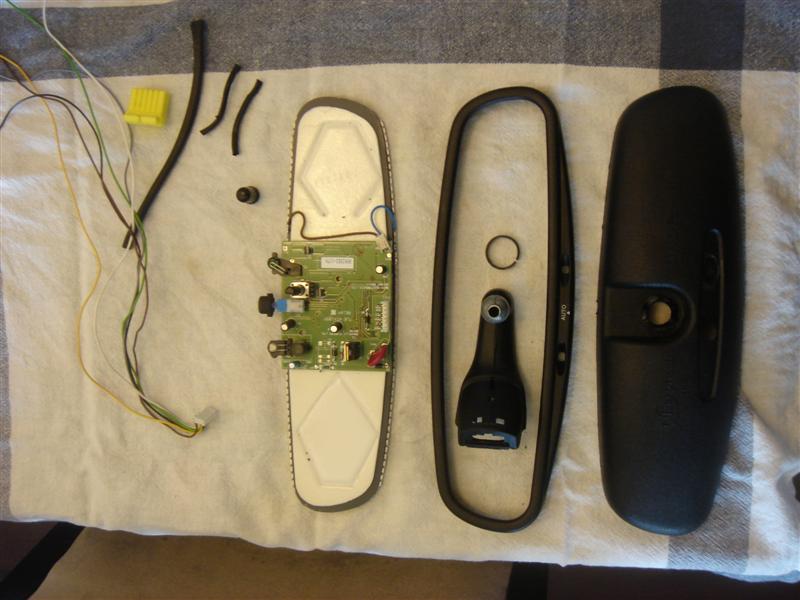
I decided to re-glue the housings together.
If you do that carefully, there is no glue visible on the outside, and the result is a rock solid mirror, which works as it should do.
By the way, I really have no idea how Sybesma does it without any damage to the housing.
Perhaps they heat them up.
You might try that as well, I thought about it too late, but did mine in relative hot ambient temperatures this summer.
As mentioned, I had a bad mirror in a good housing, and a good mirror, of which the ball-joint broke (I hope for other forum members that this is not going to be the next new problem on these cars ..)
I decided to give it a try on the mirror with the broken housing first, as there was not much to loose there.
The 2 housing parts are held together by a combination of 2 clips at the outer ends, several locators (lips) around the housing, and what seems to be glue all around.
I put the mirror glass-down on a towel, then carefully pried a small screwdriver between the 2 parts, working from the middle of the top of the mirror slowly outwards.
You will need to find the right movement of the screwdriver, pushing it slowly outwards while turning the bit at the same time.
This way the glue brakes away at 1/4 inch at the time.
Be careful that you limit the imprint of the screwdriver in the relative soft plastic.
It makes terrible noises, and you will surely think several times the whole housing cracks, but in my case it did not.
Slowly work your way to the outer corners, where you have to be very careful as the clips are in the way.
I decided to break them, as you will not need them later on.
Then work your way inwards on the bottom of the mirror.
At a certain point, the mirror will crack open.
If you feel confident enough, and after a little prayer, you can repeat the process on the good housing.
If that is successful, it is just a matter of carefully exchanging and installing the parts, cable, push button, and adjusting knob.
Be careful with the glass though.
I decided to re-glue the housings together.
If you do that carefully, there is no glue visible on the outside, and the result is a rock solid mirror, which works as it should do.
By the way, I really have no idea how Sybesma does it without any damage to the housing.
Perhaps they heat them up.
You might try that as well, I thought about it too late, but did mine in relative hot ambient temperatures this summer.

Member
Joined: Aug 2012
Posts: 41
Likes: 4
From: Oswego, NY
So, I have an issue where the circular "spring" clip that hold the ball joint tight has sprung off of the plastic clamp. Therefore, the mirror will not hold in position.
I know I need to spread the ring to slide it back over the plastic section where the ball joint seats, but, I am having difficulty in opening it wide enough to slip it over.
How did you achieve that? Do you have a special tool?
I know I need to spread the ring to slide it back over the plastic section where the ball joint seats, but, I am having difficulty in opening it wide enough to slip it over.
How did you achieve that? Do you have a special tool?
Veteran Member
Joined: Dec 2013
Posts: 3,256
Likes: 1,371
From: Taiwan, R.O.C.
I see your point, but I did not need to reinstall that washer myself.
I propose you buy the appropriate tool for it (kind of reverse working nose-plyer), that's way cheaper then a new mirror.
The plastic is brittle, and once you break it, it's game-over.
Good luck.
I propose you buy the appropriate tool for it (kind of reverse working nose-plyer), that's way cheaper then a new mirror.
The plastic is brittle, and once you break it, it's game-over.
Good luck.
Trending Topics
Member
Joined: Aug 2012
Posts: 41
Likes: 4
From: Oswego, NY
So, I have now studied that ball joint, and clip in great detail and I now realise there should be a collar at the top of the compression joint, which must have sheared off, the fracture is smooth enough I did not notice it to begin with.
I wonder if it is possible to get a slightly bigger ring ......
I wonder if it is possible to get a slightly bigger ring ......
Member
Joined: Aug 2012
Posts: 41
Likes: 4
From: Oswego, NY
So, I decided to just try a simple approach. I got a cable tie as wide as the collar is tall (black so that it does not show) and pulled that sucker as tight is it would go and it's given enough compression that the mirror holds and swivels just like it should.

Thread
Thread Starter
Forum
Replies
Last Post
Currently Active Users Viewing This Thread: 1 (0 members and 1 guests)