When you click on links to various merchants on this site and make a purchase, this can result in this site earning a commission. Affiliate programs and affiliations include, but are not limited to, the eBay Partner Network.
How To: Repair the J-Gate (shifter assembly) Backlight.
Hi Guys. I had a lot of help on my J-Gate installation
from the guys on here. Thanks to Stu 1986, Sean B,
flay, and a special thanks to Rae, for getting me back on
the road again!!!
Now, to business. I took photos of the whole job, so I
figured it would be easier for people who do this in the
future, if they had a photo guide on how to do it.
This applies to the XJR, XJ8... any X308.
**Warnings** Don't snap the little switches off of the
sides of the Shifter box while the shifter is taken apart. This will happen if
you change gears with no J-gate in place, just using
the bare shaft. Also, (I thought this may go without saying) Don't start the car during this project. Ever. Every warning light ever will come on, and the
car will start at too high of an idle. Also, Don't
drop the bolts into that hole. When you inevitably drop
something down there, though, it is nice to have an
extending magnet to grab the bolt you dropped. **End of Warnings**
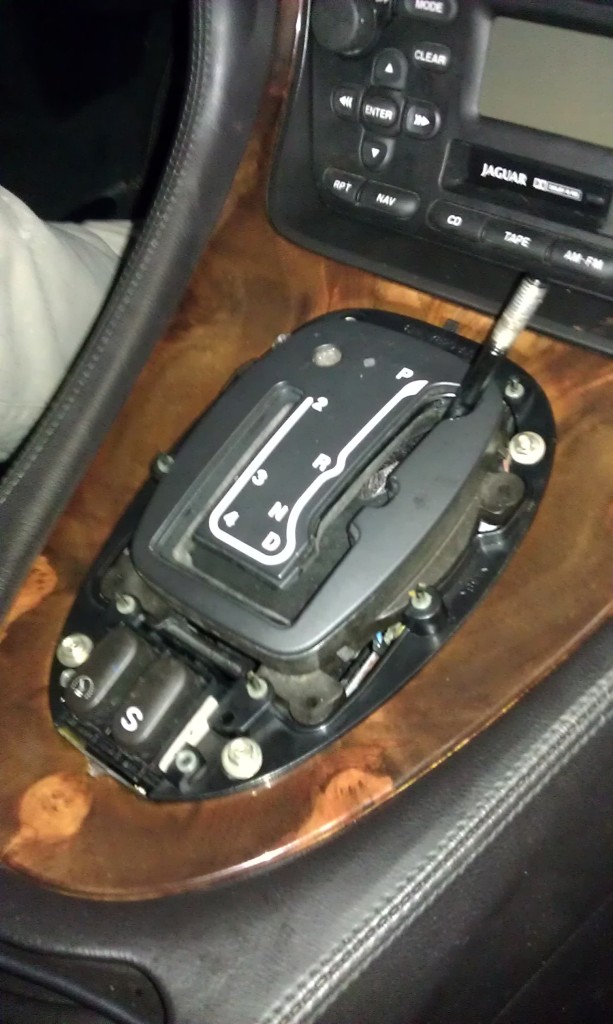
When you start to dissasemble your J-Gate, first
you need to unscrew the shift knob with your hand.
To get the black base of the shift knob off, grab
a 5/8ths inch wrench, and it will twist off.
Once the shaft is totally free of the knob (oh
dear, this isn't going well!)
Pull the handbrake, and then turn the key to the
"II" position, and slide the shifter into "N", and
wait 10s for the beeping to stop.
Now, Lift up on the top of the leather-covered
J-Gate base, and pull gently. Lift it from the top
first, then get it clear of the "sport" and "cruise
(speed) control buttons. Once the base is clear,
stow it on the dash. You won't need it again until
re-install.
Now, unscrew the 4 bronze-coloured nuts from
the bottom, and the 2 same-shade bolts from the top,
and then remove the Sport buttons/ the black trim
ring from the J-Gate. I just let it dangle over the
footwell for the rest of the job.
Now, with the 4 bolts saved (I recommend
a plastic, labelled bad if you're absent-minded,
and if not... I just left them in the footwell)
Start to take the "Ski-Slope wood" off now.
I remembered that it needed to be pried off
firmly, but I don't believe it screwed in.
OPTIONAL: If you have normal sized fingers,
you won't be able to reach under the left side
of the centre console, to unplug the white harness
that connects the J-Gate Circuit Board to the car,
without first removing the stereo.
If you want to proceed with this step, which I suggest
you do, Unscrew the screws on the console, behind
the wood. These allow the stereo to be removed.
I also unscrewed the one at the very top of the
centre console, which holds the climate control in.
Unplug all the stereo wires, firmly but carefully.
once you've got that out, pull the little metal, arch-
shaped bracket out and store it. It used to sit at the base
of the stereo.
Take a photo like this, in case your car (unlike mine, which
doesn't) has a security feature which disables the stereo
if it is removed. This was not a problem for me, but it may
be a life-saver to someone.
This probably won't come up again, but skip to the end if
this is a problem.
Now, if you don't know where the white wiring connector
is, view this photo. It's underneath the blue one, which
I also unplugged the blue one on top of it. It has a bracket
under there, which holds the 2 connectors in place. It is not
necessary to restore the plugin to its original bracket.
Remember, this is a harness with about 9 connections.
This needs to be unplugged, and it has a tang on the
outboard side of the car.
And, voil�...
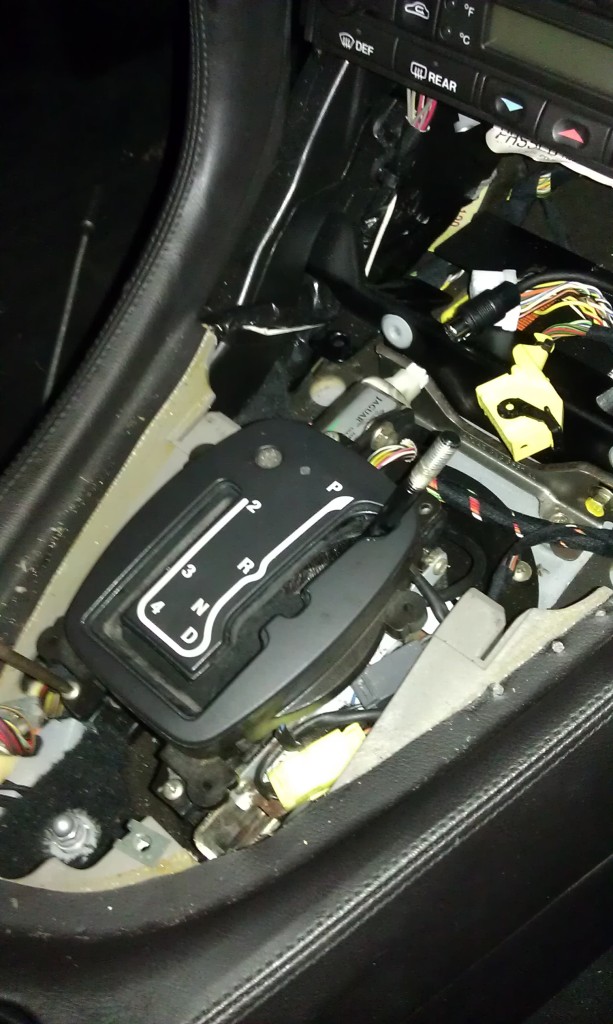
Now, since the J-Gate is unplugged, we proceed with taking it
out. Unscrew the 6 screws holding it in place.
**Mistakes I made, my first time doing it**
When I did this, I didn't know the J-Gate circuit board unplugged
where it did. So, I had the J-gate apart in-car, and the board
all by itself. It got broken, since some PB blaster might've
dissolved the connections. The part had to be replaced, and this
rendered the car undriveable.
***
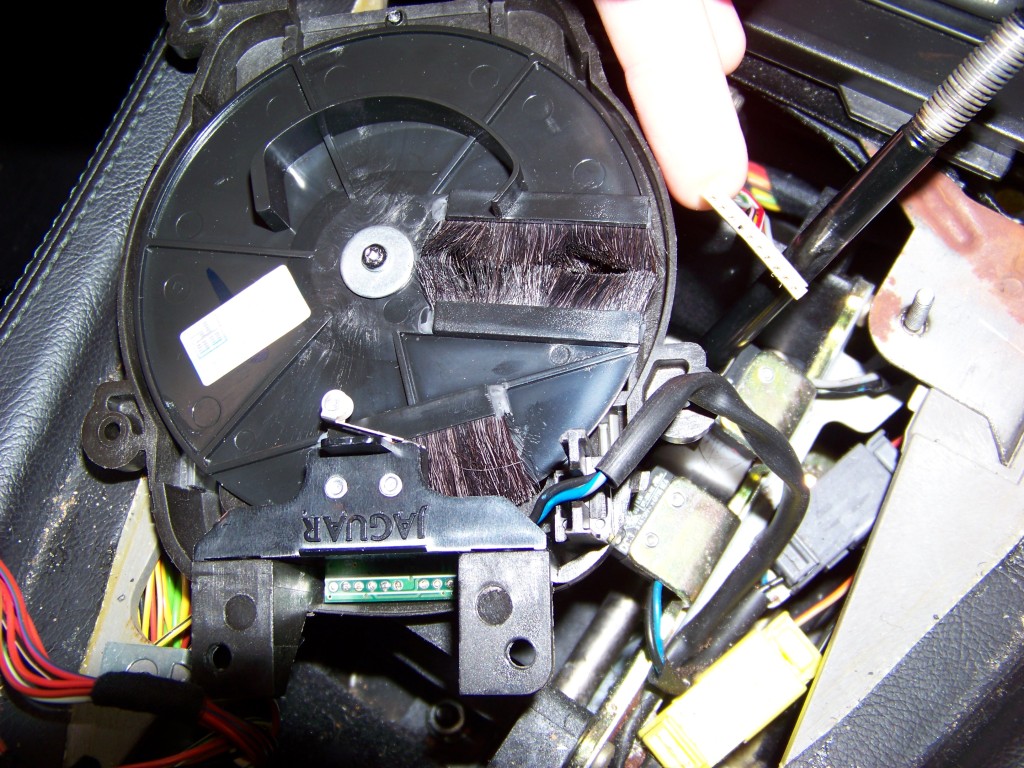
Now, there is one other wire to undo. This is some kind of a
reverse relay. It has a blue and black wire in my case.
The bracket for this wire is black plastic, and says "Jaguar"
on it. I used needle-nose pliers to get the 2 pegs squeezed
and then pushed out, and freed the J-Gate of its last
connection.
Since this was my botched attempt, notice that the J-gate green circuit
board isn't connected to its wire!
But more importantly, the blue and
black wires that remain attach to the "Jaguar" labelled bracket, which
has two horizontal pegs sticking out, just beneath the screw-holes
you can see.
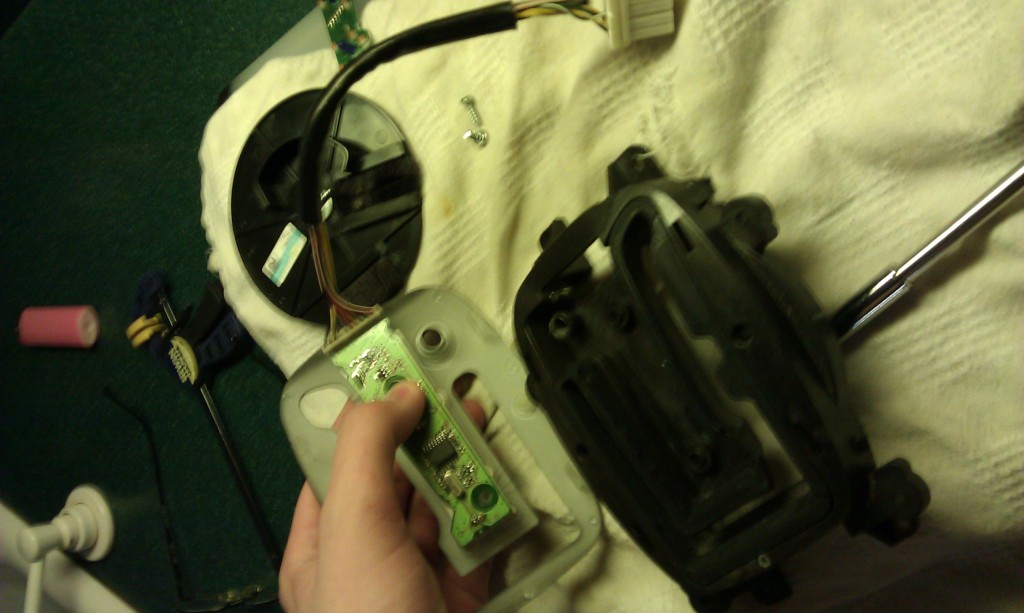
Now, you will have the J-Gate in your house. First, use a tiny,
flat-head jewellers screwdriver to take off the free-turning
wheel off the back of the assembly. It is a microscopic Torx head,
which I didn't have. Once this is off, There are four
tangs holding its cosmetic face in (the part that you can see
in the car, with PRND432 on it), which can be gently pried out.
Only start prying once the gearshift interlock screw, the
odd-headed round thing on top of the shifter, is completely
unscrewed. Use a wide flathead screwdriver for this task.
here is what it looks like when it's apart.
Now, get a soldering iron ready. (this requires some level of experience with
a soldering iron, I am thinking.) The light bulbs have a blue cover on them,
which can be removed first if you like. Now, use the soldering iron to warm
up a light bulb's two connections. Pull on it with another hand, to get
the bulbs 2 "legs" free. There should be 2 little dots of solder left on the board once it's free.
Repeat. Now, go out and buy the replacements. Radio Shack sells them
as a replacement flashlight bulb.
The Bulb is Radio Shack no. 272-1154, 12v, 50 mA.
The hard part is over. now, run out to the car, and turn the
ignition to position "II", lights on. Plug in the circuit board to
check if the lights work.
If they do, slip the blue covers on, and you're good to go.
Also ensure that the bulb is close to the base, and snip
off (I used cable cutters) the extra-long terminals. Make
sure the clearance is good, you don't want them standing
on stilts. It won't fit back inside the J-Gate then.
Ok, now the re-installation is ready. First, re-install the stereo
and the metal bracket that sits beneath it. Now, get the J-Gate
assembly, and ensure that the blue and white connectors are restored
to their original place, beneath the driver's side (LHD models) of the
console. Screw the J-gate back on (make sure the whole thing is
in the same state it was when it came out. Now, get the ski-slope wood
back on. Now, get the Ring, containing the "sport" and "cruise"
buttons. This will not tighten down until the ski-slope wood is on there.
Then, get the leather-and-chrome covered shifter surround snapped on,
aft first, and then fore last. (not too naval?) Then, grab your 5/8ths inch
wrench, and tighten back on the black shifter knob base onto the straight
shifter-shaft. Then, use your hand to screw the shift knob back on.
^If all that seems like idiotic dribble, then the re-installation is the reverse
of the dissasembly process.
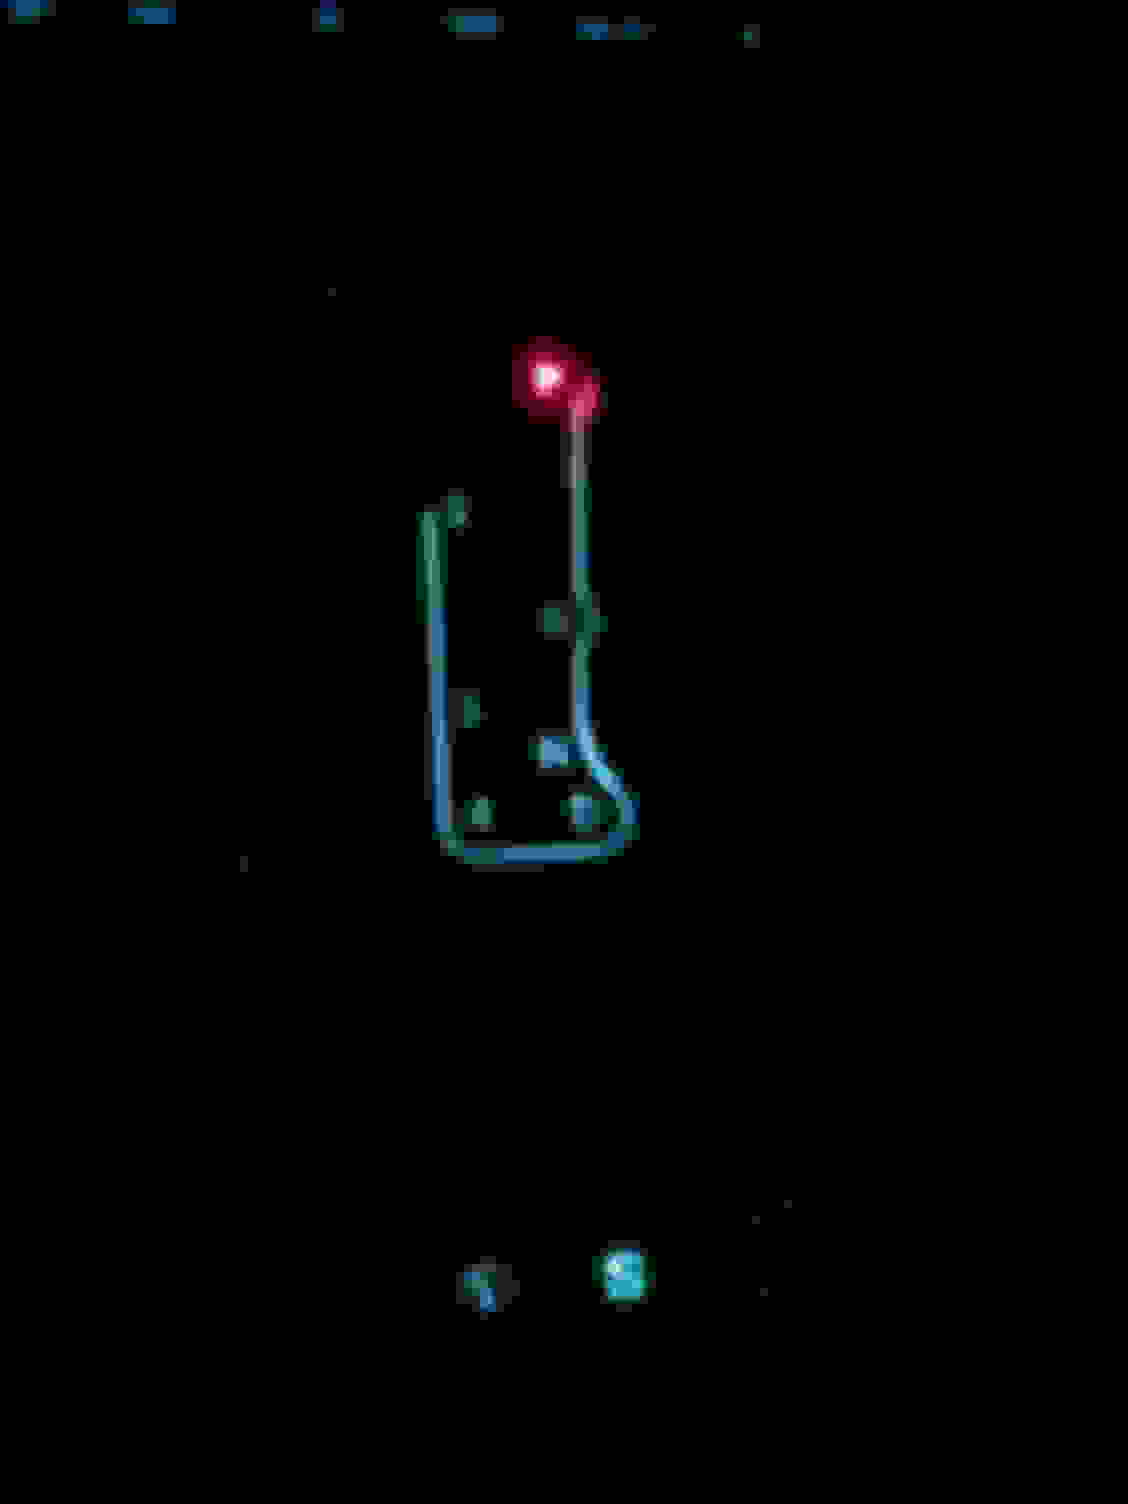
Next step: Enjoy the fruits of your labour! Your J-Gate is now back
and good as new. My cell camera has no concept of darkness, but
here is a rough idea of what it'll look like at night-time.
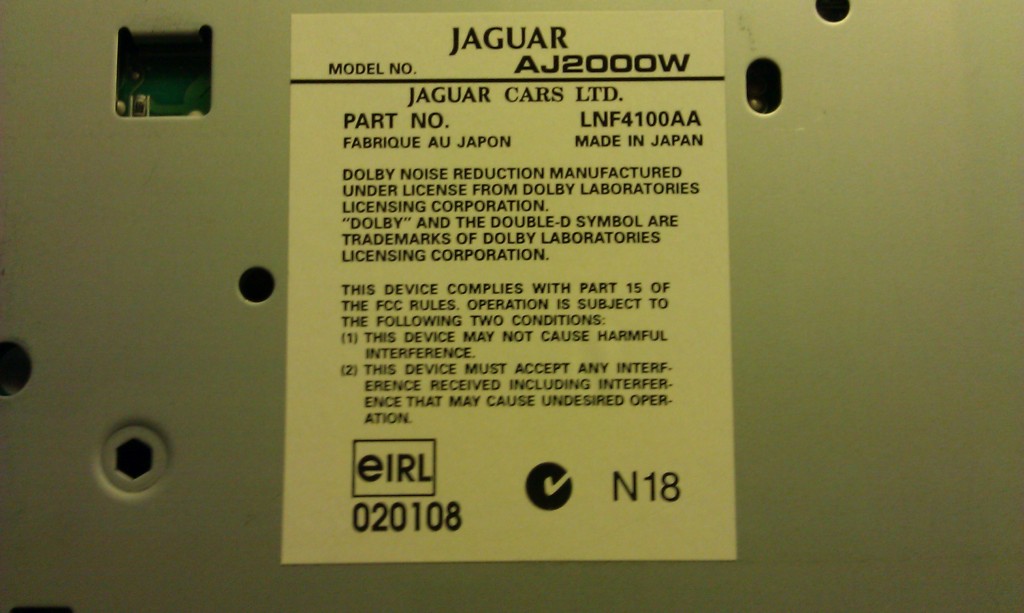
Now, if your stereo doesn't work, look at the label and call Jaguar USA corporate.
They will ask for proof of ownership, and then send you
the radio-reset codes. I doubt you will need this, only our '03 XK8 did.
First of all AWESOME write up on how to change the bulbs. I got both bulbs replaced and the whole thing out back together. However now I am receiving an fault code when I run my obdII code reader of p0706. Transmission sensor or D-4 fault. Any advice from anyone on what I might have screwed up to get this code?
I now own a different car (this was done on my 02 XJ Sport), but on my current XJR I had a sensor fail in the shifter (I'm fairly sure after some shop tech was rough on the shifter itself to cause that...) and was charged $650 by the dealer to replace it, with no DIY option, it was mid-winter and I had to get to the office!) . Sadly, some of these sensors are fragile. Whichever sensor failed in mine affected the one-touch-down functionality of my reverse RHS mirror adjustment (for curb viewing in parallel parking.)
This was a very useful DIY. I did mine today following these instructions with a few modifications:
After putting the car in reverse with the key in the II position the buzzer was so insistent and continued to buzz that I disconnected the battery just to have some quiet while I worked.
I didn't pull the radio or disconnect the circuit board from the harness. I removed the J-gate and opened it up and carefully took out the circuit board. It is still attached to its harness so it will only move so much and you have to work with it on its short cable tether. I decided to solder the bulbs in the car. I used an old steel beer can and placed it in the cupholder so I would have a place to rest my hot soldering iron. Then I removed my new Radio Shack 12v 50mA bulbs and had them ready.
Heating up the bottom of the solder that holds the two prong bulb in place took some time and I had to pull on the bulb at the same time I was heating the solder so that took some care. But with patience the bulb popped free. I removed the blue cover and then held the new bulb over the two holes in the circuit board now filled with cooled solder. I had to again place and push the bulb down onto the circuit board as I heated the solder so that when it liquified the bulb prongs could slide into and through the holes. which they both did with a very satisfying snap. The solder cooled and held them both in place and then I put on the other blue cap and reassembled everything.
Only 4 Phillips head screws hold the J Gate in place. They are a pain to rotate with the correct screwdriver and the grooves in the screw head are weird and the screwdriver wants to slip out. Slow quarter turns and pressure on the screwdriver and I got them out and back in. That was the slowest part of the whole job.
My J Gate is once again fully illuminated and is a thing of beauty to behold...
Last edited by Lord Donnington; Nov 29, 2015 at 09:19 PM.
Just a quick question on this. The bulbs that light up the J gate are they the same bulbs that light up the sports mode and cruise control switches or do they have separate bulbs
Just a quick question on this. The bulbs that light up the J gate are they the same bulbs that light up the sports mode and cruise control switches or do they have separate bulbs
The bulbs that light up the J-gate are tiny and soldered into the circuit board. The cruise control and Sport mode buttons have their own bulbs.
Rocky 15 go ahead and unclip the green J-Gate circuit board from the left side of the J-Gate and free it from the assembly. That way you can bring it inside the house and solder it on a workbench instead of in the car. I just did another one and found it much easier to unclip and bring inside...