XJ6 & XJ12 Series I, II & III 1968-1992
Sponsored by:
Sponsored by:

Remove Front Valence?

Thread Tools
 
Search this Thread
 
  #1  
Old 06-17-2019, 02:52 PM
Gismo's Avatar
Member
Thread Starter
Join Date: Aug 2018
Location: Quebec
Posts: 83
Likes: 0
Received 14 Likes on 7 Posts
Default Remove Front Valence?

Just got a new front valence for my xj6. The four front horizontal bolts holding the old one on removed easily. But there are two additional bolts vertical on each side. For the life of me I cannot figure out how I can access the bolts to remove them. The heads are behind some kind of bulkhead. Any advice?

Thanks.
 
  #2  
Old 06-17-2019, 03:34 PM
Fraser Mitchell's Avatar
Veteran Member
Join Date: Dec 2009
Location: Crewe, England
Posts: 9,391
Received 2,430 Likes on 1,940 Posts
Default

Surely it bolts to the wings on each side, plus to the cross-member at the bottom. When I replaced mine in the early 90s, I spaced out the valance from the cross member by inserting some stainless steel washers so as to make a gap between valance and cross-member. Leaves and muck accumulate in this area and salty water can lie there so with a gap at least the water drains away. You still have to vacuum-out the crud every so often, though !
 
  #3  
Old 06-17-2019, 04:32 PM
Gismo's Avatar
Member
Thread Starter
Join Date: Aug 2018
Location: Quebec
Posts: 83
Likes: 0
Received 14 Likes on 7 Posts
Default

Thanks. I know there are bolts into the wings. But they are unreachable
 
  #4  
Old 06-17-2019, 04:44 PM
Jose's Avatar
Veteran Member
Join Date: Mar 2007
Location: Florida
Posts: 8,609
Received 2,429 Likes on 1,828 Posts
Default

you need a u-joint socket adapter to remove the 4 bolts on the sides, so that the ratchet can angle with the curve of the valance panel.
 
  #5  
Old 06-17-2019, 04:47 PM
Gismo's Avatar
Member
Thread Starter
Join Date: Aug 2018
Location: Quebec
Posts: 83
Likes: 0
Received 14 Likes on 7 Posts
Default

Thanks. I’d rather buy a tool than have to take another piece off!
 
  #6  
Old 06-17-2019, 05:43 PM
Gismo's Avatar
Member
Thread Starter
Join Date: Aug 2018
Location: Quebec
Posts: 83
Likes: 0
Received 14 Likes on 7 Posts
Default

Don’t suppose you’d know offhand what the bolt size might be? I can’t even get my fingers back there to estimate!
 
  #7  
Old 06-17-2019, 05:48 PM
Jose's Avatar
Veteran Member
Join Date: Mar 2007
Location: Florida
Posts: 8,609
Received 2,429 Likes on 1,828 Posts
Default

they are either 5/8ths or 9/16ths, can't remember.

you need a 3/8" ratchet, a 3/8" woobly or u-joint adapter and the proper socket for a 3/8" ratchet.
 
  #8  
Old 06-17-2019, 06:06 PM
Gismo's Avatar
Member
Thread Starter
Join Date: Aug 2018
Location: Quebec
Posts: 83
Likes: 0
Received 14 Likes on 7 Posts
Default

Thanks. That’s a big help.
 
  #9  
Old 06-18-2019, 06:21 AM
Jose's Avatar
Veteran Member
Join Date: Mar 2007
Location: Florida
Posts: 8,609
Received 2,429 Likes on 1,828 Posts
Default

you welcome. It helps to spray Rust Blaster penetrant for a few days before attempting to loosen those bolts. They were torqued tight at the factory.

Also you need to caulk the seam at the front between the valance panel and each wing where they join so no water gets between them. I used black silicone caulking cleaning the excess with paint thinner.
 

Last edited by Jose; 06-18-2019 at 11:50 AM.
The following users liked this post:
LT1 jaguar (06-18-2019)
  #10  
Old 06-18-2019, 11:01 AM
JagCad's Avatar
Veteran Member
Join Date: Jul 2012
Location: Walnut Creek, California
Posts: 6,796
Received 2,399 Likes on 1,880 Posts
Default

Cut off the old one. Pros do that
 
  #11  
Old 06-28-2019, 09:29 PM
Gismo's Avatar
Member
Thread Starter
Join Date: Aug 2018
Location: Quebec
Posts: 83
Likes: 0
Received 14 Likes on 7 Posts
Default


New valence installed

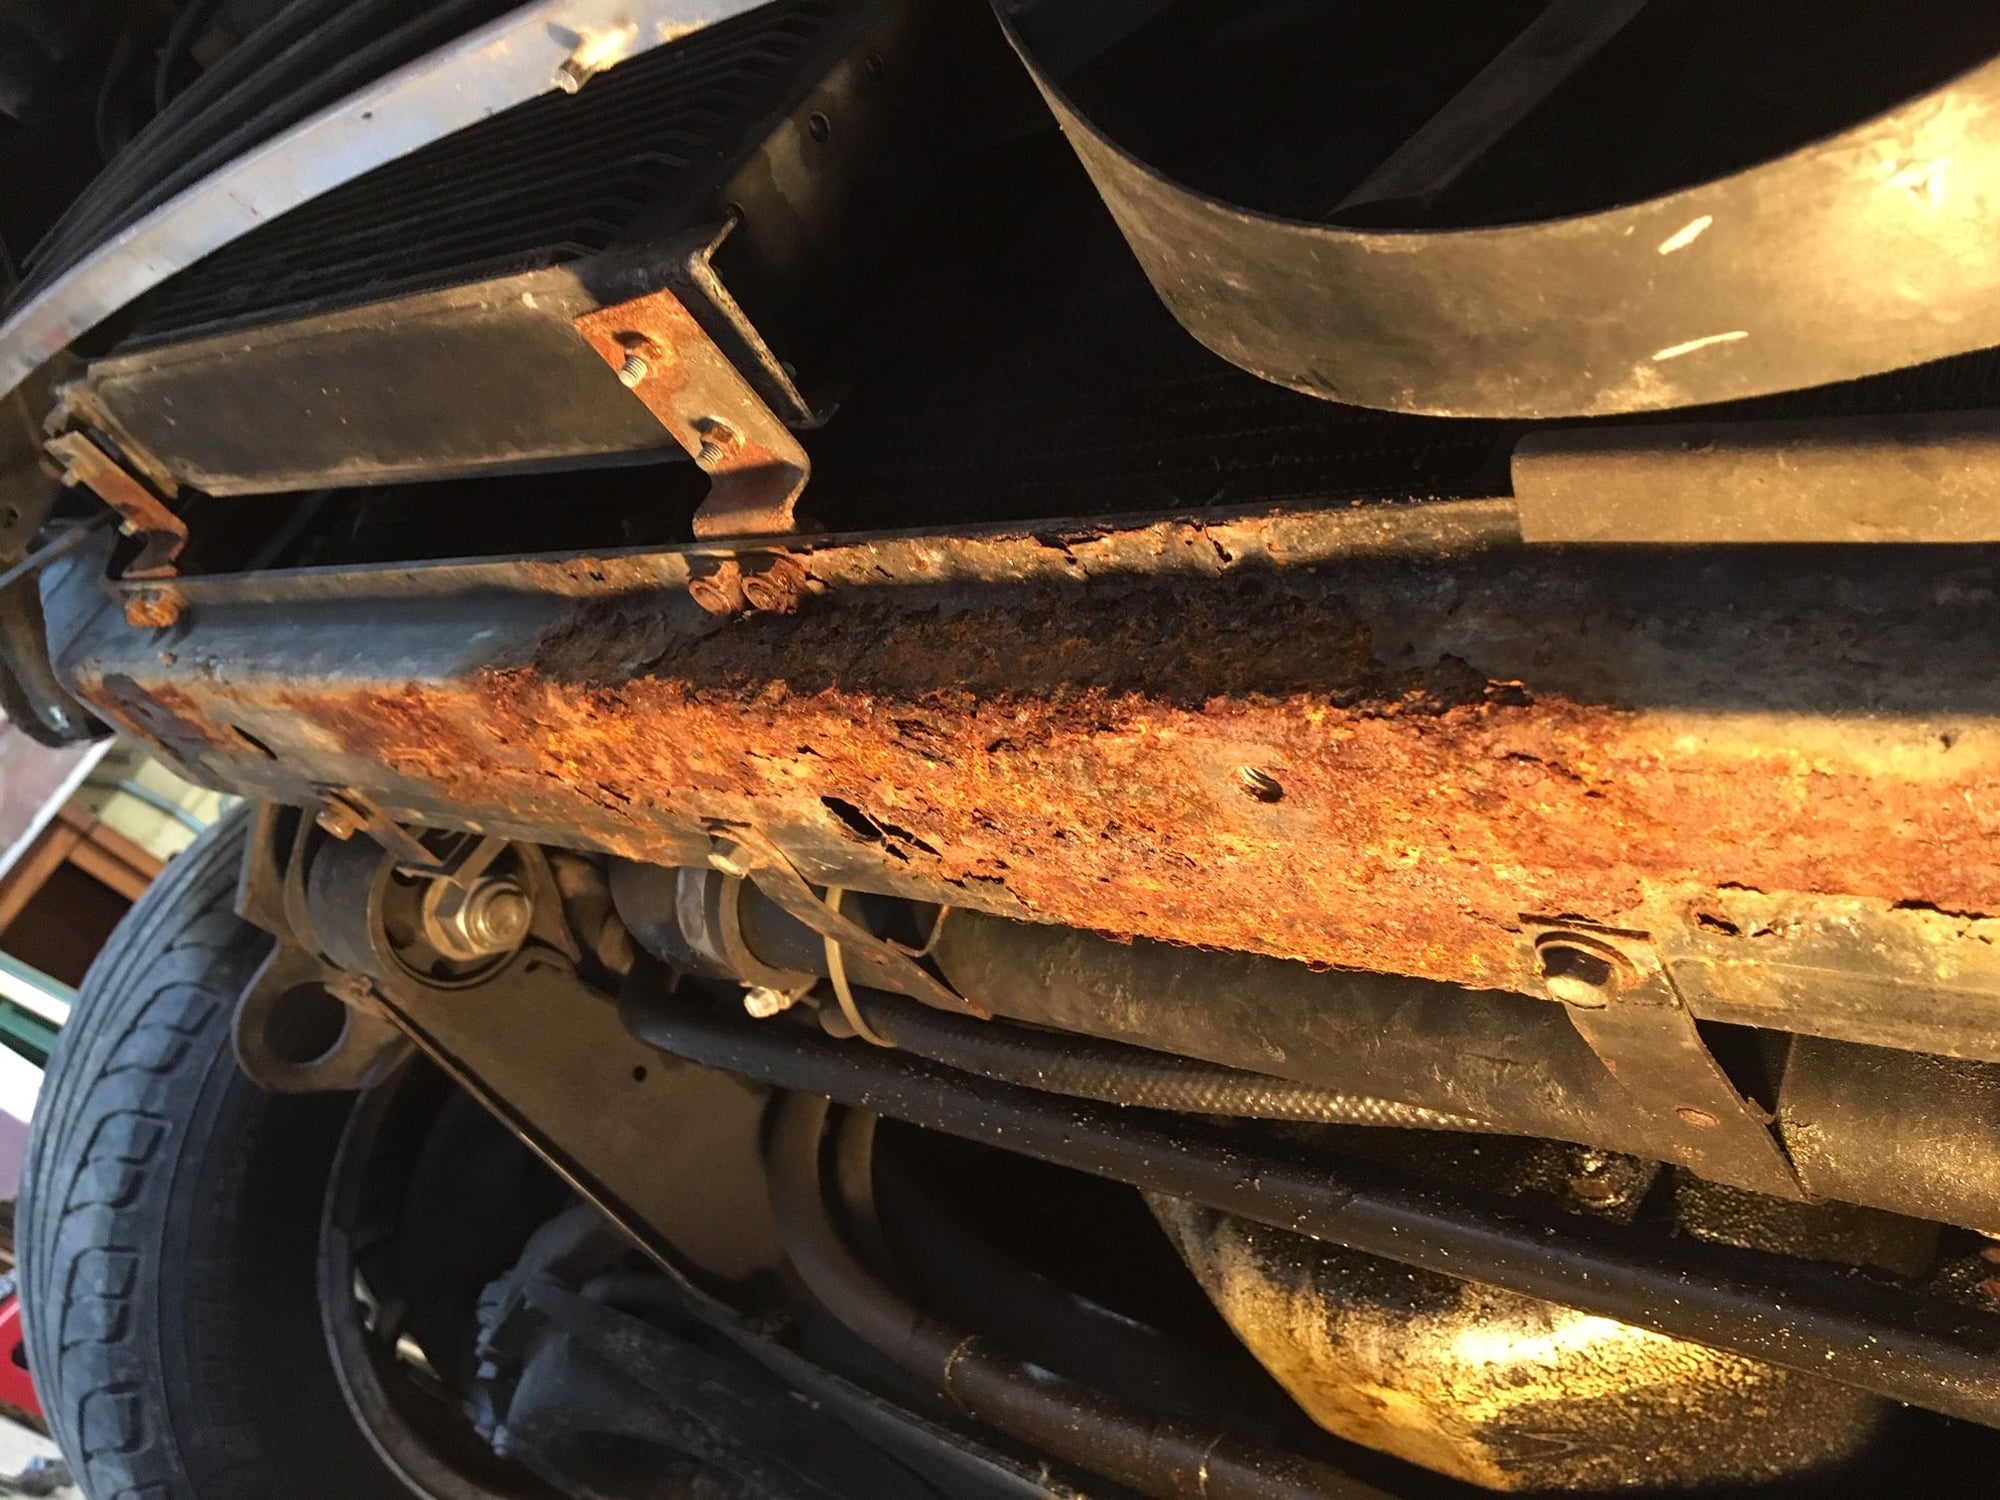
Hidden rust under old valence


Old valence
So that’s done. On my car the bolts were all 1/2 inch. The U joint was key on both sides. The passenger side bolts were quite straightforward. However the driver’s side bolts require removal of both the washer fluid reservoir and coolant overflow container (?) to reach the bolts. This was a good opportunity to clean all the dirt that had accumulated behind both. Also when I removed the valence (which had some rust) I found more behind it on the cross piece that holds the radiator. I ground everything off and primed and painted and did a thorough cleaning of the wheel wells and front of the car including refreshing the rubberized rock shield.
 
The following 2 users liked this post by Gismo:
Andy Paine (07-07-2019), Daf11e (06-28-2019)
  #12  
Old 06-28-2019, 09:32 PM
Gismo's Avatar
Member
Thread Starter
Join Date: Aug 2018
Location: Quebec
Posts: 83
Likes: 0
Received 14 Likes on 7 Posts
Default


Cleaned up drivers side wheel well.
 
The following 3 users liked this post by Gismo:
Daf11e (06-28-2019), LT1 jaguar (06-29-2019), yachtmanbuttson (06-29-2019)
  #13  
Old 06-29-2019, 12:21 AM
LnrB's Avatar
Veteran Member
Join Date: Mar 2014
Location: Tehama County, California, USA
Posts: 25,188
Received 8,953 Likes on 5,297 Posts
Default

You won't have to do that again for several decades!
BONUS!
(';')
 
  #14  
Old 06-29-2019, 04:13 AM
Fraser Mitchell's Avatar
Veteran Member
Join Date: Dec 2009
Location: Crewe, England
Posts: 9,391
Received 2,430 Likes on 1,940 Posts
Default

The photos show the devastation caused by bolting up the valance to the bottom of the cross member. My car was OK but it wasn't all that old when I replaced the front valance. It is well worth spacing out the valance from the cross member to let water flow out unhindered. Also make sure this area is vac'd out regularly.
 
  #15  
Old 06-29-2019, 08:08 AM
Gismo's Avatar
Member
Thread Starter
Join Date: Aug 2018
Location: Quebec
Posts: 83
Likes: 0
Received 14 Likes on 7 Posts
Default

Thanks for the advice. When I removed the old one a pile of crap fell down including an old manifold stud no doubt dropped a long time ago. I will add some washers. But I don’t drive it in the rain in any case.
 
  #16  
Old 06-29-2019, 08:43 AM
Jose's Avatar
Veteran Member
Join Date: Mar 2007
Location: Florida
Posts: 8,609
Received 2,429 Likes on 1,828 Posts
Default

this valance design started in the 1960s. My 1965 S type has it too, except it is only bolted to the front member, but not to the wings, a lot easier to remove with only 5 flathead screws and fender washers. Not a structural part like in the XJ, it is just a finishing under-bumper cover to hide the ugly front member fascia.
 
  #17  
Old 06-29-2019, 09:52 AM
Gismo's Avatar
Member
Thread Starter
Join Date: Aug 2018
Location: Quebec
Posts: 83
Likes: 0
Received 14 Likes on 7 Posts
Default

Is it structural? If so feels pretty flimsy! Thanks for all your advice. I made sure to caulk as you suggested. Now of course my ignition light suddenly started staying on. I haven’t driven it in two weeks and only drove it at low rpms yesterday. I turned the key on several times to get power to check that the washer pumps were working properly while replacing the washer reservoir. Could it just be a low battery? It started and ran fine despite the light staying on.
 
  #18  
Old 06-29-2019, 10:48 AM
Jose's Avatar
Veteran Member
Join Date: Mar 2007
Location: Florida
Posts: 8,609
Received 2,429 Likes on 1,828 Posts
Default

yes it is, in the XJ it keeps the front wings aligned and stable, that is the reason for two bolts each side. The bolts under it are also reinforcement.

good that it wasn't welded like the rear under-bumper valance panel.
 
  #19  
Old 06-29-2019, 01:57 PM
Gismo's Avatar
Member
Thread Starter
Join Date: Aug 2018
Location: Quebec
Posts: 83
Likes: 0
Received 14 Likes on 7 Posts
Default

The rear one is spotless. Thankfully.
 
  #20  
Old 06-29-2019, 02:06 PM
Jose's Avatar
Veteran Member
Join Date: Mar 2007
Location: Florida
Posts: 8,609
Received 2,429 Likes on 1,828 Posts
Default

did you compare the old valance metal thickness to the new one? I bet it is thinner metal than the original factory part.


Quick Reply: Remove Front Valence?


All times are GMT -5. The time now is 04:53 PM.