When you click on links to various merchants on this site and make a purchase, this can result in this site earning a commission. Affiliate programs and affiliations include, but are not limited to, the eBay Partner Network.
Foggy memory disclosure but it seems to me that the vertical body panel immediately aft of the rear wheel can be removed to reveal the lower front area of the fuel tank. From there maybe you can reach the hose?
The fasteners for the panel will be obscured by dirt and/or undercoating.
Thanks Doug. For the record, there's nothing that's obscured by dirt and/or undercoating that can be reached and cleaned without a lift.
I think the panel you remember is being remembered correctly - it's the one that curves under from below the bumper rider that has the plug/cover set in about a 2" hole. Why Jaguar would have put that in with no way to remove from the outside escapes me.
I took a quick trip to Canadian Tire (a north of the border institution) and spent $5.99 plus tas on a 1/4" drain auger. Unlike it's too big cousins, it's rubber or vinyl coated and I just snipped off the brush that came attached to the end. I can thread it a little over 3' into the drain from the opening at the back of the gas cap and then it gets "stuck". Can't tell if that's where it's blocked or if there's a bend at that point that's too sharp for the auger to turn (there were two before then that took a bit of prodding). On the first attempt, it did empty a bit of water behind the wheel but it still doesn't drain. I used a bit of dish soap to try and help the auger slip through but decided to just leave it for now.
I'll keep giving some thought to what else might be available that's still enough to push but more flexible. If anyone's keeping track, the auger did extend just over 3' before it wouldn't go any further.
Ken, I reamed all my sun-roof drain tubes with 1/4" nylon air brake tubing. Once it's inside the hose you can put good push on it. I'll attach one source from NAPA Auto Parts. Sold by many different sources. I heated the end of mine with a heat gun and formed a cone/bullet shape.
Thanks Doug. For the record, there's nothing that's obscured by dirt and/or undercoating that can be reached and cleaned without a lift.
I think the panel you remember is being remembered correctly - it's the one that curves under from below the bumper rider that has the plug/cover set in about a 2" hole.
No.
I'm thinking of a flat panel, maybe 10" x 10", vertically mounted with four (?) screws. You can take it off with just the rear tire removed or perhaps even with the rear tire in place. I'll try to remember to get a photo tomorrow
I'm thinking of a flat panel, maybe 10" x 10", vertically mounted with four (?) screws. You can take it off with just the rear tire removed or perhaps even with the rear tire in place. I'll try to remember to get a photo tomorrow
Cheers
DD
Thanks for the lead - I�ll check tomorrow and let you know how I make out!
Ken, I reamed all my sun-roof drain tubes with 1/4" nylon air brake tubing. Once it's inside the hose you can put good push on it. I'll attach one source from NAPA Auto Parts. Sold by many different sources. I heated the end of mine with a heat gun and formed a cone/bullet shape.
I'm thinking of a flat panel, maybe 10" x 10", vertically mounted with four (?) screws. You can take it off with just the rear tire removed or perhaps even with the rear tire in place. I'll try to remember to get a photo tomorrow
Cheers
DD
Thanks Doug but here�s a quick photo from this end with no access panel.
There is however, a disconnected hose that comes from under the narrow fixed trunk floor panel. I�m assuming it�s for water drainage from the trunk lid recess? There�s no fuel smell in the trunk or when driving.
One thing I have used for sunroof drain tube clearing is weed whipper line. It's thin, but strong. Round the end a bit so you don't poke a hole in the tubing you're trying to clear.
I'm thinking of a flat panel, maybe 10" x 10", vertically mounted with four (?) screws. You can take it off with just the rear tire removed or perhaps even with the rear tire in place. I'll try to remember to get a photo tomorrow
Cheers
DD
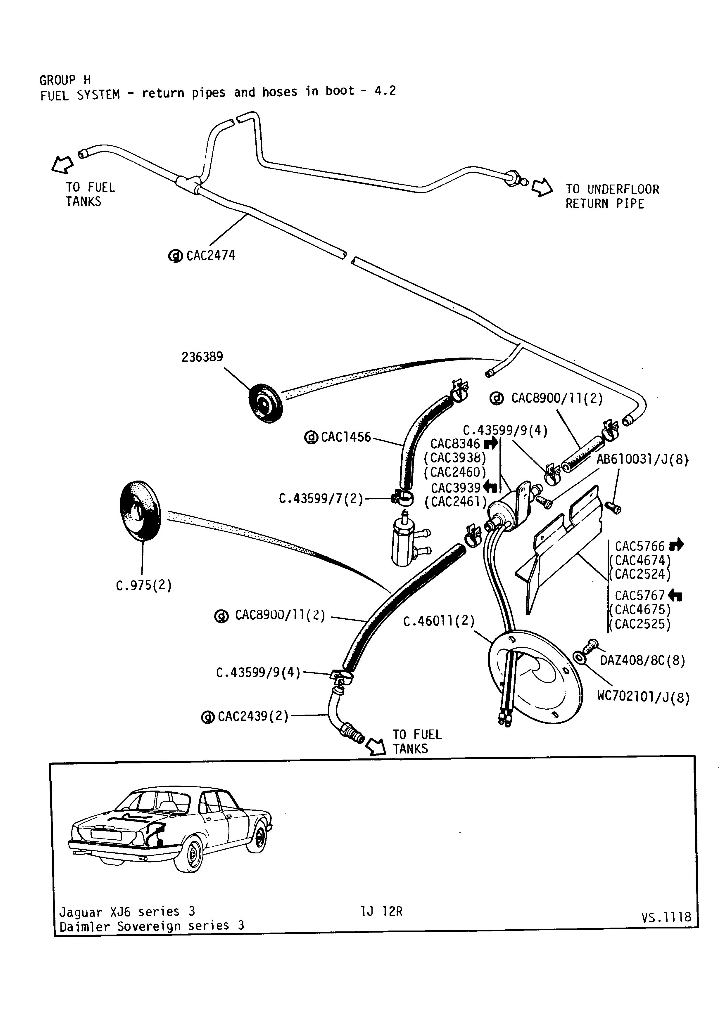
According to the parts drawing in the SNG Barratt website, the vertical panel is part of the pressing for the Rear Side Panels each side of the spare wheel well. It has a large circular hole in the panel. facing the rear wheel which is, indeed held on by four screws. This gives access to the front of the fuel tank, but as far as I know, only if the car has the immersed fuel pumps.
Part Nos 12136 & 12137 https://www.sngbarratt.com/English/u...assembly/17281
You will also note three fixing holes on the outer edge, and as I recall (it was the late 80s, when I was putting in a new boot floor, rear valance, and side panels !!), there was a rubber seal there that sealed the gap with the closing panel that covers the fuel tanks.
It just so happens that I have one of my tank covers off and took a pic of the drain hose, FWIW. Also visible is the round cover as seen from the other side versus what I posted a few days ago
Good photo, and exactly as I remember it. I had to fabricate a piece of sheet steel to replace the curved part with the oval holes so I could attach the front of the rear quarter panels. Maybe there wasn't a rubber seal there after all. My memory fades 30 years after doing the work !
The removable, semi-rectangular panel I was referring to in earlier posts, and the one which has the rubber seal, is situated aft of the front wheels. Part number BD38380 and 81 in the illustration below. The rubber seal is BBC4463
Imperfect memory haunts all of eventually, it seems
When I was doing body repairs on my 1980 XJ6, I remember taking all of that lot off ! The rear panel with the seal gives access to the rear lower bolts of the wings.
I know this isn�t the most exciting thread on the forum but I�m still happy to report a successful resolution.
This is the 5� auger previously mentioned with a Canadian quarter for reference:
it originally came with a nylon brush end that I cut off flush. As noted above, I managed to insert that almost 3� but couldn�t get it in further than that before reaching a hard stop.
The next stage was to cut back the sheathing about an inch to expose the interior hollow metal coil. That allowed it to be gradually pushed in another 12� or so in small increments over the next month or so before a hard stop.
The final step involved straightening out the end of the coil to a point for another week or so of small incremental progress with the final result this morning being rewarded with the sound of water dripping on the garage floor being the rear wheel.
In total, there was a little over 4� of drain that needed cleaning and I would guess that the further in the auger went went either the drier/harder things were or the further in it went the more crud it needed to push forward. As there was always water in the line, I�m assuming that assisted in incrementally loosening things up.
In the end, a half litre of hot water flowed through the drain as quickly on this side as the other.