
Stake down kit

Somebody here has to have a picture of a stake down kit before and after! I've seen the kit pop up occaisionally, but noone ever gives a good picture of what I'm looking for. Also, where can I buy one, or is it something I can just do without buying a kit? Google search turns up squat. I highly doubt that my XJ has one, since both PO's knew little more about a c@r than how to drive it.
HELP!?! PLEASE!?!!
HELP!?! PLEASE!?!!

HI
I have some XJs with the kits that I can post a picture of, and some without. I'll try to get them posted for you tomorrow.
Also have one that had the stakedown kit installed, and still threw a tappet guide. Totally ruined the head, not pretty. But I'm sure there were more underlying reasons for that.
Definetly pick one up --- JTO is probably a good source.
David
EverydayXJ.com
Thanks guys. A pic is always worth a thousand words. I've done plenty with sbc heads-lapping valves, replacing springs, pinning studs, tapping/screw in studs, but want to know what I'm getting into on this 4.2 as it is new to me.
Ken is offering one for $31.95 + shipping. Sounds reasonable enough.
For anyone looking into this for future reference link to Kens stakedown kit.
Ken is offering one for $31.95 + shipping. Sounds reasonable enough.
For anyone looking into this for future reference link to Kens stakedown kit.
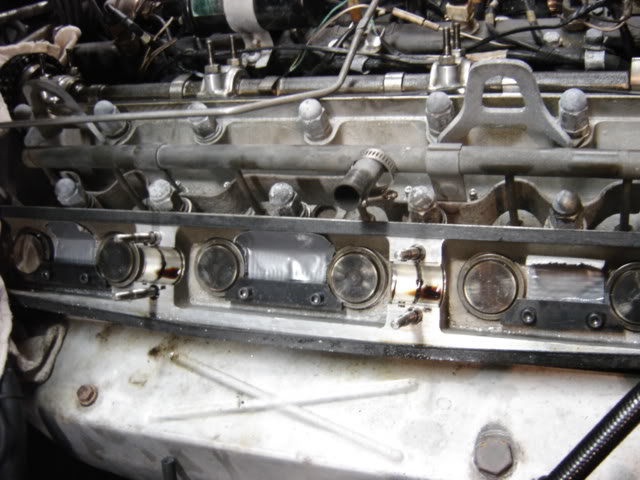
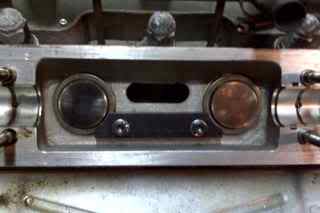
Here are some photos of the stakedown kit.
This is on a car that has a damaged head, the cam covers have been removed a while, hence the rust on the tappets.
The first is an undamaged kit installed.
The second is one that has the securing bolt broken into the head, and the tappet guide really torn up.
David
EverydayXJ.com
This is on a car that has a damaged head, the cam covers have been removed a while, hence the rust on the tappets.
The first is an undamaged kit installed.
The second is one that has the securing bolt broken into the head, and the tappet guide really torn up.
David
EverydayXJ.com
Thanks Dave! A couple more questions: To see if these are installed I will need to remove the valve/cam cover? If that is true then I will need new gaskets. Are there different kinds available, with sbc's I have used poly and cork. The poly seemed to leak, but held up better...the cork didn't leak as bad, but liked to stick to the head. I put a thin bead of Right Stuff silicon between the cover and the gasket so it would stick to the cover when removed. Bear in mind that I had to reset the lash every couple weeks on the mechanical cam/lifters, so easy removal and not having to replace gaskets every time (esp. at the track) was essential. Is silicon between the gaskets recommended on these to help sealing?
Next question(s): The cam has to be removed to put in the stakes? Sure looks like it-seems obvious! What do you torque the bolts to after replacing? Do the cams connect directly to a gear on the timing chain? Any tips on that...if necessary? Is it best to install the kit on both intake and exhaust? I've seen some say the exhaust is the only side that requires the kit.
At present I only have a Haynes manual that came with the c@r. It is good for translating English to Yankee, but sketchy on many other things.....Gotta get the factory manual, I know, I know!

Junior Member
Joined: Apr 2009
Posts: 15
Likes: 0
I dont know much about the stake down kit, but having just done a head rebuild, I did not use any silicone on the gasket. There are several schools of thought on this matter
Jag never used silicone, whether that is good or bad I dont know.
Yes the cams connect via 4 bolts per gear to the timing chain. Releasing the cams from the gear and putting them back together isnt too horrible, but is a bit fiddly. Have to make sure you dont drop parts inside the engine
Jag never used silicone, whether that is good or bad I dont know.
Yes the cams connect via 4 bolts per gear to the timing chain. Releasing the cams from the gear and putting them back together isnt too horrible, but is a bit fiddly. Have to make sure you dont drop parts inside the engine
Trending Topics

Joined: Mar 2008
Posts: 2,521
Likes: 71
From: Powell, Ohio U.S.A. 43065
Exhaust side only in 99% of cases, this ancient head design only proved problematic when catalytic converters were added to the cars and resulted in increased exhaust temperature.
Remove exhaust side cam cover.
Clean out all residual oil in top of cylonder head thet you will see with cover removed.
Duct tape over the three oval shaped oil drain holes in the head. Now it's clean and protected enough to start drilling holes.
IF the tappet bores are still relatively intact, and there is a good lip on them in the area where the retaining plate recess will regester, hold each plate up against a pair ot tappet bores and puch mark the location of the mounting holes to be drilled.
Cheap kits are supplied with self tapping screws, these will easily snap off at about 4 ft. lbs. of torque, so the hole better be the perfect size in the perfect place. Good kits come with cap head machine screws, 1/4" x 20 (NC).
It's preferred if you do not drill all the way through to the oil return cavity in the head, but it really doesn't matter. I run a vacuum cleaner to remove the swarf as I am drilling.
Grease the tap to hold the swarf .
Bolt 'em on.
If you use silicone on both sides of the cam cover gasket, they will eventually slip out. Get the latest style Gortex material gaskets if you can find them, the original ones and common replacements are just treated paper like all other old Jaguar gaskets.
Use weatherstrip adhesive or brush-on Permatex to affix the new gasket onto athe clean cam cover. When that is cured, silicone sealer on the side that seals it to the head.
8 ft lbs for the retaining nuts, alot of torque cracks the covers.
The only reason to have to remove the camshaft is when one or more tappet bores have been badly damaged from repeated whacks by the cam lobe. That is a more involved repair, but can still be done with the cylinder head in place. You will have to get ahold of me if this is the case, few people know how to do it or have the correct tappet bores. If you buy a new bore to install, it can't be done with the head on the car.
Instructions for the tappet bore retaining plate kit installation were included with just about every kit I ever bought. These are from memory, after doing it a thousand times. Parts men and inexperienced repairers without the requisite knowledge need only tear open the bag to obtain the instructions.
Change the oil when you're done if it hasn't been done recently. The steps listed to prevent swarf from entering the engine are adequate, further paranoia is superflouous.

Everyone should know their limits and not be afraid to ask questions before going into something. Just 'cuz I know a bit about other engines doesn't make me qualified to tear into any engine and pretend to know what I'm doing. That kind of arrogance gets many people in trouble...I've seen it hundreds of times. Shade tree mechanics only takes a guy so far.
Once again, your help and the advice of others is greatly appreciated. Books and manuals can never replace the precautions and the pointers that you post up here everyday based on your repeated hands on experience.

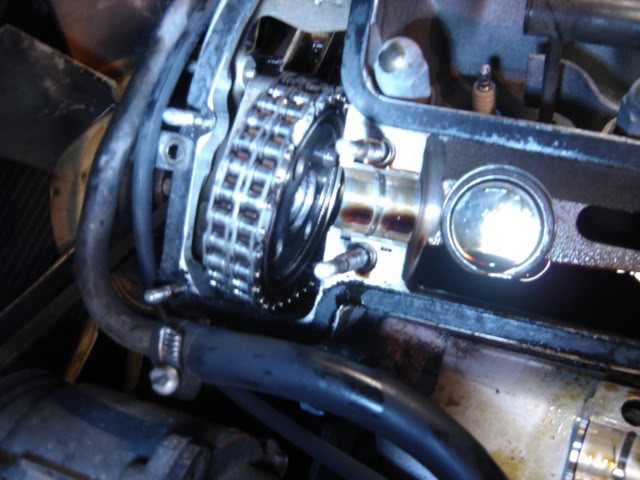
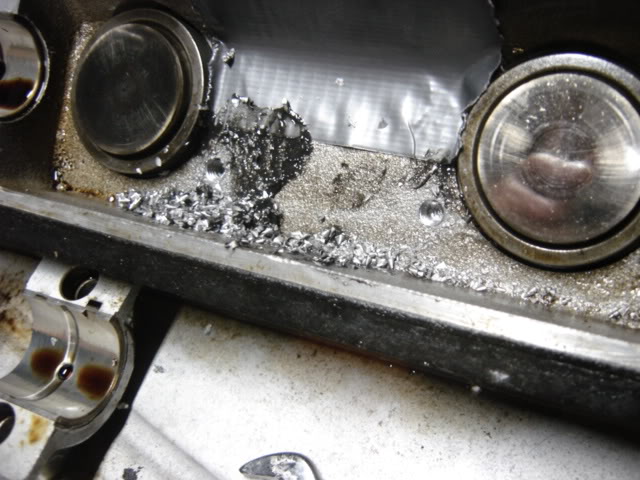
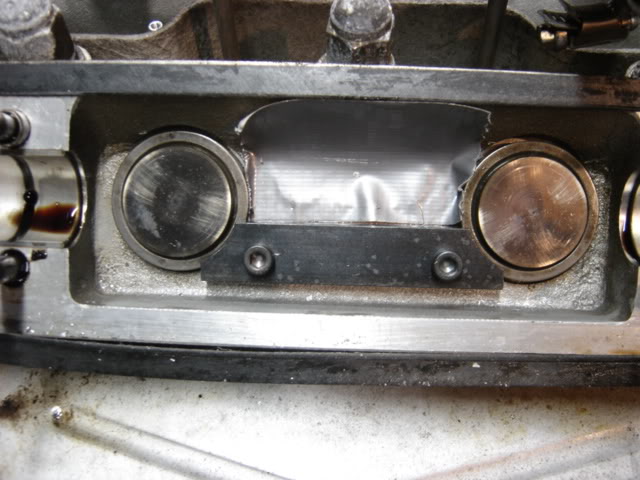
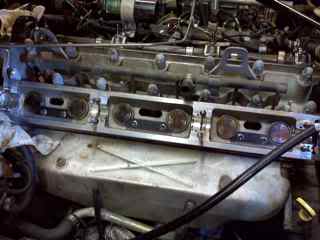
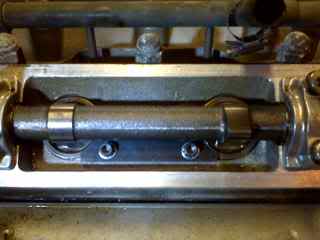
I was flipping through the photo albums on the Jag-Lovers site and found Justin Wilt's pics of his installation of a stake-down kit. Thought I should steal it and share it here for any future reference.
Cam removed
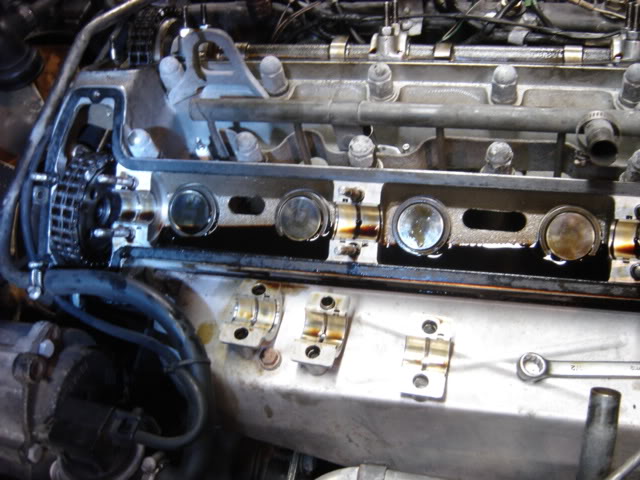
Close up of exhaust cam gear
Drilling out the holes
Test fitting the plates
Plates installed
Cam removed
Close up of exhaust cam gear
Drilling out the holes
Test fitting the plates
Plates installed
Last edited by moronthethrottle; Apr 30, 2009 at 02:56 PM.
Close up of installed plate with washers, etc
View of all installed prior to putting cam back in
Cams in!

Final lash checks, etc. According to Justin-"not as easy a job as one might think".
View of all installed prior to putting cam back in
Cams in!
Final lash checks, etc. According to Justin-"not as easy a job as one might think".
Ya, I can see where it can be done without removing the cam. If I have to tackle this project, I will probably elect to leave it in....he seems to think it would be extremely difficult though.
Here's the link to his album: Jag-LoversJustinWiltStakeDownKitInstallation
Here's the link to his album: Jag-LoversJustinWiltStakeDownKitInstallation
Joined: Mar 2008
Posts: 2,521
Likes: 71
From: Powell, Ohio U.S.A. 43065
Good, that spares me from having to write any more complete descriptions which will likely be dismissed anyway. I've been reading JagLovers posts for 5 years. A couple of them were actually valuable.

Thread
Thread Starter
Forum
Replies
Last Post
dmatthewman
XJ XJ6 / XJ8 / XJR ( X350 & X358 )
1
Sep 30, 2015 10:10 AM
Currently Active Users Viewing This Thread: 1 (0 members and 1 guests)