
Steering Arm Shims


Thread Starter
|
Veteran Member

Joined: Jun 2015
Posts: 1,514
Likes: 687
From: Florida
I made a big BOO BOO. I disassembled the steering arm from the vertical link to replace the lower ball joint and some shims fell out. I have a total of 5 shims and I am not sure of how many fell from the top bolt of the vertical link and how many from the bottom bolt.
How critical is it if I just guess the number of shims that go to the top or bottom and how will it affect the steering geometry.
How critical is it if I just guess the number of shims that go to the top or bottom and how will it affect the steering geometry.

Veteran Member


Joined: Mar 2008
Posts: 25,539
Likes: 11,737
From: Pacific Northwest USA
The important thing is that you take up the gap between the steering arm and the vertical link....so that when the bolts are tightened the steering arm is not under tension. It's conceivable that the stress could weaken the arm. Never heard of it happening ....and lord knows how many Jags are running around with the shims missing entirely....but it isn't something you'd wanna take a chance on.
The worst that will happen if the shims are not put back to the original location is that the 'toe-in' will be slightly off. Easy fix for an alignment shop or even some enterprising DIYers
Cheers
DD
The worst that will happen if the shims are not put back to the original location is that the 'toe-in' will be slightly off. Easy fix for an alignment shop or even some enterprising DIYers
Cheers
DD
Veteran Member

Joined: Dec 2009
Posts: 9,555
Likes: 2,554
From: Crewe, England
Not taking up the space between the steering arm and the hub carrier, (or upright), is very dangerous. It has been reported here in the UK that arms that have just been bolted up to take up the space have eventually fractured at the bolt and fallen off, thus the car loses all steering. Quite why the arms don't fit snug at both bolt positions tells you a lot about Jaguar manufacturing at the time. I suspect it was because the arms, being a forging, cannot be produced sufficiently accurately to match up to the upright bolt positions. However we'll never know as most of the old Jaguar people are now dead, (or maybe retired and living a long way away !)
On my Series 3, the bolt at the end of the steering arm had no shims, and the second bolt position had a spacer about 1/8" in thickness to take up the gap.
On my Series 3, the bolt at the end of the steering arm had no shims, and the second bolt position had a spacer about 1/8" in thickness to take up the gap.
Last edited by Fraser Mitchell; Apr 28, 2016 at 03:54 PM.


Joined: Feb 2010
Posts: 28,839
Likes: 11,292
From: Adelaide Stralia
As said already.
My understanding from teachings that I actually remember.
Fit the TOP and BOTTOM bolt, torque the TOP bolt to spec (TIGHT).
Measure the gap between the vertical and the face of the arm AT the BOTTOM bolt. Select the shims to fill that gap. Remove the untightened BOTTOM bolt, slide the selected shims into the gap and "juggle" the bolt back into place and tighten to spec (TIGHT).
Thats as simple as it is, and has worked for me for ever.
PLENTY of Anti-Seize please on those bolts, they do rust in there, and that is a real funny situation later in life.
In your case a "Toe in" check would be a smart idea, due to unknown shim locations, as Doug has stated.
Thread Starter
|
Veteran Member
Joined: Jun 2015
Posts: 1,514
Likes: 687
From: Florida
All of your posts make a lot of sense and some time this week I will be putting it together.
As Grant says, "tighten the top bolt and shim the bottom". This may not work for me as I am sure that some of the shims came from the top bolt. Also, the bottom bolt is also the lower bolt for the brake caliper, so do the shims go between the brake caliper and the steering arm, or the brake caliper and vertical arm? Its going to be a trial and error thing, so I will be doing the assembly off the car to verify shim placement before final installation.
If I tighten the top bolt, I can put shims at the bottom bolt. If I tighten the bottom bolt without shims I can put shims at the top bolt. Based on this, the flex of the steering arm is somewhere between 1/64th and 1/128th of an inch depending on which bolt you tighten. My vernier caliper and feeler gauge will help to resolve this issue.
Last edited by sanchez; May 1, 2016 at 06:05 AM.
Trending Topics
Joined: Feb 2010
Posts: 28,839
Likes: 11,292
From: Adelaide Stralia
The shims go on the bottom bolt, and between the arm and the caliper.
The shims are to PREVENT flex in that steering arm when tightened to spec.
If yours has been assembled wrong for any length of time, i would suggest that those arms are deformed, and I would NOT trust them in my car, full stop.
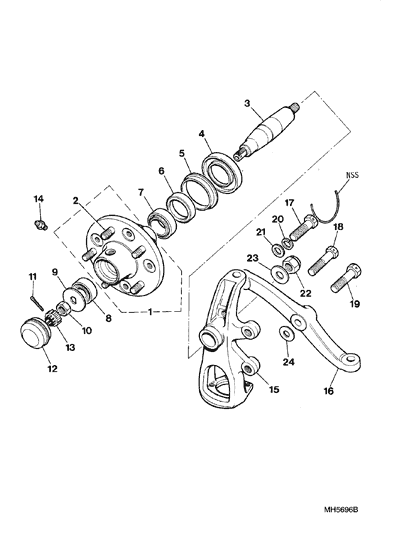
This parts drawing shows the shim as #24, on bolt #19. They come in sizes of 0.010 and 0.004 inches.
Our S2 Daimler had those arms without shims when I got the car and changed the front rotors, and I simply purchased 2 new arms and did the job properly. The previous owner/mechanic had no idea and had simply thrown the shims away coz he did not see them fall out and just moved on with the repair, clueless to the error he was creating.

The shims are to PREVENT flex in that steering arm when tightened to spec.
If yours has been assembled wrong for any length of time, i would suggest that those arms are deformed, and I would NOT trust them in my car, full stop.
This parts drawing shows the shim as #24, on bolt #19. They come in sizes of 0.010 and 0.004 inches.
Our S2 Daimler had those arms without shims when I got the car and changed the front rotors, and I simply purchased 2 new arms and did the job properly. The previous owner/mechanic had no idea and had simply thrown the shims away coz he did not see them fall out and just moved on with the repair, clueless to the error he was creating.
Last edited by Grant Francis; May 1, 2016 at 07:11 AM.

Veteran Member
Joined: Jul 2012
Posts: 6,796
Likes: 2,403
From: Walnut Creek, California
Interesting discourse. Even if I've never taken these apart on my car.
Hope no one else did and messed it up! So far so good.
Can't argue with Grant's process. It is logical and works.
I wonder how the guys on the Jaguar assembly line determined where
to place what sized shims?? Eyeballs ??? Match the parts and feel for a rocking motion ? Specialized feeler guage?
I can't help but believe that the mating surfaces at the bolt holes of these forgings had to be machined.
So, the issue is that the mating surfaces on one or both are not on the same vertical plane and as such can not mate on a common plane unless shimmed.
I can almost imagine a rule that is absolutely straight with pointers at
a 90 degree angle to measure that difference. Apply to each member, calculate the shim dimension needed.
If so, it could be that production differences might just be complimetry and no shims needed????
Ugh, mental gymnastics at this hour and on Sunday???
Carl
Thread Starter
|
Veteran Member
Joined: Jun 2015
Posts: 1,514
Likes: 687
From: Florida
@ Grant: Seems to me that these were never touched except for Brake caliper removal. the upper and lower ball joints seem to be original to the car. Aircraft wire on the top bolt was cut and left there and the rest of the wire removed from the two caliper bolts, and not put back.
When I removed the top steering arm bolt I did not know that there were shims placed there. Middle bolt is the top brake caliper bolt. When I removed the lower steering arm/caliper bolt that's when the shims from the top fell, but I did not notice them until I pulled the vertical arm back to access the lower ball joint nut.
Given that, I believe that the steering arm was never removed.
The lower bolt had shims and I saw those fall out and of course they just scattered all over the place.
Knowing that I had shims at the top and the bottom, my plan is to set up the vertical arm on my vice and mount all of the components in place then measure the clearance and put the appropriate shims in place.
I am trying to make this as difficult as possible, but I want to see what the hell was going through the minds of the Jaguar engineers when they forged a part then had to shim it to get it to work properly.
This whole scenario is telling me that some cars would have shims of varying thicknesses on the top and bottom, some would be shimmed on the top only, some on the bottom only and so forth.
I cleaned and inspected my other Series 3 and there are shims on the top on the driver's side and shims on both the top and bottom on the passenger side. Who knows what is happening there.
As Doug says the Lord only knows how many of these cars are on the road with the shims missing because they were never put back in place.
Veteran Member
Joined: Dec 2009
Posts: 9,555
Likes: 2,554
From: Crewe, England
Jaguar assembly is always something of a PITA. As I recall, it is sometimes necessary to centralise the caliper to the disc, (as it is a fixed caliper, and not the more common sliding types), and of course shims are used to do this. Then there is the need to shim the steering arm lower bolt. If I remember correctly, the procedures were all in the workshop manual.
Dismantling the suspension without knowing about this shimming can result in all the shims just falling out, if one is not prepared for it, and then there is the fun in working out where they all go back !
Dismantling the suspension without knowing about this shimming can result in all the shims just falling out, if one is not prepared for it, and then there is the fun in working out where they all go back !

Veteran Member
Joined: Mar 2014
Posts: 26,786
Likes: 10,318
From: Tehama County, California, USA
The following may be irrelevant and it may be superfluous and it might not even have anything to do with the subject at hand but:
According to the Blue Book, ROM (aka, Jaguar Bible) page 70-3, section 70.10.10, Removal and Refitting of the Front Disc, the following is advised:
Removing
1. Remove brake caliper friction pads (appropriate section sited).
2. Remove front hub (appropriate section sited).
3. Remove locking wire from caliper mounting bolts.
4. Remove caliper mounting blots, recover and note position of shims located between steering arm and caliper.
(Yeah, this only works if you know shims are there!!)
5. Slacken bolt securing steering arm to hub carrier.
6. Gently easing caliper aside remove disc.
Inspection
7. Examine disc for cracks and heavy scoring, light scratches and scoring are not detrimental and may be ignored. If in doubt, a new disc should be fitted.
Refitting
8. If original disc is refitted reverse operations 1-6 and ensure caliper mounting bolts are torqued to 55 foot/pounds (7.5kg/m)
9. If new disc is fitted reverse operations 2-6 ensuring mounting bolts are not wire locked.
10. Check gap between caliper abutments and disc face. Gap on opposite sides of disc may differ by up to 0.010 inch (0.25mm) but gap on upper and lower abutment on same side of disc should be same.
11. Of disc is not central in caliper carry out operations 12-14. If disc is central proceed to operation 15.
12. Remove one caliper mounting bolt and add or withdraw shim required to centralize disc, refit caliper bolt.
13. Repeat operation 12 on remaining caliper mounting bolt.
14. Repeat operation 10.
15. Torque caliper mounting bolts to 55 foot/pounds (7.5kg/m)
16. Refit brake friction pads.
~~~~~~~~~~~
So, it would appear the shims were originally to center the disc in the caliper (or the caliper on the rotor) and make sure they're parallel. This may be the reason Sanchez has shims on both upper and lower bolts. That being the case, new calipers for his car may need the same treatment as before or might not.
My discs were well centered in the calipers without all this fussing. Shims were only needed on the lower bolts as pictured above.
(';')
Veteran Member
Joined: Mar 2008
Posts: 25,539
Likes: 11,737
From: Pacific Northwest USA
The ROM has mislead lord-knows-how-many-people regarding these shims.
The shim/shims used to take up the gap at the steering arm mount have nothing at all to do with caliper centralization. You could one shim or a hundred in this location and the caliper position wouldn't change at all.
To centralize the caliper you'll need shims between the caliper body and the caliper mounting pads/abutments on the vertical link. Not that mine is the final word on anything, but I've *never* seen a Jag fitted with the caliper shims...and I've had quite a few of them apart over the years.
Cheers
DD
Last edited by Doug; May 1, 2016 at 10:53 PM.
Veteran Member
Joined: Mar 2008
Posts: 25,539
Likes: 11,737
From: Pacific Northwest USA
Jaguar assembly is always something of a PITA. As I recall, it is sometimes necessary to centralise the caliper to the disc, (as it is a fixed caliper, and not the more common sliding types), and of course shims are used to do this. Then there is the need to shim the steering arm lower bolt. If I remember correctly, the procedures were all in the workshop manual.
You're exactly right, but the ROM incorrectly has the reader believing that the steering arm shims will alter caliper alignment.
Dismantling the suspension without knowing about this shimming can result in all the shims just falling out, if one is not prepared for it, and then there is the fun in working out where they all go back !
Or, as often as not, the shims, invisible amid the brake dust and gunk, falling silently to the shop floor without the mechanic's knowledge that they ever even existed in the first place....until the end of the day when he is sweeping up

Cheers
DD
Veteran Member
Joined: Mar 2014
Posts: 26,786
Likes: 10,318
From: Tehama County, California, USA
...
The shim/shims used to take up the gap at the steering arm mount have nothing at all to do with caliper centralization. You could one shim or a hundred in this location and the caliper position wouldn't change at all.
To centralize the caliper you'll need shims between the caliper body and the caliper mounting pads/abutments on the vertical link. Not that mine is the final word on anything, but I've *never* seen a Jag fitted with the caliper shims...and I've had quite a few of them apart over the years.
Cheers
DD
Thank you for the clarification.
(';')
Thread Starter
|
Veteran Member
Joined: Jun 2015
Posts: 1,514
Likes: 687
From: Florida
This post is getting more intriguing as we move along.
I did a setup on my vice last night. With new rotors and pads, when I bolted the steering arm and brake caliper to the vertical arm with no shims, I was able to install the outboard disc pad with some play but the inboard disc pad would not fit. It stands to reason that the centralization of the caliper is of importance here. Using a feeler gauge, I measures the clearance at the outboard pad, divided it by two and shimmed it accordingly. What the shim did was to move the caliper inward and the two disc pads were able to fit. With the bottom bolt tightened, I was able to fit a .008 inch blade at the top bolt. The remaining shims measured approximately .007, so I installed them at the top and tightened it.
I then loosened the lower bolt and could not get my smallest feeler gauge blade which is a .002 to fit.
Lesson?- Lower shim sets up the brake caliper in the proper location and the upper shim compensates for any irregularity on the steering arm.
So, if you have worn brake rotors and pads, you can very well install the caliper and pads without the shims and all would seem okay.
In reality it's not.
Later, not today, I am going to try different scenarios with the other side and post the results.
Jury Duty Calls at 8:00 a.m. today.
Veteran Member
Joined: Mar 2008
Posts: 25,539
Likes: 11,737
From: Pacific Northwest USA
Indeed!
I did a setup on my vice last night. With new rotors and pads, when I bolted the steering arm and brake caliper to the vertical arm with no shims, I was able to install the outboard disc pad with some play but the inboard disc pad would not fit. It stands to reason that the centralization of the caliper is of importance here. Using a feeler gauge, I measures the clearance at the outboard pad, divided it by two and shimmed it accordingly. What the shim did was to move the caliper inward and the two disc pads were able to fit. With the bottom bolt tightened, I was able to fit a .008 inch blade at the top bolt. The remaining shims measured approximately .007, so I installed them at the top and tightened it.
I then loosened the lower bolt and could not get my smallest feeler gauge blade which is a .002 to fit.
Lesson?- Lower shim sets up the brake caliper in the proper location and the upper shim compensates for any irregularity on the steering arm.
I then loosened the lower bolt and could not get my smallest feeler gauge blade which is a .002 to fit.
Lesson?- Lower shim sets up the brake caliper in the proper location and the upper shim compensates for any irregularity on the steering arm.
I must say that yours is the first case I've ever heard of where shims were used/needed to centralize the caliper. There's a first time for everything, as the saying goes!
The usual scenario....which my coincides with my own experience....is no shims at all on the upper bolt and 1-3 shims on the lower bolt between the arm and the caliper.....which cannot change caliper position.
So, if you have worn brake rotors and pads, you can very well install the caliper and pads without the shims and all would seem okay.
In reality it's not.
In reality it's not.
Quite right, if you have a combination of parts with the right (or should I say 'wrong'?) stack-up of tolerances.
In the grand scheme of things what you're experiencing is the exception, not the rule.
Cheers
DD
Veteran Member
Joined: Mar 2008
Posts: 25,539
Likes: 11,737
From: Pacific Northwest USA
You almost certainly didn't make a mistake. If the caliper is parallel to the brake rotor, and central-enough to let the brake pads slide in, there is no need to alter the position of the caliper with shims.
However, if there was gap between the steering arm and the caliper, and you didn't use shims to take up that gap, *that* would be a mistake
Cheers
DD
Veteran Member
Joined: Mar 2008
Posts: 25,539
Likes: 11,737
From: Pacific Northwest USA
A oft-asked question.
I can think of no reason why the parts couldn't have been more precisely manufactured as we see on virtually every other car.
I say virtually, not literally, because there is at least one other car using a similar shim arrangement. I replaced calipers on an older Ferrari (246 Dino) that used caliper shims. That was a little different, though, in that the manual actually specifically a minute clearance between the pads and the brake discs. The caliper piston can be adjusted in-out, to a point, and together with shims, and experimenting, you can achieve the requested clearance. Apparently Ferrari didn't like the idea of the pads dragging against the brake discs at all. Of course, this tiny clearance...about a thou as I recall....results in a nano-second delay before feeling the brakes bite. Weird.
But, I digress.
Cheers
DD
Thread Starter
|
Veteran Member
Joined: Jun 2015
Posts: 1,514
Likes: 687
From: Florida
Doug, the other thing I could have done to make the disc pad fit was to remove the big shim that came with the disc pad and it would fit.
Based on what you stated the shim should go between the steering arm and the brake caliper ear.
The way I have it now the shims are between the brake caliper and the vertical arm, which could be totally wrong.
I am going to check whether the caliper is parallel with the rotor by moving the shims around and report thereafter.
INTERESTING!!!!