
Timing Oddity


Thread Starter
|
Senior Member


Joined: May 2015
Posts: 853
Likes: 70
From: Auckland, New Zealand
Had some help timing the engine, found an oddity with the timing light. We used two different timing lights, but no signal on first cylinder, however all the rest caused the timing light to fire (2-6). Changed over the cable from 1 to see if it was the cable but cable performed fine on cyl 2 or 3.
So neither timing light is triggered by the 1st cylinder.
Distributor cap is new and checks out ok. Plugs all clean.
Oddest of all, the engine runs smoothly enough that it doesn't sound at all like 1# is not firing (if that were the cause)...
So neither timing light is triggered by the 1st cylinder.
Distributor cap is new and checks out ok. Plugs all clean.
Oddest of all, the engine runs smoothly enough that it doesn't sound at all like 1# is not firing (if that were the cause)...


Joined: Feb 2010
Posts: 28,839
Likes: 11,290
From: Adelaide Stralia
Pull that spark plug, maybe it is not firing, or firing erratically.
Pull #2 and compare the status of the electrode colour etc.
Without reading the posts, have you replaced the rotor at the same time as the cap??
These timing lights are an Inductive pick up, and if the plug itself is not firing, there is no pulse to Induce.
How old are the leads??
Pull #2 and compare the status of the electrode colour etc.
Without reading the posts, have you replaced the rotor at the same time as the cap??
These timing lights are an Inductive pick up, and if the plug itself is not firing, there is no pulse to Induce.
How old are the leads??

Veteran Member
Joined: Jul 2012
Posts: 6,796
Likes: 2,403
From: Walnut Creek, California
I delight in my old tech "not adjustable" strobe. Neither of my cars have distributors that can be moved to advance or retard timing. OTH, my Jeep has one that hat just might. Never messed with it, though.
So, I use the strobe merely as Aden did, to detect volts in the HT cables.
As Grant says, the rules of circuitry apply here as ell. There must be continuity.
Agree, in the failure of #1 to light up the light, only the spark plug is left.
I may still have an older and more primitive light. It has a little coil to insert between the plug end and the cable. And/or small lamp to light up. I'd hesitate to use it with an electronic ignition. Just might mess things up. Why, not sure yet.
Carl
Thread Starter
|
Senior Member
Joined: May 2015
Posts: 853
Likes: 70
From: Auckland, New Zealand
cables 6 months new and not on road, spark plugs 6 month new and not on road.
changed s.plug from one to two and problem reoccured in 1#
finally started to go for no apparent reason and engine was starting to sound okay then light on 1# went off again and would not resume. heat effect the light? thought I was getting some place for a short time. will try again tomorrow and see. just odd that no obvious testable error occurring consistently.
Joined: Feb 2010
Posts: 28,839
Likes: 11,290
From: Adelaide Stralia
Stab inthe dark.
Remove the distributor cap. Using a p/pack solvent, Carby cleaner, Electrical cleaner, etc, and spray the inside of that cap, and let is "Air dry", then refit.
Remove each plug lead, and spray clean the cap sockets, and refit.
The fact it kind of came good, then got hissy again, is usually caused by condensation inside the cap.
Veteran Member
Joined: Jul 2012
Posts: 6,796
Likes: 2,403
From: Walnut Creek, California
Cap sockets, aye, had not thought of that. My "tune up box" occupied now by largely obsolete tools. But, one is a bit that I made. A length of stiff but malleable coat hanger wire. A "T" at the top as a handle. Doubled back onto itself at the other. I insert a strip of emery paper, with the abrasive side exposed. Wrap in to a cylinder that just fits the post. Insert, twist a few times, remove and evacuate the crud til I see bright brass or alloy in some.
WD 40 or carbon tet are good desicant for moisture in the posts or under. A bit of warmth works, no real hot, just warm.
Way back when I was a mere wee lad, Dad drove a Model A Ford Roadster. It's odd shaped Distributor cap was above the head. Cracked as were many. OK most of the time in West Texas, durn little rain. But on cold rainy mornings, no start. Fix. A bit of rag on a wire. Dip into hand cowl mounted fuel tank. He lit it with his trusty Zippo. Applied gently under the arms of the cap. Voila, dry. Fired right up.
Carl
Thread Starter
|
Senior Member
Joined: May 2015
Posts: 853
Likes: 70
From: Auckland, New Zealand
Made a few attempts to time the engine yesterday, was roaring fitfully at moments but would not seem to lock and light was intermittent. The time mark remained off the mark.
Tried again today with full charged battery again, distributor seemed to jerk about and was concerned that it had become dislodged from it’s internal gearings (or whatever its links too).
Tested the light on the HT lead from the coil to the distributor and found a clean, constant signal from coil to distributor but none now on any of the leads out of the distributor. Tried two different caps, same result.
Is it possible with just the securing bolt loosened to have the distributor pull entirely free of the inner workings? And just now bad is that..
Trending Topics
If you just had the bolt loosened to retard/advance the distributor nothing much bad can happen. Its one unit, or at least it should be :-)
Spark in, no/low spark out, I would check the following:
- have I forgotten to put the rotor button back in? (you wouldnt be the first)
- have I pushed the coil lead in properly on the distributor
- with the cap off check the rotor rotates when you spin the motor over
- with the cap off check that the carbon button in the top that connects to the rotor button is present and in good condition. Should be under spring tension pushing it onto the rotor top.
Veteran Member
Joined: Jul 2012
Posts: 6,796
Likes: 2,403
From: Walnut Creek, California
Not sure about the architecture here as to how the distributor shaft is driven. But, that description indicates something is astray. Remove the cap and crank the engine. Observe the rotor. Should be turning smoothly. If not the drive has failed!!
Way back circa 1948 or so, my wheels were a neat little 41 Champion tudor sedan.
Powered by smooth but teeny flat head six. I was going down N. Mesa in El Paso from college to my job at a full service station. It quit about a block away!! I coasted in to a parking place alongside. Jumped from civvies to work uniform and got to it.
That evening when things got quiet. I began to see what was wrong. My patient boss watched. Oh, s..., the distributor rotor does not turn. off with the cam cover. Not easy, but could be worse, At the front of the engine. Stripped cam gear, a fiber thing!!!
Bus and street car home that night and the next day. Kind boss got me a gasket and cam gear. After the afternoon work, I put t together. With huge trepidation, I stepped on the starter. In that car, under the clutch!! Great, it fired right up and sounded just fine. Impressed my boss. He remained a friend, after I graduated, and went on to serve and returned. And, when I began my career, in insurance claims, I did some for him. I developed an understanding of "Garage Liability Insurance" and how it worked.
Carli
Joined: Feb 2010
Posts: 28,839
Likes: 11,290
From: Adelaide Stralia
The distributor drive is an offset tang into the middle shaft that rises from the oil pump Bronze gear that is driven by the crankshaft.
The distributor will need to "rise" about 1/4" or more to disengage.
The Bronze driven gear further down in that hole could strip, MAYBE. BUT, there would be NO oil pressure also. That Bronze gear is a MONGREL to replace, as most of the engine front needs to come off. I have NEVER seen one stripped, so it would NOT be a priority to me, unless the distributor is NOT rotating, AND there is no oil pressure, and I think it is rotating, but other issues are clouding the process.
Thread Starter
|
Senior Member
Joined: May 2015
Posts: 853
Likes: 70
From: Auckland, New Zealand
Rotors nicely and fluidly as best I can see (video included)
rotor and cables pushed in
cap button on both dist. caps are springing in and out nicely
same thing today, could get a steady induction pulse with timing light on the coil-to-dist. lead but only occasional pulses on the leads to the plugs and never it seems on plug 1#
rotor and cables pushed in
cap button on both dist. caps are springing in and out nicely
same thing today, could get a steady induction pulse with timing light on the coil-to-dist. lead but only occasional pulses on the leads to the plugs and never it seems on plug 1#
Thread Starter
|
Senior Member
Joined: May 2015
Posts: 853
Likes: 70
From: Auckland, New Zealand

plugs bit dirty but recent and not in ruin

that damn distributor

newer cap, some scaring

older cap, scaring is also recent

grand design

the rotor, some marking despite being fairly new, maybe four months
Joined: Feb 2010
Posts: 28,839
Likes: 11,290
From: Adelaide Stralia
OK.
That is the wrong rotor, it is too long, it is striking the terminal post of the cap, with its top face on the bottom face of the cap posts.
The coil volts SHOULD pass out the TIP of the rotor, and "jump" an air gap to the terminal post of the cap at about 1/2 way up the vertical face.
Many different distributors in tehS2, but my book claim a GL254 as the correct rotor, and looks like this.
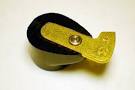
Looking at the old and new cap, this has been a mismatch for a long time.
That is the wrong rotor, it is too long, it is striking the terminal post of the cap, with its top face on the bottom face of the cap posts.
The coil volts SHOULD pass out the TIP of the rotor, and "jump" an air gap to the terminal post of the cap at about 1/2 way up the vertical face.
Many different distributors in tehS2, but my book claim a GL254 as the correct rotor, and looks like this.
Looking at the old and new cap, this has been a mismatch for a long time.
Thread Starter
|
Senior Member
Joined: May 2015
Posts: 853
Likes: 70
From: Auckland, New Zealand
one rotor sold to me by Repco was a clear mismatch and might account for some of the marks. the red one came from Classic Car Parts on the Northshore here, most of the part they have gotten for me have been fine. The original one was brown and cracked in two about seven odd months or more ago which then led to the Repco one and finally the red one. Using all three the car has operated from time to time. MAYBE the original one was also a mismatch if this is the case??
the code on the red one, I think, from my records, was LUCAS DRB106C RED ROTOR ARM
the distributor itself is of course a 22D Lucas model
the code on the red one, I think, from my records, was LUCAS DRB106C RED ROTOR ARM
the distributor itself is of course a 22D Lucas model
Thread Starter
|
Senior Member
Joined: May 2015
Posts: 853
Likes: 70
From: Auckland, New Zealand
fairly sure this was the one I purchased to replace the broken one about a year ago.
Lucas DRB106C High quality red rotor arm
Butler's AutoMart in Chch, NZ lists a ROTOR - 8CYL VALIANT as part number GL254 and its looks similar.
Lucas DRB106C High quality red rotor arm
Butler's AutoMart in Chch, NZ lists a ROTOR - 8CYL VALIANT as part number GL254 and its looks similar.
Last edited by adenshillito; Apr 21, 2017 at 05:20 AM.
Veteran Member
Joined: Nov 2013
Posts: 3,415
Likes: 1,647
From: Regional NSW, Australia
Hey Aden . . . go with Grant's call . . . you can see where the rotor has been smacking cap posts. Why else would rotor crack and break? Given that it's possible your XK may have had its dizzy replaced by a "ring in", you do need to check carefully that the rotor matches. Final hint is that cr@ppy spark plug. Appears like it's been a while since it sparked full burns. Are they all sooty black?
Best wishes,

Ken
Best wishes,
Ken
Thread Starter
|
Senior Member
Joined: May 2015
Posts: 853
Likes: 70
From: Auckland, New Zealand
Ken, yes. Most are a bit sooty even tho fairly new, I try and clean then often as the car is drive-way-bound and therefore really only turning over for various motor tests and not getting out on the road for a serious work out.
Joined: Feb 2010
Posts: 28,839
Likes: 11,290
From: Adelaide Stralia
That GL254 is a very common Lucas rotor, and fits all sorts of cars, that used Lucas running gear.
Bedford, Triumph, Rover, Dodge, international, Wolseley. Austin Group, MG, etc etc, and the cylinders have ZIP to do with the rotor, that is the caps task.
This Link to the Bosch Ignition Catalogue may help you a tad.
Page B66 is the page you need. So scroll down till it appears.
Bosch Ignition Parts 2017.pdf
I agree that the thing was probably wrong prior to you getting the car, and you have done what we all do, and use what we have as samples for new, makes perfect sense.
Also, rotors rarely crack and smash unless they strike the cap. The cap will also crack if clobbered hard enough, and what I see in those snaps, you are on the edge there.
If you are 110% sure the cap fits the base, including all the odd tangs and cutouts, then that is deemed OK. The difference in Lucas cutouts is huge, so it fits or it dont.
Veteran Member
Joined: Jul 2012
Posts: 6,796
Likes: 2,403
From: Walnut Creek, California
Ouch, small miracle that the mismatch did not split the cap as well. I'd go with Grant and others. Get parts that fit ! At ties, not easy, they almost but not quite fit. Good example here.
1. Compare the notches on the cap to the tangs on the distributor. They shoud ocate the cap snugly. And level at the proper height as well. Is that he "jumping" you describe, as opposed tot he entire distributor?.
2. Holding the cap, open side up, fit the "red" rotor in the center. What is the relation of the tip to the posts as you gently turn it, still centered? Hits or with the gap, Grant describes.
3. Were that my car, and a parts source within range, I'd remove the distributor and go shopping. New cap that fits right. New rotor that fits right.
Carl