When you click on links to various merchants on this site and make a purchase, this can result in this site earning a commission. Affiliate programs and affiliations include, but are not limited to, the eBay Partner Network.
In another thread I reported about an issue with a vacuum line going to the vacuum capsule of the distributor. Subsequent tests suggested that the vacuum capsule is a toast. On Greg's suggestion, I am now preparing to pull off the distributor and do a full service (oil & lube, etc.) of this thingy.
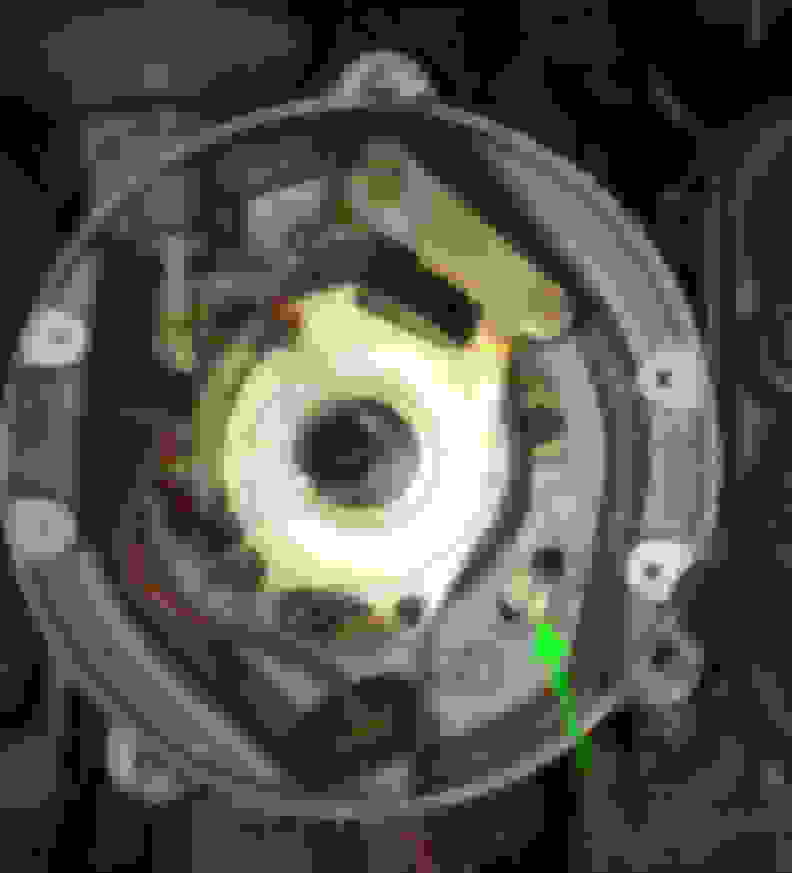
First step was easy. Pulled off spark plug leads and wires; undid 3 screws and pulled of the distributor cap.
Next step is to pull of the rotating rotor arm. I tried to hold it tightly and pull it up. It does not go. How much upward pressure should I apply? I am afraid I could break it.
Also, should I remember the position of the arm when it is being pulled? Or does it have only one possible way to go in and out?
The rotor can only go back one way.
To remove the rotor, it is ESSENTIAL that you do not just prise it straight off upwards. Instead: grasp each end of the rotor and rock it carefully, one side downwards while the other is upwards; but overall no serious upward pull is exerted on the spindle. What you are trying to do is loosen it on the spindle by rocking it. It will come off OK. Also best to buy a new cap and rotor and HT leads, IMO.
Under the rotor is a flash shield secured by those four tiny screws. remove this item. Under that is the "starwheel", a 12 pointed rotor thing. It is secured by a circlip with a springy washer under it too. Undo the circlip with the correct circlip pliers, and noting the order, any other washers etc on top of the starwheel. ALSO note the gap between the star points and the pickup module they go past. There is a U shaped spring that secures the starwheel to the spindle so it cannot rotate on the spindle. Carefully prise this out. Then, gently ease the starwheel upwards while pressing down equally on the spindle, and rotate the starwheel on the spindle back and forth gently if it seems stuck, using fingers only. A bit of WD40 will do no harm. The starwheel is NLA and very brittle, so bare hands and great care!
Once that is off, you may be able to see the end of the vac unit where it fixes to the moveable bit at the bottom of the dizzy. To release the end of the vac unit you MAY have to undo the moveable bit from where it is screwed into the dizzy base. If so, again CAREFULLY mark exactly where it was positioned BEFORE undoing it. Ob replacing it, ensure the gap to the starwheel is the same as before, once the starwheel is back in position. This can be adjusted separately.
Also you will see two differently sized return springs at the dizzy bottom. One looks a bit loose, it is meant to be like that; but ensure the springs are connected to the dizzy parts at each end, they have been known to fall off when work is being done. Post pics of anything you are not sure about.
The vac unit is secured to the dizzy body on the outside by a VERY small 2mm diameter rollpin. This must be drive out by a very fine punch to get the vac unit off. On putting it back, you can drill a slightly bigger hole and secure it with a small self tapper if you cannot find a suitably sized rollpin.
If you get stuck, do not force anything, post again. I hope I have not forgotten anything! Also, lightly lubricate the moveable bits with fully synthetic engine oil and make sure they all move freely.
Last edited by Greg in France; Sep 4, 2017 at 11:33 AM.
Rocking the rotor arm up and down gently did the trick! After loosening it up a little bit, if came off.
I struggled a bit with the circlip, but in the end it also came off.
Same with the star wheel. Had to to move it up and down slowly and repeatedly, millimeter by millimeter. Sometimes applying a little bit of WD40. In the end, it came off, too
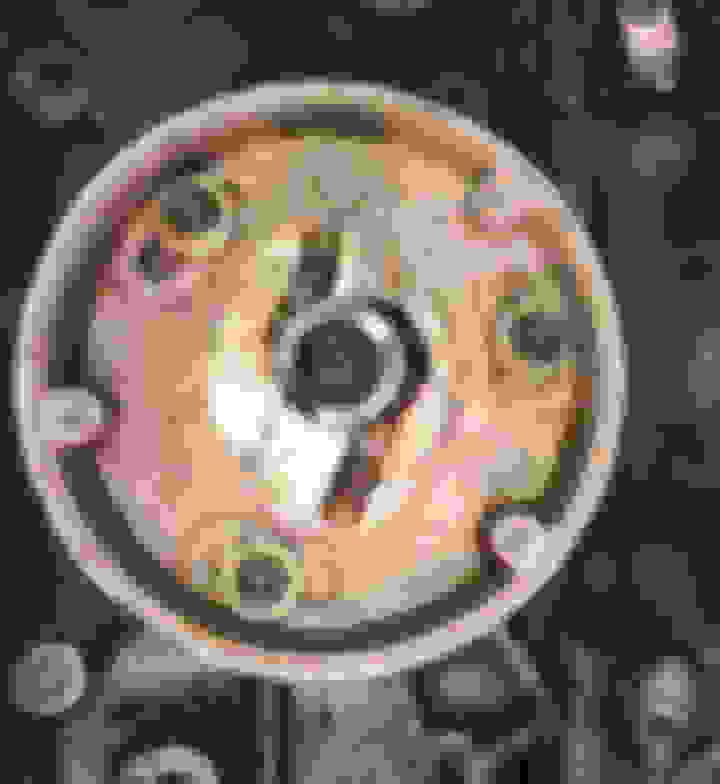
What is next? Should I try removing the whole dizzy body by going after the two flat screws at the bottom? (See an arrow on the picture.) Will it come off after that? Or are there intermediate steps involving pick up module?
Went ahead and undid the two screws holding pick-up module, which revealed the vacuum capsule rod.
Also removed 3 flat springy screws on the bottom after which distributor body came off. I can now have access to two return spring (one loose, one firmer).
Besides testing and replacing the vacuum capsule, what other routine maintenance I should do on the distributor? What areas/points should I lubricate?
I would simply clean out the innards of all the old crud stuff.
A few drops of Synthetic engine oil, Synthetic ATF down the centre of the shaft the rotor came off of and SLOWLY work the 2 spindles, as in they rotate one inside the other a few degrees.
The top spindle should "snap back" to zero with each attempt.
Once that is achieved, done and dusted.
Not sure if you have this Doco, might help later on.
Thanks, Grant. No, I did not have this write-up of yours (though I have a few others). Just downloaded and saved in my Jaguar XJS folder
Will apply the lubrication as described.
Regarding the vacuum advance capsule. Now that the whole dizzy assembly is off, is there a way to test the vacuum capsule? I tried pulling the rod by hand -- no significant movement. Not sure what that means
Greg is spot on, messing as to why?????? is a waste of drinking time.
Those things fry, and the innards are usually solid charcoal looking gunk.
Maybe Jag has sorted their parts suppliers by now, but when I got my new capsule the rod was too short, oops, so I spliced in a section of the old rod, daily driver at the time, it was needed next morning for the school run. I am talking 20mm from memory, so maybe, measure your rod, from capsule mounting face to peg hole, and make sure you get the right one first up.
Ok, I have a new vacuum advance capsule on order from SNG Barrat.
In the meantime, I am thinking about what to do with the pin hole to connect the new vacuum advance capsule to the dizzy. I understand I can push the old pin out. But I assume it would not be in good condition to be reused, right?
Can I drill a hole for a tall and skinny bolt and connect the capsule to the dizzy this way?
Any other alternatives?
I used a thin self tapping screw, having drilled the holes out a touch. It does not need to go all the way through, just solidly enough into the parts it attaches. This was recommended to me by a professional and works fine. Also, when you need to renew it again (somewhere between 3 and 5 years if you use the car) it is easy to get out! Also to get a roll pin in again is not easy
greg.
Last edited by Greg in France; Sep 7, 2017 at 12:56 AM.
When you have the arm of the vac capsule off the base plate make sure the base plate can turn smoothly by hand. That's the part the vac capsule moves to give advance, so it must turn easily.
I had one brand new that was seized solid, teh vac capsule would never have been able to move it.
Again, clean it and lube with synthetic ATF as per the weights etc.
Thanks. Yep, I figured. The base plates are moving against each other. But just in case I added a few drops of full synthetic oil.
Currently awaiting the replacement vacuum capsule. Hopefully it will arrive over the next few days so that I can install and put everything back together next weekend