
E81BBB 1/09/12 the Restoration begins

Well this is it, no turning back now!
I've started pulling her apart in order to ascertain just how much I'm going to have to do.
First order is right hand side, front wing, sills, floorpan, rear wing and anything else that comes along.
Started today by removing the front right wing and front spoiler, then chipping away at the rust to see the extent and wether a potential fabrication repair would be possible.
So far so good, here's where I got to:
Front right wing removed, amazingly this is the only rust on it, so this'll be a definate repair job. I did have to cut the screws securing the spoiler, but other than that the remaning screws and bolts all came undone.
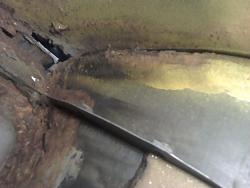
This is the only area of rust I found behind the wing, again a surprise, I was expecting there to be little left of this area. Again all stuff that can be fabricated and welded in.

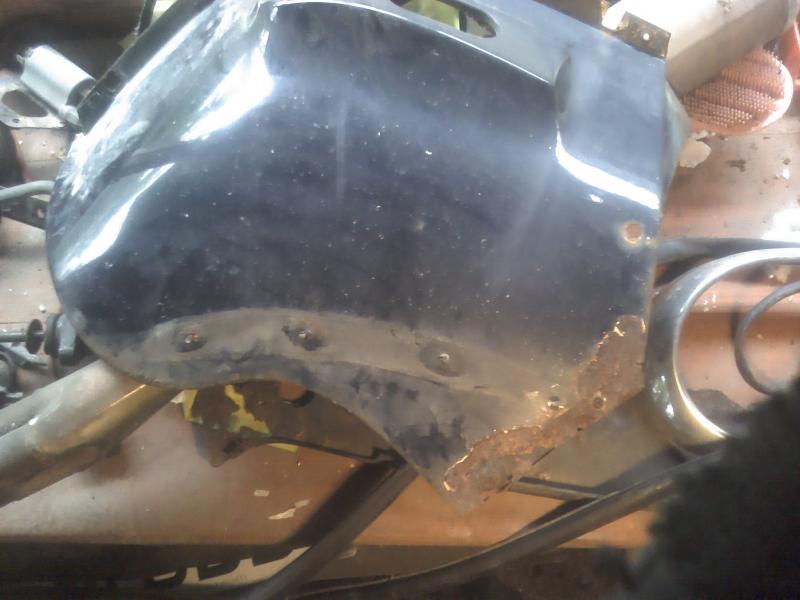
This was the lower half of the front of the wing, again quite minor and restorable.
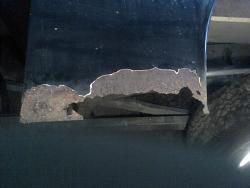
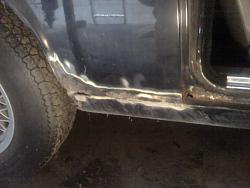
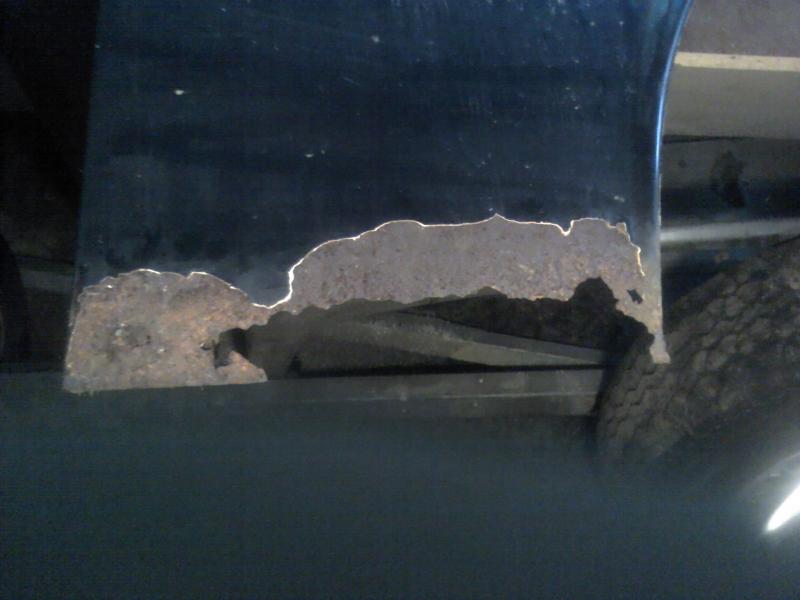
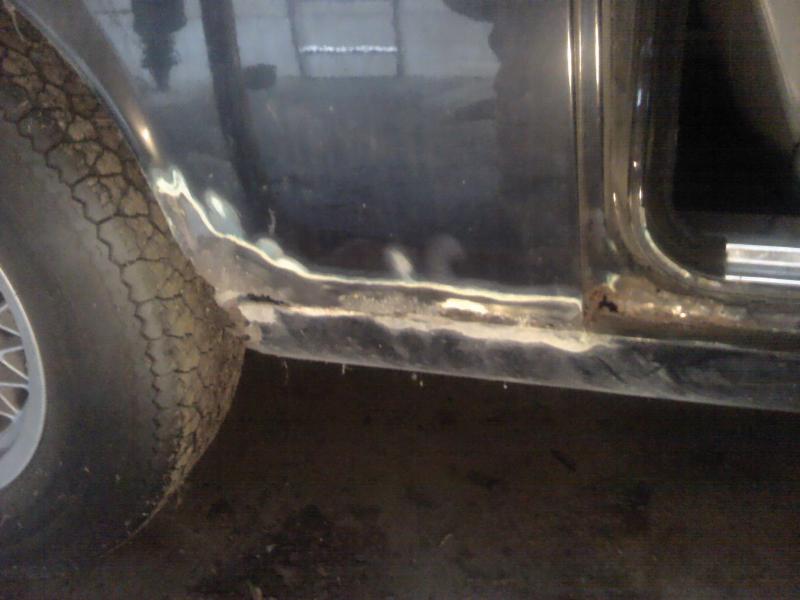
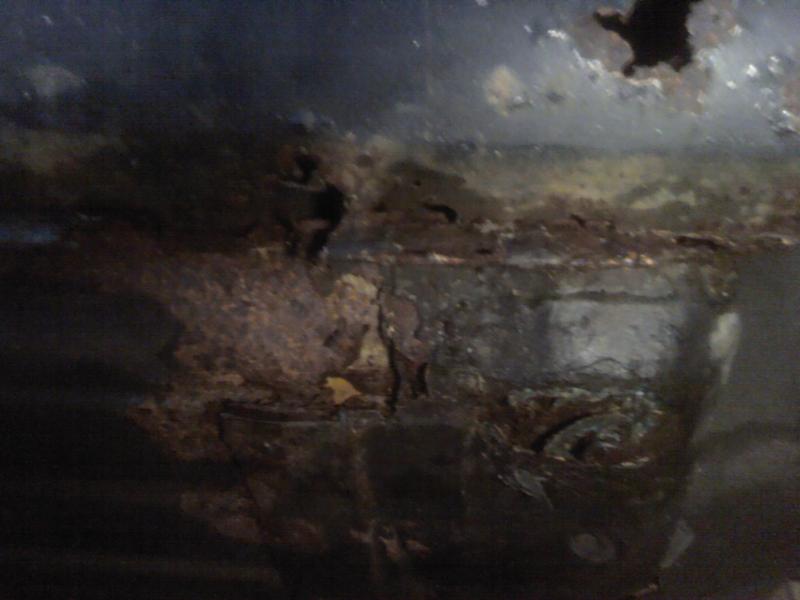
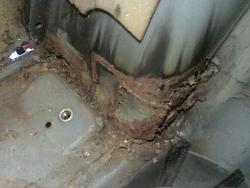
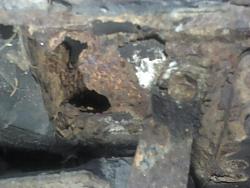
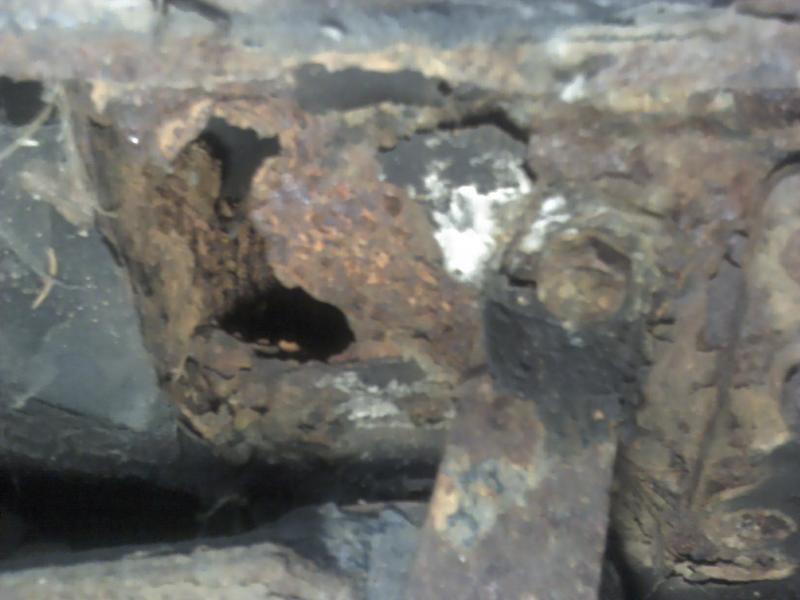
Now here's where things start getting interesring, rear quarter behind door, although rusted through, the rust was only present upto 1/2 inch above the hole, the outer sill is history and the B pillar will need to be repaired.
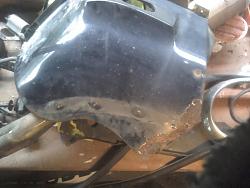
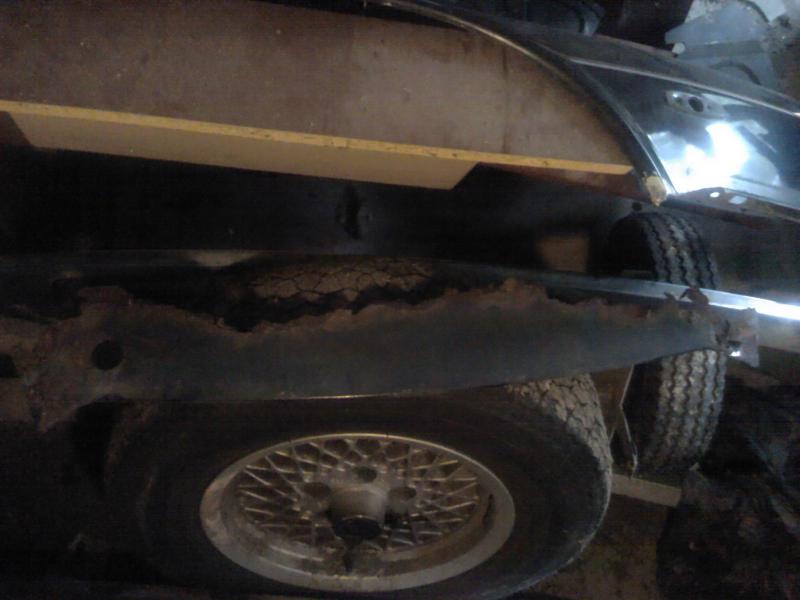
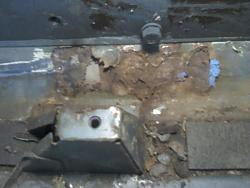
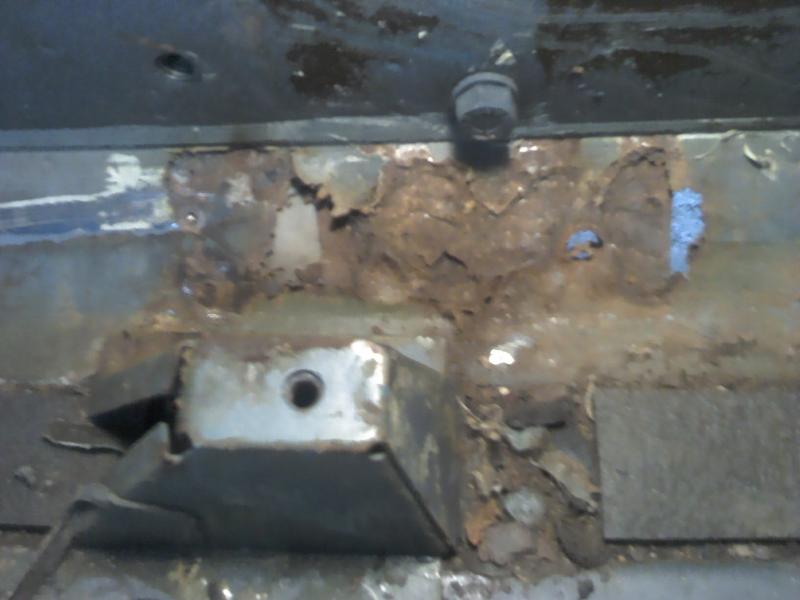
This is all that remains of the panel under the Radiator crossbeam that the spolier mounts to.

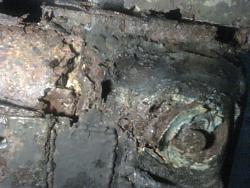
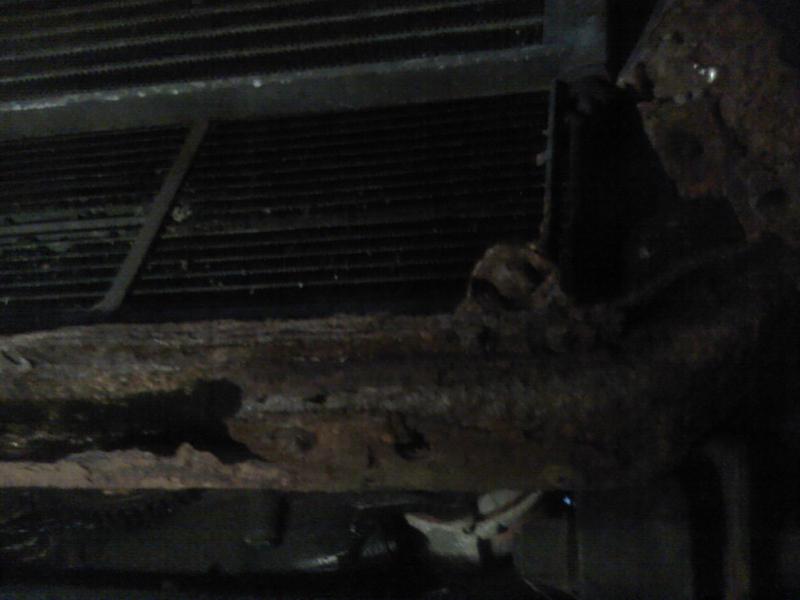
And here's the crossbeam it bolted to, or I should say here was the crossbeam!

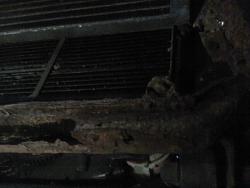
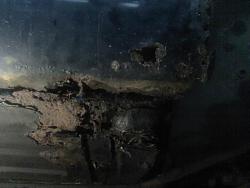
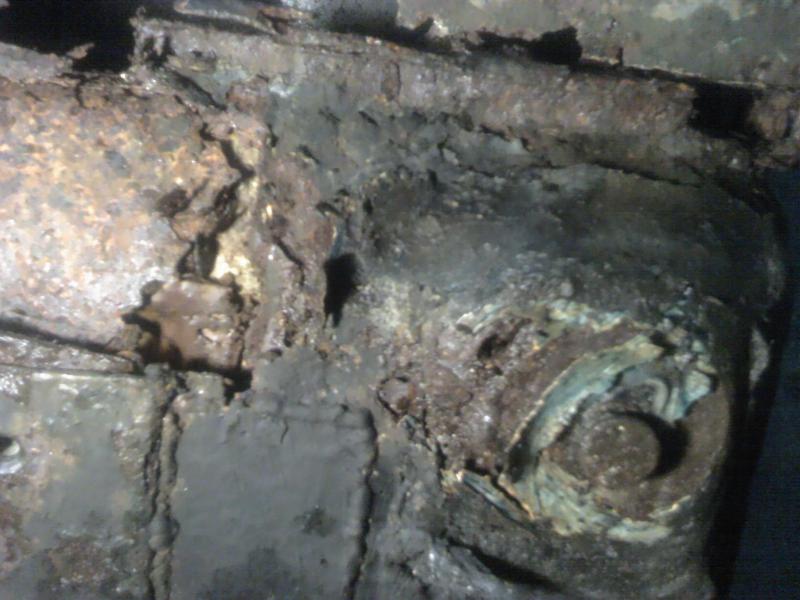
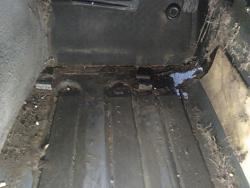
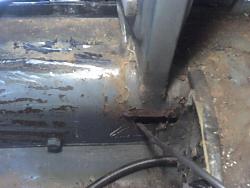
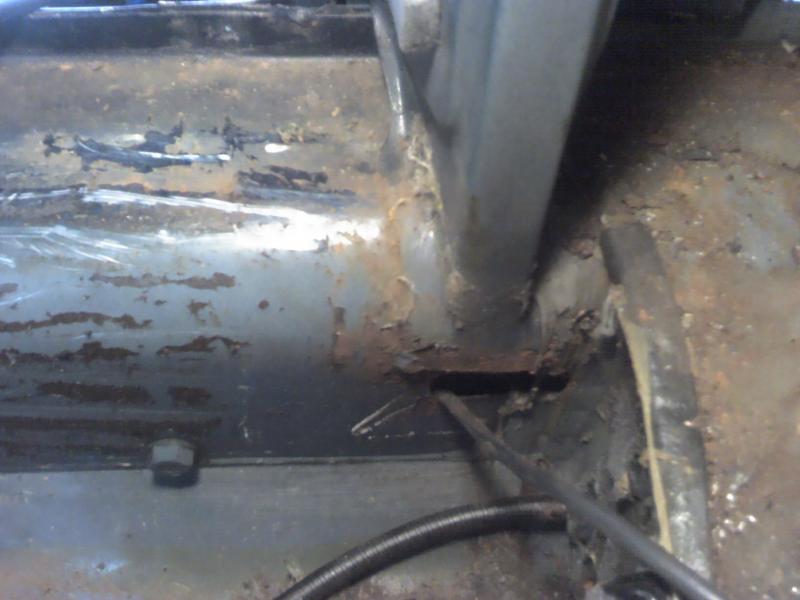
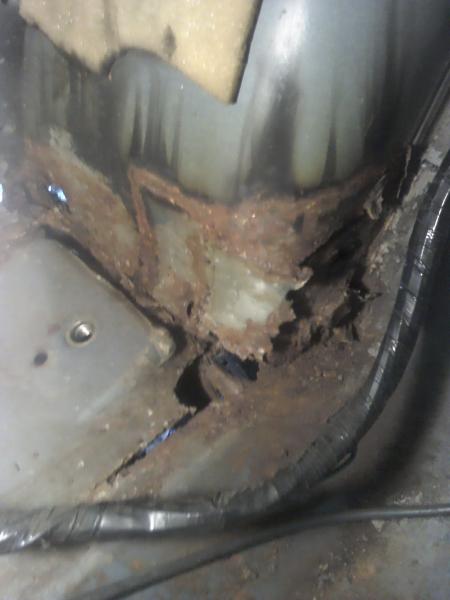
And now onto that bit you've all be thinking about, yes the floor pan, and front jacking point, I think the pictures here speak for themselves. The jacking point does however support the weight of the car without creaking, though I'm not leaving her sitting on them until I've made the repair. this will be a little trickier to fabricate, but I fancy I shall be using a thicker grade steel here. 1mm should suffice for everything else non-structural.
Floorpan is also a goner, albeit in only this place (so far), do I or don't I, I think I'll try at least.

Finally, the sills, outer I will have to bite the bullet and replace, the inners I will likely fabricate myself.
This is day one on what could be a very long restoration, My name is Mark and I AM a Jagoholic
I've started pulling her apart in order to ascertain just how much I'm going to have to do.
First order is right hand side, front wing, sills, floorpan, rear wing and anything else that comes along.
Started today by removing the front right wing and front spoiler, then chipping away at the rust to see the extent and wether a potential fabrication repair would be possible.
So far so good, here's where I got to:
Front right wing removed, amazingly this is the only rust on it, so this'll be a definate repair job. I did have to cut the screws securing the spoiler, but other than that the remaning screws and bolts all came undone.
This is the only area of rust I found behind the wing, again a surprise, I was expecting there to be little left of this area. Again all stuff that can be fabricated and welded in.

This was the lower half of the front of the wing, again quite minor and restorable.
Now here's where things start getting interesring, rear quarter behind door, although rusted through, the rust was only present upto 1/2 inch above the hole, the outer sill is history and the B pillar will need to be repaired.
This is all that remains of the panel under the Radiator crossbeam that the spolier mounts to.
And here's the crossbeam it bolted to, or I should say here was the crossbeam!

And now onto that bit you've all be thinking about, yes the floor pan, and front jacking point, I think the pictures here speak for themselves. The jacking point does however support the weight of the car without creaking, though I'm not leaving her sitting on them until I've made the repair. this will be a little trickier to fabricate, but I fancy I shall be using a thicker grade steel here. 1mm should suffice for everything else non-structural.
Floorpan is also a goner, albeit in only this place (so far), do I or don't I, I think I'll try at least.
Finally, the sills, outer I will have to bite the bullet and replace, the inners I will likely fabricate myself.

This is day one on what could be a very long restoration, My name is Mark and I AM a Jagoholic

Senior Member
Joined: Oct 2011
Posts: 345
Likes: 24
From: Mountaintop, PA
Looks to me like someone took TOO good of care of your car mechanically. You see, Jaguar quite astutely designed these cars with an internal self-rustproofing system. It's really quite ingenious, and involves strategically-located lubrication spray points that coat the entire underside of most XJ-Ss (when the system is working properly) with a precious fluid that actually comes from - seriously, get this - decomposed dinosaurs.
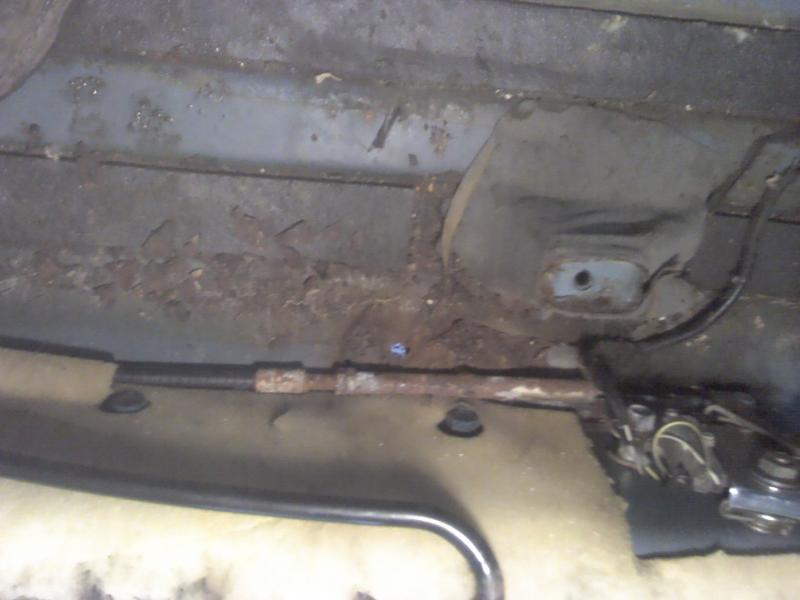
Most notably on your front crossmember, it looks like the lube point located around the front main seal has failed to weep forth its' precious rustproofing fluid, and kept it selfishly sealed inside of the engine crankcase. There are also multiple rustproofing points located on the power steering rack that may not be working either.
But no fear! Jaguar designed this system SO well, that all you have to to is wait, and it will fix itself! Ingenious! Unfortunately you are now dealing with the aftermath of the failure of the Jaguar-patented self-rustproofing system, and must get that repaired before anything else.
Good luck to you...looks like you have a big project ahead of you but I look forward to seeing your continued progress. Sometimes the best threads are ones that the OP keeps adding to over the years so we can watch the project develop over time.
Good luck!
Darel
Thanks Darrel  Infact the steering rack part of the Rust prevention system is working stupendously, the front subframe is wonderfully rust free and gleaming with fresh dinosaur fat. Unfortunately my equally prehistoric garage has decided that the best way to deal with rain is to allow it to flow acroos the floor under the XJS, which has resulted in rain on the drying floor condensing on the underside of BB thereby accelerating the rate of return to the earth from which she came. It looks like I have a fight against time itself now.
I suppose I could find the drainage channel behind the garge first, but seriously, going round the back of that garage seems to me to be a fate worse than death.
Infact the steering rack part of the Rust prevention system is working stupendously, the front subframe is wonderfully rust free and gleaming with fresh dinosaur fat. Unfortunately my equally prehistoric garage has decided that the best way to deal with rain is to allow it to flow acroos the floor under the XJS, which has resulted in rain on the drying floor condensing on the underside of BB thereby accelerating the rate of return to the earth from which she came. It looks like I have a fight against time itself now.I suppose I could find the drainage channel behind the garge first, but seriously, going round the back of that garage seems to me to be a fate worse than death.
Last edited by xjs36uk; Sep 1, 2012 at 02:29 PM.
Yesterday, I attempted to clear some sort of drainage channel behind the garage to help stop the rainwater from washing across the floor, right underneath the XJS.
No rain today so no idea if it will work...
But I did spend a little more time uncovering the extent of rust (and necessary repairs to do).
Deciding the outer rust on the sill and floor pan was enough evidence to warrant further probing, notwithsatnding the fact that I'll have to whip the inside out to weld it all up anyways, I took the plunge and pulled up the front right carpet (drivers side, this is a UK car afetr all). The pulled up the FR sill carpet, which of course led to the seat being removed and so on....
So here are the results:
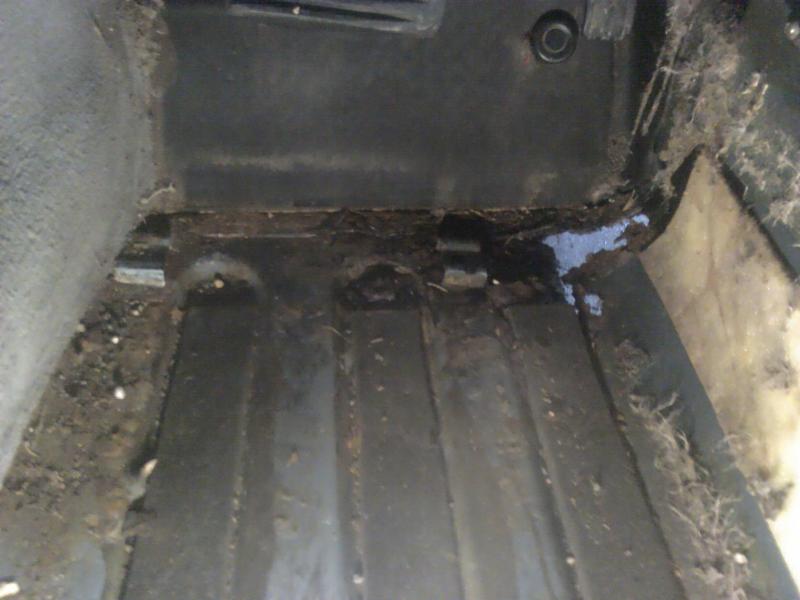
After carefully peeling the carpet back using a chisel to try and keep the foam backing as intact as possible, it is possible to see that although there is quite definately a hole there the majority of the floor pan is actually quite solid and will therefore be repaired.
In the process of removing the sill carpet, the seatbelt rail (mount) had to be unbolted, and amazingly it did complete with clean threads, although I can't say much for my condition after removing just that one bolt, 26 years and never touched! This highlighted another part of the floorpan that requires attention:

And finally for today, with the carpet and seat out I thought it prudent to at least lift the transmission tunnel carpet, and yes there we go, still not a deathknell for the floorpan, just adding to the list. Luckilly I've 'ordered 4sq metres of 1mm thick galvanised steel. (although I'm starting to think I may need more).

More as it happens............
No rain today so no idea if it will work...
But I did spend a little more time uncovering the extent of rust (and necessary repairs to do).
Deciding the outer rust on the sill and floor pan was enough evidence to warrant further probing, notwithsatnding the fact that I'll have to whip the inside out to weld it all up anyways, I took the plunge and pulled up the front right carpet (drivers side, this is a UK car afetr all). The pulled up the FR sill carpet, which of course led to the seat being removed and so on....
So here are the results:
After carefully peeling the carpet back using a chisel to try and keep the foam backing as intact as possible, it is possible to see that although there is quite definately a hole there the majority of the floor pan is actually quite solid and will therefore be repaired.
In the process of removing the sill carpet, the seatbelt rail (mount) had to be unbolted, and amazingly it did complete with clean threads, although I can't say much for my condition after removing just that one bolt, 26 years and never touched! This highlighted another part of the floorpan that requires attention:
And finally for today, with the carpet and seat out I thought it prudent to at least lift the transmission tunnel carpet, and yes there we go, still not a deathknell for the floorpan, just adding to the list. Luckilly I've 'ordered 4sq metres of 1mm thick galvanised steel. (although I'm starting to think I may need more).

More as it happens............

Veteran Member
Joined: Oct 2011
Posts: 1,738
Likes: 70
From: WV
Looks to me like someone took TOO good of care of your car mechanically. You see, Jaguar quite astutely designed these cars with an internal self-rustproofing system. It's really quite ingenious, and involves strategically-located lubrication spray points that coat the entire underside of most XJ-Ss (when the system is working properly) with a precious fluid that actually comes from - seriously, get this - decomposed dinosaurs.
Most notably on your front crossmember, it looks like the lube point located around the front main seal has failed to weep forth its' precious rustproofing fluid, and kept it selfishly sealed inside of the engine crankcase. There are also multiple rustproofing points located on the power steering rack that may not be working either.
But no fear! Jaguar designed this system SO well, that all you have to to is wait, and it will fix itself! Ingenious! Unfortunately you are now dealing with the aftermath of the failure of the Jaguar-patented self-rustproofing system, and must get that repaired before anything else.
Good luck to you...looks like you have a big project ahead of you but I look forward to seeing your continued progress. Sometimes the best threads are ones that the OP keeps adding to over the years so we can watch the project develop over time.
Good luck!
Darel
mine not run, but at least its not rusty.
Not much rain then in West Virginia!
Trending Topics
Veteran Member
Joined: Oct 2011
Posts: 1,738
Likes: 70
From: WV
you kidding? its been raining for a solid week straight with no end in sight.
and the car came from Welch, which is basically a hole thats been mined into the ground for the miners to live and there is dew on EEEEEVERYTHING down there.
and the car came from Welch, which is basically a hole thats been mined into the ground for the miners to live and there is dew on EEEEEVERYTHING down there.
Today's installment of the stripdown is actually from yesterday, I ended up having very little time in the evening to update or upload on here and today I'm too tired to do any work on the car, so today's is yesterday's.
Moving a bit further back the B pillar looks as solid as the day it was put in:
That seat belt mounting once I removed the handbrake and the remaining bitumen lining on the inner sill and then had a little tap around with the pointy hammer. Still repairable.
Yet more carpeting, padding and the rear seats removed revealed a previous 'repair' the the inner rear wheel arch, nicely welded, but it's just a plate slapped onto a rust patch.
AND after a bit of tapping, it was obviously an old repair as that too had rusted through:

Remember that B pillar, well here's another angle showing the inside of the wing and sill:
it's at this point we take a moment to pause and shudder: Any guesses what this is!? or was I should say! Either way some meticulous fabrication in some thick steel plate will be required.
I just now need to remove the rear bumper and wheel and see what goes there, then I'll be not far away from starting the repairs on this side. When that's done it'll be empty the garage time and turn her round to start the other side.
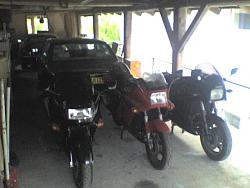
This is the garage when she was first parked in, in 2009
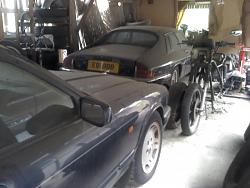
And this is not long before work commenced:
Moving a bit further back the B pillar looks as solid as the day it was put in:
That seat belt mounting once I removed the handbrake and the remaining bitumen lining on the inner sill and then had a little tap around with the pointy hammer. Still repairable.
Yet more carpeting, padding and the rear seats removed revealed a previous 'repair' the the inner rear wheel arch, nicely welded, but it's just a plate slapped onto a rust patch.

AND after a bit of tapping, it was obviously an old repair as that too had rusted through:
Remember that B pillar, well here's another angle showing the inside of the wing and sill:

it's at this point we take a moment to pause and shudder: Any guesses what this is!? or was I should say! Either way some meticulous fabrication in some thick steel plate will be required.
I just now need to remove the rear bumper and wheel and see what goes there, then I'll be not far away from starting the repairs on this side. When that's done it'll be empty the garage time and turn her round to start the other side.
This is the garage when she was first parked in, in 2009

And this is not long before work commenced:


Thanks Graham, I'm gonna need all the luck I can get, this is not only a resto on a nearly non existant budget, it's also my first!
I keep looking at the X300 and saying to myself, it probably would have been better to start with that seeing as she only needs the rear arches doing and I've got the repair panels already for that. But then I look at it again and say nah! Gotta start somewhere, and nothing like learning by jumping in at the deep end.
I keep looking at the X300 and saying to myself, it probably would have been better to start with that seeing as she only needs the rear arches doing and I've got the repair panels already for that. But then I look at it again and say nah! Gotta start somewhere, and nothing like learning by jumping in at the deep end.
Last edited by xjs36uk; Sep 5, 2012 at 09:31 AM. Reason: Can't smell properly

Senior Member


Joined: Sep 2012
Posts: 599
Likes: 533
From: Cambs
Good luck with your resto Mark, I'm in the same boat so can give You some general idea on time and costs.
My car was badly rusted in same places as yours plus, top of the wings, rails underneath which will be badly rusted on your car too since thats where the problem starts, headlamp housing, both headlamps, front big panel which is welded between the headlamps was also gone.
Check for rust on the shock absorber mounting plates, these tend to rust badly too, especially on such neglected cars.
Before I started my resto I did not know anything about welding or any other metal work, I've started last December and currently 3/4 of the car is completed, going from the front end. Just finished painting floors yesterday. I've been doing work mainly during saturdays, not every. I guess I've done two weeks of work since I've started.
Allow one day per one rusty area, for example wing bottom will take almost a day to fix, despite the fact that it looks easy to do.
Last weekend I've fixed the seat belt mountings, this took 12 hours to sort out. You need to drill the spot welds and remove the seat post, cut everything underneath, weld in new metal and then weld the seat post back. Whether you want to weld in a new strengthening plate at the underneath of the floor or not is up to You.
So that the general idea on times needed to fix each thing.
My entire project was done on the cheap side too, I've tried to save as much as it was possible and spend pretty much nothing on it. This was not entirely correct way of doing it I must admit now.
For example I've spent LOTS of time fabricating the jacking point box, this was really difficult job for me and I've succeeded but would NOT do it again for sure. It would be much easier and better to spent ~100GBP on new panels which are available and use that time to fix other stuff. Im guessing you will have to cut at least two - three inches of the floor to get to reasonable metal.
So what you need is : 1 sill which You can then use to fix all 4 sill ends. Sills are rusted only at 25cm max on each side and end so You can still keep the middle parts and just cut the rusty bits. I've used approx 60cm to fix both mine and I got a second hand part from jag forum member.
Panel under radiator, this is welded and cost approx �120
Panel in front of it - I've jsut got mine from JDHT yesterday - �32
Door skin from barrat - Im sure your doors will need some repairs too, if not, your lucky. If they need repair, get the cheapest door skin from sng barrat, its for convertible I think but you'll need the bottom part which is going to be ok for the job and cost only �15 instead of hundreds.
Inner sill - get one to fix all 4 corners - they are cheap from jdht and will save you lots of time.
Jacking point boxes - these are aftermarket but again will save a LOT of time, unfortunately they are not that cheap.
Shock mounts - approx �35 from JDHT
Check for rust under headlights and check that horizontal panel underneath them - this one is cheap as less than �20.
Radius arms mountings - you're lucky because they are available on eBay from kutuka sports and are less than �40 I think. You will need them for sure. Dont bother with fabricating.
Rear arches! Both sides available from SNGBarrat, just got mine and they were �130 for a pair, inc delivery. Despite how your may look - get them. I've tried to repair mine through universal arch, but the amount of rust and fabrication makes it difficult and impractical. Replacement panels are easy to fit in and will also take care of rust just behind the door.
New inner arches are not needed as lip can be welded to the new panel inside the wheel well and therefore eliminate difficult spot welds and another potential rust trap.
Everything else should be easy to save and fabricate, few more things to consider.
Top of the inner wing - grind it down, even if it looks solid. One tiny pinhole there - and there will be lots of holes under paint. Water from this area goes straight into the jacking point box - thats how it all starts and rots, so pay special attention to it.
Lower quarters, either front or rear are available from eBay and in fiberglass. I fixed mine despite being like your rad tray but on my car they are hidden behind the twr bumper.
Swap all carpets as soon as possible and get rid of them, they are just making more mess inside at the moment.
You might have a pool of water under rear seats, or rust holes in rear screen tray, check that too.
Good luck with your resto project!
Veteran Member
Joined: May 2010
Posts: 4,638
Likes: 2,583
From: Vic Australia
This was the lower half of the front of the wing, again quite minor and restorable.
Attachment 23182
Good luck.
Veteran Member
Joined: May 2010
Posts: 4,638
Likes: 2,583
From: Vic Australia
I had rust here too. I think the reason is that the front scuttle can let water in through the wiper grille. The front scuttle bends down towards the top rails but there is no drain in the end. Water pools here and rusts from the inside out. I drilled a hole to let the water drain into the top rail and then made sure the top rail drain was clear. BTW the top rail drain on both sides was clogged with seamsealer.
Well, I have to apologise to everyone that was following my restoration, as per usual with these things, life and other associated problems always seem to get in the way at the most inopportune moments!
I have not given up on the restoration, but since my last post on the subject I was initially let down on the supply of steel (now sorted 2 years later!!!!), then a series of issues with the Rangey (our day to day car) culminating in engine failure meant I had to switch all my efforts to re-commisioning my old w124 in a hurry so my wife could get to work (and learned to weld properly in the process), then my bike blew it's engine and is still awaiting some parts (engine parts for a 1986 Kawasaki zx series engine are very hard to find!) meanwhile the Engine strip and rebuild on the Rangey had to take priority and is now just awaiting funds to finish! Then my hip finally gave up last summer, which took me out of the game until March this year, my discharge from hospital was met with an immediate requirement to totally renew all the bushes and bearings on the Merc, which took 6 weeks (most of it waiting for parts) and with that job out of the way, I am now welding up a Ford Cougar for a friend, then his sisters L200, then I have to get on and finish the Rangey, the bike and a bike for the same friend. On top of that we are selling our guesthouse and are looking to get a smaller house with a bigger garage.
As I've said I will be continuing with the xjs restoration, though it's likely to be in the new house when we get there, (once we sell this place of course!).

Thread
Thread Starter
Forum
Replies
Last Post
FS[SouthEast]: Books - Various Jaguar Titles
SCMike
PRIVATE For Sale / Trade or Buy Classifieds
6
Nov 25, 2015 07:55 AM
wynlaidig
MKI / MKII S type 240 340 & Daimler
0
Sep 29, 2015 02:35 PM
Currently Active Users Viewing This Thread: 1 (0 members and 1 guests)