
Finally finished the woodtrim

Actually, sometimes the adhesive does seep through the grain. In that case you can wait until it gets hard and scrape it with sand paper.

Thread Starter
|
Banned
Joined: Aug 2013
Posts: 832
Likes: 325
I got the lacquer off... bad news is the veneer came off too in places. I am thinking of following Daveb's lead and re-veneering myself.
What did you use to adhere the veneer to the metal? I was advised from a veneer store that West System F-flex650 would be the best to adhere raw veneer with no backing to metal. However, I have been warned by others that many adhesives used to adhere wood to metal may bleed through the thin veneer. I'd love to hear what other's used and their thoughts.
Also, I love the color of Warrjon's finished wood. Is that the natural wood with just the poly finish, or did you stain it with something first?
I used 3M 77 to adhere the raw wood to the metal, set it upside down and place some weight on it, not sure how much weight I used because placed some large pieces of walnut I had around that I use for turning. the wood to wood I used Elmers wood glue, the kind that is water proof and can be stained and painted. Remember you also have to "Soften" up the raw veneer before using, you can find out ways on the internet. Hope this helps.
Thread Starter
|
Banned
Joined: Aug 2013
Posts: 832
Likes: 325
FWIW - Many pro woodworkers use Unibond 800 Urea adhesive for veneering.
Here's some info on it:
A Review of Urea Resin Glue | The Wood Whisperer
Google will give more details.
Here's some info on it:
A Review of Urea Resin Glue | The Wood Whisperer
Google will give more details.
The Wood Whisperer is a great resource, I follow him

Senior Member


Joined: Nov 2011
Posts: 353
Likes: 92
From: nyc
novice question here:
what did you use to pry the pieces off of the dash? screwdriver?
ive taken off the two pieces that have the buttons, but the others seem attached quite tightly, and i dont want to destroy either the panels or the dash.
thanks.
what did you use to pry the pieces off of the dash? screwdriver?
ive taken off the two pieces that have the buttons, but the others seem attached quite tightly, and i dont want to destroy either the panels or the dash.
thanks.
Senior Member

Joined: Mar 2010
Posts: 355
Likes: 45
From: South of Buffalo, NY
A while back I bought an auto trim removal kit. Just search it and you'll find plenty. It was the one of the best tools I have bought for working on vehicles. Its basically a bunch of plastic wedges and things made exactly for this kind of work.
 !
!
Senior Member
Joined: Mar 2010
Posts: 355
Likes: 45
From: South of Buffalo, NY
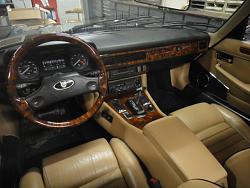
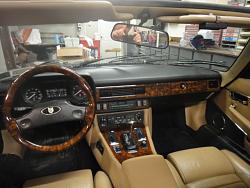
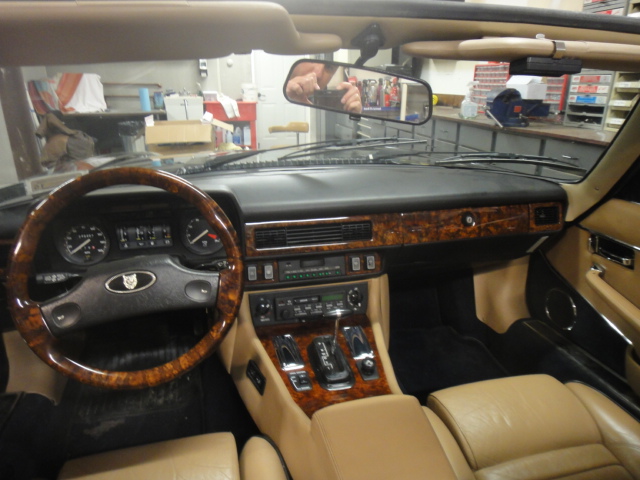
After a lot of thought about re-veneering and finishing the ski slope myself, I decided to remove all of the wood trim and have it professionally done so it would all match. And boy I couldn't be happier. I sent it to Britishautowood.com and he did a fantastic job! Between removing the wood pieces and him returning them, I put a walnut steering wheel from Myrtle Products on the car and posted a pic on the forum. Saul from Britishautowood used that photo and was able to match the newly veneered wood to the steering wheel. It looks fantastic! The attention to detail is superb. He bookmatched the ski slope with the most detail in the middle to produce some great patterns. The center dash and the glove compartment veneer came from the same piece of wood that carries the grain over between the 2 trim pieces. Very high end, very professional.


Senior Member
Joined: May 2012
Posts: 331
Likes: 124
From: Roswell, GA
[QUOTE=jnporcello;926547]After a lot of thought about re-veneering and finishing the ski slope myself, I decided to remove all of the wood trim and have it professionally done so it would all match. And boy I couldn't be happier. I sent it to Britishautowood.com and he did a fantastic job! Between removing the wood pieces and him returning them, I put a walnut steering wheel from Myrtle Products on the car and posted a pic on the forum. Saul from Britishautowood used that photo and was able to match the newly veneered wood to the steering wheel. It looks fantastic! The attention to detail is superb. He bookmatched the ski slope with the most detail in the middle to produce some great patterns. The center dash and the glove compartment veneer came from the same piece of wood that carries the grain over between the 2 trim pieces. Very high end, very professional.
Wow, that is excellent work.
Wow, that is excellent work.
Veteran Member
Joined: Jul 2010
Posts: 1,124
Likes: 368
From: Southern California
After a lot of thought about re-veneering and finishing the ski slope myself, I decided to remove all of the wood trim and have it professionally done so it would all match. And boy I couldn't be happier. I sent it to Britishautowood.com and he did a fantastic job! Between removing the wood pieces and him returning them, I put a walnut steering wheel from Myrtle Products on the car and posted a pic on the forum. Saul from Britishautowood used that photo and was able to match the newly veneered wood to the steering wheel. It looks fantastic! The attention to detail is superb. He bookmatched the ski slope with the most detail in the middle to produce some great patterns. The center dash and the glove compartment veneer came from the same piece of wood that carries the grain over between the 2 trim pieces. Very high end, very professional.
Attachment 75236
Attachment 75237
Attachment 75236
Attachment 75237
Other than that, Saul's work is the standard, hands down.
BTW, has anybody removed the (LHD) "airbag" wood piece lately?
Cheers,
Last edited by Forcedair1; Apr 23, 2014 at 07:25 PM. Reason: Forgot the question I was going to ask

Junior Member
Joined: Jun 2014
Posts: 14
Likes: 2
From: Costa Mesa CA
Perused with awe the above posts. I have a simpler question. I wish to exchange the wood trim on the console from '95 XJS with another '95 XJS. Once I have remove the various bezels, will the veneer wood just lift out, or is it glued to the console structure.
Thanks to whoever has knowledge and time to respond. Gary
Thanks to whoever has knowledge and time to respond. Gary
Here you can see the pics of the procedure.
All written in Japanese and you won't be able to read, but the pics will give you an idea what it is like.
Undo the screw under the center console box catch lid, remove all the bezels and remove 2 bolts on the side. Then pull the veneer and it comes off.
http://jaglover.web.fc2.com/XJSmaint...erremoval.html
Veteran Member
Joined: May 2010
Posts: 5,331
Likes: 1,742
From: Arlington, VA
It is held in place with one single Philips head screw that will be visible once you remove the armrest cubby and two tabs that fit into two slots just under the radio.
No glue. No mess. No problem.
No glue. No mess. No problem.
Thread Starter
|
Banned
Joined: Aug 2013
Posts: 832
Likes: 325
After a lot of thought about re-veneering and finishing the ski slope myself, I decided to remove all of the wood trim and have it professionally done so it would all match. And boy I couldn't be happier. I sent it to Britishautowood.com and he did a fantastic job! Between removing the wood pieces and him returning them, I put a walnut steering wheel from Myrtle Products on the car and posted a pic on the forum. Saul from Britishautowood used that photo and was able to match the newly veneered wood to the steering wheel. It looks fantastic! The attention to detail is superb. He bookmatched the ski slope with the most detail in the middle to produce some great patterns. The center dash and the glove compartment veneer came from the same piece of wood that carries the grain over between the 2 trim pieces. Very high end, very professional.
Attachment 75236
Attachment 75237
Attachment 75236
Attachment 75237
Really looks super nice


Thread
Thread Starter
Forum
Replies
Last Post
Currently Active Users Viewing This Thread: 1 (0 members and 1 guests)