
V12 - How to remove alternator? RESOLVED

Thread Starter
|
Senior Member
Joined: Sep 2014
Posts: 366
Likes: 78
From: Dallas, TX
Hey folks, new '88 XJ12 owner (2 days and less than 20
miles
Last night on the very first trip beyond the block, the
red battery warning light lit up. Voltmeter gradually went to
leftmost point on the gauge, used to be around 12-13 V
before that. Lights dimmed, died on the side of the road.
Surely, this must have been my personalized Welcome to the
Jaguar ownership experience
Now for the diagnosis, will crank up and start if I use an
external battery. But the red battery light is on and volts
start dropping. Engine dies when voltage drops to around 10V
I've cleaned the battery terminals, the bus bar point from
the +ve battery cable, and the ground to the -ve battery cable.
I can't access the rear of the alt to measure voltage there
and I can't see where the other end of the alt leads
terminate. Perhaps someone here can enlighten me (keep in
mind I've had 2 days with this car). So I reckon my next
step is to pull the alt out and take it in to be tested.
I'm stuck trying to get the alternator out. Here are some
pics, I'm not sure if my '88 XJ12 is exactly the same as the
XJS:

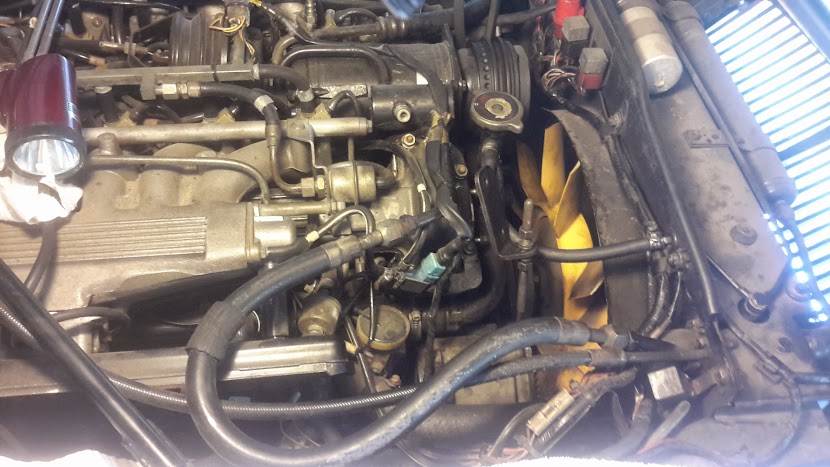

I can see two approaches for getting the alternator out.
Option 1:
Remove the bracket that attaches the alternator to the
block. There are 4 bolts that hold this on (numbered 1-4) in
the pic. I've applied heat (map gas torch) and loosened
bolts 1, 2, and 3. The number 4 bolt is underneath (below)
the number 3 bolt and there is no room/clearance to get a
wrench or socket in there from above. To get to it from
below, I'd have to remove a WHOLE BUNCH of stuff underneath.
Option 2:
It appears that the bracket attaches to the alternator with
a through bolt that goes from the front to the back of the
alternator. This is bolt numbered 5 (not visible in the pic,
its under the fan). I can get a socket on this and turn it,
but I can that there is a nut at the other end that is
turning (see the diagram with the red arrow that says ''Thru
bolt''). I cannot for the life of me get a wrench/socket in
there to hold it without taking off whatever is there
underneath the radiator hose. I assume (not sure) that this
is the ''air pump'' that I've seen referred to? Anyhow, it
looks like I need to get this thing off if I want to prevent
the alternator thru' bolt from turning, but I can't figure
out how to get this off. (Looks like a catch-22, the
alternator needs to come off for this to come off)
Someone please tell me there is an easier way to get the
alternator out. I've been stuck on this for hours now.
Option 1, or 2 or Option X that I'm overlooking?
Thanks guys
Sonny
--
'88 XJ12 VDP, '97 993
miles
Last night on the very first trip beyond the block, the
red battery warning light lit up. Voltmeter gradually went to
leftmost point on the gauge, used to be around 12-13 V
before that. Lights dimmed, died on the side of the road.
Surely, this must have been my personalized Welcome to the
Jaguar ownership experience
Now for the diagnosis, will crank up and start if I use an
external battery. But the red battery light is on and volts
start dropping. Engine dies when voltage drops to around 10V
I've cleaned the battery terminals, the bus bar point from
the +ve battery cable, and the ground to the -ve battery cable.
I can't access the rear of the alt to measure voltage there
and I can't see where the other end of the alt leads
terminate. Perhaps someone here can enlighten me (keep in
mind I've had 2 days with this car). So I reckon my next
step is to pull the alt out and take it in to be tested.
I'm stuck trying to get the alternator out. Here are some
pics, I'm not sure if my '88 XJ12 is exactly the same as the
XJS:
I can see two approaches for getting the alternator out.
Option 1:
Remove the bracket that attaches the alternator to the
block. There are 4 bolts that hold this on (numbered 1-4) in
the pic. I've applied heat (map gas torch) and loosened
bolts 1, 2, and 3. The number 4 bolt is underneath (below)
the number 3 bolt and there is no room/clearance to get a
wrench or socket in there from above. To get to it from
below, I'd have to remove a WHOLE BUNCH of stuff underneath.
Option 2:
It appears that the bracket attaches to the alternator with
a through bolt that goes from the front to the back of the
alternator. This is bolt numbered 5 (not visible in the pic,
its under the fan). I can get a socket on this and turn it,
but I can that there is a nut at the other end that is
turning (see the diagram with the red arrow that says ''Thru
bolt''). I cannot for the life of me get a wrench/socket in
there to hold it without taking off whatever is there
underneath the radiator hose. I assume (not sure) that this
is the ''air pump'' that I've seen referred to? Anyhow, it
looks like I need to get this thing off if I want to prevent
the alternator thru' bolt from turning, but I can't figure
out how to get this off. (Looks like a catch-22, the
alternator needs to come off for this to come off)
Someone please tell me there is an easier way to get the
alternator out. I've been stuck on this for hours now.
Option 1, or 2 or Option X that I'm overlooking?
Thanks guys
Sonny
--
'88 XJ12 VDP, '97 993

Veteran Member


Joined: Jan 2012
Posts: 14,612
Likes: 10,809
From: France
Unless you have a modified car, that thing in your first pic is NOT the alternator. The alternator looks like it is below that thing. If you look at the first pic by the arrow and the number 5, you can see below that first thing a belt that is turning something. That something should be the alternator.
Someone else familiar with the US spec cars may be able to identify the thing, maybe an air pump? if so, it will have to come out before the alternator is accessible.
greg
Someone else familiar with the US spec cars may be able to identify the thing, maybe an air pump? if so, it will have to come out before the alternator is accessible.
greg


Joined: Feb 2010
Posts: 28,833
Likes: 11,290
From: Adelaide Stralia
Firstly welcome to the forum.
Sadly there is NO easy way of removing that alternator if your car has the air pump system, which yours clearly does. We dont have that nonsense down here.
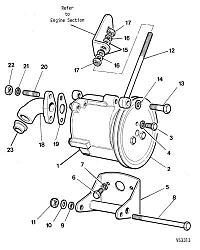
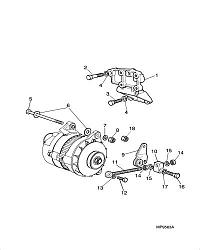
I have attached 2 drawings from my parts book, and that shows the mounting brackets TO teh engine block, and the bolts etc you are seeking.
The air pump must come off first, and its thru bolt is easy to access if the radiator top hose, and air cleaner cover and backing plate are removed. This frees up a LOT of precious space.
Once the air pump is removed out thru the top, then reaching down the alternator mount thru bolt can be removed.
This is not a quick job, sorry.
I think it will all fall into place with these drawings, if not ask back and I will bring the memory into the present and go thru it as I remember it a long time ago.
Sadly there is NO easy way of removing that alternator if your car has the air pump system, which yours clearly does. We dont have that nonsense down here.
I have attached 2 drawings from my parts book, and that shows the mounting brackets TO teh engine block, and the bolts etc you are seeking.
The air pump must come off first, and its thru bolt is easy to access if the radiator top hose, and air cleaner cover and backing plate are removed. This frees up a LOT of precious space.
Once the air pump is removed out thru the top, then reaching down the alternator mount thru bolt can be removed.
This is not a quick job, sorry.
I think it will all fall into place with these drawings, if not ask back and I will bring the memory into the present and go thru it as I remember it a long time ago.


Thread Starter
|
Senior Member
Joined: Sep 2014
Posts: 366
Likes: 78
From: Dallas, TX
Thanks Grant, that helps. Looking back, I had googled and found pics, but that person must have eliminated his air-pump and relocated his alternator there. For good reason, I see.
Texas does not require smog testing for cars 25+ years, so eliminating the air pump is an option for me. Based on some prelim research, that does mean some fab work on brackets, changing pulleys, and grinding for clearance. Anybody got some links for either air-pump elimination/alt relocation?
Texas does not require smog testing for cars 25+ years, so eliminating the air pump is an option for me. Based on some prelim research, that does mean some fab work on brackets, changing pulleys, and grinding for clearance. Anybody got some links for either air-pump elimination/alt relocation?
Junior Member
Joined: Aug 2014
Posts: 16
Likes: 7
From: Herminie, Pa.
Warlock - 1st - did you try another battery? If the battery has a shorted out cell, this might be a reason for the voltage going down as fast as it is. Did you try to start the car, and disconnecting the battery while it's running? If the alternator is good, the car will continue to run, if it's bad it will stall as soon as you disconnect the battery. 2nd - Here's a little hint for you - If you disconnect the front hood/bonnet "shocks", the hood will open a lot further, allowing you better access to the alternator, but use something to hold up the hood (2x4) while you work on it because if that hood falls down on your head (OK Experience) it HURTS! - So - In your first picture, you are looking at the air pump, which is clearly disconnected. You must take that out before you can even see the alternator. Here is some pictures of the V-12 without the air pump (89). Don't be afraid of it. It just looks intimidating. It's really just a ***** Cat.
Thread Starter
|
Senior Member
Joined: Sep 2014
Posts: 366
Likes: 78
From: Dallas, TX
Kimba, that's a clean lookin' engine bay, shiny as well as stripped of clutter. What does one need to do about the open hoses/ports when you junk the air pump?
I did crawl underneath to see if I could access the alternator from there. Looking around, I did find the short. Right where the alt cable bends around some rusty, and no doubt, hot pipe/conduit I can see that the insulation has been burnt/abraded away (red circle in pics). I stuffed some insulation between the cable and the rusty pipe and the card will start and hold voltage right at 12.3 Volts (without falling away in under a minute like it used to).


Unfortunately, it looks like the alt is fried, the voltage drops slightly from 12.6 V (still engine) to 12.3 (engine running, no lights), to 11.X (running + headlights). Increasing revs to 2K does nothing to the voltage output either at the Alt terminals or the battery.
So, looks like I know what caused it (idiot mechanic who did the previous install for PO), but I still need to pull the alt out to fix it. Also that cable is frayed right at the edge where it goes - should I just run another cable to the battery instead of trying to splice or replace this?
Any idea what alternator that is? It's not the high amp Bosch since it's a regular V pulley, not multi-groove.
I did crawl underneath to see if I could access the alternator from there. Looking around, I did find the short. Right where the alt cable bends around some rusty, and no doubt, hot pipe/conduit I can see that the insulation has been burnt/abraded away (red circle in pics). I stuffed some insulation between the cable and the rusty pipe and the card will start and hold voltage right at 12.3 Volts (without falling away in under a minute like it used to).
Unfortunately, it looks like the alt is fried, the voltage drops slightly from 12.6 V (still engine) to 12.3 (engine running, no lights), to 11.X (running + headlights). Increasing revs to 2K does nothing to the voltage output either at the Alt terminals or the battery.
So, looks like I know what caused it (idiot mechanic who did the previous install for PO), but I still need to pull the alt out to fix it. Also that cable is frayed right at the edge where it goes - should I just run another cable to the battery instead of trying to splice or replace this?
Any idea what alternator that is? It's not the high amp Bosch since it's a regular V pulley, not multi-groove.
Joined: Feb 2010
Posts: 28,833
Likes: 11,290
From: Adelaide Stralia
YEP, sadly that alternator is now an excellent boat anchor.
The "hot" battery cables are showing signs of old age, hence the insulation breaking down.
The wires at the +ve of the alternator travel back thru a metal tube towards the starter motor solenoid battery terminal. This metal tube travels under the exhaust manifold on the RH side. I have some V12's with the insulation of the wires up inside that tube being quite missing, and obviously a battery drain is present.
Also under that exhaust manifold is the pipe from the air pump, and is impossible to remove with the engine in the car, so leave it in place, and when the engine comes out (and that will happen, trust me), simply remove said pipe.
Disconnect it at the rear, near the oil switches, and plug the 12 pipes going into the inlet manifold clamps. The large pipe can simply be left open at each end, as it is not connected to anything.
I reckon you got many hours ahead of you getting all that junk out the way, and then the alternator, then repairing all the wiring damage.
Jaguar made an idler pulley/bracket for the cars without an air pump, and my parts book drawing is attached. You see them at times on Ebay etc. Any V12 from 1976 to about 1992ish will do, and Sedan and Coupe are the same.
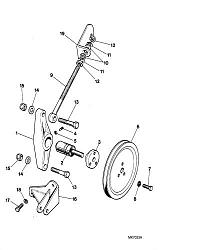
The pulley in the drawing is the SAME as the pulley on your air pump, as are the pulley securing bolts.
Last edited by Grant Francis; Sep 2, 2014 at 05:19 AM.
Trending Topics

Veteran Member
Joined: Jun 2013
Posts: 2,124
Likes: 1,386
From: Australia
I had to plug them on a '76 I have and found closed end aluminium blind rivets of the appropriate size are ideal. This enables the removal of the complete assembly along each bank.
Thread Starter
|
Senior Member
Joined: Sep 2014
Posts: 366
Likes: 78
From: Dallas, TX
The wires at the +ve of the alternator travel back thru a metal tube towards the starter motor solenoid battery terminal. This metal tube travels under the exhaust manifold on the RH side. I have some V12's with the insulation of the wires up inside that tube being quite missing, and obviously a battery drain is present.
Junior Member
Joined: Aug 2014
Posts: 16
Likes: 7
From: Herminie, Pa.
Warlock - Grant is exactly right! It's a shame about that alternator, because it looks like it was just re-placed. I plugged my air pump a little differently, but the end result is the same. And Grant is right again about that "Lousy" air line not coming out! (Wish I would have joined this Forum sooner!)
I've been looking at the pictures you took in the beginning, and it looks like you already started re-moving the air pump before these was taken. (belt hanging - disconnected pulley - unbolted bracket) ... but in the second picture it looks like you also have a disconnected A/C unit & a disconnected speed controller (the accordion looking thingy behind the A/C) but I could be wrong. Anyhow - it looks like you have some work ahead of you. Don't get disgusted, put every bolt in a bag and mark them. You can't just run down to the local parts store and get new ones.
I've been looking at the pictures you took in the beginning, and it looks like you already started re-moving the air pump before these was taken. (belt hanging - disconnected pulley - unbolted bracket) ... but in the second picture it looks like you also have a disconnected A/C unit & a disconnected speed controller (the accordion looking thingy behind the A/C) but I could be wrong. Anyhow - it looks like you have some work ahead of you. Don't get disgusted, put every bolt in a bag and mark them. You can't just run down to the local parts store and get new ones.

Thread Starter
|
Senior Member
Joined: Sep 2014
Posts: 366
Likes: 78
From: Dallas, TX
Time for an update, got some time this weekend to wrench on it.
Air pump is out, removed the radiator hose on top and got the freakin' thing out. Not fun.
Went shopping for 100+ amp alternators. Keep in mind my car is a 1998 Canadian Series 3 V12 VDP (some may simply call it XJ12). The unit on it appears to be a non-original Lucas 70 amp unit.
The Kirby books talks about a 95 Landrover 13695 fitting (O Reilly #15945), the only one local parts stores had was Autozone part# 13434. This unit has 2 tabs where the adjuster goes (no threads) and does not look like it fits without major hassles.
O Reilly #15536 and Autozone 14383 appear to be identical remanufactured units, both are 115 amps, $115 + $57 core charge. I decided to try and make this work.


Issues:
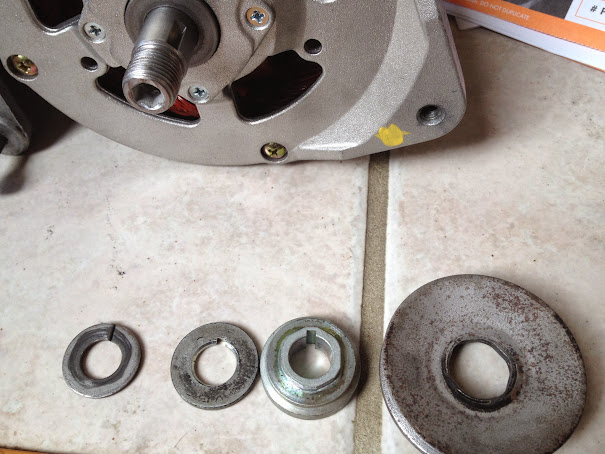
1. Original comes with 15 mm shaft, the 14383 comes with 17 mm shaft. The adaptor that couples shaft spline to the pulley needs to be bored out 2 mm, and perhaps the slot for the key needs to be ground deeper.
2. The inner width between the mounting tabs on the original is 78 mm, outer is 108 mm, the new one is 82 mm and 120 mm respectively. The bolt hole on the new one is also larger. This means I need to use a longer and thicker bolt. I also need to use some spacers/washers between the inner end of one of the mounting tabs and the alternator bracket.
Sigh, more running around. I'm also unsure of the exact alignment of the pulley after this is done since the mounting bosses on the new one is slightly thicker and has different angles. The aforementioned washers between the inner end of one of the mounting tabs and the alternator bracket may give me adjustment options, but I'd be eyeballing it and it would not be exact. It would also be the 1st time I'm trying something like this, and its way out of my comfort zone. After all this, if the cat keeps throwing belts, or causing other probs, I'd have to be committed to an asylum.
Alternate choice would be John's cars GMALT bracket and a 94 amp unit. Hopefully, that is a drop in replacement without the headache.
Suggestions and guidance would be appreciated.
Any machine shops around the DFW area that you'd recommend?
Air pump is out, removed the radiator hose on top and got the freakin' thing out. Not fun.
Went shopping for 100+ amp alternators. Keep in mind my car is a 1998 Canadian Series 3 V12 VDP (some may simply call it XJ12). The unit on it appears to be a non-original Lucas 70 amp unit.
The Kirby books talks about a 95 Landrover 13695 fitting (O Reilly #15945), the only one local parts stores had was Autozone part# 13434. This unit has 2 tabs where the adjuster goes (no threads) and does not look like it fits without major hassles.
O Reilly #15536 and Autozone 14383 appear to be identical remanufactured units, both are 115 amps, $115 + $57 core charge. I decided to try and make this work.
Issues:
1. Original comes with 15 mm shaft, the 14383 comes with 17 mm shaft. The adaptor that couples shaft spline to the pulley needs to be bored out 2 mm, and perhaps the slot for the key needs to be ground deeper.
2. The inner width between the mounting tabs on the original is 78 mm, outer is 108 mm, the new one is 82 mm and 120 mm respectively. The bolt hole on the new one is also larger. This means I need to use a longer and thicker bolt. I also need to use some spacers/washers between the inner end of one of the mounting tabs and the alternator bracket.
Sigh, more running around. I'm also unsure of the exact alignment of the pulley after this is done since the mounting bosses on the new one is slightly thicker and has different angles. The aforementioned washers between the inner end of one of the mounting tabs and the alternator bracket may give me adjustment options, but I'd be eyeballing it and it would not be exact. It would also be the 1st time I'm trying something like this, and its way out of my comfort zone. After all this, if the cat keeps throwing belts, or causing other probs, I'd have to be committed to an asylum.
Alternate choice would be John's cars GMALT bracket and a 94 amp unit. Hopefully, that is a drop in replacement without the headache.
Suggestions and guidance would be appreciated.
Any machine shops around the DFW area that you'd recommend?
Veteran Member
Joined: Jan 2012
Posts: 14,612
Likes: 10,809
From: France
I have sympathy for you, the main thing is to get it so when the alt next gives up, the replacement is an easy swap! II5 amp most important, very good choice. FYI, You can align the pulley by adding/subtracting washers to the spindle between the pulley and the unit.
Greg
Greg
Joined: Feb 2010
Posts: 28,833
Likes: 11,290
From: Adelaide Stralia
Some outside square thinking needed here.
You guys do it TOUGH up there.
I used the 110?amp Bosch from the XJ40 series. Changed the pulley with any Bosch V pulley. Hand drilled the alloy bracket bolted on the engine from 8mm to 10mm to accommodate the larger mount bolt.
The rest of the mounting was just a reverse of removal, it just all fitted, even the V belt was reused.
Maybe there is an XJ40 in a wrecking yard that will prove fruitful. Failing that contact XK Unlimited is San Louis Obispo, as they have helped me over the years.
Thread Starter
|
Senior Member
Joined: Sep 2014
Posts: 366
Likes: 78
From: Dallas, TX
Got some time this last weekend, and found an alternator shop who rebuilt it for "135 amps". Took it home only to find out he had the mounting holes in the wrong side. Took it back and got it right this time.
I had mended the frayed alternator wire with 3M high temp insulating tape (rated for over 250 degs) and then put the plastic flexible wire shield over it. Checked continuity from alt wire to battery + terminal, and open circuit to ground.
Installed the alternator. Low battery Light on the dash comes on after starting, DVM reads 12.5 to 12.7V at the battery terminals. Sigh!
There is a single green exciter wire to the alternator, and it is putting out 12V. The alt body to -ve battery terminal shows continuity, as does the alt wire to +ve.
I guess I should crawl back there and check at the alt output. What else? This sure is wearing on me, thanks for staying with me guys.
Veteran Member
Joined: Jan 2012
Posts: 14,612
Likes: 10,809
From: France
I have a very cheap digital voltmeter that just plugs into the cigar socket. I bought it on USA Ebay, very useful for this sort of thing.
My question: did you renew the big heavy wire from the alt to the starter? If you just patched it, I think you should renew it? And did you clean up the terminals on the starter, and did you clean up the terminal on the firewall that the big wire from the starter to the firewall terminal goes to?
Also did you run another ground wire from the alternator bracket direct to the chassis frame? Even if all these things do not cure it, they definitely will help it to not recur.
Greg
Thread Starter
|
Senior Member
Joined: Sep 2014
Posts: 366
Likes: 78
From: Dallas, TX
SOLVED!!!! FINALLY !
New/long sitting alternators dont have any residual magnetism. All I had to do was drive it for a short while and the volts came up just fine and everything behaves as it should.
I appreciate all the assistance from all of you.
The 135 amp alternator puts out some charge at idle speed, the alternator guy said that the idle issue comes up as you start approaching 180-200 amps
My voltmeter on the dash never dropped below 13v, I'll get a ciggy lighter VM and get a more precise measurement
Senior Member
Joined: Jan 2010
Posts: 204
Likes: 15
From: Canada
YEP, sadly that alternator is now an excellent boat anchor.
The "hot" battery cables are showing signs of old age, hence the insulation breaking down.
The wires at the +ve of the alternator travel back thru a metal tube towards the starter motor solenoid battery terminal. This metal tube travels under the exhaust manifold on the RH side. I have some V12's with the insulation of the wires up inside that tube being quite missing, and obviously a battery drain is present.
Also under that exhaust manifold is the pipe from the air pump, and is impossible to remove with the engine in the car, so leave it in place, and when the engine comes out (and that will happen, trust me), simply remove said pipe.
Disconnect it at the rear, near the oil switches, and plug the 12 pipes going into the inlet manifold clamps. The large pipe can simply be left open at each end, as it is not connected to anything.
I reckon you got many hours ahead of you getting all that junk out the way, and then the alternator, then repairing all the wiring damage.
Jaguar made an idler pulley/bracket for the cars without an air pump, and my parts book drawing is attached. You see them at times on Ebay etc. Any V12 from 1976 to about 1992ish will do, and Sedan and Coupe are the same.
Attachment 94759
The pulley in the drawing is the SAME as the pulley on your air pump, as are the pulley securing bolts.