
What's the best way to get your Engine Looking Awesome? XJS V12

Thread Starter
|
Veteran Member
Joined: Feb 2013
Posts: 17,809
Likes: 3,945
It probably goes without saying that there is a lot of Hard Work involved including maybe hundreds or thousands of hours of Polishing.
But apart from that, what do you need?
Any suggestions for Power Tools or Polishing Compounds just to get the job started for those like me who don't have too much time.
So lets see those engine bay Photos of before and after Pics.
But apart from that, what do you need?
Any suggestions for Power Tools or Polishing Compounds just to get the job started for those like me who don't have too much time.
So lets see those engine bay Photos of before and after Pics.
How bizarre, just about to start on mine!
I think most generic cleaners should do the job along with a lot of patience.
I have also snaffled the steam cleaner without her in doors noticing so I will (carefully) have a go with that although it had absolutely zero effect on the diesel engine on the boat.
I've also got a large rotary toothbrush type thing with various heads which is handy for getting into small spaces.
And a Dremmel of course.
Given the sensitive nature of the wiring under there I would avoid jet washing at all costs.
I've also got some 'red bits' to fit to bling it up a bit.
Are you going for this sort of effect?
Last edited by Steve M; Jul 16, 2014 at 05:26 AM.

Veteran Member


Joined: Jan 2012
Posts: 14,611
Likes: 10,808
From: France
OB
Step 1: remove engine
Step 2: remove induction, stuff anti-scream bungs into induction ports
Step 3: remove cam covers and replace gaskets
Step 4: seal tappet block to head metal to metal join
Step 5: replace sump and sandwich plate gaskets
Step 6: while doing (5) replace internal oil delivery pipe O rings
Step 7: replace top hat water manifold seals
Step 8: remove exhaust manifolds and have them covered in some high-tec gunk, replace with new baskets
Final step: polish everything including the block exterior before re-assembly. Colours to choice, smart racing HT leads to choice, etc etc.
Personally I stopped after (7) above!
Greg


Joined: Feb 2010
Posts: 28,832
Likes: 11,289
From: Adelaide Stralia
Dunno about awesome, but mine was the DD.
I rewired the engine bay, normal EFI loom issues + others, and with near ALL the wiring coming in from the rear, thus hiding a good amount under the panel at the bulkhead, made things neater straight up.
I cleaned it all basically whilst apart, nothing was polished (not my thing), and wash the engine semi regularly, and thats about it.
Always found something to "tidy up", from time to time. Sold the car some 4 years ago, so basically memories now, sadly.
Some snaps from the archives.


Thread Starter
|
Veteran Member
Joined: Feb 2013
Posts: 17,809
Likes: 3,945
How bizarre, just about to start on mine!
I think most generic cleaners should do the job along with a lot of patience.
I have also snaffled the steam cleaner without her in doors noticing so I will (carefully) have a go with that although it had absolutely zero effect on the diesel engine on the boat.
I've also got a large rotary toothbrush type thing with various heads which is handy for getting into small spaces.
And a Dremmel of course.
Given the sensitive nature of the wiring under there I would avoid jet washing at all costs.
I've also got some 'red bits' to fit to bling it up a bit.
Are you going for this sort of effect?
I think most generic cleaners should do the job along with a lot of patience.
I have also snaffled the steam cleaner without her in doors noticing so I will (carefully) have a go with that although it had absolutely zero effect on the diesel engine on the boat.
I've also got a large rotary toothbrush type thing with various heads which is handy for getting into small spaces.
And a Dremmel of course.
Given the sensitive nature of the wiring under there I would avoid jet washing at all costs.
I've also got some 'red bits' to fit to bling it up a bit.
Are you going for this sort of effect?
I've seen that engine somewhere before, I think it was in my Dreams!
Yeah! (gulp!) when I've finished with it, its going to look just like that!
Thread Starter
|
Veteran Member
Joined: Feb 2013
Posts: 17,809
Likes: 3,945
OB
Step 1: remove engine
Step 2: remove induction, stuff anti-scream bungs into induction ports
Step 3: remove cam covers and replace gaskets
Step 4: seal tappet block to head metal to metal join
Step 5: replace sump and sandwich plate gaskets
Step 6: while doing (5) replace internal oil delivery pipe O rings
Step 7: replace top hat water manifold seals
Step 8: remove exhaust manifolds and have them covered in some high-tec gunk, replace with new baskets
Final step: polish everything including the block exterior before re-assembly. Colours to choice, smart racing HT leads to choice, etc etc.
Personally I stopped after (7) above!
Greg
Step 1: remove engine
Step 2: remove induction, stuff anti-scream bungs into induction ports
Step 3: remove cam covers and replace gaskets
Step 4: seal tappet block to head metal to metal join
Step 5: replace sump and sandwich plate gaskets
Step 6: while doing (5) replace internal oil delivery pipe O rings
Step 7: replace top hat water manifold seals
Step 8: remove exhaust manifolds and have them covered in some high-tec gunk, replace with new baskets
Final step: polish everything including the block exterior before re-assembly. Colours to choice, smart racing HT leads to choice, etc etc.
Personally I stopped after (7) above!
Greg
There's more to this than meets the eye, I'm thinking about stopping before I get to Stage 1.
The thought of taking the Engine out, is taking me out of my Comfort Zone by a trillion miles! and sounds a bit more involved that just changing the Calipers!
So I think I will do it the hard way and try and 'bling it up' with the Engine in Situ.
Thread Starter
|
Veteran Member
Joined: Feb 2013
Posts: 17,809
Likes: 3,945
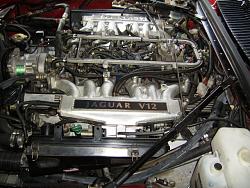
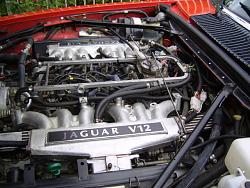
Dunno about awesome, but mine was the DD.
I rewired the engine bay, normal EFI loom issues + others, and with near ALL the wiring coming in from the rear, thus hiding a good amount under the panel at the bulkhead, made things neater straight up.
I cleaned it all basically whilst apart, nothing was polished (not my thing), and wash the engine semi regularly, and thats about it.
Always found something to "tidy up", from time to time. Sold the car some 4 years ago, so basically memories now, sadly.
Some snaps from the archives.
Attachment 90767
Attachment 90768
Attachment 90769
Those Manifolds look a bit Special, are they performance related in any way!
Trending Topics
Joined: Feb 2010
Posts: 28,832
Likes: 11,289
From: Adelaide Stralia
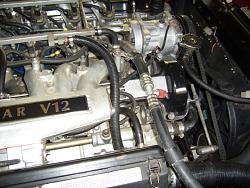
NOPE, just the stock units with the "special high performance" plaques attached. Those I found in the throw away bin at the dealer a long time back.
The throttle bodies are "my own", as in they have the enlarged discs from the 3.6ltr XJ40 installed. Memory HAHA, 68mm out to 73mm, I THINK, anyway, a lot bigger than standard V12 discs.
The cold air intakes go ALL the way to the opening in the body behind the bumper indicator lamps, so they pick up REAL cold air, and birds, bugs etc, life goes on.
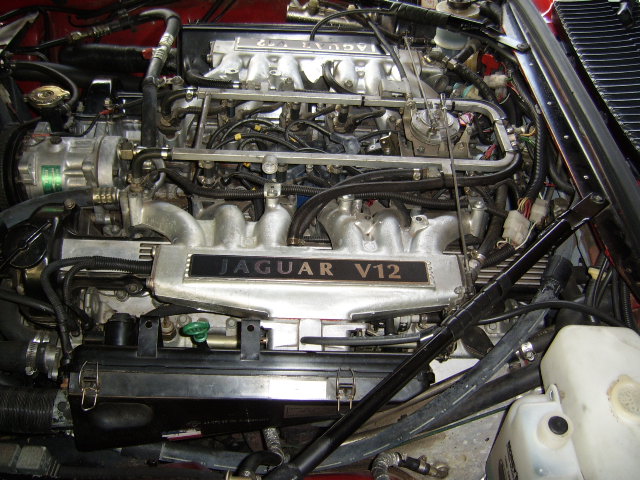
Made a start and quite pleased with the result so far.
Steam cleaner was no good as couldn't see anything for steam!
Dremmel was no good as the heads wore out immediately.
Used a Sonic Scrubber which did an excellent job; it's got nylon brushes so won't damage wiring and components like a metal one would.
First photo is before, 2 and 3 are after so can you see the difference.
Lost quite a bit of time having to remove the stay bar to get underneath to replace a disconnected vacuum pipe under the right hand throttle linkage (picture 4): anyone any ideas what it is for?
Thread Starter
|
Veteran Member
Joined: Feb 2013
Posts: 17,809
Likes: 3,945
Made a start and quite pleased with the result so far.
Steam cleaner was no good as couldn't see anything for steam!
Dremmel was no good as the heads wore out immediately.
Used a Sonic Scrubber which did an excellent job; it's got nylon brushes so won't damage wiring and components like a metal one would.
First photo is before, 2 and 3 are after so can you see the difference.
Lost quite a bit of time having to remove the stay bar to get underneath to replace a disconnected vacuum pipe under the right hand throttle linkage (picture 4): anyone any ideas what it is for?
Steam cleaner was no good as couldn't see anything for steam!
Dremmel was no good as the heads wore out immediately.
Used a Sonic Scrubber which did an excellent job; it's got nylon brushes so won't damage wiring and components like a metal one would.
First photo is before, 2 and 3 are after so can you see the difference.
Lost quite a bit of time having to remove the stay bar to get underneath to replace a disconnected vacuum pipe under the right hand throttle linkage (picture 4): anyone any ideas what it is for?
Its already a massive improvement on how it looked before! So can't wait to see it all blingged up like the photo!
Thread Starter
|
Veteran Member
Joined: Feb 2013
Posts: 17,809
Likes: 3,945
Just checked out the Scrubber, interesting piece of kit which certainly seems to do a good job on your engine.
In any event, I'm glad you are back on the road.
Thread Starter
|
Veteran Member
Joined: Feb 2013
Posts: 17,809
Likes: 3,945
OB,
NOPE, just the stock units with the "special high performance" plaques attached. Those I found in the throw away bin at the dealer a long time back.
The throttle bodies are "my own", as in they have the enlarged discs from the 3.6ltr XJ40 installed. Memory HAHA, 68mm out to 73mm, I THINK, anyway, a lot bigger than standard V12 discs.
The cold air intakes go ALL the way to the opening in the body behind the bumper indicator lamps, so they pick up REAL cold air, and birds, bugs etc, life goes on.
I only wished my engine looked as good as that, so I will have to get stuck in and clean it up before posting some pics.
Love those manifolds and wish I had them on mine.
Thread Starter
|
Veteran Member
Joined: Feb 2013
Posts: 17,809
Likes: 3,945
Dunno about awesome, but mine was the DD.
I rewired the engine bay, normal EFI loom issues + others, and with near ALL the wiring coming in from the rear, thus hiding a good amount under the panel at the bulkhead, made things neater straight up.
I cleaned it all basically whilst apart, nothing was polished (not my thing), and wash the engine semi regularly, and thats about it.
Always found something to "tidy up", from time to time. Sold the car some 4 years ago, so basically memories now, sadly.
Some snaps from the archives.
Attachment 90767
Attachment 90768
Attachment 90769
I rewired the engine bay, normal EFI loom issues + others, and with near ALL the wiring coming in from the rear, thus hiding a good amount under the panel at the bulkhead, made things neater straight up.
I cleaned it all basically whilst apart, nothing was polished (not my thing), and wash the engine semi regularly, and thats about it.
Always found something to "tidy up", from time to time. Sold the car some 4 years ago, so basically memories now, sadly.
Some snaps from the archives.
Attachment 90767
Attachment 90768
Attachment 90769
Thanks for posting those pics


Veteran Member
Joined: Dec 2013
Posts: 1,078
Likes: 398
From: Greer SC
Thread Starter
|
Veteran Member
Joined: Feb 2013
Posts: 17,809
Likes: 3,945
That's just the kind of an Engine Bay, that I was hoping to see.
Note to Self: Way to go! Keep Polishing!
Thread Starter
|
Veteran Member
Joined: Feb 2013
Posts: 17,809
Likes: 3,945
I think any of use would be hard pressed to top this.Tony's V12 Jaguar | My Style | Pinterest
How could anyone hope to follow that!
Thanks for Sharing

Thread Starter
|
Veteran Member
Joined: Feb 2013
Posts: 17,809
Likes: 3,945
That's nice!
If only I could get my engine looking even half as good as that!
But I am working on it!
If only I could get my engine looking even half as good as that!
But I am working on it!