
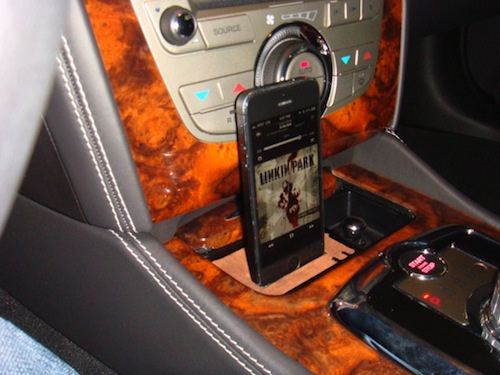
DIY iPhone Dock in the ashtray


My DIY iPhone dock:


***Materials***
* Jaguar XK/XKR or some variation thereof
* Built-in ACM (Audio Connectivity Module)
* iPhone with iOS 6.1.3 or later. (This example uses an iPhone 5--which is easier because the connector is smaller--but the project might be adaptable for an earlier model with a little tweaking. If you try it I'm sure people would like to see how you worked it out.) You need the iOS update if you want to be able to navigate your song selection using the phone or if you want to use Pandora, which now works with the updated iOS version.
* Charging adapter (unless you have the newest jaguar ACM-iPhone connector cord)
* 20 cm (8 in) lightening-to-30-pin extension cable
* 1 m (3 ft) 30-pin extension cable with A-V Capacity
* 1 Package of simulated water resin
* Small strip of leather
* Small bit of clay
***Project Cost***
About $85,000. Give or take.
***Procedure***
First piece all the cables together to ensure the project will work.
Starting with the factory ACM iPhone cable, I next attached the charging adapter (I used "Scosche passPORT Charging Adapter," $20 on Amazon). (See Appendix at the end.)

Then I attached the 30-pin, 3-ft extension cable (I used "Patuoxun Dock Extender Extension," $7 on Amazon) It has to have audio capacity!! If you try to use the data transfer cable this will not work!!

Finally I attached the Apple 30-pin-to-lightening 8-inch adapter (Apple Brand)

And test. If it works, continue. If not, stop.
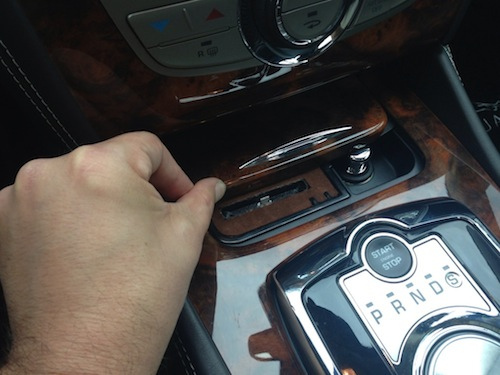
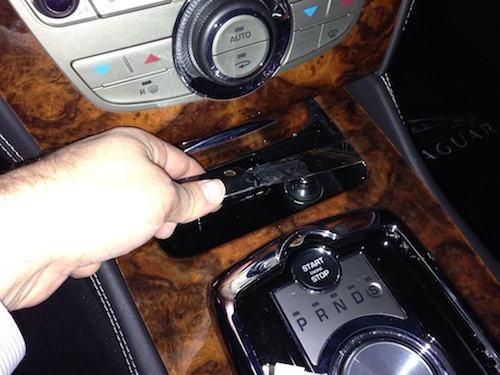
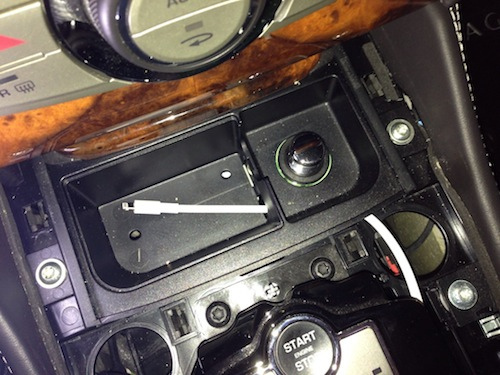
Next I removed the center floor console trim plate. (Well really I did this first, but you get the idea.)


The cup holders

And unscrewed the cover of the emergency tranny release lever (this step may not be entirely necessary, especially if you don't have the right screwdriver head, which I didn't, but I made due).

And removed the rubber bottom of the floor console cubby

Remove the Ashtray insert

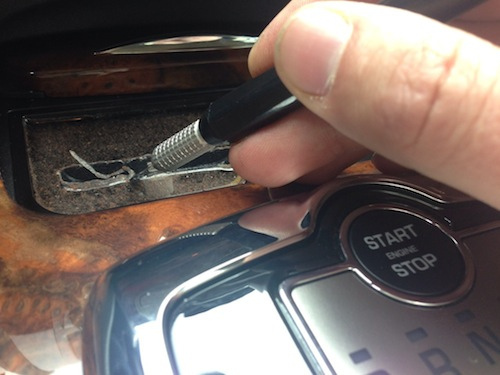
Unscrew the small green window and remove it from the ashtray. Grip it between a finger and thumb and twist to remove. Save for posterity.
Using the ashtray insert and a blade, cut a piece of the leather to use as a trim piece when you are finished.


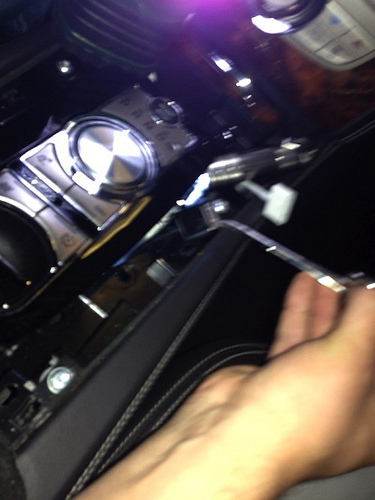
Thread the Lightening adapter through the space between the floor console area and the ashtray, through the hole that aligns up with the green window you removed in the ashtray insert. Here I'm using a hemostat to grab the end as I thread it through.

Now thread one end of the 30-pin extension cable from the console cubby to the transmission release access panel


And then continue right on through to the space under the shifter knob. The hemostat comes in handy here again to fish it out.
Connect the 30-pin cable to the lightening adapter

Connect the other end of the cable up as before
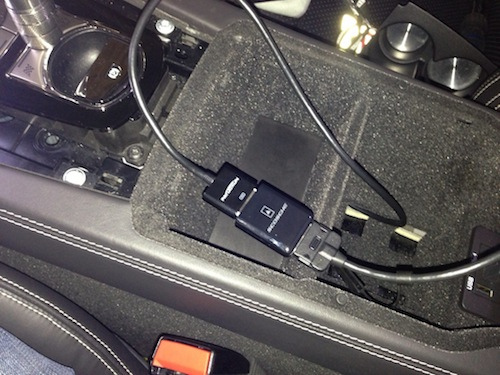
Replace the rubber bottom and stash the extra wire in the cubby. you might be able to feed it into empty space below, but I'd keep the connectors up above in case something goes wrong.
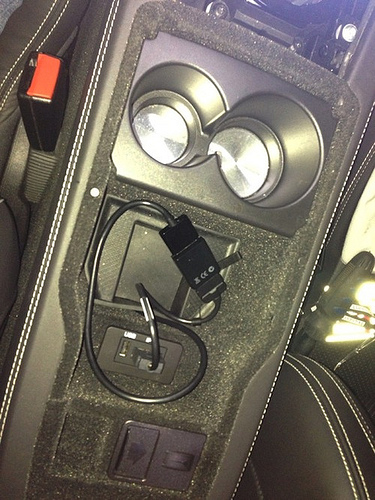
Tape the front adapter with electrical tape so it doesn't come loose and stash in the space beside the shifting knob.

Be sure and test it again! Don't want to have to undo everything because of a loose connection!
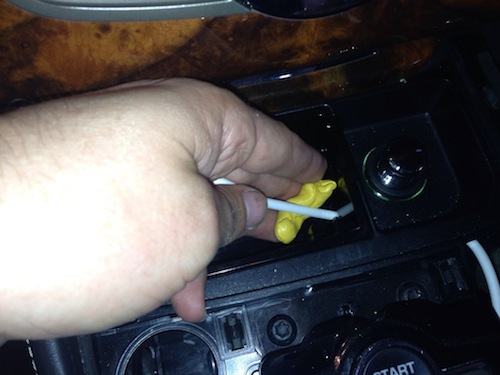
Thread the end of the lightening adapter through the ashtray insert window, and take a small piece of clay (I used a piece off my clay bar) to seal the hole.


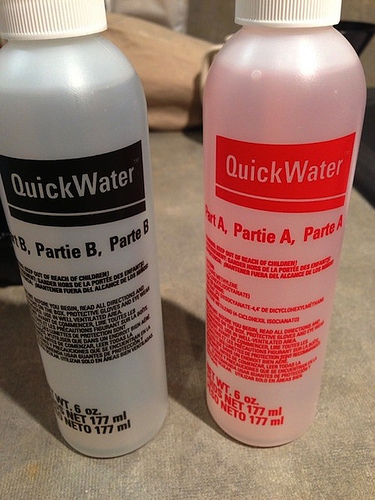
Mix simulated water resin as per instructions for your brand. The ashtray holds pretty close to 150 ml so that made measurement pretty easy for me (75 ml of solution B followed by 75 ml of solution A). Your directions may differ. I picked this brand up at a craft store.

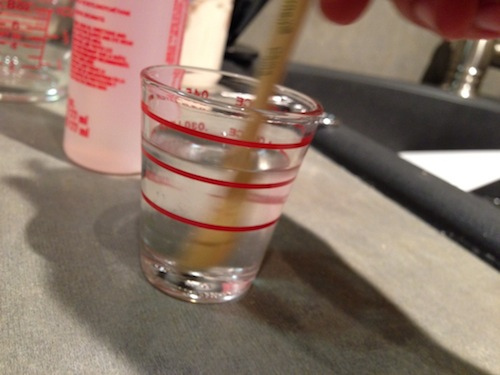
Test it first if you have never used it before. The dried resin is the consistency of the rubber in those bouncy ***** you used to get from the gum ball machines. Here I tested it in a small shot glass and I throw the pics in just so you can get an idea of what it does. It will come out of the container (so you can return your ashtray to stock if you ever want to) but not without a struggle. It feels sticky to the touch and will not be nice to your car's interior should you spread it around with messy fingers.


Check the length of the internal part of the adapter. You can see from this picture how far up into the phone it goes. This will become important if you want to be able to close your ashtray lid. The adapter's final positioning has to be below the level of the top of the ashtray for the lid to close. I tried to find a landmark on the exterior of the phone to use later.

Wrap the underside of the iPhone in plastic wrap to protect it and plug in the lightening adapter through the plastic wrap.


Then use a very high-tech and sophisticated clamping system to hold the iPhone in place EXACTLY where you want it to be. This will be it's permanent resting place, so be careful here. I kept mine about a centimeter away from the climate-control knob so that it wouldn't vibrate against it when I drove. The lightening adapter is strong enough to hold the phone by itself, so don't worry about needing extra support or leaning it against anything.

Double check to make sure landmark you found earlier falls below the level where the sliding lid will hit it. The phone bottom will be below the level of the top of the ashtray for this reason.

Measure out your resin and mix. Mine gave me an easy hour of workability before starting to set. Poor it into the ashtray, leaving a small lip below the top for the leather covering. For obvious reasons, I have no pictures of me actually poring this mixture. If it does spill, let it cure, and remove it in one piece.
Make sure your car is parked on even and level ground! Gravity has no respect for your good intentions.


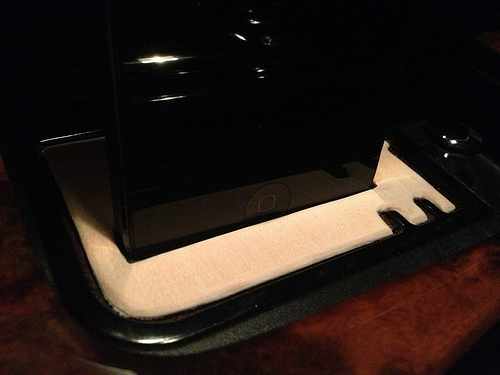
Leave the phone there. Let it cure overnight. Here is a picture of the clear, cured resin before removing all the stuff

Pull out the iPhone and trim the plastic wrap

I found that heating the knife helps trim off the meniscus line that dries around the lip of the iPhone opening if that bothers you. (The 'dust' in the picture is from the leather strip that I pulled back off when I saw I needed to trim it up some more.)

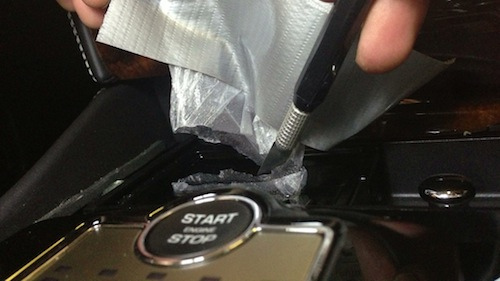
Cut a hole in the leather piece to roughly locate the iPhone location, then trim it up. Replace the wood fascia.


***Things I might do differently next time:
* I might wrap the bottom of the phone in a little pocket of leather with a hole for the adapter. That way the interior portion of the dock would be lined with leather, also.
* I might still update my leather trim piece to something else, especially if I can find a piece of wood veneer that seems to match my interior.
* I would use a level to be extra sure I was parked on level ground. I lucked out this time
***Appendix
Screenshots of the two non-apple cable adapters. Remember you must have AV capability in the extension cables. Data and power cables will not work.


***Materials***
* Jaguar XK/XKR or some variation thereof
* Built-in ACM (Audio Connectivity Module)
* iPhone with iOS 6.1.3 or later. (This example uses an iPhone 5--which is easier because the connector is smaller--but the project might be adaptable for an earlier model with a little tweaking. If you try it I'm sure people would like to see how you worked it out.) You need the iOS update if you want to be able to navigate your song selection using the phone or if you want to use Pandora, which now works with the updated iOS version.
* Charging adapter (unless you have the newest jaguar ACM-iPhone connector cord)
* 20 cm (8 in) lightening-to-30-pin extension cable
* 1 m (3 ft) 30-pin extension cable with A-V Capacity
* 1 Package of simulated water resin
* Small strip of leather
* Small bit of clay
***Project Cost***
About $85,000. Give or take.
***Procedure***
First piece all the cables together to ensure the project will work.
Starting with the factory ACM iPhone cable, I next attached the charging adapter (I used "Scosche passPORT Charging Adapter," $20 on Amazon). (See Appendix at the end.)
Then I attached the 30-pin, 3-ft extension cable (I used "Patuoxun Dock Extender Extension," $7 on Amazon) It has to have audio capacity!! If you try to use the data transfer cable this will not work!!
Finally I attached the Apple 30-pin-to-lightening 8-inch adapter (Apple Brand)
And test. If it works, continue. If not, stop.
Next I removed the center floor console trim plate. (Well really I did this first, but you get the idea.)
The cup holders
And unscrewed the cover of the emergency tranny release lever (this step may not be entirely necessary, especially if you don't have the right screwdriver head, which I didn't, but I made due).
And removed the rubber bottom of the floor console cubby
Remove the Ashtray insert
Unscrew the small green window and remove it from the ashtray. Grip it between a finger and thumb and twist to remove. Save for posterity.
Using the ashtray insert and a blade, cut a piece of the leather to use as a trim piece when you are finished.
Thread the Lightening adapter through the space between the floor console area and the ashtray, through the hole that aligns up with the green window you removed in the ashtray insert. Here I'm using a hemostat to grab the end as I thread it through.
Now thread one end of the 30-pin extension cable from the console cubby to the transmission release access panel
And then continue right on through to the space under the shifter knob. The hemostat comes in handy here again to fish it out.
Connect the 30-pin cable to the lightening adapter
Connect the other end of the cable up as before
Replace the rubber bottom and stash the extra wire in the cubby. you might be able to feed it into empty space below, but I'd keep the connectors up above in case something goes wrong.
Tape the front adapter with electrical tape so it doesn't come loose and stash in the space beside the shifting knob.
Be sure and test it again! Don't want to have to undo everything because of a loose connection!
Thread the end of the lightening adapter through the ashtray insert window, and take a small piece of clay (I used a piece off my clay bar) to seal the hole.
Mix simulated water resin as per instructions for your brand. The ashtray holds pretty close to 150 ml so that made measurement pretty easy for me (75 ml of solution B followed by 75 ml of solution A). Your directions may differ. I picked this brand up at a craft store.
Test it first if you have never used it before. The dried resin is the consistency of the rubber in those bouncy ***** you used to get from the gum ball machines. Here I tested it in a small shot glass and I throw the pics in just so you can get an idea of what it does. It will come out of the container (so you can return your ashtray to stock if you ever want to) but not without a struggle. It feels sticky to the touch and will not be nice to your car's interior should you spread it around with messy fingers.
Check the length of the internal part of the adapter. You can see from this picture how far up into the phone it goes. This will become important if you want to be able to close your ashtray lid. The adapter's final positioning has to be below the level of the top of the ashtray for the lid to close. I tried to find a landmark on the exterior of the phone to use later.
Wrap the underside of the iPhone in plastic wrap to protect it and plug in the lightening adapter through the plastic wrap.
Then use a very high-tech and sophisticated clamping system to hold the iPhone in place EXACTLY where you want it to be. This will be it's permanent resting place, so be careful here. I kept mine about a centimeter away from the climate-control knob so that it wouldn't vibrate against it when I drove. The lightening adapter is strong enough to hold the phone by itself, so don't worry about needing extra support or leaning it against anything.
Double check to make sure landmark you found earlier falls below the level where the sliding lid will hit it. The phone bottom will be below the level of the top of the ashtray for this reason.
Measure out your resin and mix. Mine gave me an easy hour of workability before starting to set. Poor it into the ashtray, leaving a small lip below the top for the leather covering. For obvious reasons, I have no pictures of me actually poring this mixture. If it does spill, let it cure, and remove it in one piece.
Make sure your car is parked on even and level ground! Gravity has no respect for your good intentions.
Leave the phone there. Let it cure overnight. Here is a picture of the clear, cured resin before removing all the stuff
Pull out the iPhone and trim the plastic wrap
I found that heating the knife helps trim off the meniscus line that dries around the lip of the iPhone opening if that bothers you. (The 'dust' in the picture is from the leather strip that I pulled back off when I saw I needed to trim it up some more.)
Cut a hole in the leather piece to roughly locate the iPhone location, then trim it up. Replace the wood fascia.
***Things I might do differently next time:
* I might wrap the bottom of the phone in a little pocket of leather with a hole for the adapter. That way the interior portion of the dock would be lined with leather, also.
* I might still update my leather trim piece to something else, especially if I can find a piece of wood veneer that seems to match my interior.
* I would use a level to be extra sure I was parked on level ground. I lucked out this time
***Appendix
Screenshots of the two non-apple cable adapters. Remember you must have AV capability in the extension cables. Data and power cables will not work.
Last edited by Muddydog; Sep 17, 2013 at 12:52 AM.

Senior Member
Joined: Sep 2011
Posts: 314
Likes: 76
From: Berkeley, CA
I worship your skills! Unreal! Truly a high-level challenge, masterfully executed. Compliments
A question or two...
My iPhone connector is (I think) a Land Rover part. Works the same, but it is a long spiral cord (maybe 2' extended I think). I slapped a 30-pin to lightning connector adapter from Apple and the phone plays and charges fine. Leading me to guess that I could skip the intermediate cable steps by just putting the 30 pin to the lighting extension cable... Is it simply a matter of 'if it plays and charges, the cable setup is good'?
Second, how hard does the simulated water get when it is set? I must admit to never having heard of the stuff.
Well, compliments again on an inspired piece of work and the meticulous documentation. If I had the SLIGHTEST hope that my building skills were close to yours, I'd be on this TOMORROW. Alas, manual precision isn't on my list of skills, I have a heavy hand and tend to overdo things like this... No patience and no soft touch.
Anyone think that a stereo shop might be up to the task, or would it be impossible to find someone (especially up here in the SF Bay Area, no exactly car central like L.A!).
Nicely done,
Skeeter
Thanks for the compliment. My wife said if I break this car I'm not getting another one. She was also aghast that I hadn't masked off the interior before I poured the polymer, which, I'll admit, had never actually occurred to me but in retrospect would have been a good idea
Regarding the Simulated Water
The polymer is the consistency of syrup when wet, and of a hard rubber when cured. It has some 'give' to it with pressure but will hold in place otherwise. You could conceivably peel it back out of the ashtray in one or two chunks if you ever needed to with a little force and a flathead screwdriver. It is very easy to work with and the extended curing time makes it quite forgiving. It is perfectly clear when cured and looks like water in a clear vase, so it's used for fake flower arrangements. I dabbled with other ideas like paraffin, bondo and wood filler, but this was the best option, I think. It's also readily available at a "Michael's" craft store.
Regarding the complexity
I hope all the pictures didn't make this project look harder than it is. I was only trying to be thorough. I can be a bull in a china shop as much as the next guy, and I will cut corners wherever I find them. Any project that does not end with me getting a tetanus shot is a success.
The center trim piece is held on with friction only. In all my research I could not determine exactly how the tabs held in place, and finally just pried it up, which, it turns out, is exactly what you have to do. Having the hemostat to reach in to the small areas and grasp the ends of the cords was also very helpful. The leather finish was just my idea, but you could finish it off in any number of different ways. Even something as simple as black felt. Because the cured resin has a tacky surface, anything will stick in place.
Regarding the cable arrangement
Yes, whatever works, works. I was only so specific because there have been a number of posts in other threads indicating the need for such. With my arrangement I like that I can disconnect the extension and still plug a phone in at the console cubby if I wanted to. Trying to thread a coiled cord through the floor console may be a bugger.
All the best!
Last edited by Muddydog; May 14, 2013 at 01:51 PM.

Senior Member
Joined: May 2012
Posts: 142
Likes: 21
From: Brighton, UK
Mate.. stunning job well done looks fantastic!
I feel from your comment you're not happy with the leather part. I agree, it's the thing that spoils it. It's doesn't match anything around it and I think you'll struggle to find wood to match. Maybe try black suede?
I feel from your comment you're not happy with the leather part. I agree, it's the thing that spoils it. It's doesn't match anything around it and I think you'll struggle to find wood to match. Maybe try black suede?

Senior Member
Joined: Jul 2011
Posts: 311
Likes: 44
From: Maine
[QUOTE=
***Project Cost***
About $85,000. Give or take. QUOTE]
A bit pricey, but I'm gonna do it!
All kidding aside, That's a really nice job...well executed and definitely thinking outside the box
Bruce
***Project Cost***
About $85,000. Give or take. QUOTE]
A bit pricey, but I'm gonna do it!
All kidding aside, That's a really nice job...well executed and definitely thinking outside the box
Bruce
Veteran Member


Joined: Dec 2012
Posts: 3,054
Likes: 978
From: Canada
Trending Topics
Sklimii, that's a good idea. I'll update if I find something better.


Joined: Apr 2012
Posts: 25,875
Likes: 4,712
From: Summerville, South Carolina
Jay - saw someone post yesterday about getting custom shift knobs from British Autowood. I checked out their site and that may be an option for a custom piece - their site shows some custom dash panels for Jags. Here is the link if you're interested
British Autowood | Dashboard and Woodwork Restoration
British Autowood | Dashboard and Woodwork Restoration
I changed the facia to a gloss-black plate I made out of balsa wood. I think it looks much better and blends with the rest of the interior. Showing here after final installation and before paint to show the detail (I actually broke that one and had to make another).

Last edited by Muddydog; Sep 17, 2013 at 01:28 AM.

Junior Member
Joined: Aug 2013
Posts: 27
Likes: 12
From: San Diego, CA
What an excellent installation and depiction of the process! If I did not already have a remote mount radar detector display and control module installed there I would do it in a heartbeat.
Senior Member
Joined: Sep 2011
Posts: 758
Likes: 142
From: Seattle, WA
I like the switch to gloss black vs the leather too -- very slick.
All I've done to 'hide' it is to simply use my old iPhone 3Gs and leave it in the console. But you've got your album artwork showing, which is, of course, cool.
Looking forward to seeing it in person next weekend!
All I've done to 'hide' it is to simply use my old iPhone 3Gs and leave it in the console. But you've got your album artwork showing, which is, of course, cool.
Looking forward to seeing it in person next weekend!
Member
Joined: Jul 2014
Posts: 38
Likes: 6
From: Örebro, Sweden
Hi there,
Just a few short questions, if you happen to see this.
(Very nice guide btw)
The Scosche PassPort. Is that A passive device that just sits on the cable and get the charging to work? Or does it require power? What does it actually do, does it some how switch signals between pins?
Just a few short questions, if you happen to see this.
(Very nice guide btw)
The Scosche PassPort. Is that A passive device that just sits on the cable and get the charging to work? Or does it require power? What does it actually do, does it some how switch signals between pins?
Precisely. Apple changed the charging pins somewhere between the iPhone 3 and the iPhone 4, so old connecters (like the one that came in my 2010 car) don't charge the newer phones. The Scosche is simply a pass-through that re-organizes the charging pins to work with newer model iPhones. No power required.
Newer model Jags may not need it.
And welcome to the forum!
**Additional thing I would now do differently: I would figure out a way to leave a little space under the iPhone speaker. There have been times when I don't want the audio routed through the speakers, but I still want the iPhone visible and charging. The way it exists now the speaker is blocked and I can't hear well from it. For instance, I want to listen to a radio station and use the apple maps audio directions at the same time.
Last edited by Muddydog; Jul 10, 2014 at 06:10 PM.
Member
Joined: Jul 2014
Posts: 38
Likes: 6
From: Örebro, Sweden
Precisely. Apple changed the charging pins somewhere between the iPhone 3 and the iPhone 4, so old connecters (like the one that came in my 2010 car) don't charge the newer phones. The Scosche is simply a pass-through that re-organizes the charging pins to work with newer model iPhones. No power required.
Newer model Jags may not need it.
And welcome to the forum!
**Additional thing I would now do differently: I would figure out a way to leave a little space under the iPhone speaker. There have been times when I don't want the audio routed through the speakers, but I still want the iPhone visible and charging. The way it exists now the speaker is blocked and I can't hear well from it. For instance, I want to listen to a radio station and use the apple maps audio directions at the same time.
Newer model Jags may not need it.
And welcome to the forum!
**Additional thing I would now do differently: I would figure out a way to leave a little space under the iPhone speaker. There have been times when I don't want the audio routed through the speakers, but I still want the iPhone visible and charging. The way it exists now the speaker is blocked and I can't hear well from it. For instance, I want to listen to a radio station and use the apple maps audio directions at the same time.
My intention is to make a holder that snaps to the side of the centre consol. We'll se how that works out. If successful I'll put some pictures here.

Thread
Thread Starter
Forum
Replies
Last Post
Msteiner
Audio/Visual Electronics
1
Sep 30, 2015 08:36 AM
bydand
XF and XFR ( X250 )
8
Sep 28, 2015 09:47 AM
Currently Active Users Viewing This Thread: 1 (0 members and 1 guests)