
Fuel Filler Bowl - replacement

Thread Starter
|


Joined: Dec 2011
Posts: 120,439
Likes: 17,008
From: Durham, UK
Has anyone changed a fuel filler bowl (item 1)?
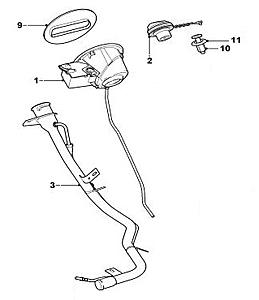
The hinge pin for the filler flap arm on mine has broken.
The Workshop Manual procedure is to access the fuel tank filler pipe from within the wheelarch by removing the liner. However, the manual makes no reference to the filler bowl.
It looks as if I may be able to get to the back of the filler bowl by removing the RH luggage compartment liner.
Advice from anyone who has done this replacement would be appreciated.
Graham
Veteran Member
Joined: Sep 2013
Posts: 5,209
Likes: 1,847
From: NY
My 2012 conv. is parked on a lift so I just went out and took a look. The manual is correct as the access to the bowl is behind the fender inner liner. You cannot get to it from the inside of the car. Just remover the wheel and then the fender inner liner and the assembly is right in front of you.
Thread Starter
|
Joined: Dec 2011
Posts: 120,439
Likes: 17,008
From: Durham, UK
THANKS - that's now the task for tomorrow.
I was expecting a fright at the cost of the new filler bowl as it includes the complete release mechanism and the drain tube but it was a not too unreasonable 72 UKP ($101) plus tax.
Graham
I was expecting a fright at the cost of the new filler bowl as it includes the complete release mechanism and the drain tube but it was a not too unreasonable 72 UKP ($101) plus tax.
Graham

Graham,
I hope this repair works out for you but, are you concerned there might be a broken bit that has fallen into the tank where it might interfere with pickup or pump? If it is just the pin perhaps that is small enough to not be a worry.
Just wondering.
I hope this repair works out for you but, are you concerned there might be a broken bit that has fallen into the tank where it might interfere with pickup or pump? If it is just the pin perhaps that is small enough to not be a worry.
Just wondering.
Thread Starter
|
Joined: Dec 2011
Posts: 120,439
Likes: 17,008
From: Durham, UK
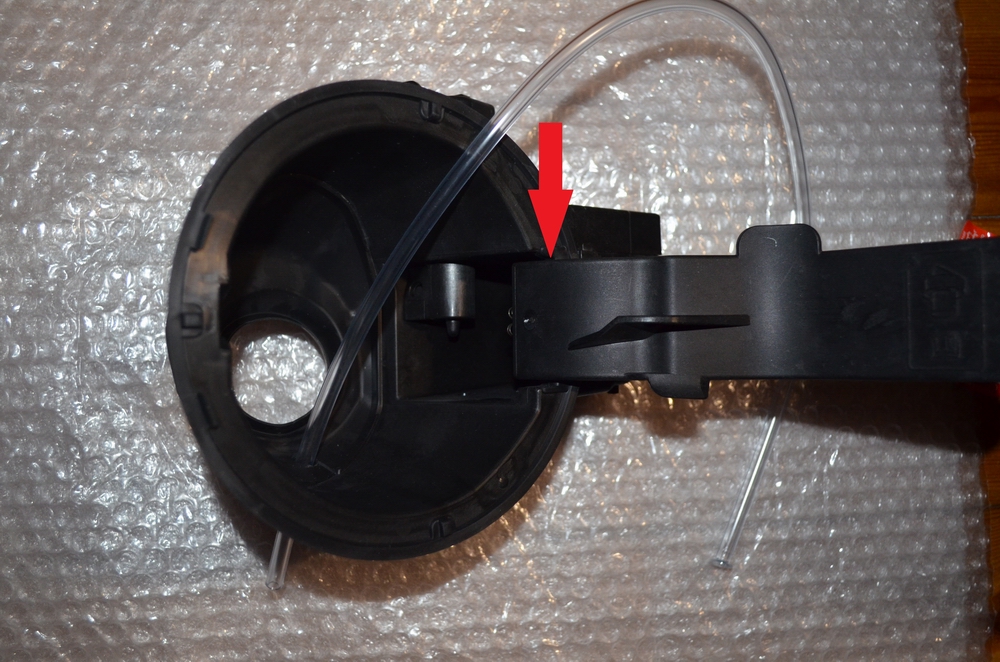
It's the top of the housing where the filler flap arm pivots that's cracked where I've arrowed in red in this photo of the new one. Nothing looks to have broken off.
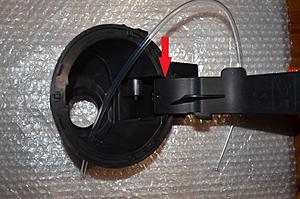
The design of the later model flap and pivot arm doesn't look as substantial as the one on my 2007 XK.
Graham
The design of the later model flap and pivot arm doesn't look as substantial as the one on my 2007 XK.
Graham
Thread Starter
|
Joined: Dec 2011
Posts: 120,439
Likes: 17,008
From: Durham, UK
The longest part of the job was jacking up the vehicle, removing the wheel and then the 14 fixings securing the wheelarch liner in place.
If you're ever stuck with a failed solenoid and can't open the Filler Flap Flap, a screwdriver can be inserted through the hole circled in green to push the locking pin upwards and release the Filler Flap.
The Filler Bowl is held in place by three plastic tabs (see example arrowed in blue).

To release these, the bowl has to be rotated but this is prevented by the locating peg (arrowed in red) through a hole in the filler pipe bracket. There is sufficient free play in the filler pipe assembly to pull it clear of the locating peg.
There is insufficient clearance to remove the harness connection. The Filler Bowl has to be removed first but there is plenty of free cable length.
To fit the new Filler Bowl, first connect the harness. This is released from the old Filler Bowl by sliding a small screwdriver in from the harness end to lift the locking tab clear of the raised piece arrowed in blue.

The Filler Bowl is then inserted with the tabs aligned with the three cutouts in the body (arrowed in red) and rotated to lock. When correctly positioned, the locating peg on the rear of the bowl aligns with the hole in the filler pipe bracket and is inserted to prevent the Filler Bowl from rotating.

The Fuel Filler Flap has four tabs on the back which engage with slots in the Filler Bowl arm (upper pair arrowed in red). The Filler Flap is pushed towards the vehicle to lock it in place.
Finally the drain tube is secured in a clip on the rear bumper.
Graham
Veteran Member
Joined: Sep 2013
Posts: 5,209
Likes: 1,847
From: NY
Trending Topics

Veteran Member
Joined: Sep 2013
Posts: 5,209
Likes: 1,847
From: NY
Show room condition?! We're not worthy.
I think my PO tried to paint the inside on one of my sets black and I haven't been able to get all of it off. I just may have to give up and find another set instead.....not what the wife wants hear though.
I think my PO tried to paint the inside on one of my sets black and I haven't been able to get all of it off. I just may have to give up and find another set instead.....not what the wife wants hear though.

Thread
Thread Starter
Forum
Replies
Last Post
Jaguar Forums Editor
Jaguar Press release
5
Feb 1, 2014 03:59 PM
Jaguar Forums Editor
Jaguar Press release
1
Nov 10, 2013 08:38 PM
Currently Active Users Viewing This Thread: 1 (0 members and 1 guests)