When you click on links to various merchants on this site and make a purchase, this can result in this site earning a commission. Affiliate programs and affiliations include, but are not limited to, the eBay Partner Network.
Oh yeah, I think I have a set of 19" Toba's lined up with 15k mile tires off a '14 XJL. Slightly taller than stock but they'll relieve a lot of stress over the current rolling stock.
Haven't accomplished a darned this yet otherwise. Mocking up a jig for the mid pipe so I can hack it apart and put it back together without doing it under the car.
I think there may be several owners of 2007-2009 4.2L XKRs who want to upgrade their OEM exhaust with an X-pipe like the one you just built. Would you be interested in replicating your X-pipe for Forum members? It's a superior design compared to the universal stamped designs and would be a custom fit and easy installation for our cars. If so, how many buyers would you need and what would it cost? Thanks.
Stuart, that's an interesting thought. I used to make sub frame connectors for Fox mustangs before the commercial shops sold them for less than my materials. My mill was paid for by making a bunch of dome lamp bezels for the 64'-'73 Ford trucks. I'd need to make two fixtures, a cut fixture and a mock up one. I'd flip the J bends around so the long side went to the front instead of the back. That would give me enough material to fit the left over cuts for the head pipes. It would be a weld in setup, cut the section out of the old mid pipe and weld this one in. I'm gonna need a guinea pig since I hacked my cat pipes up. Packaging is a PITA but doable. Let me see what's involved since I have most of the dimensions needed from my old mid pipe.
Speaking of which, the front end of the exhaust is done. Cross member is bolted back in place, no extra pieces except the dead o2's. But first a shot of the OEM pipe vs. the mandrel bent 2.25" The replacement stuff is larger.
Mock up time. I couldn't find pipe that would fit into the mid pipe clamps so I welded them to a scrap length of angle and clamped that to the table. Note the extra chunks of angle are getting used now. I needed to shorten the bend location @ 1" to get the pipe to clear in the chassis. A muffler shop would need to enlarge the clamp sections so the new pipe would slide in. Same thing for the back.
Done. I used the band saw to cut the welds free once this pic was taken and it had cooled off some.
Finally the coolant pipe is in place. It clears the pulley by @ 1" and I zip tied it to the crass brace just for added piece of mind. $70 and done.
Added coolant but need to finish the mid pipe before firing it up.
Ranchero50, I cant tell you much I enjoy the reading of your updates and viewing the numerous pictures that you post. I'm sure you have built a following here and we all benefit from your experience and knowledge. You are doing great work and I will also say at a very fast pace considering that you also work. Looking forward to the next chapter and hearing her come to life........
Ranchero50, I cant tell you much I enjoy the reading of your updates and viewing the numerous pictures that you post. I'm sure you have built a following here and we all benefit from your experience and knowledge. You are doing great work and I will also say at a very fast pace considering that you also work. Looking forward to the next chapter and hearing her come to life........
^ this!
It's been a long time since I've worked on cars to your extent and to be honest, I don't miss it, but I still enjoy watching other people do it
Keep up the good work and thank for sharing in detail.
It's been a long time since I've worked on cars to your extent and to be honest, I don't miss it, but I still enjoy watching other people do it
Keep up the good work and thank for sharing in detail.
Same. But I'm enjoying the heck out of this thread from the comforts of my office.
And if Ranchero ever wants to sell that Fairlane...my first car was a '67 Fairlane. I still have recurring dreams about finding it and restoring it. It must be the guilt over just flogging that poor car to death. I'd surely take better care of it this time around.
Well, if you guys are living vicariously through this thread, be pleased and excited because we are over a huge hump to getting it back on the road.
Today my oldest son and I did a 80 mile road trip to get the new wheels and tires. Stopped by the tire shop later and got the TPMS's swapped from the OZ's to the Toba's. Sadly the '14 wheels don't use acorn nuts but a shank style lug nut. That means they are hub-centric and not lug-centric like the acorn style. Heading out to find them momentarily.
The inside of the front resonator. There was a series of narrow 1/8" x 2" slots in each tube at different spots.
New mid pipe before welding the joint. It needed a pretty good hump to clear the mid chassis floor brace.
Finally where I'm at now. Pulled the inner fender to dress up the fan wiring and look to see what other problems are hiding up front. I also need to dig out the side marker lamp but it looks like the assy needs pulled for that. For some dumb reason the TPMS system didn't alarm with only one tire on the car. I did see the wire harness that always gets pinched by the bumper in the wrong place. Maybe my shaking it shorted out the fuse. Maybe... Oh yeah, Jaguar air filter looks ten years old but was clean so back it went.
Oh yeah, the exhaust tone is everything I hoped it would be. Nice mellow burble at idle with a wicked high pitched rasp when the throttle is blipped hard. Sounds a lot like a race car but at 3k free revving it's not terribly loud and absolutely no drone. All this is with the mufflers just hanging off the ends of the mid pipes. Now it's time to build muffler aasy's and see if I can get it inspected in the morning.
I thought the Toy's were still acorn style? Autozone doesn't have anything listed Jaguar post 2014...
Derp... Mag style lug nut is what they are called. Jags are expensive, Toys aren't... AZ has Dormans for $4 each x 20 is $80. Ebay is so screwed up trying to search anymore.
Last edited by Ranchero50; Apr 7, 2017 at 07:22 PM.
Reason: jagtoes is right
I thought the Toy's were still acorn style? Autozone doesn't have anything listed Jaguar post 2014...
Derp... Mag style lug nut is what they are called. Jags are expensive, Toys aren't... AZ has Dormans for $4 each x 20 is $80. Ebay is so screwed up trying to search anymore.
Yep, I checked and the XKR is the same. Didn't get much done last night after stalling out for a couple hours trying to find non Dorman lug nuts that weren't coming from California. Supposed to be nice today so I think I'm going to take a break and run up to a truck junk yard and see if they have any. If not it'll be a nice ride and walk.
I don't think the puddle of spilled coolant under the car got any larger so things are looking up.
OK, lug nuts have been sorted out as well as the $140 charge to install the TPMS's. $20 for used nuts off Toyota's and $60 to install the TPMS's. Got in a nice bike ride and relaxing walk through the junk yard too. I need to finish up my friends tractor today and run it down to his farm. Then I'll be back for the mufflers before working tomorrow.
OK, lug nuts have been sorted out as well as the $140 charge to install the TPMS's. $20 for used nuts off Toyota's and $60 to install the TPMS's. Got in a nice bike ride and relaxing walk through the junk yard too. I need to finish up my friends tractor today and run it down to his farm. Then I'll be back for the mufflers before working tomorrow.
Ranch as an FYI the toyota lug nuts are a different hex size then the Jaguar lug nuts. So if you have the Jag wrench in the boot it will not fit the toyota nuts.
Yep, they are 21 mm vs. 19 mm for the acorns I had on the OZ wheels. While rummaging around the shed I noticed that the Jupiters used the same style lug nut. Trying to find a lug wrench in a junk yard isn't pleasant. Anyway, 23 lug nuts later out of 45 I pulled. Oldest kid came down and started polishing them on the buffer wheel. I guess he was bored.
Moved forward this evening and pulled the driver inner fender out and started on the bumper covers. What a PITA. Three of the nut-serts for the top of the bumper were spinning. I was able to hold two with the headlamps out but had to cut one bolt. Now I need to source three 6mm inserts and install them.
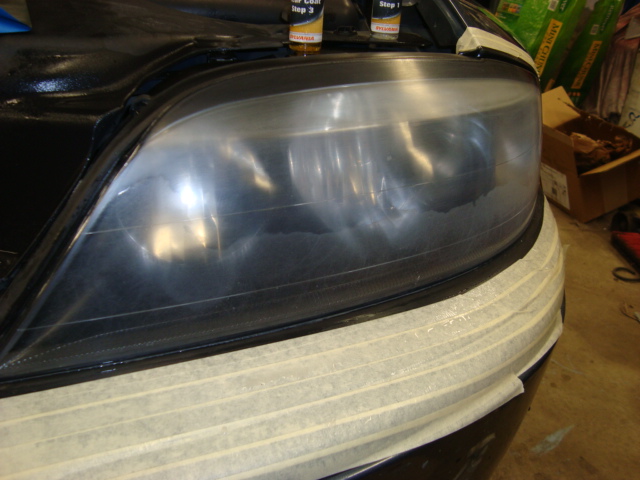
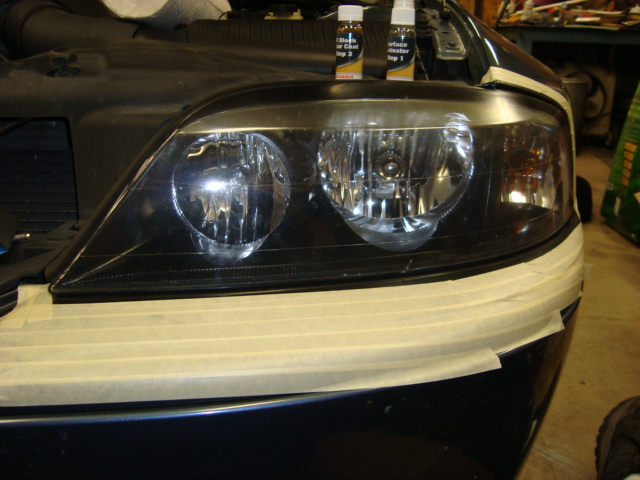
Good thing the flash was on because this poor thing is hideous. They have a good bit of crazing on the sides and this one took a side swipe. I should be able to wet sand / polish them out and plan on doing the Helm spar clear with a napkin trick to UV seal them. I had good luck with it in the past and really bad luck when I used spray last time. So back to a napkin...
Goal is on the road Friday. Not sure if I can pull it off but I'm going to try. Twelve hour work days Sunday - Wednesday. I'll try to pull an hour or so a night getting the exhaust sorted out. I have one marker lamp in the headlamp that's out so they needed popped anyways. Tires and brakes are good. Suspension looks fine. Looking forward to putting some miles on her and digging into the AFS system so I can drive it at night.
Just Google spar urethane headlamp repair and a ton of stuff pops up. Use a shop towel to wipe and thinned coating of urethane on the sanded / polished lens. Once sanded the lens is hazy but the urethane makes it clear as glass and lasts a good long time. The trick is to get all the old sealant off the lens.
Updated with some pics from when we did the LS. It hazed after a couple years and we tried again with spray. Needs sanded yet again and done with the paper towel method.
Last edited by Ranchero50; Apr 9, 2017 at 06:33 AM.
Came home, went fully retarded trying to weld the tips onto the mufflers without any purge gas. It got ugly quick. Resorted to the Miller and zipped them in place smoothly. Then spent too much time pondering exactly what I'd done, how to hold it finally where the combo is going to fit the chassis so the tip tops were flat with the ground (a must have for me). Oh well... Finally decided that the 'muffler' needed to be on the outside so it could fit up in the trunk well where there's more room. The straight pipe will be coming out the inside, opposite of Jaguar's design. Mocked everything up with some aluminum blocks to get the spacing where it fit the exhaust openings well. 1" between the tips and 1" of offset making the inside ones longer. I think this will give it a good look.
Kind of torn on how to hold the pipes parallel. The machinist in me says mill out some radius'd brackets and weld the pipe to the muffler.
Even the dog is wondering what I'm doing...
After cutting and fitting the OEM pipe I decided to just junk the whole works and go with 2.25" from the coupling back. I have two 180` bends to make the whole thing work. Thinking a pair of 45's to get the pipes kicked out and another pair where they need to come out. Holding everything in plane for fitment is going to suck. Especially since both sides must match.
As a demonstrator we stuck some 48" lengths of pipe onto the mid pipe and fired up the car with the mufflers. It doesn't sound that great, very deep warbling sound at idle. It actually sounds better without than with. Tried it as shown and it doesn't sound horrible. I think with 1/2 the pressure / flow going through the resonator and 1/2 going open pipe it'll have a softer sound. One nice thing is if I don't like it I can change it later.
More to come. I'm trying to decide which center caps to buy for the car. I've read that the Growler ones have pealing chrome issues. I'm thinking about getting the ones with the //R decals. Also torn between cleaning the black calipers and trying to go red.