When you click on links to various merchants on this site and make a purchase, this can result in this site earning a commission. Affiliate programs and affiliations include, but are not limited to, the eBay Partner Network.
1997 XK8 Convertible - Rear view mirror replacement with DVR & rearview camera
Posting the story of my rear view mirror failure and the process of replacing it with an aftermarket camera/DVR/rear view monitor mirror for others who may be facing the decision of what to do with a failing mirror. This started with a large bubble in the mirror, indicating that the seal holding the electro-chromatic dimming fluid had failed. I'll start with a description of what was done and follow with a series of photos showing the procedure and sequence.
Mirror removal - very straightforward. To remove the mirror, tap downward (parallel to the plane of the windshield) using a small hammer and a wood block or similar buffer so that you're not striking directly on the mirror mount. Mine moved very easily with minor tapping, then slid off down towards the dash by hand pressure and slight wiggling after being loosened.
Mirror inspection and replacement considerations - After reading other posts and contacting mirror repair vendors, I felt that it wasn't worth spending about $125 plus shipping to simply repair the factory self-dimming mirror. There are many aftermarket self-dimming mirrors on Ebay and Amazon that might have worked for less, but once I got into this, I decided to upgrade to an aftermarket mirror with self-dimming, front camera, DVR and rear view monitor capabilities, with the hope of finding one that would be compatible with the factory mount using the ball that goes into the back of the factory mirror. Since I wasn't planning to reuse it anyway, I decided to disassemble the factory mirror to detach and evaluate the ball. The diameter is 16 mm, and I was unable to find a suitable aftermarket mirror. So, I realized that I would have to use an aftermarket mirror with mounting hardware supplied by the aftermarket vendor. Fortunately, there are a number of aftermarket mirrors that are compatible with the Jaguar windshield mount (tab), so the tab doesn't have to be removed/replaced. But, when considering aftermarket options, the size and shape of the aftermarket mounting arm that attaches to the original tab needs to be fairly close to the factory style so that the new mirror doesn't extend at a strange angle or hang down too far into the windshield.
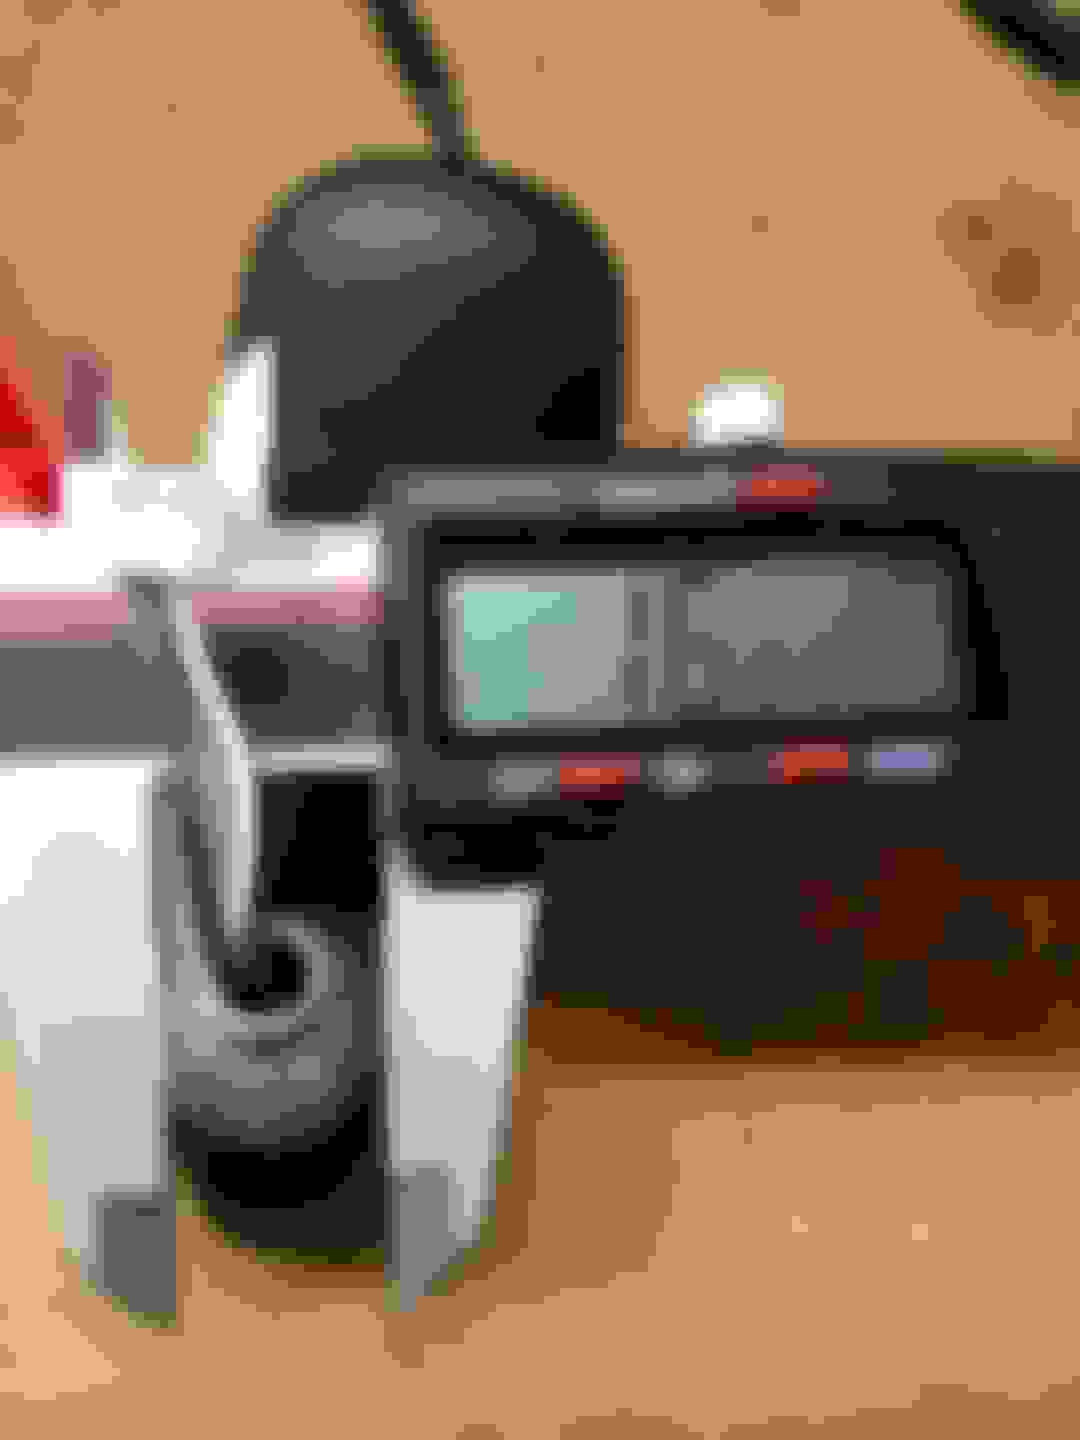
Aftermarket mirror selection - I ended up purchasing an iMirror Model AK-D priced at $229 on Amazon.
. Getting a mirror that self-dims at night was a feature that really limited selection when the front camera, DVR and rear view monitor were added. iMirror didn't have many reviews at the time, but it turns out that these mirrors are made by Germid, which is a high-end OEM manufacturer for several car brands. Germid branded OEM mirrors are very expensive, so it appears that this is their effort to play in the aftermarket equipment world using a different brand name. Nevertheless, the mirror quality is excellent, certainly on a par with an OEM factory mirror. The mirror is slightly bigger than the factory version, and I've included some side-by-side photos showing how they compare. One consideration that was not initially evident is that the replacement mirror is heavier than the factory version, which makes sense because there is a lot more stuff inside. Initially, I received a plastic mount from the manufacturer, and the mirror wobbled a bit when going over bumps or on rough roads. The manufacturer responded quickly by supplying a replacement mirror with a metallic mounting arm that solved this issue, and they assured me after my feedback that all future mirrors sold for this application would be provided with the metallic arm. When ordering the mirror, you advise the manufacturer re. the car it will be installed on so that they can provide the correct arm style with a mount that is compatible with the OEM tab on the windshield.
Installation of the mirror - installing the mirror is as simple as placing it below the tab on the windshield and tapping it upward in the plane of the windshield until it's fully engaged on the tab. I used a block of wood and a small hammer to tap it into position. Then, the cord went up to the cavity behind the overhead console, following the path of the original mirror's cord. Once inside the cavity (Other posts describe how to drop the overhead console, which is literally just carefully pulling it down from the sides to release the clips that hold it in place). I cut off the factory harness connection and used the yellow wire to trigger the rear-view monitor. The yellow wire connects to the reversing circuit to tell the factory mirror to not dim when backing up. That's the same signal needed by the aftermarket mirror to tell it to turn on the backup camera monitor embedded in the mirror. For power and ground and the rear camera video signal, I pushed the wire inside of the windshield trim at the windshield edge, then ran it behind the A-pillar to the dash. Getting from the top of the dash into the fuse box was challenging. I used a long nylon zip tie (24-inch type used to tie air conditioning duct) to find a clear path, then taped the wires onto the zip tie and pulled them to the fuse box. Recommend to disconnect the battery for this, and beware that the exposed bolt on the fuse box is NOT ground. It has 12V positive on it. At the box, I identified fuses for constant power, accessory power and attached the mirror supply wires to the side of the fuse lugs that was controlled by the fuse (not the side of the fuse that power is supplied to). I also used the fuse box as the junction location for the rear view camera wire.
Installation of the rear view camera - To mount the rear camera above the license plate, I drilled a small hole behind the plate and inserted the wire through a rubber grommet. Then, I ran the wire across the trunk lid (partial removal of the trunk lid trim required), and then adjacent to the factory wire in the corner next to the trunk hinge to get into the trunk (pushed the wire through the factory grommets at either end and secured to the factory wire using a slightly larger plastic cable cover purchased at Harbor Freight and secured with nylon ties). Once in the trunk, you need camera power, ground and to route the video wire up to the connector to the mirror that had been brought down to the fuse box. For ground, I used a grounded screw on the CD/radio rack on the passenger side of the trunk. For power, I tapped the yellow/white wire in the wire harness for the rear lights which supplies power to the backup light. Note that the DVR in the mirror does not record the rear camera at any time. Only the front camera in the mirror is recorded, so you don't need to power the rear camera unless the car is in reverse. To get from the trunk to the back seat, the back seat and passenger side bolster were removed, a small hole was drilled through the metal back plate behind the side bolster, and the long nylon zip tie was used to fish from the back seat into the trunk past the gas tank, then pulled the wire from the trunk into the rear seat. Rear and right side trunk trim panels had to be removed for this. Last, the wire was run under the back seat to the center, along the side of the console, over the steering wheel area and into the fuse box for connection.
The result - I'm very happy with the final result. The iMirror product is great and has a factory quality appearance. The rear camera is a nice addition, and I really like having a front camera DVR integrated into the rear view mirror vs. having a separate DVR camera device on a suction cup or sitting on the dash. This is a really nice upgrade project for my XK8. The only qualifying comments that I feel compelled to offer are that the instructions provided with the mirror aren't always clear without reading the text a couple times and thinking it through. But, the manufacturer's technical support was very quick to respond (next day via email) when I had a question. Also, be aware that mirrors with embedded video monitors inherently have a limit on how bright the monitor will be. On a sunny day when there is a bright image from the rear window in the mirror, the monitor can be difficult to see unless you tilt the mirror up a bit to get the back window out of the view. Not a big deal or a huge inconvenience, but it's something to be aware of so that you're not surprised if you decide to go this route. In normal operation, the DVR and monitor will automatically start when you turn the car on showing the front camera image to demonstrate that the unit is working correctly. That can be set to turn off in a few seconds so that it looks like a regular mirror for normal driving. If an accident or some other reason to save a video takes place, touching the power button on the mirror brings up the monitor, and touch screen controls allow you to lock (save until manually deleted) and play videos on the monitor.
If you have any specific questions, feel free to send me a personal message.
Factory mirror electro-chemical dimming fluid leaked - air bubble along top edge factory mirror disassembly factory mirror disassembly factory mirror disassembly factory mirror disassembly factory mirror disassembly factory mirror disassembly factory mirror disassembly factory mirror disassembly factory mirror disassembly factory mirror mount factory mirror ball removal after mirror and circuit board removed from housing factory mirror ball removal after mirror and circuit board removed from housing factory mirror ball removal after mirror and circuit board removed from housing
factory mirror mount and ball factory mirror mount and ball factory mirror mount and ball factory mirror mount and ball Wiring iMirror AK-D unboxing iMirror AK-D comparison to factory mirror iMirror AK-D comparison to factory mirror iMirror AK-D comparison to factory mirror trunk hole under license plate grommet in hole wired through hole rear camera mounted trunk lid trim removal wiring in trunk lid wiring trunk lid to trunk wiring trunk lid to trunk yellow-white wire is power to backup light tapped for rear camera power passenger side back seat bolster removal wiring from trunk to back seat behind bolster completed installation completed installation - car in reverse turns on rear view monitor (not a great image...it's nighttime and the garage door is down right behind camera). Camera view in normal applications is good. completed installation mirror with monitor off.
97 XK8 doesn't have that feature. Headlights on mine are manual, so that wasn't an issue. However, there is no output from this mirror (or any other aftermarket mirror that I looked at) to initiate automatic headlights.
Since it kills the auto headlights for anything besides the 97 probably does not need a sticky, but nice for anyone with a 97 (possibly 98)
I would imagine on cars with auto headlights, you could just take that pcb out of the old mirror and glue it to the back of the new mirror and reconnect it to get everything working as before.
Great pics of the mirror dismantling for anyone attempting that in the future for a DIY glass change.
Posting the story of my rear view mirror failure and the process of replacing it with an aftermarket camera/DVR/rear view monitor mirror for others who may be facing the decision of what to do with a failing mirror. This started with a large bubble in the mirror, indicating that the seal holding the electro-chromatic dimming fluid had failed. I'll start with a description of what was done and follow with a series of photos showing the procedure and sequence.
Mirror removal - very straightforward. To remove the mirror, tap downward (parallel to the plane of the windshield) using a small hammer and a wood block or similar buffer so that you're not striking directly on the mirror mount. Mine moved very easily with minor tapping, then slid off down towards the dash by hand pressure and slight wiggling after being loosened.
Mirror inspection and replacement considerations - After reading other posts and contacting mirror repair vendors, I felt that it wasn't worth spending about $125 plus shipping to simply repair the factory self-dimming mirror. There are many aftermarket self-dimming mirrors on Ebay and Amazon that might have worked for less, but once I got into this, I decided to upgrade to an aftermarket mirror with self-dimming, front camera, DVR and rear view monitor capabilities, with the hope of finding one that would be compatible with the factory mount using the ball that goes into the back of the factory mirror. Since I wasn't planning to reuse it anyway, I decided to disassemble the factory mirror to detach and evaluate the ball. The diameter is 16 mm, and I was unable to find a suitable aftermarket mirror. So, I realized that I would have to use an aftermarket mirror with mounting hardware supplied by the aftermarket vendor. Fortunately, there are a number of aftermarket mirrors that are compatible with the Jaguar windshield mount (tab), so the tab doesn't have to be removed/replaced. But, when considering aftermarket options, the size and shape of the aftermarket mounting arm that attaches to the original tab needs to be fairly close to the factory style so that the new mirror doesn't extend at a strange angle or hang down too far into the windshield.
Aftermarket mirror selection - I ended up purchasing an iMirror Model AK-D priced at $229 on Amazon. https://www.amazon.com/iMirror-AK-D-...eb_18608573011. Getting a mirror that self-dims at night was a feature that really limited selection when the front camera, DVR and rear view monitor were added. iMirror didn't have many reviews at the time, but it turns out that these mirrors are made by Germid, which is a high-end OEM manufacturer for several car brands. Germid branded OEM mirrors are very expensive, so it appears that this is their effort to play in the aftermarket equipment world using a different brand name. Nevertheless, the mirror quality is excellent, certainly on a par with an OEM factory mirror. The mirror is slightly bigger than the factory version, and I've included some side-by-side photos showing how they compare. One consideration that was not initially evident is that the replacement mirror is heavier than the factory version, which makes sense because there is a lot more stuff inside. Initially, I received a plastic mount from the manufacturer, and the mirror wobbled a bit when going over bumps or on rough roads. The manufacturer responded quickly by supplying a replacement mirror with a metallic mounting arm that solved this issue, and they assured me after my feedback that all future mirrors sold for this application would be provided with the metallic arm. When ordering the mirror, you advise the manufacturer re. the car it will be installed on so that they can provide the correct arm style with a mount that is compatible with the OEM tab on the windshield.
Installation of the mirror - installing the mirror is as simple as placing it below the tab on the windshield and tapping it upward in the plane of the windshield until it's fully engaged on the tab. I used a block of wood and a small hammer to tap it into position. Then, the cord went up to the cavity behind the overhead console, following the path of the original mirror's cord. Once inside the cavity (Other posts describe how to drop the overhead console, which is literally just carefully pulling it down from the sides to release the clips that hold it in place). I cut off the factory harness connection and used the yellow wire to trigger the rear-view monitor. The yellow wire connects to the reversing circuit to tell the factory mirror to not dim when backing up. That's the same signal needed by the aftermarket mirror to tell it to turn on the backup camera monitor embedded in the mirror. For power and ground and the rear camera video signal, I pushed the wire inside of the windshield trim at the windshield edge, then ran it behind the A-pillar to the dash. Getting from the top of the dash into the fuse box was challenging. I used a long nylon zip tie (24-inch type used to tie air conditioning duct) to find a clear path, then taped the wires onto the zip tie and pulled them to the fuse box. Recommend to disconnect the battery for this, and beware that the exposed bolt on the fuse box is NOT ground. It has 12V positive on it. At the box, I identified fuses for constant power, accessory power and attached the mirror supply wires to the side of the fuse lugs that was controlled by the fuse (not the side of the fuse that power is supplied to). I also used the fuse box as the junction location for the rear view camera wire.
Installation of the rear view camera - To mount the rear camera above the license plate, I drilled a small hole behind the plate and inserted the wire through a rubber grommet. Then, I ran the wire across the trunk lid (partial removal of the trunk lid trim required), and then adjacent to the factory wire in the corner next to the trunk hinge to get into the trunk (pushed the wire through the factory grommets at either end and secured to the factory wire using a slightly larger plastic cable cover purchased at Harbor Freight and secured with nylon ties). Once in the trunk, you need camera power, ground and to route the video wire up to the connector to the mirror that had been brought down to the fuse box. For ground, I used a grounded screw on the CD/radio rack on the passenger side of the trunk. For power, I tapped the yellow/white wire in the wire harness for the rear lights which supplies power to the backup light. Note that the DVR in the mirror does not record the rear camera at any time. Only the front camera in the mirror is recorded, so you don't need to power the rear camera unless the car is in reverse. To get from the trunk to the back seat, the back seat and passenger side bolster were removed, a small hole was drilled through the metal back plate behind the side bolster, and the long nylon zip tie was used to fish from the back seat into the trunk past the gas tank, then pulled the wire from the trunk into the rear seat. Rear and right side trunk trim panels had to be removed for this. Last, the wire was run under the back seat to the center, along the side of the console, over the steering wheel area and into the fuse box for connection.
The result - I'm very happy with the final result. The iMirror product is great and has a factory quality appearance. The rear camera is a nice addition, and I really like having a front camera DVR integrated into the rear view mirror vs. having a separate DVR camera device on a suction cup or sitting on the dash. This is a really nice upgrade project for my XK8. The only qualifying comments that I feel compelled to offer are that the instructions provided with the mirror aren't always clear without reading the text a couple times and thinking it through. But, the manufacturer's technical support was very quick to respond (next day via email) when I had a question. Also, be aware that mirrors with embedded video monitors inherently have a limit on how bright the monitor will be. On a sunny day when there is a bright image from the rear window in the mirror, the monitor can be difficult to see unless you tilt the mirror up a bit to get the back window out of the view. Not a big deal or a huge inconvenience, but it's something to be aware of so that you're not surprised if you decide to go this route. In normal operation, the DVR and monitor will automatically start when you turn the car on showing the front camera image to demonstrate that the unit is working correctly. That can be set to turn off in a few seconds so that it looks like a regular mirror for normal driving. If an accident or some other reason to save a video takes place, touching the power button on the mirror brings up the monitor, and touch screen controls allow you to lock (save until manually deleted) and play videos on the monitor.
If you have any specific questions, feel free to send me a personal message.
Factory mirror electro-chemical dimming fluid leaked - air bubble along top edge factory mirror disassembly factory mirror disassembly factory mirror disassembly factory mirror disassembly factory mirror disassembly factory mirror disassembly factory mirror disassembly factory mirror disassembly factory mirror disassembly factory mirror mount factory mirror ball removal after mirror and circuit board removed from housing factory mirror ball removal after mirror and circuit board removed from housing factory mirror ball removal after mirror and circuit board removed from housing
factory mirror mount and ball factory mirror mount and ball factory mirror mount and ball factory mirror mount and ball Wiring iMirror AK-D unboxing iMirror AK-D comparison to factory mirror iMirror AK-D comparison to factory mirror iMirror AK-D comparison to factory mirror trunk hole under license plate grommet in hole wired through hole rear camera mounted trunk lid trim removal wiring in trunk lid wiring trunk lid to trunk wiring trunk lid to trunk yellow-white wire is power to backup light tapped for rear camera power passenger side back seat bolster removal wiring from trunk to back seat behind bolster completed installation completed installation - car in reverse turns on rear view monitor (not a great image...it's nighttime and the garage door is down right behind camera). Camera view in normal applications is good. completed installation mirror with monitor off.
Great job, unfortunatly Imirror doesn't offer anyomer.
I bought a mirror and rear camera on ebay for $20..Clips over original mirror works perfect . I have a separate dash cam recording front and rear views.
Seems like you went to a lot of trouble for the same end result.
I used this for some time on the Jag but have a central 7 in screen now so I moved it to my range Rover and again it works perfect ...Prices have gone up a bit from the �16 I paid but try this number in ebay.
Found the one I bought ..eBay item number:394821210209
Beware the one at �13.26 you dont get a camera !
Wire just long enough ...through backseat along carpet up rubber seal and behind the head lining. picked up earth from sun visor screw White not required.
Picks up live from rear light cluster reversing lights which is what turns it on.
Thanks again - you'll see I edited my post when I realised you mentioned where to get the power. I've been thinking of this for some time and you have given me a nudge to actually do it!
Hey Pstnbroke I have a handy roll of Andrex for you.
I bought the mirror/camera, I can see where I get power for the camera but the mirror seems to need power for the display which is fair enough. Where did you pick that up or did you add your own 12v line from the rear to the camera along with the video feed cable so that the mirror/screen only gets power when in reverse?
I do feel they could have provided better instructions. Not all of us are auto electricians
I moved the mirror to the range rover but i will check tomorrow what the power situation was,
from memory the power comes from the rev lights via that red wire ..
If you do need an extra live easy to pick up from the drivers side fuse box.

 08-29-2019, 11:19 PM