
1998 xk8 fuel filter - I'm baffled


Thread Starter
|
Veteran Member
Joined: Apr 2014
Posts: 5,457
Likes: 1,816
From: New Jersey USA
Friends, I decided to replace my fuel filter. Got the part from Auto Zone, took off the right front tire and opened the pannel. To my surprise the filter they sold me looks nothing like the one in the car. The one in the car has a small rubber hose, attached with what looks like a lead crimp on on both ends. I went back to the auto parts place, everywhere they looked, it shows a metal case fuel filter (the one in there is clear plastic) with a threaded end, and the fuel line it is designed for must be 1/2 inch diameter at least. Was wondering if you could help me straighten this out. Am I looking at the right thing? Is the filter actually crimped on? If so are there special tools for this? Is it possible I'm looking at the wrong filter? Any coaching would sure be apprecaited. Thanks, John
Last edited by GGG; Aug 22, 2014 at 05:46 PM.
Thread Starter
|
Veteran Member
Joined: Apr 2014
Posts: 5,457
Likes: 1,816
From: New Jersey USA
Just went to all data.com. Looks like the filiter is underneath the car under the rear seat area. Well you live and learn. One thing though, all data indcates one must empty the gas tank before changing the filter - is this true? It sounds like they are saying gravity will empty the tank through the open connection if you don't empty it. Thanks John
Veteran Member


Joined: Apr 2010
Posts: 7,657
Likes: 3,021
From: Arlington VA USA
Just went to all data.com. Looks like the filiter is underneath the car under the rear seat area. Well you live and learn. One thing though, all data indcates one must empty the gas tank before changing the filter - is this true? It sounds like they are saying gravity will empty the tank through the open connection if you don't empty it. Thanks John


Joined: Dec 2011
Posts: 120,439
Likes: 17,016
From: Durham, UK
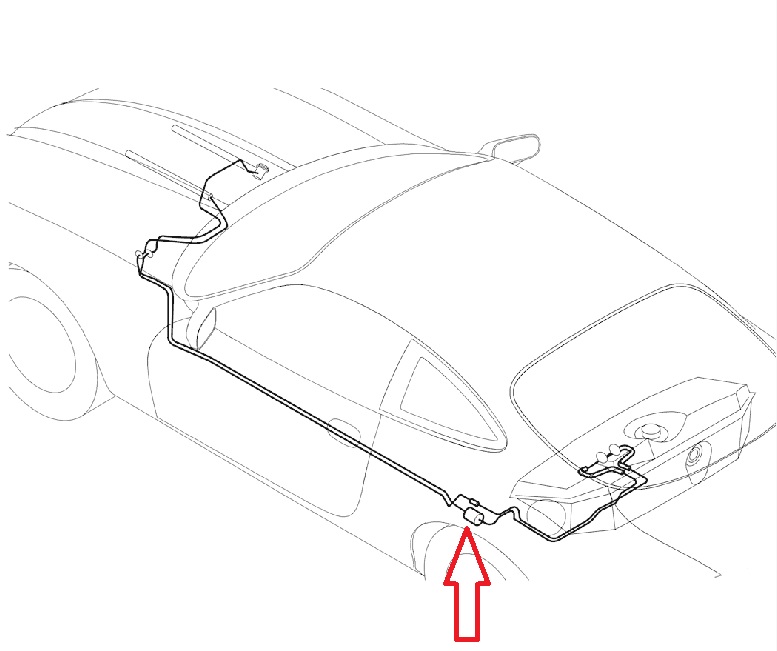
Start at the LH chrome exhaust trim and crawl forwards underneath the vehicle! Fuel filter is arrowed in red on the diagram below:

Here's the JTIS procedure for removing/replacing the fuel filter:
JTIS - XK8 Fuel Filter.pdf
I've never drained the tank to change a filter. Depressurising the fuel system is adequate BUT be aware there will be some fuel spillage as the filter is removed.
Graham
Here's the JTIS procedure for removing/replacing the fuel filter:
JTIS - XK8 Fuel Filter.pdf
I've never drained the tank to change a filter. Depressurising the fuel system is adequate BUT be aware there will be some fuel spillage as the filter is removed.
Graham
Senior Member
Joined: Aug 2013
Posts: 801
Likes: 77
From: North Northumberland England
Johnken, the fuel filter will be shielded by an aluminium cover, its very crowded in there, I needed to get the garage to change mine as the nuts were too tight and I could not get the leverage with the spanners even on a ramp.
Good luck, let us know how you come on.
Good luck, let us know how you come on.
Thread Starter
|
Veteran Member
Joined: Apr 2014
Posts: 5,457
Likes: 1,816
From: New Jersey USA
Arty, I used a set of ramps, can't imaging how to do it without them. Good news you may not realize - the heat shield is very maliable. You can bend it out of the way, do the change and bend it back - still looks like new. I wish I could remember the size of the ratchet wrench attachements needed for the bracket (I can look real easily if it helps you), I spent 1/2 of the hour this took just looking for them. You need 2 sizes, one for the screw that compresses the bracket, one for the pair of nuts that hold the braket to the underside of the car. The union nuts are 5/8 on the fuel line and the next larger wrench from 3/4 inches on the filter. Can't remember the exact # but you have the new filter in your hand so it is easy to find. Spray with wd40 or liquid wrench, the bolts are likely galvanized together a bit. It was quit a struggle (force) before I sprayed them. Though the union nuts went back on very easily.
Once I had the old filter off I did the blow through test - it was practically solid! Wow I said to myself how did this car drive like this? I checked the new filter - no resistance at all. I have to smile, every other car I had with fuel injection and a clogged filter would stutter and shake when the rpms were getting up there. This car apparenly modifies everything else to give a smooth ride regardless. Did my ride get a little power back? Yes, oh yes it sure did, but I have to admit it took about 20 to 30 miles of driving to get there. So - seat of the pants feel, very nice improvment. Gas mileage - 5% better (according to Trip computer) with same hard driving style. Arty, something to look forward to mate.
Steve, Graham, thanks again for your great instructions.
Guys, what in the world is that filter, with crimped on connections, inside the left front fender (1998 xk8)? Does anyone know? It looks so much like a fuel filter it sure fooled me.
Thanks again,
John
Joined: Dec 2011
Posts: 120,439
Likes: 17,016
From: Durham, UK
Somewhere 'inside' behind the black plastic liner (this is a 2001 XK8 with the liner removed) .........
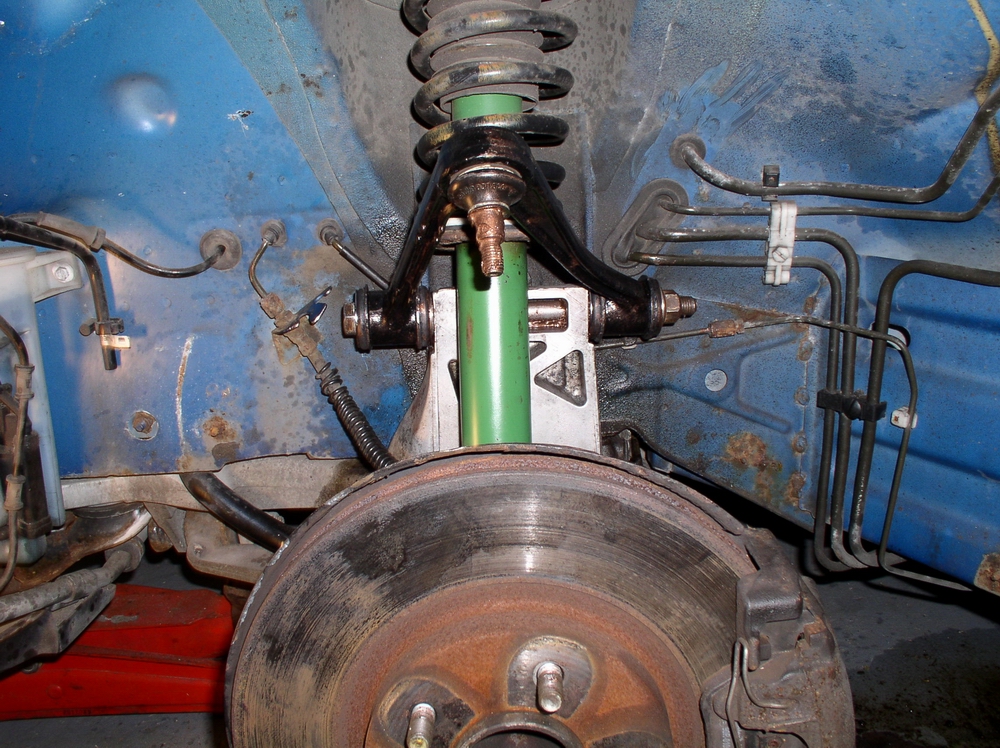
....... or are you looking from inside the engine bay?
Graham
Trending Topics
Thread Starter
|
Veteran Member
Joined: Apr 2014
Posts: 5,457
Likes: 1,816
From: New Jersey USA
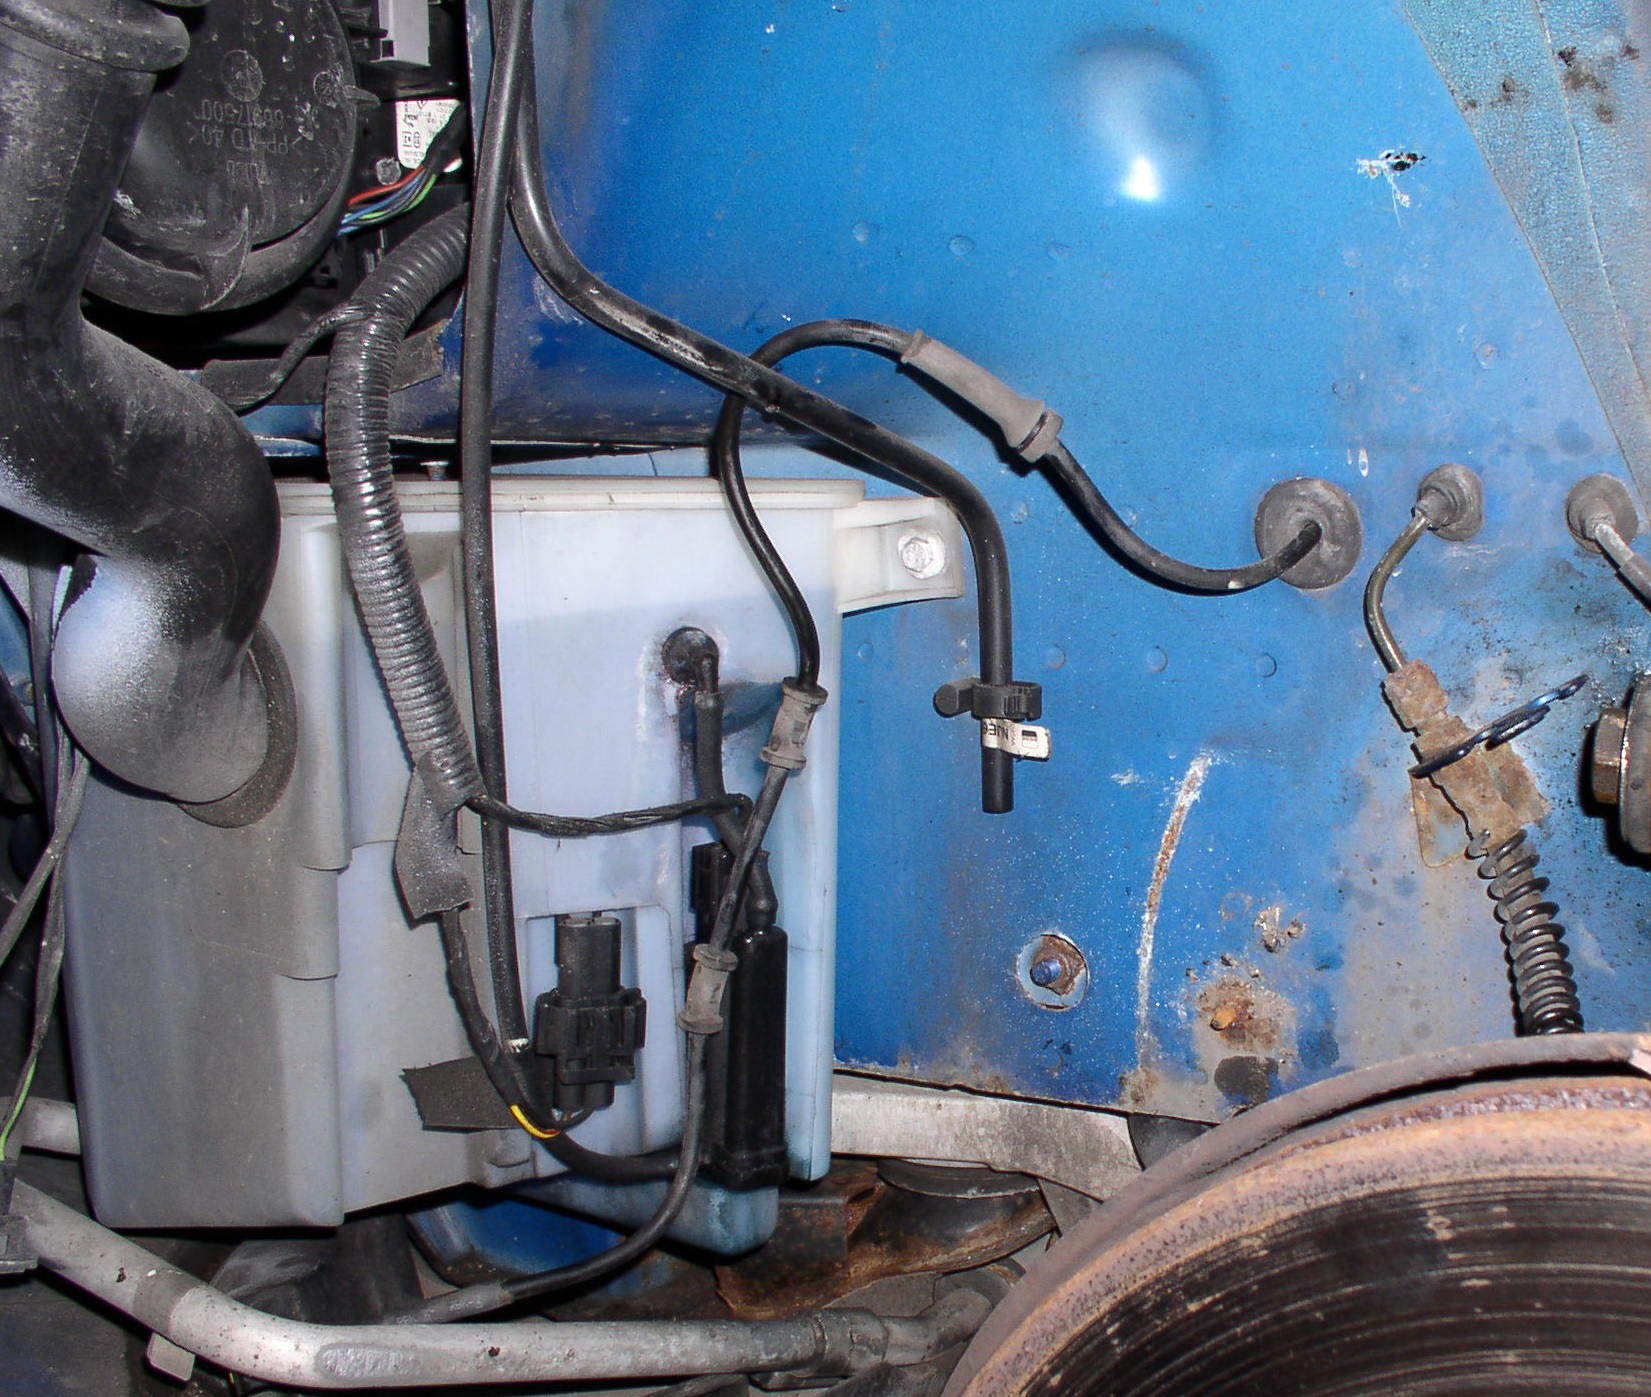
Graham, I'm glad I included the picture - no one would have belived me  . I can only imagine what folks thought when I described this. Yes I suppose it is the washer fluid, I can only imagine how it got there. I think I'll let sleeping dogs lie on this one. I could have sworn I saw someone once point to this area for fuel filter replacemnet on an earlier post, maybe is is on some cars or something. It sure looks like a professoinal crimp. I say that because I remember nodding my head to myself after I had just gotten intimate with this area while changing my first headlight bulb, and filing it away as the fuel filter location. Frankly I have to laugh at myself, the inner diamer of that rubber hose is so tiny there is no way this could be the fuel pipline.
Thanks, John
. I can only imagine what folks thought when I described this. Yes I suppose it is the washer fluid, I can only imagine how it got there. I think I'll let sleeping dogs lie on this one. I could have sworn I saw someone once point to this area for fuel filter replacemnet on an earlier post, maybe is is on some cars or something. It sure looks like a professoinal crimp. I say that because I remember nodding my head to myself after I had just gotten intimate with this area while changing my first headlight bulb, and filing it away as the fuel filter location. Frankly I have to laugh at myself, the inner diamer of that rubber hose is so tiny there is no way this could be the fuel pipline. Thanks, John
Veteran Member
Joined: Dec 2011
Posts: 2,946
Likes: 1,586
From: Spencer, NC
Johnken, Thanks for your write up and as I took it on with your instructions may I add one or two. As noted the 3/4 and 5/8 are good, (19 and 16 MM), the two bracket holders are 10 MM (deep well) and the squeeze one is 8 MM on a 1/4 inch drive. Don't take out the squeeze one all the way out unless you need too, and if you do, get it started before putting things back in place, (ask me how I know). I found that getting the bracket all snugged up first before tightening the pipes worked best for me. The back pipe is easier to pull back before the front one will come out. Use the ring end of your 3/4 to smooth the shield back neatly. Oh, and being a contortionist will be of great help.
Jonken, Thanks again.
Wayne
Jonken, Thanks again.
Wayne
Senior Member
Joined: May 2012
Posts: 289
Likes: 51
From: Liechtenstein
I replaced my filter while changing the rear shocks a couple of weeks ago. Gave some extra space to maneuver in there. Had a previous attempt at the job, but just couldn't get it off then.
When filter was off I noticed it had a production date stamp of 2002, so it most likely was the original filter on there. Service book had fuel filter change stamped (by dealer!) though, but I suppose they also considered it to be a bitch of a job.
When filter was off I noticed it had a production date stamp of 2002, so it most likely was the original filter on there. Service book had fuel filter change stamped (by dealer!) though, but I suppose they also considered it to be a bitch of a job.
Joined: Dec 2011
Posts: 120,439
Likes: 17,016
From: Durham, UK
I replaced my filter while changing the rear shocks a couple of weeks ago. Gave some extra space to maneuver in there. Had a previous attempt at the job, but just couldn't get it off then.
When filter was off I noticed it had a production date stamp of 2002, so it most likely was the original filter on there. Service book had fuel filter change stamped (by dealer!) though, but I suppose they also considered it to be a bitch of a job.
When filter was off I noticed it had a production date stamp of 2002, so it most likely was the original filter on there. Service book had fuel filter change stamped (by dealer!) though, but I suppose they also considered it to be a bitch of a job.
I usually cut removed fuel filters open to check and have found few contaminants in them even after five years.
It certainly is a 'bitch of a job' and very easy to damage a fuel line!
Graham


Member
Joined: Nov 2016
Posts: 58
Likes: 6
From: Arizona
Squeter91
Exactly my experience.
I did this today. Biggest difficulty was maneuvering around the jack stand placed at the rear jack point - had to withdraw and reenter to go from filter outlet to inlet side and vice versa.
Took me longer but I took time to sandblast, primer. and repaint bracket and bracket bolt heads and cleaned up bolt threads with a wire brush and solvent. But I wanted to do this to an auxiliary wheel chock I made from a piece of hefty angle iron anyway and also glitzed my brake calipers - hate to see rust anywhere.
On a scale of 1-10 this filter change job was a 2...maybe...

Member

Joined: May 2018
Posts: 59
Likes: 13
From: Fort Worth, TX
Just measured my container and I have collected approximately 10 cups of fuel with no sign of a slowdown. The gas is coming from the tank side. Ask me if I am a believer that you need to do this with an empty tank! Until I hear from y�all, I have screwed the line back into the existing filter.

