
Another rear seat delete underway

Veteran Member


Joined: Feb 2012
Posts: 2,997
Likes: 714
From: Waco, Texas, US
Well they SHOULD be. Looks awesome and fits with your style. Tell Vic damn the cost, you want it done!
Thread Starter
|
Veteran Member
Joined: Feb 2011
Posts: 2,916
Likes: 547
From: North Carolina
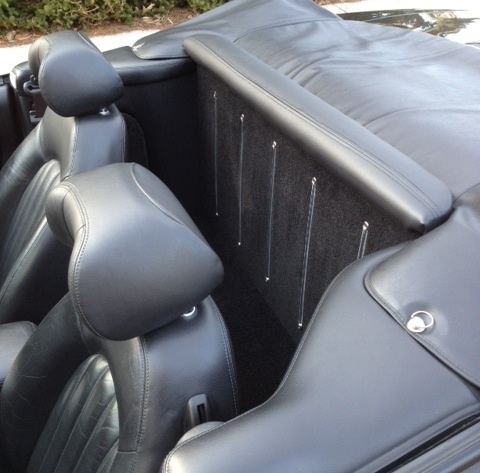
Added the aluminum and chrome rub strips. Need to make them for the floor as well but ran out!! Ignore my feeble attempt to stitch and cover the cap rail. I'll have it properly covered to match when the new seats go in.

Veteran Member
Joined: Jun 2013
Posts: 1,162
Likes: 246
From: Chicago, IL
Great job! I've been following all of your work, and must say I'm impressed! I've always considered myself a purist with these cars, but you've proven to me that some tasteful modifications aren't always a bad thing. Keep up the good work!!


Thread Starter
|
Veteran Member
Joined: Feb 2011
Posts: 2,916
Likes: 547
From: North Carolina
Now it i had a flawless victory edition or such, it'd be another story!!
Veteran Member

Joined: Jan 2009
Posts: 2,199
Likes: 1,371
From: Hudson, Florida
Looks really good Phil. A couple thoughts...
Did you notice any change in road noise? The thick foam in the seats seemed like a good insulator. Did you add any new insulation?
Would it make sense to attach the top cover to the cap rail in some way? Then you could just pop the trunk, unsnap the ends, fold the ends inward and flip it into your new storage area whenever the top is up. Maybe even make a new top cover that incorporates the cap rail cover for a cleaner overall appearance.
Thread Starter
|
Veteran Member
Joined: Feb 2011
Posts: 2,916
Likes: 547
From: North Carolina
Looks really good Phil. A couple thoughts...
Did you notice any change in road noise? The thick foam in the seats seemed like a good insulator. Did you add any new insulation?
Would it make sense to attach the top cover to the cap rail in some way? Then you could just pop the trunk, unsnap the ends, fold the ends inward and flip it into your new storage area whenever the top is up. Maybe even make a new top cover that incorporates the cap rail cover for a cleaner overall appearance.
Did you notice any change in road noise? The thick foam in the seats seemed like a good insulator. Did you add any new insulation?
Would it make sense to attach the top cover to the cap rail in some way? Then you could just pop the trunk, unsnap the ends, fold the ends inward and flip it into your new storage area whenever the top is up. Maybe even make a new top cover that incorporates the cap rail cover for a cleaner overall appearance.
And frankly, the sound is even more quiet with the carpet. I think since i have some dead space between the back and i added some left over foam in the floor to protect all the wiring, it keeps road noise the same. And the carpet absorbs much more sound than the leather so its very cacooning!

Attachment 73736
Very sturdy and actually frees up more room without the worry of damaging the old seats. Frankly, I can't imagine why anyone would want to put them back!
Very sturdy and actually frees up more room without the worry of damaging the old seats. Frankly, I can't imagine why anyone would want to put them back!
Please see my post
Finally finished my XKR is now a two seater with luggage space.
Thread Starter
|
Veteran Member
Joined: Feb 2011
Posts: 2,916
Likes: 547
From: North Carolina
That looks really good You will find it is the best mod you could have done, did you build your own strips ? if so how , mine don't have chrome. I also included storage for tools etc under the luggage bottom floor. Bernie.
Please see my post
Finally finished my XKR is now a two seater with luggage space.
Please see my post
Finally finished my XKR is now a two seater with luggage space.
I was going to make bottom open but there were too many wires and such so I added some foam padding for sound and closed it ip.
You're lucky to have the closing lid for the top so it cleans things up.
Thread Starter
|
Veteran Member
Joined: Feb 2011
Posts: 2,916
Likes: 547
From: North Carolina
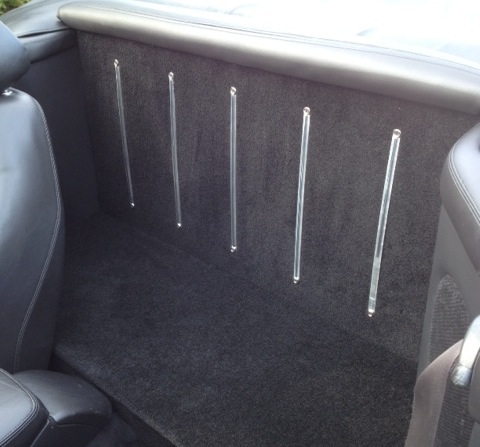
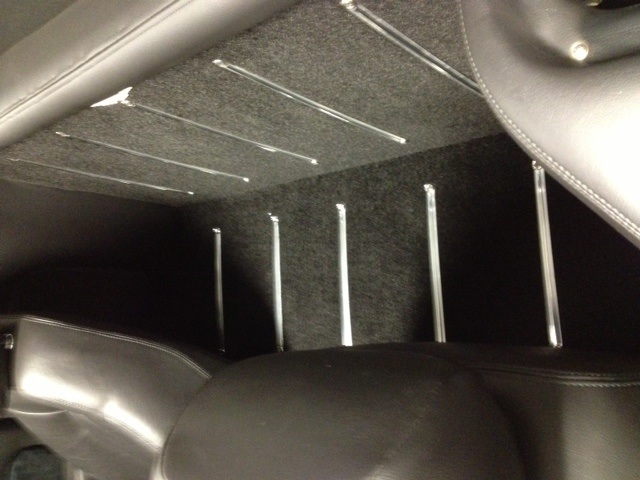
Finished the floor strips today.
And again, pic is sideways!! Argh!!
Senior Member
Joined: Dec 2012
Posts: 896
Likes: 156
From: North Texas
Phil, this looks amazing! The best mod you've done yet, at least my favorite. You nailed the design touches from the metal strips to the black carpet.
You uh... feel like making more of them for a nominal fee? I might be interested. After doing my hydraulic hoses last year and tearing the backseat out once, seeing how worthless it was (and REALLY not wanting to put it back but not having a choice), I'd love to tear it out for good. If it looked proper. I imagine it might even save a bit of weight?
P.s.: it very much reminds me of the 'rear seat' of my Dad's old Alfa Spider. That's a good thing.
You uh... feel like making more of them for a nominal fee?
I might be interested. After doing my hydraulic hoses last year and tearing the backseat out once, seeing how worthless it was (and REALLY not wanting to put it back but not having a choice), I'd love to tear it out for good. If it looked proper. I imagine it might even save a bit of weight?P.s.: it very much reminds me of the 'rear seat' of my Dad's old Alfa Spider. That's a good thing.
Last edited by Sentinelist; Feb 25, 2014 at 10:27 PM.
I made my own strips. Probably could have come up with something better but they look good in person. I used 1/2 aluminum stripe, drilled the ends and used a domed washers and they actually capped the ends so it liiks very finished. For the chrome, I used the 1/4 self stick flex chrome trim from autozone. Just ran a piece down the middle.
I was going to make bottom open but there were too many wires and such so I added some foam padding for sound and closed it ip.
You're lucky to have the closing lid for the top so it cleans things up.
I was going to make bottom open but there were too many wires and such so I added some foam padding for sound and closed it ip.
You're lucky to have the closing lid for the top so it cleans things up.
Thread Starter
|
Veteran Member
Joined: Feb 2011
Posts: 2,916
Likes: 547
From: North Carolina
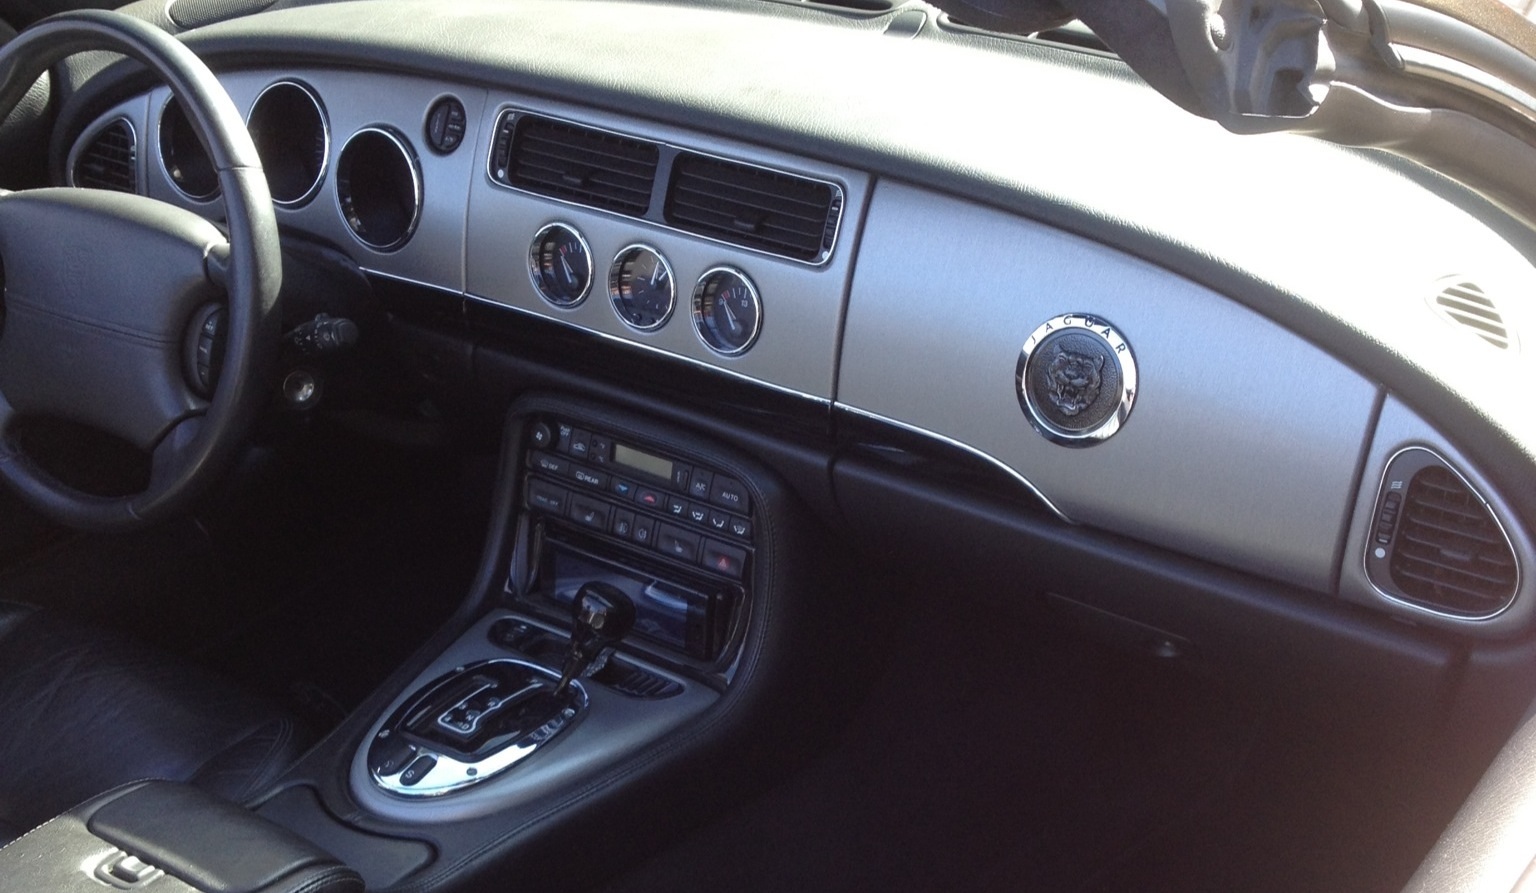
You can see the chrome and brushed dash. Matches the strips.


Junior Member
Joined: Jan 2014
Posts: 29
Likes: 2
From: NJ
WOW, the stuff you guy's do is amazing. Was the back area cover (deck?) fabricated too
or is that available from a vendor? I'd love to try my hand at duplicating that back seat delete and cover assembly.
or is that available from a vendor? I'd love to try my hand at duplicating that back seat delete and cover assembly.


Senior Member
Joined: Feb 2011
Posts: 186
Likes: 24
From: Los Gatos,Ca
Job very well done! Phil where I don't always agree with all of your mods, actually can't think of any that I don't, so I guess I'm just covering myself here, I so appreciate all of you guys willing to modify, improve and personalize your cars. Between you and Rob E, the ideas never seem to stop, and I for one am appreciative and inspired.
I copied your headliner mod and couldn't be happier. I have longed for a mod to the back seat area, and again you have instructed and inspired. So...
Thanks again, and never be satisfied with the status quo.
I copied your headliner mod and couldn't be happier. I have longed for a mod to the back seat area, and again you have instructed and inspired. So...
Thanks again, and never be satisfied with the status quo.
Veteran Member
Joined: Feb 2012
Posts: 2,997
Likes: 714
From: Waco, Texas, US
Job very well done! Phil where I don't always agree with all of your mods... I so appreciate all of you guys willing to modify, improve and personalize your cars. Between you and Rob E, the ideas never seem to stop, and I for one am appreciative and inspired. So...Thanks again, and never be satisfied with the status quo.