
Another rear seat delete underway

Thread Starter
|
Veteran Member
Joined: Feb 2011
Posts: 2,916
Likes: 547
From: North Carolina
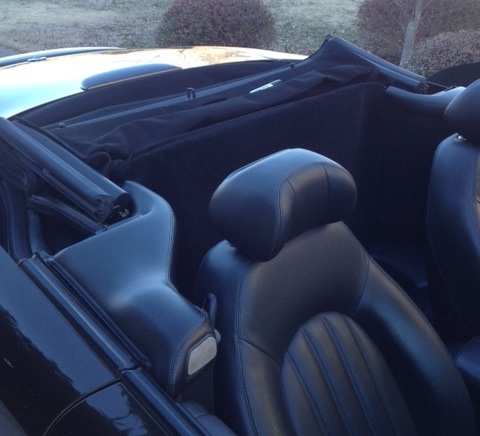
I've finally taken the plunge and started my rear seat delete on my 2002 XK8. Since I just got my new seat skins in the oatmeal with lack stitching and also the center arm rest cover and enough leather to cover the middle door inserts, I decided to do away with the rear seats. Lets face it, they're really useless and should have been there in the first place.
Got the seats out, seatbelts and hardware and made templates in foamcore so I could make sure everything fits. I screwed pieces of wood to several locations in the seat well so that the bottom is level and I have something to attach the base too. I'm running brushed aluminum luggage strips to the floor so I'll simply screw through to the wood strips. The back is actually going in with extra wide velcro. I'm doing it all in matching black carpet. I originally bought black vinyl but it looked like a flat seat when I tested it. So now I'm making a cap rail for the back that will velcro on as well and adding a line of double top stitching to match sides.
I think I may also add a similar vinyl pocket to the back, like the ones on the back of the seats. Although I did find a cool chrome wall mount magazine holder. Attachment 73379
Last edited by sklimii; Feb 22, 2014 at 06:31 PM.


Senior Member
Joined: Feb 2013
Posts: 314
Likes: 63
From: Long Island, NY
Phil,
From what I can see in the picture, your front seats look great. Are you saying that you bought the materials (leather) and someone stitched it into seat covers for you or did you do it yourself?
I'm looking to spice up my interior with a mix of alcantara and leather - hopefully this year. I took the car to a few places and getting ridiculous quotes (12K +) for a custom interior, but not even including new carpets. I think people see a super clean Jag and they think I'm made of $$$. What is it costing you to upgrade?
(if you already posted it in earlier posts, sorry, I have been busy with work last few months and have missed a lot of developments on the forum)
Thread Starter
|
Veteran Member
Joined: Feb 2011
Posts: 2,916
Likes: 547
From: North Carolina
Phil,
From what I can see in the picture, your front seats look great. Are you saying that you bought the materials (leather) and someone stitched it into seat covers for you or did you do it yourself?
I'm looking to spice up my interior with a mix of alcantara and leather - hopefully this year. I took the car to a few places and getting ridiculous quotes (12K +) for a custom interior, but not even including new carpets. I think people see a super clean Jag and they think I'm made of $$$. What is it costing you to upgrade?
(if you already posted it in earlier posts, sorry, I have been busy with work last few months and have missed a lot of developments on the forum)
From what I can see in the picture, your front seats look great. Are you saying that you bought the materials (leather) and someone stitched it into seat covers for you or did you do it yourself?
I'm looking to spice up my interior with a mix of alcantara and leather - hopefully this year. I took the car to a few places and getting ridiculous quotes (12K +) for a custom interior, but not even including new carpets. I think people see a super clean Jag and they think I'm made of $$$. What is it costing you to upgrade?
(if you already posted it in earlier posts, sorry, I have been busy with work last few months and have missed a lot of developments on the forum)
 sorta the look I'm going for but less white.
Thread Starter
|
Veteran Member
Joined: Feb 2011
Posts: 2,916
Likes: 547
From: North Carolina
So here's the floor pan with the wood blocking installed. I used 1x4 to make ledges. Screwed them in the front to the lips above the mounting flanges and added a couple blocks underneath to make up for the slant. Stacked three boards, progressively longer leaving a gap in the middle for the wiring harness.
The rear ledge board I used angle brackets screwed to the under neath of the board, pre drilled holes on back brace and used self tapping screws to attach. Also added brace boards to fill in underneath.
The rear ledge board I used angle brackets screwed to the under neath of the board, pre drilled holes on back brace and used self tapping screws to attach. Also added brace boards to fill in underneath.
Last edited by sklimii; Feb 22, 2014 at 06:53 PM.
Trending Topics
Thread Starter
|
Veteran Member
Joined: Feb 2011
Posts: 2,916
Likes: 547
From: North Carolina
Carpeted floor in with front carpeted skirts cut to arch over center tunnel. I actually made two separate pieces with a 1" gap in the middle. Put a small piece of carpet over wires and then screwed skirts into the ledge boards with small head black screws. Then screwed floor into ledges. VERY secure!! Could dance it!!
This is the board I screwed to the back brace to attach the back panel.
This is the board I screwed to the back brace to attach the back panel.
Last edited by sklimii; Feb 22, 2014 at 06:59 PM.
Thread Starter
|
Veteran Member
Joined: Feb 2011
Posts: 2,916
Likes: 547
From: North Carolina
Carpeted back installed. I added a couple pieces of scrap wood to space the back out from the metal wall. Screwed in from behind at top, through the metal wall. Totally perfect. I actually have plenty of room if I upgrade my speakers. Can cut holes and have enough depth.
I tried vinyl that matches perfectly but it looked too much like a cheap seat with no padding. Carpet looks more in keeping with a real two seater.
I tried vinyl that matches perfectly but it looked too much like a cheap seat with no padding. Carpet looks more in keeping with a real two seater.
Last edited by sklimii; Feb 22, 2014 at 06:55 PM.
Thread Starter
|
Veteran Member
Joined: Feb 2011
Posts: 2,916
Likes: 547
From: North Carolina
Here's the almost finished project. I have the cap rail made under the black vinyl in this photo, just not stapled yet. I'm sewing double top stitching to match side bolsters. I used a 2" aluminum angle for the back that caps over the lining material, a 1"3 on the top and a 1x2 on the face. I'll add some padding and cover everything in the black stitched vinyl and its pretty tight fit. I'm screwing in three sheet metal screws behind the cap, into the metal back and using license plate bolt covers to hide screws and not catch the roof. I curved the outer corners to match the seatbelt caps so it flows perfectly.
Last edited by sklimii; Feb 22, 2014 at 06:56 PM.


Veteran Member


Joined: Feb 2012
Posts: 2,997
Likes: 714
From: Waco, Texas, US
Looking pretty good Phil. Nice interior upgrade. (Sounds strange to say removing two leather seats is an upgrade.)
Are you still planning on adding the metal rails to keep things from sliding around?
Are you still planning on adding the metal rails to keep things from sliding around?
Thread Starter
|
Veteran Member
Joined: Feb 2011
Posts: 2,916
Likes: 547
From: North Carolina
I've got them but just ran out of steam today. Still trying to decide exactly what to put. I had an idea to used a couple leather snap bracelets riveted on to hold a couple umbrellas across the back. VERY British!!
Senior Member
Joined: Feb 2013
Posts: 314
Likes: 63
From: Long Island, NY
I've really wanted a two tone interior. I already have a black headliner and alcantara door inserts, speaker covers and all parts around front window. I actually ordered new seat skins from topsonline.com and I'm doing oatmeal full leather seats, armrest cover and the middle door inserts in oatmeal. Black top stitching on all. He's really open to some custom stuff. Not cheap but no where near my quote of 4900.00 for custom interior. Seat skins and extras are 750.00 and my installer said 400.00 labor. Attachment 73403sorta the look I'm going for but less white.
When are you planning finishing up? I'd love to see the pics.
Thread Starter
|
Veteran Member
Joined: Feb 2011
Posts: 2,916
Likes: 547
From: North Carolina
Ok ok, wait, the black seats aren't mine!! Lol those are the inspiration for my new skins. I'm still waiting to hear back from topsonline.com to see if I can custom order the quilting. He said he could do custom so I'm just waiting for the up charge. I had originally ordered black, got them in and didnt like the match with the interior so I decided to go completely contrasting since I had a second chance!