
Cats rear suspension wiring harness colours


Thread Starter
|
Junior Member
Joined: Oct 2012
Posts: 20
Likes: 3
From: UK
HELP
I have just replaced the rear shock absorbers on my 1998 xk8 coupe with cats suspension.
Jaguar advised the original shock absorbers were no longer available and sold me the later shocks. The electrical plug in the top of the shock absorber was updated so jaguar sold me a short link harness about 200mm long to replace the original link harness.
The original link harness had a two pin male connector at the car end one with a red and orange trace wire and one with an orange and white trace wire.
The new link harness had a two pin female connector one with a red wire and one with an orange wire.
As I can not connect the female connector on the new link harness to the female connector on the main car harness jaguar told me to cut the male connector off the old link harness and solder it onto the new.
I soldered the red wire to the red wire with the orange trace and the orange wire to the orange wire with the White trace! Can anyone advise if I have soldered the wires together the right way around?
Thanks
Thread Starter
|
Junior Member
Joined: Oct 2012
Posts: 20
Likes: 3
From: UK
Thanks Charlie. Like you I have shrink wrapped the soldered connections. My worry is that I have soldered the wires on the wrong way around. I would like to see the wiring diagrams for the new and old models to see if they answer my question above but so far have not found any.
Veteran Member
Joined: Jan 2012
Posts: 2,953
Likes: 1,120
From: Phoenix, AZ USA
Looks like red is pin 1 and orange is pin 2 for the left hand rear damper. But it is a simple solenoid so the polarity likely doesn't matter.
Last edited by ccfulton; Nov 4, 2014 at 08:59 PM.
Thread Starter
|
Junior Member
Joined: Oct 2012
Posts: 20
Likes: 3
From: UK
Thanks.
So for the later cars the red wire goes to pin 1 and the Orange to pin 2.
Does the wiring diagram for my 1998 jag show a red and orange wire and an orange and white wire and if so which goes to which pin?
I could not read the thumbnail on my screen. Is a clearer version available anywhere? And if the thumbnail is the later cars is there an equivalent for the earlier cars?
I am interested that you think the solenoid is not polarity sensetive. If tru it doesn't matter which way I connect the wires. Can anyone advise?
Veteran Member
Joined: Jan 2012
Posts: 2,953
Likes: 1,120
From: Phoenix, AZ USA
Sorry, I used the app to post the picture the first time so it was hard to read. This should be better.
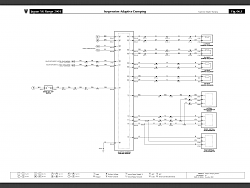
There are schematics for earlier cars, but it looks like the link in the DIY sticky is broken and I don't have the earlier years to post one.
Most of the time a solenoid will be built with a soft iron core where it doesn't matter which way the current flows:
Solenoid Valve Coil Polarity
I don't know that the shocks are made this way but I suspect that they probably are.
Thread Starter
|
Junior Member
Joined: Oct 2012
Posts: 20
Likes: 3
From: UK
Thank you again.
I read your attachment and can understand why polarity does not matter. It seems like the chances are I don't need to worry about having the wires the wrong way around.
It would have been nice to have checked the second wiring diagram but I think I will leave it for now unless evidence to the contrary crops up.
Trending Topics

I have just replaced the rear shock absorbers and springs on my 1998 XKR Cab with Cats suspension. I had the same issue with the link lead.
Did everything work out fine with your modification?
I put on the ignition before mounting the A frame, and got a suspension fault - yellow light that I can't reset with my OBD 2 program.
I am planning to demount and control the connections; did it work out fine for you?
Did everything work out fine with your modification?
I put on the ignition before mounting the A frame, and got a suspension fault - yellow light that I can't reset with my OBD 2 program.
I am planning to demount and control the connections; did it work out fine for you?
Senior Member
Joined: Aug 2013
Posts: 801
Likes: 77
From: North Northumberland England
Hi Steve, I have a 99 xk8 and was wondering if you did the job yourself or at a garage? Can you give an idea of price and where you got them please, as mine is just about the same age as yours and may need attending to soon.
Cheers,
Arty
Cheers,
Arty
I don't know when the link lead connector changed, but on the attached electrical diagram you can see that the connector is the other way than on the later model (ref.2003 diagram earlier posted). The new damper have a new connector, so the link lead must be changed, and on earlier models they need to be modified.
I have not finished my work. Need to measure the connection in the trunk to find out if one of my dampers or connectors is wrong. It is possible to measure the resistance between BT73/3 and 4 for the LH rear damper, shall be about 6 ohms over the damper. This way I will find out if I have done anything wrong on one of the sides.
I bought my dampers from Dave Roche DCR Autoparts Jaguar Parts and Accessories | Jaguar XK8 and XKR Parts and Accessories.
I also got a procedure to change the rear dampers if someone is interested.
Thread Starter
|
Junior Member
Joined: Oct 2012
Posts: 20
Likes: 3
From: UK
I replaced the shock absorbers at home as a DIY job. Fairly involved. No special tools or spring compressors but I do have a scissor jack that lifts up the entire car. I think the job took a day or two.
I bought the shocks from jaguar as well as the link wires. Retrospectively I wish I bought the link wires from a scrap car as I had to cut them in halve and throw the car end away!
I never bottomed out the wiring and have gone with the idea the shocks are not polarity sensitive. Seems to work ok
I bought the shocks from jaguar as well as the link wires. Retrospectively I wish I bought the link wires from a scrap car as I had to cut them in halve and throw the car end away!
I never bottomed out the wiring and have gone with the idea the shocks are not polarity sensitive. Seems to work ok
Update on my fault finding. Attached Picture showes the Connector in the trunk for the left rear Adaptive Damper and ABS sensor, was marked with ABS/ADS. The to top/front connectors was for the ABS sensor, measured about 1050 ohm, the to lower/rear connectors was to the damper and was supposed to measure about 6 ohm. I had no contact to the damper on the left side and opened it up again. The connector on the top of the damper was not locked in position, and had wiggled it self enough out of position while I mounted the damper and spring so it lost contact. Lesson learned, check twice that the connector on the top of the damper locks in position.
Another tips: While demounting the A frame, make sure to held the same level on the sides, or it will lock and be difficult to demount. Mine was difficult to loosen. Used WD40 and CRC 5-56 over several days.
Now my fault message is gone :-)
Another tips: While demounting the A frame, make sure to held the same level on the sides, or it will lock and be difficult to demount. Mine was difficult to loosen. Used WD40 and CRC 5-56 over several days.
Now my fault message is gone :-)

Thread
Thread Starter
Forum
Replies
Last Post
philwarner
XJ6 & XJ12 Series I, II & III
16
Sep 5, 2015 10:05 AM
Currently Active Users Viewing This Thread: 1 (0 members and 1 guests)