When you click on links to various merchants on this site and make a purchase, this can result in this site earning a commission. Affiliate programs and affiliations include, but are not limited to, the eBay Partner Network.
Just noticed a slight drip coming from the coolant tank so I would like to replace it ASAP, any photos or links to doing this step by step would be appreciated, thanks
It's a really easy job. You can see everything you need under the bonnet. Just suck the coolant out of the tank with a turkey baster ( don't tell the spouse ). Un-do one bolt, un-clip one wire and let go the hose clamps.
Just did this a few days ago. Tools to make it "easy":
1. T30 Bit on Socket for Reservoir Bolt
2. 90 degree small pick to remove wire harness metal snap
3. Turkey Baster or "Suction Gun" from harbor freight etc, makes it easy to remove excess coolant on multiple jobs and less messy.
4. Set of hose clamp pliers for spring and "snap ring" style.
Took me about 10 mins start to refill after I've done it once.
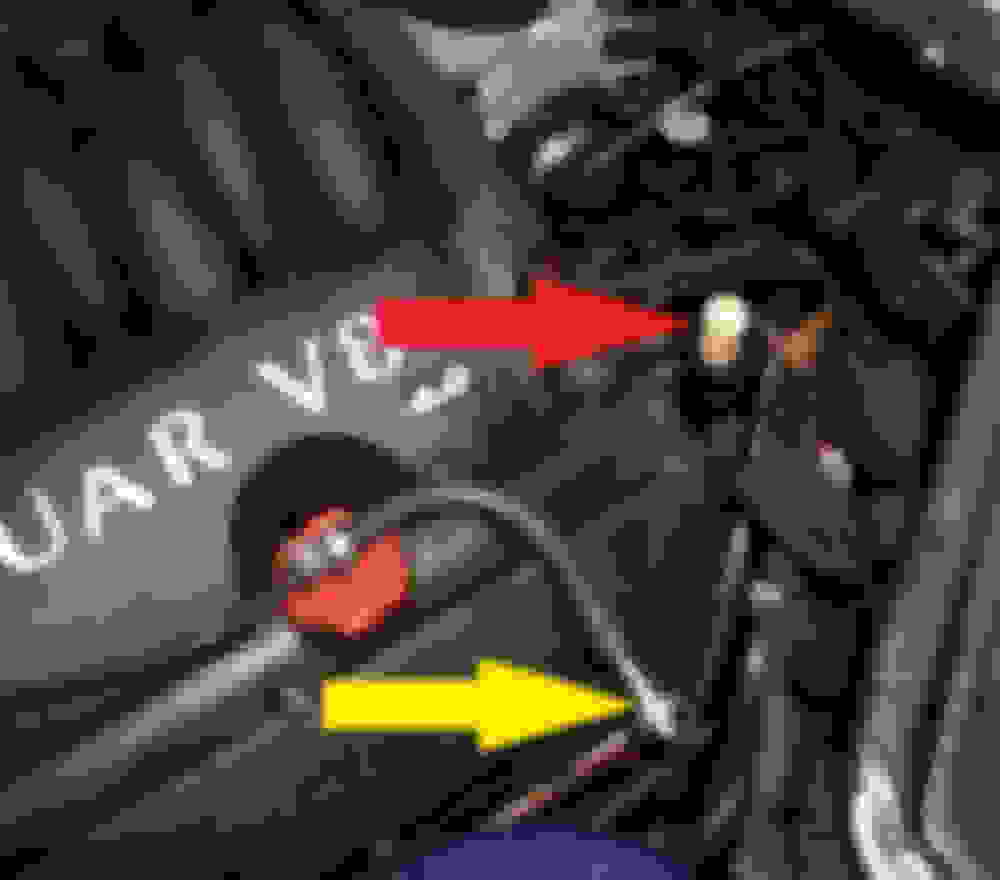
To minimise coolant loss, temporarily plug the detached hoses:
1. insert a suitable plug in the return hose (arrowed in yellow) - I used a 1/4 inch short socket drive
2. insert a wine bottle cork in the outlet hose (arrowed red)
This will allow you do the swap at leisure without coolant trickling from the open hoses.
Expect the hard plastic line from the thermostat area to the tank to be super brittle and shatter on (eye) contact. Have a replacement rubber line ready to go.
FWIW, folks have posted lately about a bad batch of these tanks (bad sensor). You might want to bench test yours ahead of time.
Just noticed a slight drip coming from the coolant tank so I would like to replace it ASAP, any photos or links to doing this step by step would be appreciated, thanks
Expect the hard plastic line from the thermostat area to the tank to be super brittle and shatter on (eye) contact. Have a replacement rubber line ready to go.
FWIW, folks have posted lately about a bad batch of these tanks (bad sensor). You might want to bench test yours ahead of time.
Best of luck, keep us posted.
This is True, I just had a bad one. I made a video of how to test easily here:
Expect the hard plastic line from the thermostat area to the tank to be super brittle and shatter on (eye) contact. Have a replacement rubber line ready to go.
FWIW, folks have posted lately about a bad batch of these tanks (bad sensor). You might want to bench test yours ahead of time.
Best of luck, keep us posted.
+1.
On both my X308 and X100, those lines have broken upon attempts to remove them. I just plan on replacing them every time I touch them. Under $50 for them a piece if I recall. Plus, if they are this brittle when you remove, really you should be replacing them preventatively anyway.
and that little clip behind the sensor, that holds the plug into place is very important , the clip can come of when taking it all off so what i found is that if you squeeze it correction with your fingers it will come off the tank easily, rather than using a pic. with the pic it just sailed off into oblivion, so thankfully a member here sent me his extra clip, but to find the replacement for the bosh clip means having to fit another clip/plug and that means having to find one...in the end i ordered some sort of fuel injection part but ended up using the one given to me....
keep in mind there maybe another issue with your cooling system that caused enough pressure to blow out the sensor, happened to me....and it is more likely that your sensor and tank just got old, hope that is the case . it's an easy replacement once you have done it. remember to burp the system afterwards and check the coolant level later when cold and on a flat surface.
+1 on the brittle hard hose connection. Have suitable sized clamps and hose ready.
Graham, I forget if the tank comes with new cap or not. If not, you might want to buy a new one now too.
I was surprised at the "pop / woosh" noise I heard releasing a vacuum seal on this tank the 1st time I unscrewed my new cap. The old cap must have been leaking. Guess I was long overdue.
I replaced the original thermostat tower-to-coolant expansion tank hose with a segment of 5/16-inch fuel hose back in November 2014 when I replaced the entire coolant outlet pipe assembly due to the typical leak at the plastic thermostat housing seam. I replaced that hose again in September 2017 when I replaced the factory coolant expansion tank, this time using a segment of 5/16-inch transmission oil hose (which should hold up better to the heat build-up in the engine bay than the fuel hose segment did). Both of those hose segments cost me around $6 each. Both are much better options than the lousy factory mostly-plastic line that runs between those two points....
Once you use the turkey baster for this, it stays in the garage. Buy her a new one for the kitchen for three reasons: 1-Keep her happy, 2-Prevent a funky taste on Thanksgiving. and 3-You'll need it in the garage again someday.
If yer not gonna put the baster back in the kitchen drawer.......it's best to just go to the store and buy a new one to start with Women sometimes get "upset" when you buy them kitchen utensils
To minimize coolant loss, just stick a hose into the reservoire and down into the thick hose in the bottom as far as you can.
Now you have a simple siphon.
Have a bottle ready, suck as much of the coolant up into the hose and let it drain into the bottle.
Then the reservoire and the upper part of the thick hose are empty and you can change the reservoire without any loss or dripping.
When you have the old tank you have pretty good access the the rear of the water hose that runs from the thermostat housing to the heater control valve. This would be a good time to replace that hose as it is a bitch otherwise.


 Women sometimes get "upset" when you buy them kitchen utensils


