
Fuel injectors ultrasonically cleaned and flow-tested by Injector RX (PHOTOS)

Thread Starter
|
Veteran Member
Joined: Aug 2011
Posts: 1,294
Likes: 372
From: South Carolina
Hello guys;
We've all talked often about cleaning dirty fuel injectors. The ability of your injectors to properly distribute fuel into the cylinders has obvious implications on engine performance.
An injector-cleaning fuel additive called BG-44K is talked about a lot, and when I purchased my 1997 coupe last summer, I ran two bottles of BG-44K through the fuel system and injectors (about a month apart from each other).
One of our esteemed tech members of this forum, a certain Mr. Brutal, has recommended a company called Injector RX in Houston, for those who want professional cleaning and flow-testing of their injectors. I recently took Brutal's suggestion and shipped my 15-year old injectors off to Injector RX so they could work their wizardry. I'm glad I did.
First off, you can find the Injector RX website HERE, and learn more about their process.
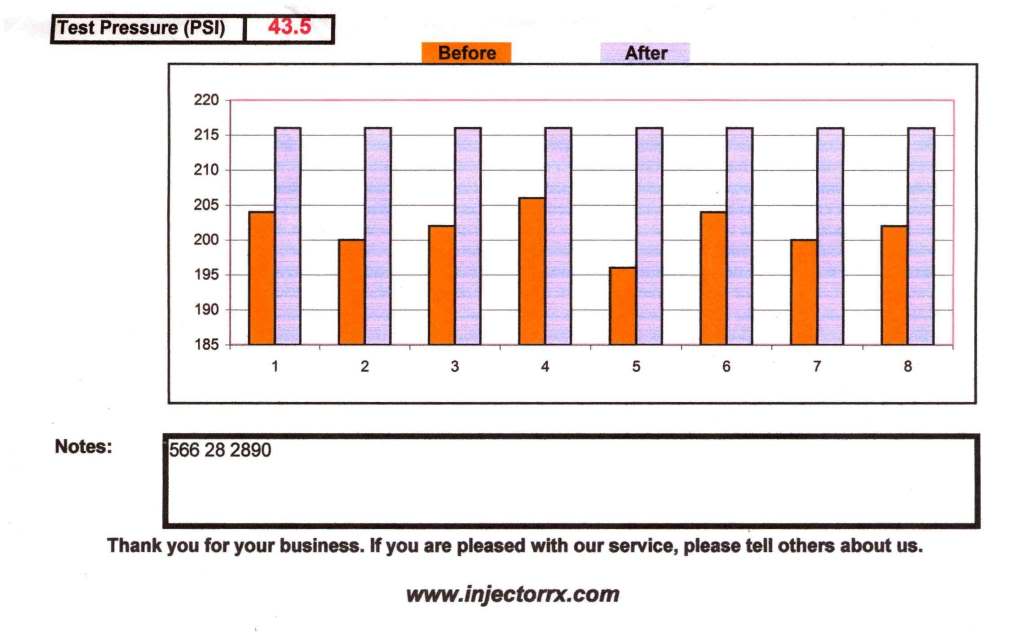
Each injector's circuitry is tested for resistance and inductance. Then, both BEFORE and AFTER a thorough ultrasonic cleaning that gets at material / dirt you can't see from the outside, each injector is tested for leaks, proper spray pattern and static flow. I was quite happy to see that they provide a one-page chart that shows each of these metrics before and after cleaning, so one can get a clear idea of how each injector might have improved in the process.
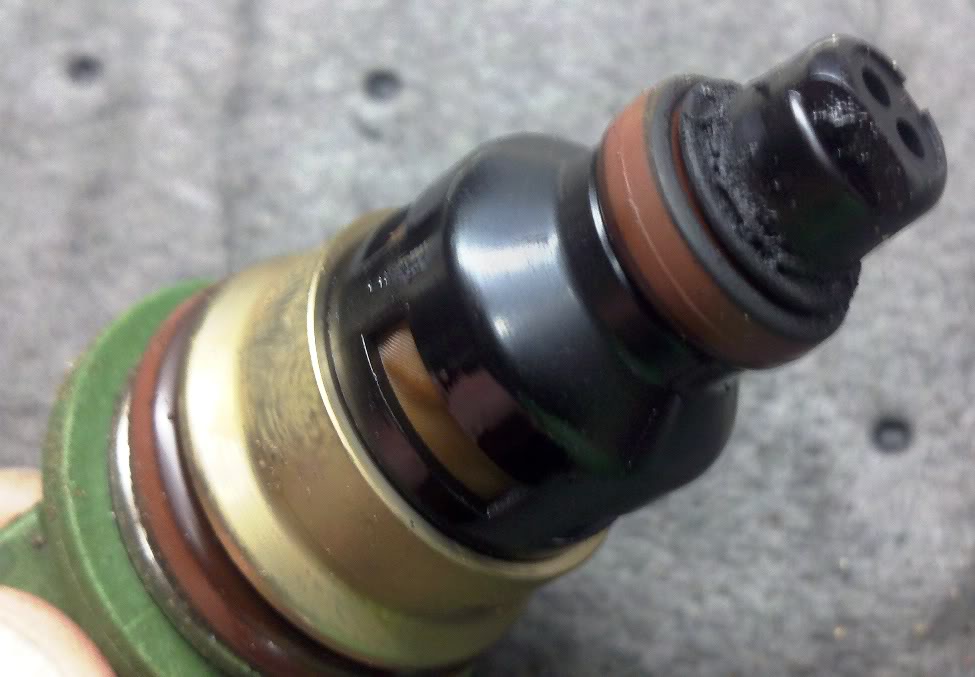
Here�s a snap of a dirty injector, before I sent them off. They all looked like this.

And here�s another view of the business end, again before I sent all injectors off for cleaning and flow testing.
Injector RX turned my injectors around in 48 hours, and shipped them back to me via Priority Mail. Including the shipping charges and the extra shipping insurance I bought, the whole exercise cost me about $ 170.00.
Worth it? Definitely. In my particular case, the cleaning produced an improved flow through each injector, with the smallest increase being 4.85% and the largest increase a significant 10.2%. I also had one injector that failed the leak test and had a poor spray pattern before cleaning...after cleaning it had the proper spray pattern with no leaks.
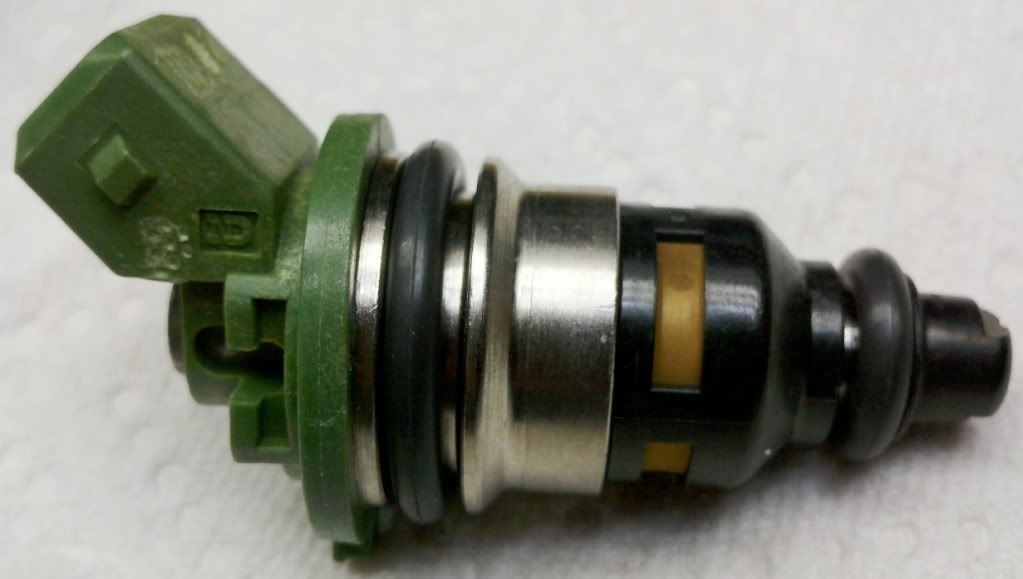
Here�s a snap of a bright, shiny clean injector after the cleaning and flow-testing. Note the new o-rings.
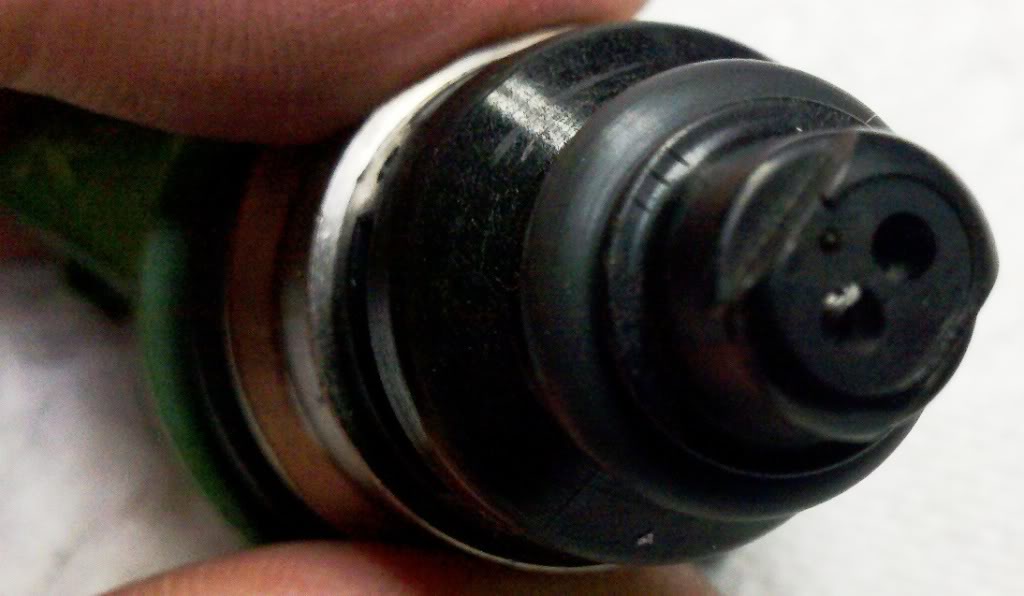
And here�s another view of the cleaned business end.
Here is the top of the chart provided by Injector RX on the performance of each injector, BEFORE and AFTER the ultrasonic cleaning. The indicators highlighted in ORANGE are BEFORE cleaning. You can see that injector 5 had the biggest increase in flow after cleaning, and injector 7 had a leak and poor spray pattern fixed by the cleaning. All were improved by the process.
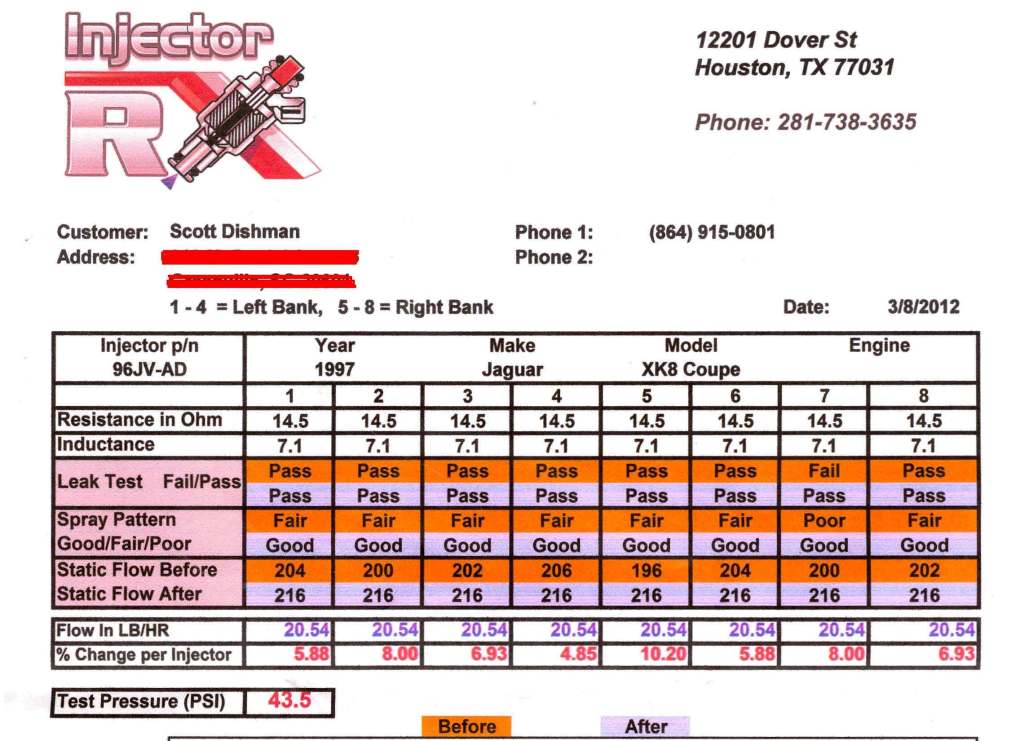
Here you can see that each injector had lost flow, by varying amounts. Again, bars in ORANGE show the flow BEFORE cleaning. All injectors are flowing at spec levels now.
So that�s it. I�m pleased with the results and can recommend Injector RX highly. They did great work, and they were very helpful on the phone with the questions I had.
And thanks for the original recommendation, Brutal!
We've all talked often about cleaning dirty fuel injectors. The ability of your injectors to properly distribute fuel into the cylinders has obvious implications on engine performance.
An injector-cleaning fuel additive called BG-44K is talked about a lot, and when I purchased my 1997 coupe last summer, I ran two bottles of BG-44K through the fuel system and injectors (about a month apart from each other).
One of our esteemed tech members of this forum, a certain Mr. Brutal, has recommended a company called Injector RX in Houston, for those who want professional cleaning and flow-testing of their injectors. I recently took Brutal's suggestion and shipped my 15-year old injectors off to Injector RX so they could work their wizardry. I'm glad I did.
First off, you can find the Injector RX website HERE, and learn more about their process.
Each injector's circuitry is tested for resistance and inductance. Then, both BEFORE and AFTER a thorough ultrasonic cleaning that gets at material / dirt you can't see from the outside, each injector is tested for leaks, proper spray pattern and static flow. I was quite happy to see that they provide a one-page chart that shows each of these metrics before and after cleaning, so one can get a clear idea of how each injector might have improved in the process.
Here�s a snap of a dirty injector, before I sent them off. They all looked like this.
And here�s another view of the business end, again before I sent all injectors off for cleaning and flow testing.
Injector RX turned my injectors around in 48 hours, and shipped them back to me via Priority Mail. Including the shipping charges and the extra shipping insurance I bought, the whole exercise cost me about $ 170.00.
Worth it? Definitely. In my particular case, the cleaning produced an improved flow through each injector, with the smallest increase being 4.85% and the largest increase a significant 10.2%. I also had one injector that failed the leak test and had a poor spray pattern before cleaning...after cleaning it had the proper spray pattern with no leaks.
Here�s a snap of a bright, shiny clean injector after the cleaning and flow-testing. Note the new o-rings.
And here�s another view of the cleaned business end.
Here is the top of the chart provided by Injector RX on the performance of each injector, BEFORE and AFTER the ultrasonic cleaning. The indicators highlighted in ORANGE are BEFORE cleaning. You can see that injector 5 had the biggest increase in flow after cleaning, and injector 7 had a leak and poor spray pattern fixed by the cleaning. All were improved by the process.
Here you can see that each injector had lost flow, by varying amounts. Again, bars in ORANGE show the flow BEFORE cleaning. All injectors are flowing at spec levels now.
So that�s it. I�m pleased with the results and can recommend Injector RX highly. They did great work, and they were very helpful on the phone with the questions I had.
And thanks for the original recommendation, Brutal!


Senior Member
Joined: Jun 2009
Posts: 346
Likes: 82
From: Lake Oswego, OR
Another one for price pointing.
Jag injector part # 2W93-AA
Ford injector part# 2W93-AA
The pictures on the website for Ford or Jag injectors was the same; all Bosch.
I wonder which one is more expensive . . . (replacement cost, cleaning is no difference)
Mike
..better get off of here tonight before I get in trouble...
Jag injector part # 2W93-AA
Ford injector part# 2W93-AA
The pictures on the website for Ford or Jag injectors was the same; all Bosch.
I wonder which one is more expensive . . .
Mike
..better get off of here tonight before I get in trouble...
Veteran Member
Joined: May 2010
Posts: 1,024
Likes: 29
From: Mid Atlantis

Trending Topics
Veteran Member
Joined: May 2010
Posts: 1,024
Likes: 29
From: Mid Atlantis
Another one for price pointing.
Jag injector part # 2W93-AA
Ford injector part# 2W93-AA
The pictures on the website for Ford or Jag injectors was the same; all Bosch.
I wonder which one is more expensive . . . (replacement cost, cleaning is no difference)
Mike
..better get off of here tonight before I get in trouble...
Jag injector part # 2W93-AA
Ford injector part# 2W93-AA
The pictures on the website for Ford or Jag injectors was the same; all Bosch.
I wonder which one is more expensive . . .
Mike
..better get off of here tonight before I get in trouble...
Fuel Injector 2w93-aa Yellow, Fuel Injector, Fuel Injection | DHgate Factory

Veteran Member
Joined: Dec 2010
Posts: 2,125
Likes: 279
From: Holly Lake Ranch, Texas
Thanks Coupe for a great write-up. I was wondering what those things looked like. Was also wondering what the mileage on the car was when you had that done? And was it difficult to remove and replace the injectors?
Thanks again.
EZDriver
Thanks again.
EZDriver
Thread Starter
|
Veteran Member
Joined: Aug 2011
Posts: 1,294
Likes: 372
From: South Carolina
H20 and EZ:
This was my first attempt at work with injectors, and if I had documented the removal and installation, it would have been a great lesson in what NOT to do. But I certainly learned a thing or two from my mistakes.
The procedure is well-documented in JTIS, but here are a few things I learned on my own.
1. JTIS calls for the use of a special tool to carefully "pry" the injector out of its pod in the fuel rail. I did not have this special tool, but I can see why it would be helpful. The injectors are reluctant to come out, and it would be fairly easy for someone to damage an injector by grabbing it with a pair of unprotected pliers, and twisting / pulling it out. I padded some pliers, carefully positioned them on a strong part of the injector's cap and pulled straight up- no twisting, or you'll break the plastic tab at the rear of the injector.
2. I screwed up my first try at reinstallation. One of the injectors didn't seat properly, and gas leaked past and into the cylinder, creating some havoc. Damaged the spark plug in that cylinder, causing a misfire. New plugs go in tonight.
To re-install your fuel injectors, coat both the upper and lower o-rings with motor oil or petroleum jelly. This is important for proper seating of the injector without damaging the o-rings. Once the o-rings are lubricated, carefully lower the injector into its pod, with the small plastic tab facing inward (you'll know why when you see it).
Once you've lowered the injector into its pod, and the small plastic tab is aligned with the gap on the rim of the pod, push straight down with considerable force. You should feel a "pop" as the injector seats itself properly. THEN you can install the semi-circular metal clamp plates to keep the injector in place. DO NOT attempt to properly seat the injector by torquing down the clamp plates. Seat the injector properly first, THEN install the clamp plate.
Have a stellar weekend, boys.

Thread
Thread Starter
Forum
Replies
Last Post
Charlene n John
XJ6 & XJ12 Series I, II & III
9
Sep 28, 2015 06:01 AM
1964Daimler
MKI / MKII S type 240 340 & Daimler
4
Sep 9, 2015 04:50 PM
Currently Active Users Viewing This Thread: 1 (0 members and 1 guests)