
Good idea wanted for this small paint job

Thread Starter
|
Veteran member
Joined: Jan 2011
Posts: 1,638
Likes: 173
From: France (UK expat)
I need to replace one of the rear parking sensors and will obviously have to paint it before installing.
I am concerned that when I spray, the paint will find its way into the slit and clog up the sensor.
Can anyone think of a simple, but effective way of masking off the slit/groove all the way around?
I am concerned that when I spray, the paint will find its way into the slit and clog up the sensor.
Can anyone think of a simple, but effective way of masking off the slit/groove all the way around?

Senior Member
Joined: Sep 2010
Posts: 140
Likes: 56
From: Leawood, KS.
While I have not sprayed a sensor, in a close quarters area as you describe, I have used a "post it" piece of paper (or painters tape) with the sticky side in or out, cut it to the circumference of the slot, stuck it into the slot or around the item to avoid painting it, closed the open end, and proceeded to spray. My experience has been masking the tire valve when doing some touch-up on one of my wheels, and also masking chromed bolts where I wanted to spray the surrounding area.
Veteran Member


Joined: Feb 2012
Posts: 1,115
Likes: 567
From: Portsmouth, England
Having just replaced one of these, I took the old one to bits to see what was there. The securing tabs snap off very easily! The gap that worries you is about an 1/8 inch deep and is sealed at the bottom with the rubber fitting that surrounds the inner core and is a tight fit in the outer ring. If paint could get into the gap, it would not get anywhere of concern. That said, when spray painting over such gaps on other jobs, I've never had much luck in getting the paint into such a thin gap! But if you remain concerned, you could cut a strip of suitable card, just over 1/8 inch wide and insert that into the gap to mask it.
I read somewhere that it is important not to have too thick a covering of paint as this can affect performance - a few v thin layers are best.
I read somewhere that it is important not to have too thick a covering of paint as this can affect performance - a few v thin layers are best.
Veteran Member

Joined: May 2010
Posts: 4,114
Likes: 1,274
From: North Carolina
Trending Topics

Joined: Dec 2011
Posts: 120,439
Likes: 17,014
From: Durham, UK
That looks like a generic sensor. (as others have already advised, the covers unclip easily on these).
The OE Jaguar sensors are a 'bayonet' design and easily dismantled for fitting and removal from the bumper. This makes painting very simple:
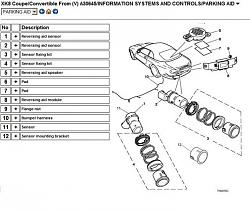
Note the two different designs used on our models - a right angled connector (item 1) for the two outer and a straight connector (item 2) for the two inner sensors.
Make sure any generic replacement sensor is the correct diameter and suitable length.
Graham
Last edited by GGG; Jan 2, 2013 at 02:54 AM.
Joined: Dec 2011
Posts: 120,439
Likes: 17,014
From: Durham, UK
The part numbers are listed to VIN A40264 for the Final Series.
1. Rear Parking Sensor - Outer : LJE7355BB
2. Rear Parking Sensor - Inner : LJE7355AB
3. Sensor Fixing Kit - Inboard : JLM21560
4. Sensor Fixing Kit - Outboard : JLM21562
Numbers 1 to 4 refer to the diagram in post #9.
Jaguar OE cost will be exorbitant! A used part from any body colour could easily be finished to Frost Blue. Alternatively, if one of your sensors has failed with no physical damage, the existing Fixing Kit could be re-used on an OE replacement sensor.
Graham
Thread Starter
|
Veteran member
Joined: Jan 2011
Posts: 1,638
Likes: 173
From: France (UK expat)
Many thanks for those numbers. Yes, I believe the dealer price is about �70, which is why I was scrabbling around on eBay trying to find one  My sensor isn't physically damaged, it just doesn't click like the other 3 and I now always get the 5-second beep inside the car when I start the engine. Looking at your diagram above, the fixing kit appears to be just a load of rings and washers. It doesn't appear to fix any electronic components...
My sensor isn't physically damaged, it just doesn't click like the other 3 and I now always get the 5-second beep inside the car when I start the engine. Looking at your diagram above, the fixing kit appears to be just a load of rings and washers. It doesn't appear to fix any electronic components...
Joined: Dec 2011
Posts: 120,439
Likes: 17,014
From: Durham, UK
I'm away from home at the moment (south of you in the Loire Valley) and don't have access to usual information resources. However, the Jaguar fitting instruction PDF is on my MediaFire account which you can download using this link if you need it:
Jaguar XK Series - Reversing Aid.pdf
The PDF includes details on dismantling / assembling the sensors with some useful diagrams.
Graham
Thread Starter
|
Veteran member
Joined: Jan 2011
Posts: 1,638
Likes: 173
From: France (UK expat)
Wow, a mobile Jaguar guru I clicked the link, but only got a blank sheet... Not to worry, I haven't ordered the part yet, so there's no rush. Maybe you could PM me when you're back home? Profite bien de la France 
I clicked the link, but only got a blank sheet... Not to worry, I haven't ordered the part yet, so there's no rush. Maybe you could PM me when you're back home? Profite bien de la France
Veteran Member
Joined: Feb 2012
Posts: 1,115
Likes: 567
From: Portsmouth, England
Sorry for adding confusion!! I'll back out of this with a 5 second Beep to indicate my fault now!!

Thread
Thread Starter
Forum
Replies
Last Post
Terrance Williams
S-Type / S type R Supercharged V8 ( X200 )
5
Aug 26, 2015 11:50 AM
Currently Active Users Viewing This Thread: 1 (0 members and 1 guests)