
Interior refresh

Thread Starter
|
Veteran Member
Joined: Jun 2011
Posts: 2,134
Likes: 543
From: Costa Mesa, CA
Hi All,
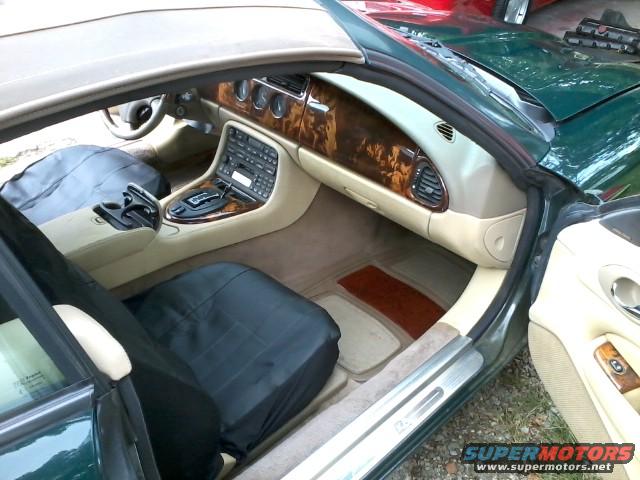
I am going to refresh the interior and redye the seats as well as the armrest. (I purchased the leather for the armrest in a different color, and am going to dye to match)
Any tips? I will be spraying the leather with an airbrush and will mix my own water based dye. I will be following up with a matte finish clear coat and need plan on many coats to insure a long life of the dye job. I have heard that you can fill in the cracks in the leather with household caulking- any thoughts on that?
I want to try and finish it so that I can use cleaner and NOT have the dye come off- any suggestions?
I will take pics and add them to this thread as I get along- I plan on about a week to finish.
One other thing- how can I get my carpet clean without taking it out and what cleaner is suggested by folks?
Thanks in advance for your assistance!
Thread Starter
|
Veteran Member
Joined: Jun 2011
Posts: 2,134
Likes: 543
From: Costa Mesa, CA
OK...
I prepped the seats/armrests and center console for dying yesterday. Today I laid down 4 coats of color and will let them dry overnight before I spray the topcoat. I watched a video that said to use gloss for the first coat or two because it is much stronger, then matte finish for the finishing coats. Anyone here tried that? I am trying to put enough clear topcoat to avoid rubbing off of the finish down the road. as this will be my daily driver.
I neglected to take pictures, but will endeavor to do so tomorrow an Wednesday as I am able. Anyone know how to remove fruit punch stains from carpet?

Senior Member
Joined: Jul 2011
Posts: 568
Likes: 192
From: Jacksonville
OK...
I prepped the seats/armrests and center console for dying yesterday. Today I laid down 4 coats of color and will let them dry overnight before I spray the topcoat. I watched a video that said to use gloss for the first coat or two because it is much stronger, then matte finish for the finishing coats. Anyone here tried that? I am trying to put enough clear topcoat to avoid rubbing off of the finish down the road. as this will be my daily driver.
I neglected to take pictures, but will endeavor to do so tomorrow an Wednesday as I am able. Anyone know how to remove fruit punch stains from carpet?
I prepped the seats/armrests and center console for dying yesterday. Today I laid down 4 coats of color and will let them dry overnight before I spray the topcoat. I watched a video that said to use gloss for the first coat or two because it is much stronger, then matte finish for the finishing coats. Anyone here tried that? I am trying to put enough clear topcoat to avoid rubbing off of the finish down the road. as this will be my daily driver.
I neglected to take pictures, but will endeavor to do so tomorrow an Wednesday as I am able. Anyone know how to remove fruit punch stains from carpet?
Did you use household caulk on the seats like you mentioned/asked?

Veteran Member


Joined: Jan 2009
Posts: 13,093
Likes: 4,750
From: Raleigh, NC
Fruit punch stains are difficult to remove on light-colored carpeting. I battled one for several years in the cargo area of a 2000 Lexus RX300 SUV that my wife drove years ago. Tried all sorts of tips and was able to tone it down quite a bit but never completely removed it. If your stain removal techniques do not deliver the results you desire, you may want to consider a carpet dye job....

Senior Member
Joined: Sep 2013
Posts: 729
Likes: 257
From: Cincinnati,Ohio USA
caulking-easier to sand, I used that for the usual, I used bumper repair resin for my severe repairs.
Followed by two dye coats, i used duplicolor vinyl and plastic paint, and let dry 3 days, then two nice coats of clear.
Takes up to 5 days, not to be sticky, mask everything off, the clear will get into the air and stick to any and everything, it is not controlled as the paint is.
this is before the clear coat, so you can imagine how incredible the difference is, its like eating a steak or a cracker.
My father even asked to borrow the car, and did nothing but compliment the work.Took me bout a hour or so with the wet/dry vac to vacuum the dust from sanding the armrest, i used 320 then fine with a orbital for the bumper repair resin, hand sand with caulk
Last edited by aode06; Oct 22, 2013 at 09:56 AM.
Thread Starter
|
Veteran Member
Joined: Jun 2011
Posts: 2,134
Likes: 543
From: Costa Mesa, CA
Ok, I took a couple pictures after the second coat of gloss- here is what it looks like.
I am pretty happy so far, except for some small cracks I did not see. Hopefully I can get to them after I am done with as I have left over dye and finish.
Ignore the red dot it is my parking laser.
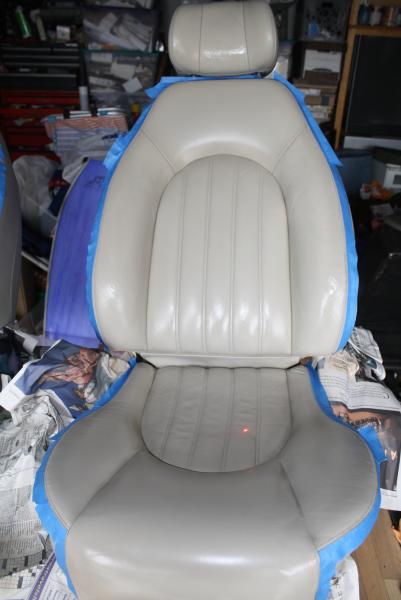
https://www.jaguarforums.com/forum/m...nger-21172.jpg
I am pretty happy so far, except for some small cracks I did not see. Hopefully I can get to them after I am done with as I have left over dye and finish.
Ignore the red dot it is my parking laser.
https://www.jaguarforums.com/forum/m...nger-21172.jpg
Thread Starter
|
Veteran Member
Joined: Jun 2011
Posts: 2,134
Likes: 543
From: Costa Mesa, CA
..and the finished product. If I had it to do again (and I may) I would have spent more time perfecting the prep work and using less coats. It looks good and is soft, which is what I was going for.
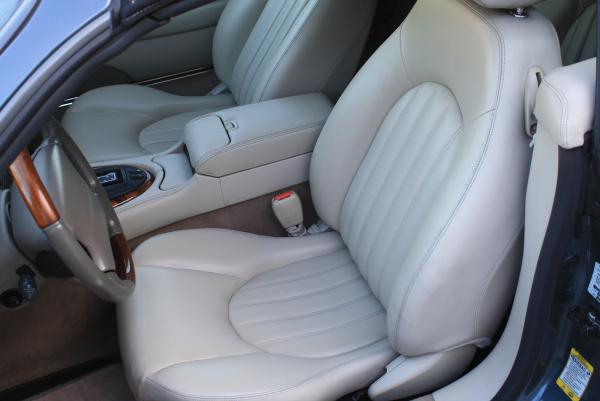
For perspective, there was a 3 inch rip in the driver's bolster and a few tears along with cracks everywhere. The center console was also ripped, but I ordered a new skin, put it on and dyed it at the same time with the seats and armrests.
all in 4 coats of color, 3 coats of gloss and 4 coats of matte. should have done 2 coats of dye, one coat of gloss and two coats of matte- lesson learned. I suppose if it gets cracks, I can repair them individually instead of doing the whole shebang. Will be taking it down to cars and coffee tomorrow morning as it is in perfect shape to do so.
Last edited by dsnyder586; Oct 25, 2013 at 07:30 PM.
Trending Topics

Thread Starter
|
Veteran Member
Joined: Jun 2011
Posts: 2,134
Likes: 543
From: Costa Mesa, CA
Get yourself an airbrush and schedule about 5 days to do it right... sandpaper dye and clear cost me under $40 as opposed to $600 for new skins or seats.
I took the opportunity to clean the carpet, vinyl, door panels and replace some of the broken bits around the job as well. FYI- I used oxyclean laundry detergent on one of the seat belts to test and it came out CLEAN. Wish I took before pictures, it was a MESS.
I took the opportunity to clean the carpet, vinyl, door panels and replace some of the broken bits around the job as well. FYI- I used oxyclean laundry detergent on one of the seat belts to test and it came out CLEAN. Wish I took before pictures, it was a MESS.

Senior Member
Joined: Feb 2013
Posts: 314
Likes: 63
From: Long Island, NY
Get yourself an airbrush and schedule about 5 days to do it right... sandpaper dye and clear cost me under $40 as opposed to $600 for new skins or seats.
I took the opportunity to clean the carpet, vinyl, door panels and replace some of the broken bits around the job as well. FYI- I used oxyclean laundry detergent on one of the seat belts to test and it came out CLEAN. Wish I took before pictures, it was a MESS.
I took the opportunity to clean the carpet, vinyl, door panels and replace some of the broken bits around the job as well. FYI- I used oxyclean laundry detergent on one of the seat belts to test and it came out CLEAN. Wish I took before pictures, it was a MESS.
I heard that after a month or two of usage, the leather develops cracks in same spots as before. Keep us posted on how it wears over time.

Thread
Thread Starter
Forum
Replies
Last Post
FS[MidAtlantic]: 1997 XJ6 VDP $3,900 - Very RARE Anthracite on Warm Charcoal
42Ajd
PRIVATE For Sale / Trade or Buy Classifieds
0
Sep 26, 2015 07:04 PM
Currently Active Users Viewing This Thread: 1 (0 members and 1 guests)