
MOT Failure - excessive corrosion
#21
 10-08-2014, 03:30 PM

Veteran Member
Id use a heavy wire wheel which will remove most of the scale. Id then use a rust converter prime/paint or use an undecoat of some sort. You can also use a POR 15. Stuffs great I would not use anything too glossy however as it will be obvious what you had done. Undercoat after will hide a bit as well. Any other area sof light rusting you can just us a a rust converter. Remove whats loose with a wire brish(hand type) then apply converter. I cant believ efailing for that but then again these peopel are not structural engineers. Likely the flaking rust is what caused you to fail. Thats a loss of strenght in the area. Good luck!
As a permanant solution there are plenty of these cars hitting junkyards. Get a good rear subframe and prep paint and install when you can. Ive seen completer rear setups with everything including sprinsg and shocks for under $1000 USD..You can change bushing and all while at it. Unsure of costs there but shouldnt be well off the mark.
As a permanant solution there are plenty of these cars hitting junkyards. Get a good rear subframe and prep paint and install when you can. Ive seen completer rear setups with everything including sprinsg and shocks for under $1000 USD..You can change bushing and all while at it. Unsure of costs there but shouldnt be well off the mark.
#22
10-09-2014, 12:10 PM
Was I wise to buy a 2000 xk8 cabriolet mot failure with known rust issues? Well it cost me �2000 and has good wheels, tyres, hood, engine and box, so hopefully 6 months work in my garage welding as much as I can and replacing tensioners and gbox fluid, I ope to get a car that will last me a few years to come - fingers crossed eh!

#24
10-09-2014, 01:47 PM

Veteran Member
Was I wise to buy a 2000 xk8 cabriolet mot failure with known rust issues? Well it cost me �2000 and has good wheels, tyres, hood, engine and box, so hopefully 6 months work in my garage welding as much as I can and replacing tensioners and gbox fluid, I ope to get a car that will last me a few years to come - fingers crossed eh!
Well, what else would you do this winter, and you will end up a with a car you know inside out.
I recon the trickiest part will be the bolts holding on the exhaust bracket on top of the rear subframe, if mine give me trouble I will just drop the entire exhaust with the subframe.
Last edited by RaceDiagnostics; 10-09-2014 at 01:49 PM.
#25
10-10-2014, 04:45 AM
Those exhaust mount screws are fiddly, especially the upper ones, which on removal and re-assembly were deemed to be of doubtful parentage at least!
The propshaft nuts and bolts are also tricky to access. a thin ring does the nuts, whilst an open ender does the bolt head. Difficult to get the ring over the nuts.
Also a pain are the bolts holding the rear mounts to the body. I used a long 15mm impact socket with the chamfered open end turned down - removing the chamfers, thus giving more engagement with the bolt head.
The axle assembly is surprisingly heavy and needs handling with care. One method to keep it under control is to screw some 12mm all thread into he front mounts. This allows it to be positioned easily on assembly and removed in a slow but controlled manner with a jack at the rear and nuts at the front.
The following 2 users liked this post by sheddist:
RaceDiagnostics (10-10-2014),
scoobie (10-23-2014)
#26
11-01-2014, 08:55 AM
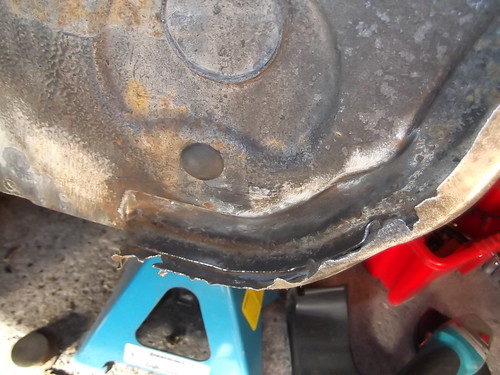
rear suspension and bumper now removed I have spent a while with the wire brush to see the extent of the rot.
The sills, chassis section where the A-frame locates and wheel arch doesn't seem as bad as I thought -
 DSCF3147
 DSCF3146
Notice the driver's side sill is crushed, which really annoys me - I think that if some half-wit tyre mechanic ruins a sill because they can't be bothered to jack the car properly they should be stoned or flogged
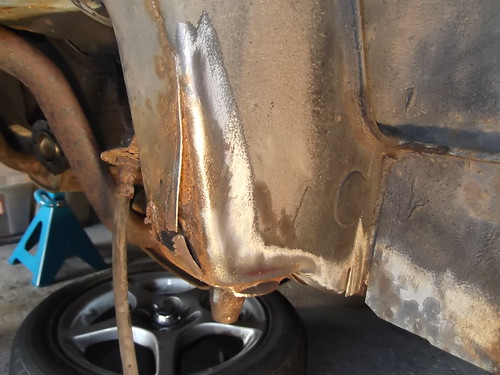
I have to cut the rot out of this and get some new steel welded in -
 DSCF3145
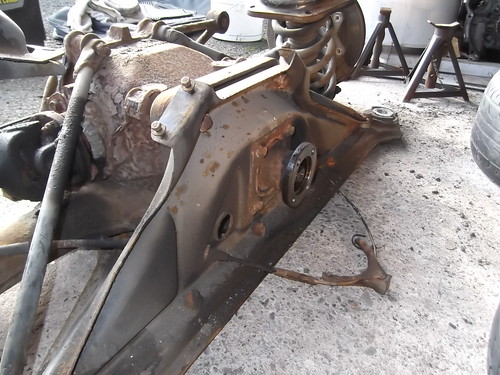
The A-Frame looks sound -
 DSCF3143
I think because the diff/propshaft has been keeping it well lubricated -
 DSCF3148
Questions -
A) Should the rear disks come off with just a tap from a hammer? I have loosened the shoes but they will not budge. (Update - sorted, I just needed to apply some WD40 around the studs and centre piece and allow it to soak through)
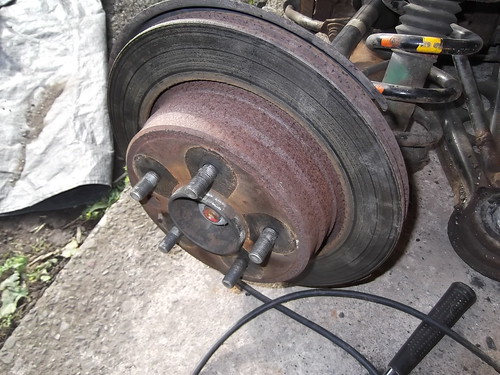 DSCF3144
B) There are some parts that may be difficult or awkward to reach with my wire wheel, would it be OK just to use liquid rust remover.
And do I need to remove the heat shield above the exhaust (looks a big job)
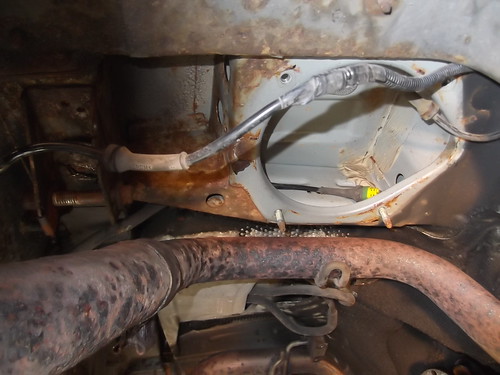 DSCF3150
 DSCF3151
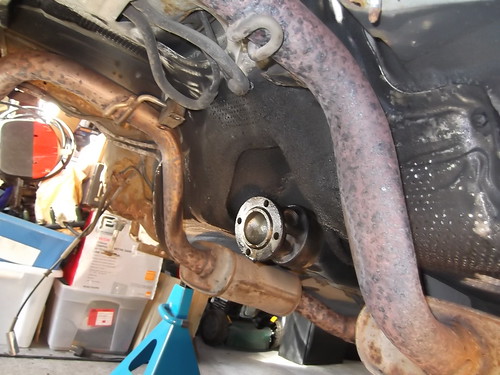
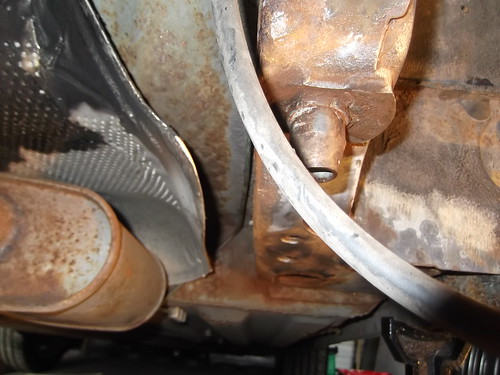
C) Has all that oil come out of the diff input shaft seal?
 DSCF3154
Thanks - Mark
The sills, chassis section where the A-frame locates and wheel arch doesn't seem as bad as I thought -
DSCF3147 DSCF3146 Notice the driver's side sill is crushed, which really annoys me - I think that if some half-wit tyre mechanic ruins a sill because they can't be bothered to jack the car properly they should be stoned or flogged
I have to cut the rot out of this and get some new steel welded in -
DSCF3145The A-Frame looks sound -
DSCF3143 I think because the diff/propshaft has been keeping it well lubricated -
DSCF3148 Questions -
A) Should the rear disks come off with just a tap from a hammer? I have loosened the shoes but they will not budge. (Update - sorted, I just needed to apply some WD40 around the studs and centre piece and allow it to soak through)
DSCF3144 B) There are some parts that may be difficult or awkward to reach with my wire wheel, would it be OK just to use liquid rust remover.
And do I need to remove the heat shield above the exhaust (looks a big job)
DSCF3150 DSCF3151C) Has all that oil come out of the diff input shaft seal?
DSCF3154Thanks - Mark
Last edited by scoobie; 11-01-2014 at 04:45 PM.

#28
11-01-2014, 02:49 PM

Veteran Member
Racer love what you have done to the undersides of your car. What did you treat/paint it with?
Scoobie your doing a great job on your car mate. I cannot even get into my garage. Wish there was some way I could get access to a car hoist, love to work under my car like you guys have. Yes I know Scoobie yours was jacked up you are still doing a fine job.
Scoobie your doing a great job on your car mate. I cannot even get into my garage. Wish there was some way I could get access to a car hoist, love to work under my car like you guys have. Yes I know Scoobie yours was jacked up you are still doing a fine job.
#29
11-01-2014, 03:18 PM
Veteran Member
#30
11-01-2014, 04:09 PM
Sandblasting would be unsuitable for me as I don't have a compressor big enough and I just don't want the dust everywhere.
The rust starting behind the heat shield concerns me but it looks like a big job to remove it.
Damn fuel lines are in the way to sand all around the chassis member, so I may have to remove them too.
As for rust remover, I am going to try some of this stuff -
http://www.amazon.co.uk/Total-Rust-Remover-Xtra-litre/dp/B009WPHQBU
Hydrochloric and phosphoric acid - sounds the dogs b**
Last edited by scoobie; 11-01-2014 at 04:42 PM.
#31
11-01-2014, 04:48 PM
#32
11-01-2014, 04:56 PM
My arm is healing nicely - I don't think it will scar
#33
11-02-2014, 03:17 PM
Veteran Member
Sandblasting would be unsuitable for me as I don't have a compressor big enough and I just don't want the dust everywhere.
The rust starting behind the heat shield concerns me but it looks like a big job to remove it.
Damn fuel lines are in the way to sand all around the chassis member, so I may have to remove them too.
As for rust remover, I am going to try some of this stuff -
Total Rust Remover Xtra - 5 litre: Amazon.co.uk: Car & Motorbike
Hydrochloric and phosphoric acid - sounds the dogs b**
Last edited by frankc; 11-02-2014 at 03:25 PM.
#34
11-02-2014, 03:27 PM
Veteran Member
Just been out to the garage to see if I had any left I could let you have to try. Bad news is that sorry its all gone. Good news is I found a tin of black Hammerite I can use under my car when it gets dryer and warmer.
I also found an empty pot of Hammerite Rust Remover Gel. It says it does the same stuff as you were going to buy on amazon and apparently it does not damage paint. Dont know if its still available though. The health and safety nuts might have stopped it.
Update.
Found it! http://reviews.halfords.com/4028/728576/reviews.htm
Last edited by frankc; 11-02-2014 at 03:29 PM.
#35
11-02-2014, 06:02 PM
#36
11-03-2014, 01:41 PM
Well it was almost game-over this morning as I opened up the double garage up and over door (made in the 70s and weighs a ton).
The pivot arm on the side where the jag is broke free and the door smashed down on the car.
Had to have the morning off work to get it free, fortunately my Daughter was here so helped me jack the door up off the car.
Took me around 2 hours to get the door fixed and it seems secure now.
The garage door came down just behind the first fold of the roof which was down.
There's a dent there but nowhere near as bad as I had feared - I think because there's a strengthening piece from the wheel arch to just under where it landed.
One of the split pins in the door mechanism had broke up so this would have happened to whoever opened the door next so I'm so glad it was me and not my Wife or kids.
Another job to add to the list
#37
11-03-2014, 03:21 PM
Veteran Member
#38
11-04-2014, 03:51 AM

#40
11-04-2014, 02:44 PM
Thanks for the support guys - I really felt like crying yesterday but after the initial shock, I think me and my daughter (still in her dressing gown and my trainers), struggling to jack the door up saw the funny side
Now I have reached a decision point, whether to employ a mobile welder or to buy an argon cylinder (hobbygas) and regulator, 6mm wire and nozzle for my MightyMig and try and do it myself.
The criteria is I want a good job but spend as little as possible.
Based on the pictures of my rusty bits above, what would you suggest?
Thanks
Mark