
Is This the Octopus Hose?

Thread Starter
|
Veteran Member


Joined: Feb 2012
Posts: 2,997
Likes: 714
From: Waco, Texas, US
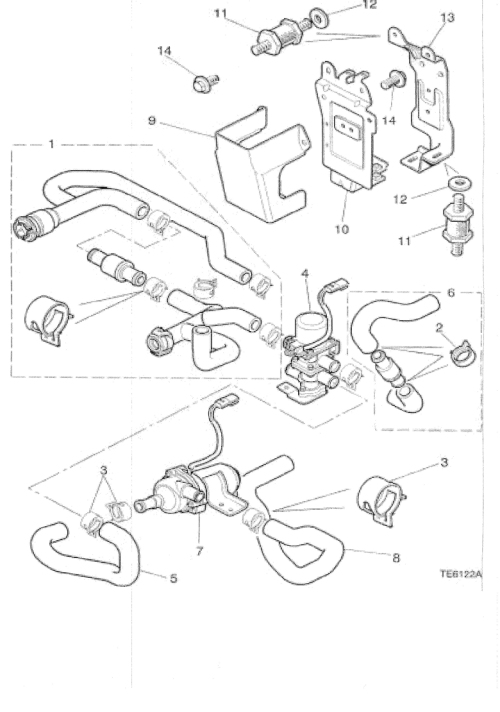
To the experienced: just want to verify this is indeed the infamous octopus hose before I pay the big bucks to order one. I believe the part number would be MJA6728AC if it is indeed the octopus monster.
It has a slow leak just to the right of the connector circled that isn't getting any better. Just after that connection (not shown) towards the firewall it branches into a "Y". One side appears to go to the heater valve body and the other looks like it goes to the bottom of the expansion tank.
Really hard to see in there. In fact, this is not even my picture. I copied it from an old thread by Roadhogg when he fixed his heater.
Trying to convince myself I can do this, but I have nightmares of breaking one of the many brittle plastic pieces associated with this repair.


Thread Starter
|
Veteran Member
Joined: Feb 2012
Posts: 2,997
Likes: 714
From: Waco, Texas, US
I'm assuming that since the diagram does show one end going into what appears to be the heater valve, that this is indeed what I need.
Veteran Member
Joined: Apr 2014
Posts: 4,814
Likes: 3,028
From: Jersey, Channel Islands
The connector you have circled is a separate T-piece that connects one of the valley hoses to the octopus. Part # is NNE3944BA. I've attached a snippet from JEPC that shows it in more detail.
(3) on the diagram is clamp just under the red arrow, and you can see the hose (10) is the vertical one in the pic.
If the leak is just to the right of the circle, then it's going to be (9) on the diagram which is one half of the crappy plastic 'Norma' connector, the other half of which is on the octopus. It's a push and twist connection with a seal sandwiched in the middle. Can't remember the exact construction as it's a while since I did the job
Some have advocated replacing the T-piece with a metal one and three clamps if you want to get in and out quickly.
But if you're intending to replace the octopus then, unless you're a contortionist with v. small indestructible hands, the TB has to come off. Once you get that far, you might as well replace the valley hoses if they're original because they will fail. You will need something beefy to get the clamps off - I used a pair of 'Mole' grips to expand them enough to be able to wiggle them clear. The octopus part # MJA6728AC you quote appears to be correct.
The only casualty I had was the part-load breather hose broke getting it off the TB as it gets brittle.
On the plus side, if you do go the whole hog at least you won't have a supercharger to remove.
HTH,
Mike
Last edited by michaelh; Jun 22, 2015 at 05:33 PM. Reason: check part # for octopus
Veteran Member
Joined: Aug 2008
Posts: 2,904
Likes: 364
From: SW OH
This repair can be done, knuckle buster if ya got big hands. Takes time and patience getting parts that have been connected for some time to come off. REMEMBER where the hose goes across the BACK of the motor almost directly above the trans there are some vacuum like hoses zip tired to the octo hose. Make sure you cut that tie before you go yanking that hose out or you could pull what ever that small hose is.
Trending Topics
Thread Starter
|
Veteran Member
Joined: Feb 2012
Posts: 2,997
Likes: 714
From: Waco, Texas, US
The connector you have circled is a separate T-piece that connects one of the valley hoses to the octopus. Part # is NNE3944BA. I've attached a snippet from JEPC that shows it in more detail.
(3) on the diagram is clamp just under the red arrow, and you can see the hose (10) is the vertical one in the pic.
If the leak is just to the right of the circle, then it's going to be (9) on the diagram which is one half of the crappy plastic 'Norma' connector, the other half of which is on the octopus. It's a push and twist connection with a seal sandwiched in the middle. Can't remember the exact construction as it's a while since I did the job
Some have advocated replacing the T-piece with a metal one and three clamps if you want to get in and out quickly.
But if you're intending to replace the octopus then, unless you're a contortionist with v. small indestructible hands, the TB has to come off. Once you get that far, you might as well replace the valley hoses if they're original because they will fail. You will need something beefy to get the clamps off - I used a pair of 'Mole' grips to expand them enough to be able to wiggle them clear. The octopus part # MJA6728AC you quote appears to be correct.
The only casualty I had was the part-load breather hose broke getting it off the TB as it gets brittle.
On the plus side, if you do go the whole hog at least you won't have a supercharger to remove.
HTH,
Mike
(3) on the diagram is clamp just under the red arrow, and you can see the hose (10) is the vertical one in the pic.
If the leak is just to the right of the circle, then it's going to be (9) on the diagram which is one half of the crappy plastic 'Norma' connector, the other half of which is on the octopus. It's a push and twist connection with a seal sandwiched in the middle. Can't remember the exact construction as it's a while since I did the job
Some have advocated replacing the T-piece with a metal one and three clamps if you want to get in and out quickly.
But if you're intending to replace the octopus then, unless you're a contortionist with v. small indestructible hands, the TB has to come off. Once you get that far, you might as well replace the valley hoses if they're original because they will fail. You will need something beefy to get the clamps off - I used a pair of 'Mole' grips to expand them enough to be able to wiggle them clear. The octopus part # MJA6728AC you quote appears to be correct.
The only casualty I had was the part-load breather hose broke getting it off the TB as it gets brittle.
On the plus side, if you do go the whole hog at least you won't have a supercharger to remove.
HTH,
Mike
The valley hoses are new and I have small hands. However, I also have short arms so looks like my back will get a workout.
Wish motorcar man was just a little closer. I'd job this out. My problem is that this is my daily driver, so an involved job like this eats the weekend. Maybe it's time to pickup an XJ for a backup. Wife complains I don't have a sedan.
Veteran Member
Joined: Aug 2008
Posts: 2,904
Likes: 364
From: SW OH
This is not a weekend job, long afternoon perhaps. I would replace the plastic T mentioned earlier in the thread here while you have it apart. Just take your time, have the right tools and it can be done in 4 hours or so. The hard part is getting it out. Goes in pretty quick. BE CAREFUL of surrounding parts, plastic hoses etc, ya don't want to replace those.
Veteran Member
Joined: Apr 2014
Posts: 4,814
Likes: 3,028
From: Jersey, Channel Islands
Odd that the octopus wasn't done at the same time as the valley hoses, 'cos it a lot easier to get at once the TB & intake stuff is out of the way.
Or maybe it was? If the 'Norma' on the other side looks good it could be worth trying to reseal this one first if you haven't already.
If you do manage to R&R without removing the TB I'd be curious to know any tricks you find. It wasn't easy stretching - even with no TB to work around, although a basketball player might describe me as vertically challenged. There's also a row of connectors on the top of the trans. that makes the space even tighter. Beware the cunningly hidden zip tie as brgjag notes & have the cuts and grazes cream handy for afterwards.
Good luck!
Your case has been made for you
Or maybe it was? If the 'Norma' on the other side looks good it could be worth trying to reseal this one first if you haven't already.
If you do manage to R&R without removing the TB I'd be curious to know any tricks you find. It wasn't easy stretching - even with no TB to work around, although a basketball player might describe me as vertically challenged. There's also a row of connectors on the top of the trans. that makes the space even tighter. Beware the cunningly hidden zip tie as brgjag notes & have the cuts and grazes cream handy for afterwards.
Good luck!
Thread Starter
|
Veteran Member
Joined: Feb 2012
Posts: 2,997
Likes: 714
From: Waco, Texas, US
With the guidance of this group, I have just about decided my issue is with the connecting piece (plastic "T") leading to the octopus hose. The local Jag dealer has one for $5 after tax, so may just give this a go first.
It looks like I will need to remove the expansion tank, but should be able to get to it without removing the throttle body. Or so I hope. I guess we will see.
Thanks for all the help. It is much appreciated.
It looks like I will need to remove the expansion tank, but should be able to get to it without removing the throttle body. Or so I hope. I guess we will see.
Thanks for all the help. It is much appreciated.
Veteran Member
Joined: Aug 2008
Posts: 2,904
Likes: 364
From: SW OH
I replaced mine on my 03 without removing the TB of anything around it. I did remove my Expansion tank. Just be careful when pulled the hose out, pull slowly so ya don't yank other things around when you take it out. It prob will be hard to take off on the pass side tube. Some try to save the connector there. Don;t know why since it is on the new hose. Mine was stuck on so I cut the plastic up and it came off. While that pipe on that side is exposed ya should clean it up some. I took fine grit sand paper to clean it up and wiped it down.
Thread Starter
|
Veteran Member
Joined: Feb 2012
Posts: 2,997
Likes: 714
From: Waco, Texas, US
The good news is that my problem was the T-connector (Part# NNE3944BA). Thanks michaelh.
The bad news is that the norma connector from the octopus hose has an ear broken off. No problem, I says. I'll just use the metal replacement method. So I cut off the offending norma nightmare.
Problem now is I cannot find a hardware store with the right T-fitting in brass. It looks to be a 7/8x7/8x1/2. I could only find 3/4" or 1" T's. Bad news.
Might have been able to glue the norma connector ear back on, but was worried it would not hold and I'd be back to square one. Either way, too late now.
Any suggestions on alternates to the brass plumbing approach is appreciated. Gotta go now and start calling some hardware stores.
Thread Starter
|
Veteran Member
Joined: Feb 2012
Posts: 2,997
Likes: 714
From: Waco, Texas, US
I think this can be marked as fixed. As usual, thanks for all the help and encouragement.
I had a friend make up an aluminum (aluminium) fitting that works like a champ. It should easily last the life of the car. Looks better too. Eliminates the frustrating norma connector.
Lessons learned?
I had a friend make up an aluminum (aluminium) fitting that works like a champ. It should easily last the life of the car. Looks better too. Eliminates the frustrating norma connector.
Lessons learned?
- ALL the plastic in there is brittle.

- It is a very tight squeeze, but can be done by removing the expansion tank. Small hands preferred and cursing helps as well.
- A cable operated hose clamp tool is worth every cent ($36 at Sears).
- You do not need to drain the radiator, but you will need a catch pan for about a quart or less of coolant
- A wine cork is perfect for stoppering the hose to the bottom of the expansion tank (learned this trick on the forum. forgot who suggested it, but thanks)
Veteran Member
Joined: Dec 2011
Posts: 2,944
Likes: 1,585
From: Spencer, NC
Mike, well done and thanks for all the tips. When is your buddy going to offer these three ways to us. I for one would be glad to have it on hand for any trip or replacing it when the time comes.
Again, thanks.
Wayne
Again, thanks.
Wayne
Thread Starter
|
Veteran Member
Joined: Feb 2012
Posts: 2,997
Likes: 714
From: Waco, Texas, US
I think he is open to 3-ways, but tends to be picky about his partners. 
I'll ask him if he is willing to make some more connectors up if there is interest from the forum.
I'll ask him if he is willing to make some more connectors up if there is interest from the forum.
Veteran Member
Joined: Apr 2014
Posts: 4,814
Likes: 3,028
From: Jersey, Channel Islands
Mike, thanks for the update.
A very elegant fix for a 'one-eared Octopus'
I was going to suggest a 22x15x22 reducing plumbing tee with some short extensions added but this is much neater. IIRC the other Norma can be replaced with a piece of hose and a short metal tube...
Mike
A very elegant fix for a 'one-eared Octopus'
I was going to suggest a 22x15x22 reducing plumbing tee with some short extensions added but this is much neater. IIRC the other Norma can be replaced with a piece of hose and a short metal tube...
Mike
Thread Starter
|
Veteran Member
Joined: Feb 2012
Posts: 2,997
Likes: 714
From: Waco, Texas, US
Let's hope I never have to test that method. It's really tight in there. Let's just say I paid my blood debt to the gods of Coventry.

Junior Member
Joined: Nov 2019
Posts: 10
Likes: 0
From: Nashville
This was VERY helpful for me! My 3-way connector has just started leaking. (and it's been hard tracking down this piece!) Has the metal piece held up for you? Any idea how your friend made the piece and what the dimensions were? I can buy the 3 way connector on ebay, but this method seems cleaner to me. I have a 2001 Vanden Plas.

Thread
Thread Starter
Forum
Replies
Last Post
Pristine97XK8Convertible
XK8 / XKR ( X100 )
18
Mar 5, 2025 10:32 AM
mikiep
XK8 / XKR ( X100 )
14
Dec 20, 2019 07:37 PM
Currently Active Users Viewing This Thread: 1 (0 members and 1 guests)