
Quadruple Black XKR! Duplicolor Vinyl and Fabric Paint Results!

Thread Starter
|
Veteran Member
Joined: Feb 2011
Posts: 1,059
Likes: 134
From: Mtn View, CA
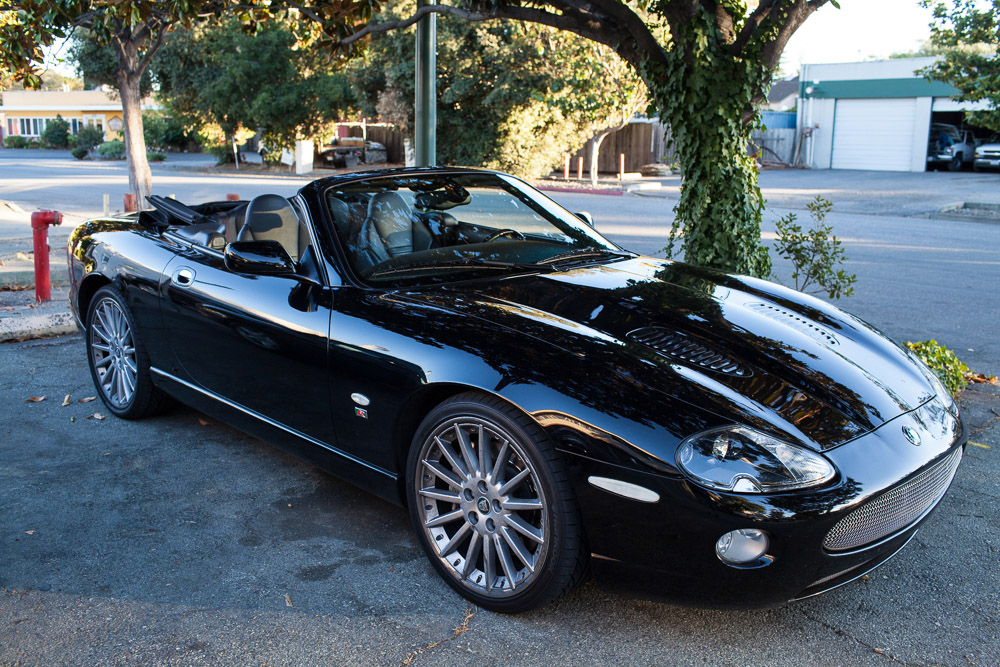
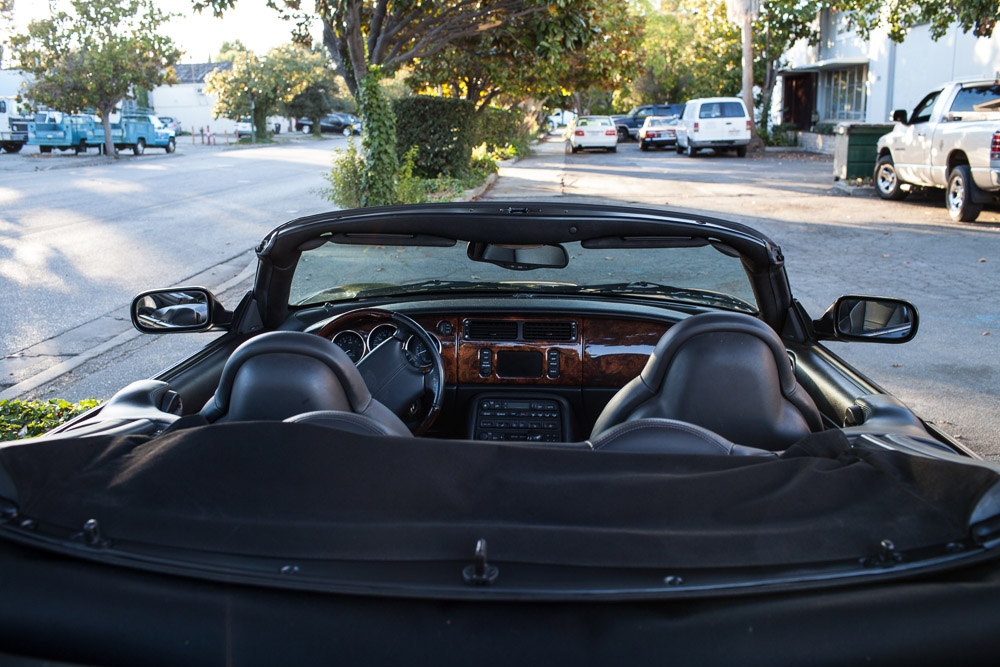
I'm finally finished re-coloring my grey interior headliner and window pillars, including all the hardware. I didn't take specific before shots, but we all know what they look like. So here are the completion pictures.
I used Duplicolor Flat Black Vinyl and Fabric Paint. The pillars, top, interior lights, blinds and vanity mirrors used up 2.5 cans. The headliner alone used nearly 4 cans. All of the pillar fabric needed 3 coats, the headliner needed 4. I put the first coat on lightly, then I went over it and filled. Then I went over one last coat. After this, there was so much paint and fumes, I let it sit 4 days before I attempted to drive it. Paint fumes were mostly gone in 6 days.
It took two rounds of touch-ups to make the fabric texture consistent and so grey fabric wasn't visible during any portion of the opening/closing of the top.
I needed 7 cans in total and have enough left in the last can for all the touchups I should ever need. It's fairly durable, though putting in the carpet behind the rear seats rubbed against the headliner and brought out some grey, so I had to retouch it with a light spray. Simple.
While paint adhesion on the plastic isn't as nice as I would like (I didn't use any plastic primer, fwiw), it coated well and looks nice. I guess time will tell how well it actually holds up.
I had several quotes for making a headliner from $400-$1200, the cheapest being if I removed and installed it. $1200 for just the headliner if they did all the labor.
I'm completely satisfied. It looks new and it makes the car look even nicer and more modern. It's a shame Jaguar didn't do this from the get-go. It does look factory in-person.


Thanks to philhef for the inspiration!
https://www.jaguarforums.com/forum/x...5-00-a-100608/
I used Duplicolor Flat Black Vinyl and Fabric Paint. The pillars, top, interior lights, blinds and vanity mirrors used up 2.5 cans. The headliner alone used nearly 4 cans. All of the pillar fabric needed 3 coats, the headliner needed 4. I put the first coat on lightly, then I went over it and filled. Then I went over one last coat. After this, there was so much paint and fumes, I let it sit 4 days before I attempted to drive it. Paint fumes were mostly gone in 6 days.
It took two rounds of touch-ups to make the fabric texture consistent and so grey fabric wasn't visible during any portion of the opening/closing of the top.
I needed 7 cans in total and have enough left in the last can for all the touchups I should ever need. It's fairly durable, though putting in the carpet behind the rear seats rubbed against the headliner and brought out some grey, so I had to retouch it with a light spray. Simple.
While paint adhesion on the plastic isn't as nice as I would like (I didn't use any plastic primer, fwiw), it coated well and looks nice. I guess time will tell how well it actually holds up.
I had several quotes for making a headliner from $400-$1200, the cheapest being if I removed and installed it. $1200 for just the headliner if they did all the labor.
I'm completely satisfied. It looks new and it makes the car look even nicer and more modern. It's a shame Jaguar didn't do this from the get-go. It does look factory in-person.
Thanks to philhef for the inspiration!
https://www.jaguarforums.com/forum/x...5-00-a-100608/
Member
Joined: Nov 2012
Posts: 73
Likes: 11
From: London
Your car looks fantastic, I hope the paint holds.
I usually do not like the combination of walnut with black interiors but for some reason in your car it looks very nice, maybe it has to do with the black headliner, not sure.
Well done.
I usually do not like the combination of walnut with black interiors but for some reason in your car it looks very nice, maybe it has to do with the black headliner, not sure.
Well done.
Veteran Member
Joined: Feb 2011
Posts: 2,916
Likes: 547
From: North Carolina
Looks amazing! Never had a doubt!! Don't you love how good it looks with top down? I never use my cover any more. (Especially after I forgot it and used the remote top!)
Jealous of the wood tone in your car! Mine is a bit more golden. May have to work on that!
Question; do you have the clear side reflectors or lit clear markers?
Jealous of the wood tone in your car! Mine is a bit more golden. May have to work on that!
Question; do you have the clear side reflectors or lit clear markers?
Veteran Member
Joined: Feb 2011
Posts: 2,916
Likes: 547
From: North Carolina
While paint adhesion on the plastic isn't as nice as I would like (I didn't use any plastic primer, fwiw), it coated well and looks nice. I guess time will tell how well it actually hold up.
https://www.jaguarforums.com/forum/x...5-00-a-100608/

Veteran Member


Joined: Feb 2012
Posts: 2,997
Likes: 714
From: Waco, Texas, US
Great job. Looks really good. How is the "hand" of it? Does it feel a little rougher or does the paint smooth back out after it dries?
My headliner is getting the orange stain but I hear the lighter colors (I have the tan) are harder to cover. Still a little afraid to go this route.
My headliner is getting the orange stain but I hear the lighter colors (I have the tan) are harder to cover. Still a little afraid to go this route.
Veteran Member
Joined: Feb 2012
Posts: 9,084
Likes: 569
From: Florida, USA
Trending Topics


Thread Starter
|
Veteran Member
Joined: Feb 2011
Posts: 1,059
Likes: 134
From: Mtn View, CA
Thanks everyone! Actually, my car is hideously dirty in these photos... it's amazing how well the pictures came out considering that.
The color is more black in-person and more consistent too... those shots were taken near-dusk. It does look factory though. I'm glad the grey is gone.
It definitely is thicker feeling, kinda in-between canvas and linen to the touch. It makes the headliner feel much stiffer but the pillars have more of a beach towel texture... though I had mine reupholstered a little while ago and the material they used was different.
All the plastic covered well except for the clasp that holds the visor electrical bar. If the paint does cure better as mentioned, then there shouldn't be any problem. I had to do some touch-up when reinstalling the visor plastics, but none for normal usage.
The color is more black in-person and more consistent too... those shots were taken near-dusk. It does look factory though. I'm glad the grey is gone.
Great job. Looks really good. How is the "hand" of it? Does it feel a little rougher or does the paint smooth back out after it dries?
My headliner is getting the orange stain but I hear the lighter colors (I have the tan) are harder to cover. Still a little afraid to go this route.
My headliner is getting the orange stain but I hear the lighter colors (I have the tan) are harder to cover. Still a little afraid to go this route.
It definitely is thicker feeling, kinda in-between canvas and linen to the touch. It makes the headliner feel much stiffer but the pillars have more of a beach towel texture... though I had mine reupholstered a little while ago and the material they used was different.
All the plastic covered well except for the clasp that holds the visor electrical bar. If the paint does cure better as mentioned, then there shouldn't be any problem. I had to do some touch-up when reinstalling the visor plastics, but none for normal usage.
How does anyone think this will look with the Oatmeal colored interior?? My headliner is definitely stained... I think it could look fairly nice in the flat black, but I was wondering if anyone else tried it with a lighter colored interior like mine?
Veteran Member
Joined: Feb 2011
Posts: 2,916
Likes: 547
From: North Carolina
Just checked your album and see black top so black headliner would be great. You could start with the headliner and see if the a pillars would need it but I'd probably do it all black. It feels so much more expensive in black!!
Last edited by philhef; Oct 1, 2013 at 08:29 PM.
I'm finally finished re-coloring my grey interior headliner and window pillars, including all the hardware. I didn't take specific before shots, but we all know what they look like. So here are the completion pictures.
I used Duplicolor Flat Black Vinyl and Fabric Paint. The pillars, top, interior lights, blinds and vanity mirrors used up 2.5 cans. The headliner alone used nearly 4 cans. All of the pillar fabric needed 3 coats, the headliner needed 4. I put the first coat on lightly, then I went over it and filled. Then I went over one last coat. After this, there was so much paint and fumes, I let it sit 4 days before I attempted to drive it. Paint fumes were mostly gone in 6 days.
It took two rounds of touch-ups to make the fabric texture consistent and so grey fabric wasn't visible during any portion of the opening/closing of the top.
I needed 7 cans in total and have enough left in the last can for all the touchups I should ever need. It's fairly durable, though putting in the carpet behind the rear seats rubbed against the headliner and brought out some grey, so I had to retouch it with a light spray. Simple.
While paint adhesion on the plastic isn't as nice as I would like (I didn't use any plastic primer, fwiw), it coated well and looks nice. I guess time will tell how well it actually holds up.
I had several quotes for making a headliner from $400-$1200, the cheapest being if I removed and installed it. $1200 for just the headliner if they did all the labor.
I'm completely satisfied. It looks new and it makes the car look even nicer and more modern. It's a shame Jaguar didn't do this from the get-go. It does look factory in-person.
Thanks to philhef for the inspiration!
https://www.jaguarforums.com/forum/x...5-00-a-100608/
Hi, absolutely drop dead gorgeous XKR! My triple black XK8 is a '99 and i'm still loving her as much as I did the day I bought her, 6yrs ago. Congratulations, that's a fine job indeed!
frank in fl


Veteran Member
Joined: Feb 2011
Posts: 2,916
Likes: 547
From: North Carolina
And after everything is done inside, open top about 3/4ths so the folds are lifted up and spray everything you can see from the inside between the outer top and headliner. I kept opening it further to expose more of the headliner backing and spraying, eventually having it opened completly and sprayed all the tan/gray.


Years ago, well something like 45 years ago, I tried this with my '65 Impala. The blue seats when black until anything at all sharp touched them. Nice to see these products have improved a lot in 45 years. Hell of a lot cheaper than what I did with my car, nice work!!