
Rear chassis rail rust repair


Thread Starter
|
Veteran Member


Joined: Apr 2012
Posts: 1,854
Likes: 987
From: UK
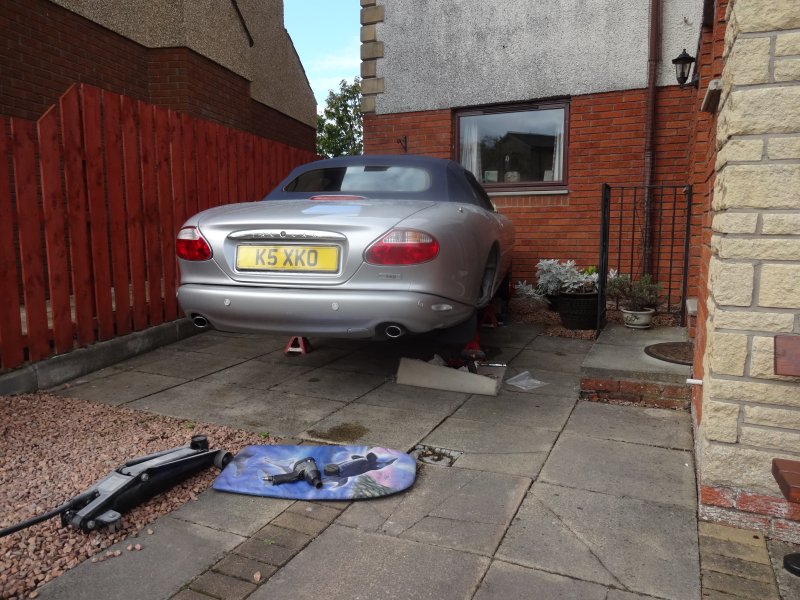
I put the car up on ramps at the front and axel stands at the back, I thought it would be high enough to allow me to pull the rear axel out, but it needs to be about another 4 inches higher so will pull it out from the side.
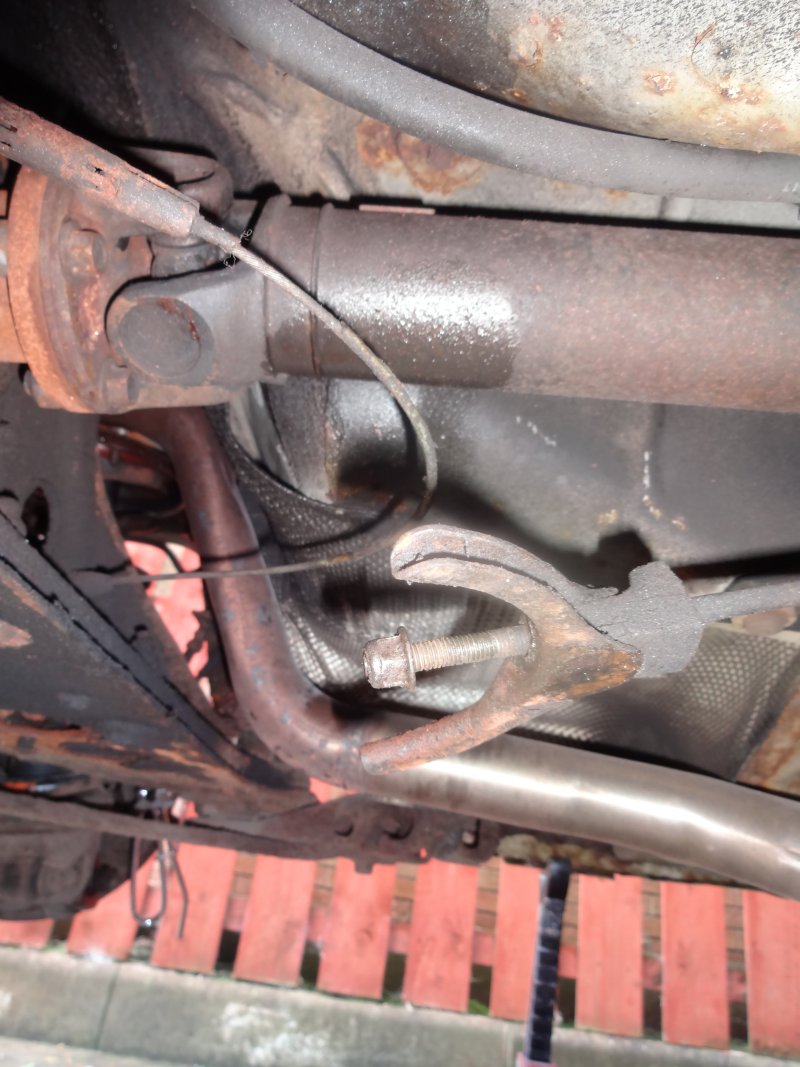
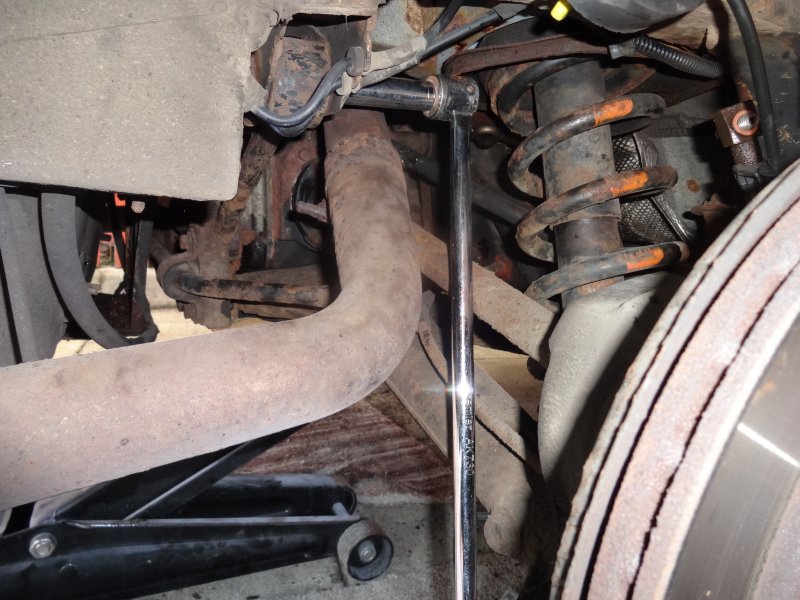
First I decided to tackle the exhaust hanger bolts, I lay like this and threaded my arm up to the bolts, 13mm I think.
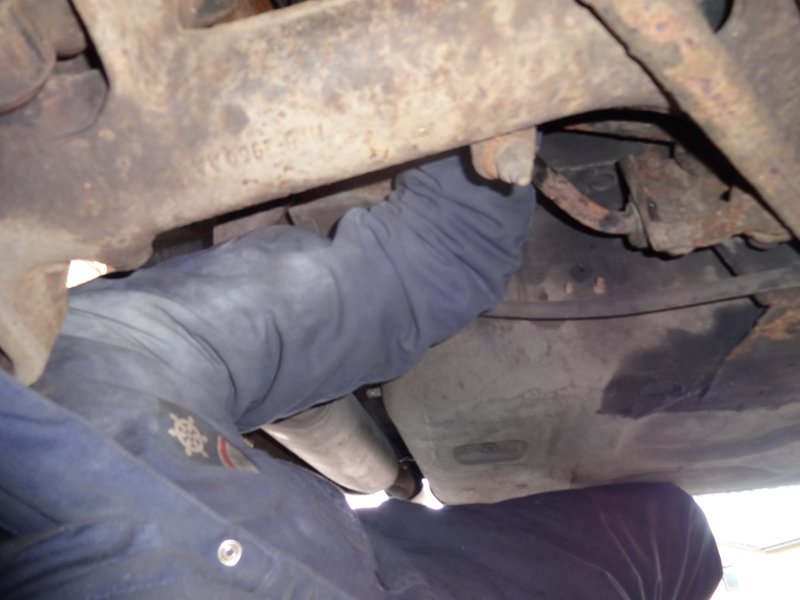
I was just able to get a spanner on, no chance to get a ratcheting spanner on unfortunately. I could only turn it a 1/6th of a turn at a time so it took ages to get all four bolts off and it was pretty painful.
Next I removed the four nuts holding the shock top plate, not to tricky but must of the studs actually came out rather then the bolts coming off.
Then loosened the handbrake cable to release.
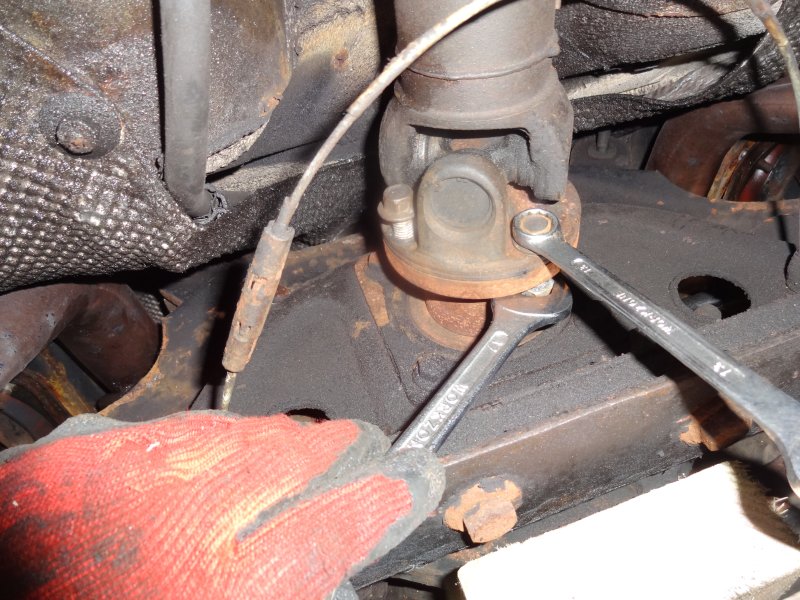
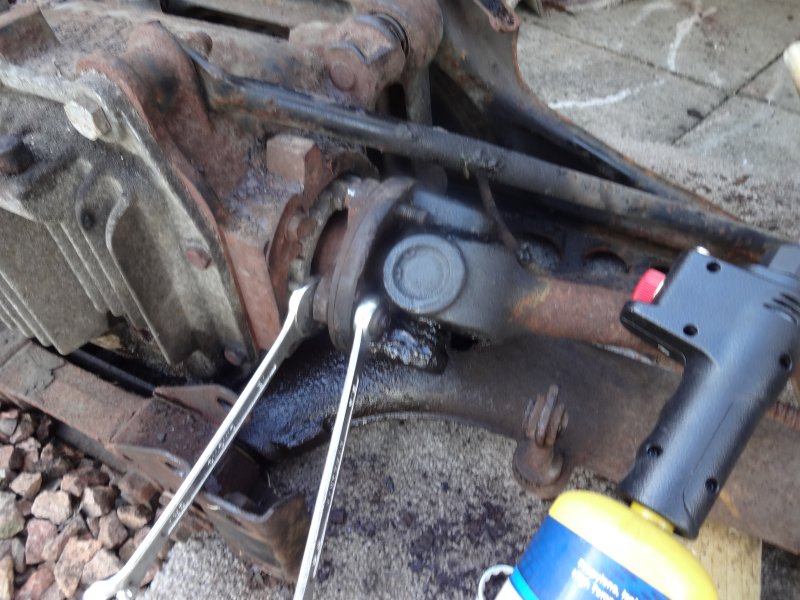
I marked up the drive shaft to diff as per JTIS then removed the four bolts.
Next were the bolts holding on the braces used on the convertible, the bolts are stupidly long, I was worried about them shearing off but they didn't, I put on plenty releasing fluid.
Next I put the jack under the diff and released the 4 bolts on each bracket. Breaker bar was needed.

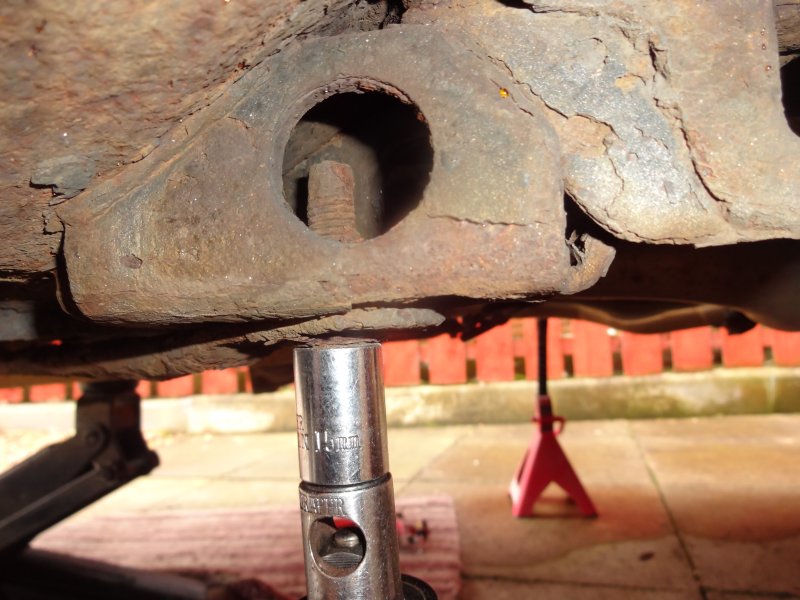
Then release the bolt at each side of the frame.
Again a breaker bar was needed.
Finally I was able to drop the lot and release the wiring going to the shocks, the assembly then slipped forwards off the trolley jack, so I packed up and called it a day.

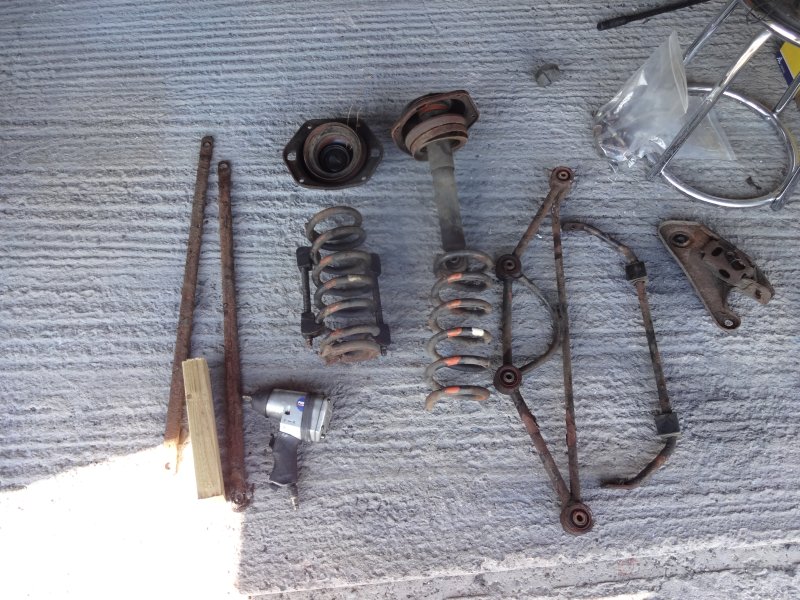
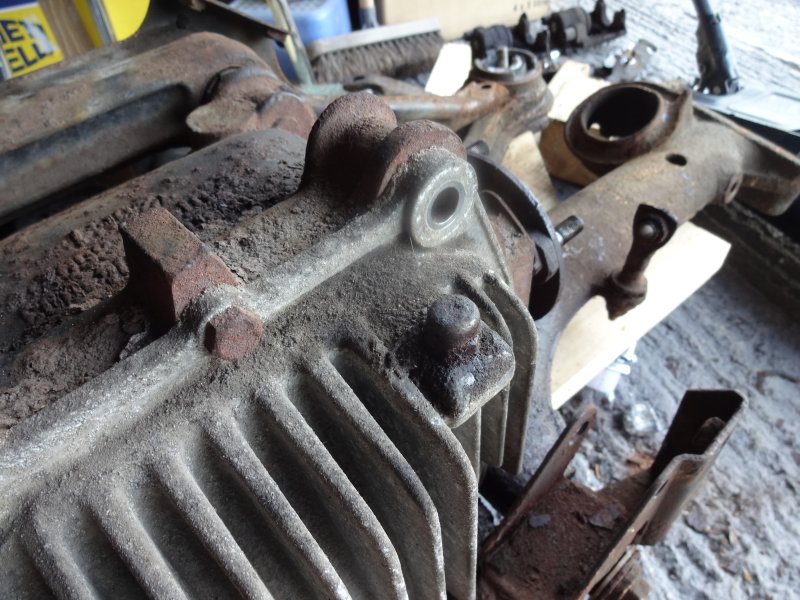
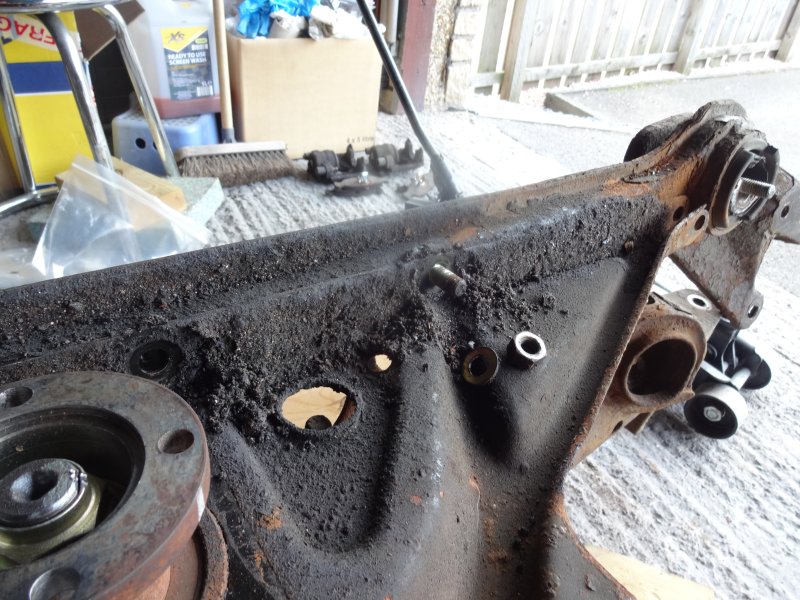
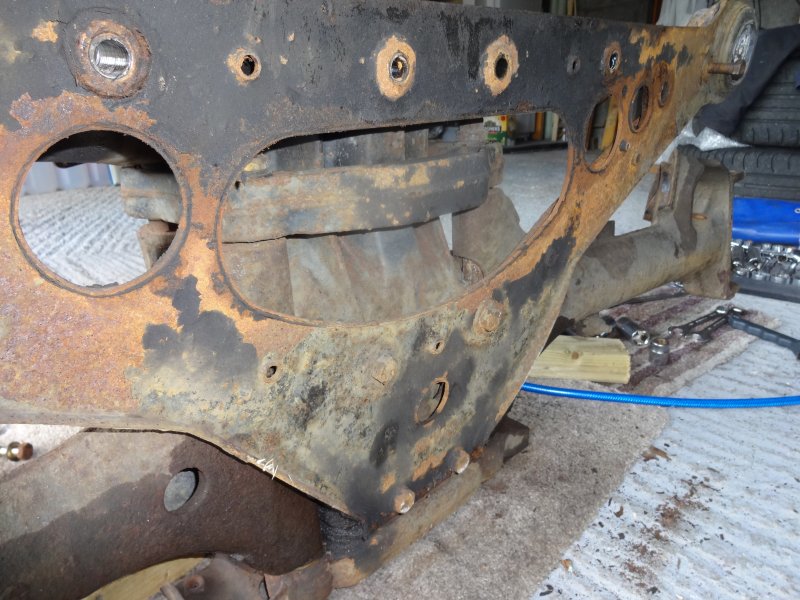
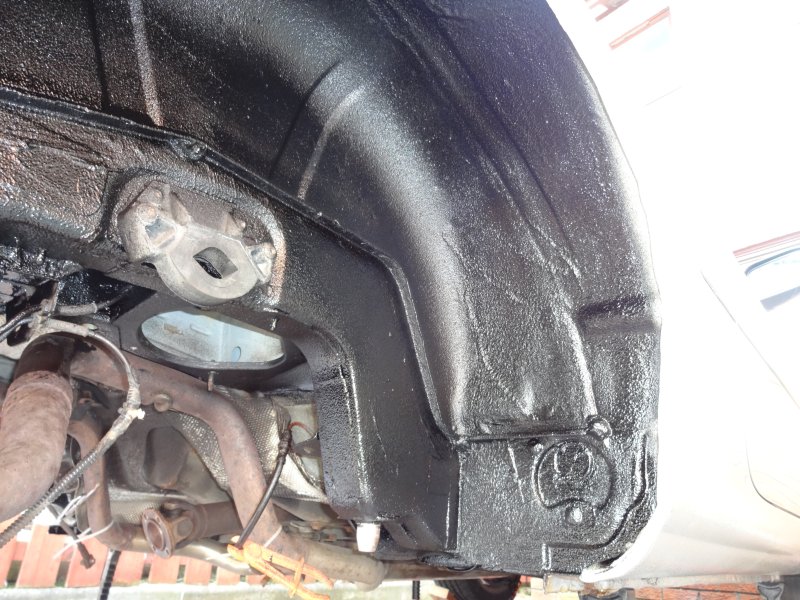
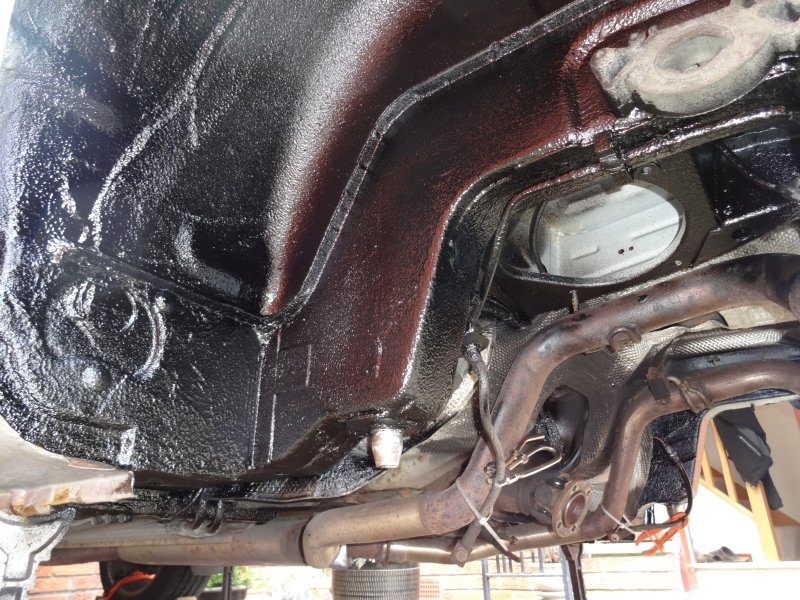
The rust areas.


Some new bushes for the reassembly.

What did I learn today, well this job is fairly tricky and painful on the forearms (especially the exhaust hangers). The entire assembly is really heavy, I will have to ask a neighbour to help me shift onto a trolley.
First I decided to tackle the exhaust hanger bolts, I lay like this and threaded my arm up to the bolts, 13mm I think.
I was just able to get a spanner on, no chance to get a ratcheting spanner on unfortunately. I could only turn it a 1/6th of a turn at a time so it took ages to get all four bolts off and it was pretty painful.
Next I removed the four nuts holding the shock top plate, not to tricky but must of the studs actually came out rather then the bolts coming off.
Then loosened the handbrake cable to release.
I marked up the drive shaft to diff as per JTIS then removed the four bolts.
Next were the bolts holding on the braces used on the convertible, the bolts are stupidly long, I was worried about them shearing off but they didn't, I put on plenty releasing fluid.
Next I put the jack under the diff and released the 4 bolts on each bracket. Breaker bar was needed.
Then release the bolt at each side of the frame.
Again a breaker bar was needed.
Finally I was able to drop the lot and release the wiring going to the shocks, the assembly then slipped forwards off the trolley jack, so I packed up and called it a day.
The rust areas.
Some new bushes for the reassembly.
What did I learn today, well this job is fairly tricky and painful on the forearms (especially the exhaust hangers). The entire assembly is really heavy, I will have to ask a neighbour to help me shift onto a trolley.
Last edited by RaceDiagnostics; Sep 14, 2015 at 05:26 PM.


Senior Member
Joined: Oct 2012
Posts: 853
Likes: 192
From: Panama City, Florida
RaceD--
Unbelievable! I would get a couple of more Jack stands under the car however, but your more then likely finished by now. In the pictures where you can see the Jack Stands, they look like they might be leaning a bit, but it may be just the photos...........On your questions about the springs. I would say yes..........
It's a brave man you are---------------- RaceyD.....
Cheers
Last edited by Chuck Schexnayder; Sep 15, 2015 at 11:10 AM.
Thread Starter
|
Veteran Member
Joined: Apr 2012
Posts: 1,854
Likes: 987
From: UK
The front tyres are on ramps and are strapped down to the ramps then I have 4 jack stands so I feel reasonable comfortable.
Last edited by RaceDiagnostics; Sep 15, 2015 at 02:56 PM.
Thread Starter
|
Veteran Member
Joined: Apr 2012
Posts: 1,854
Likes: 987
From: UK
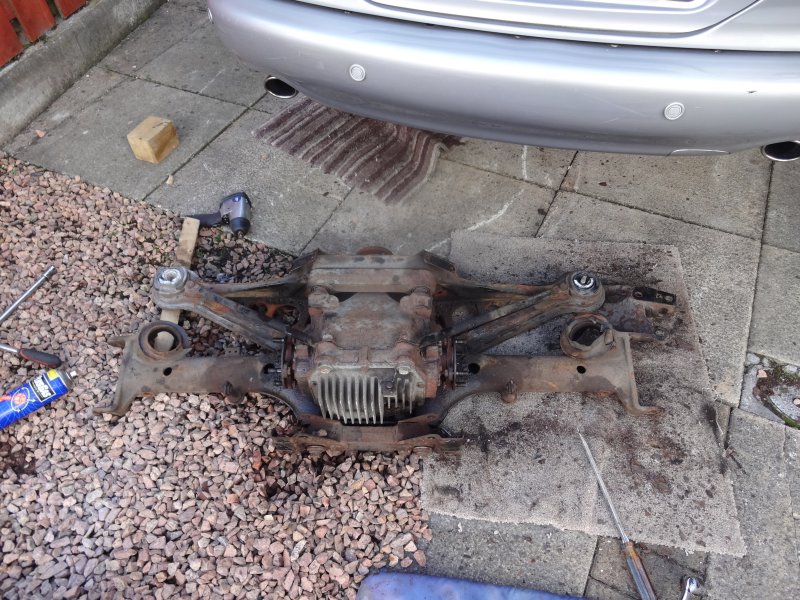
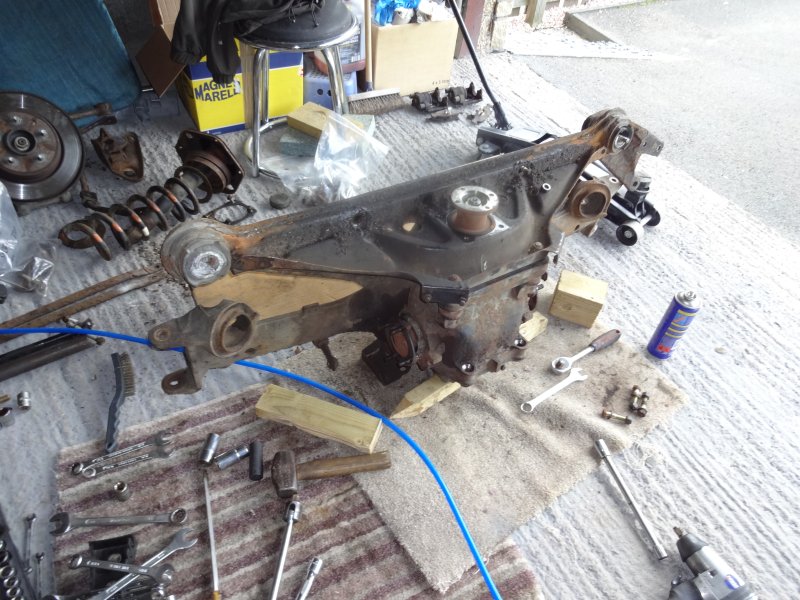
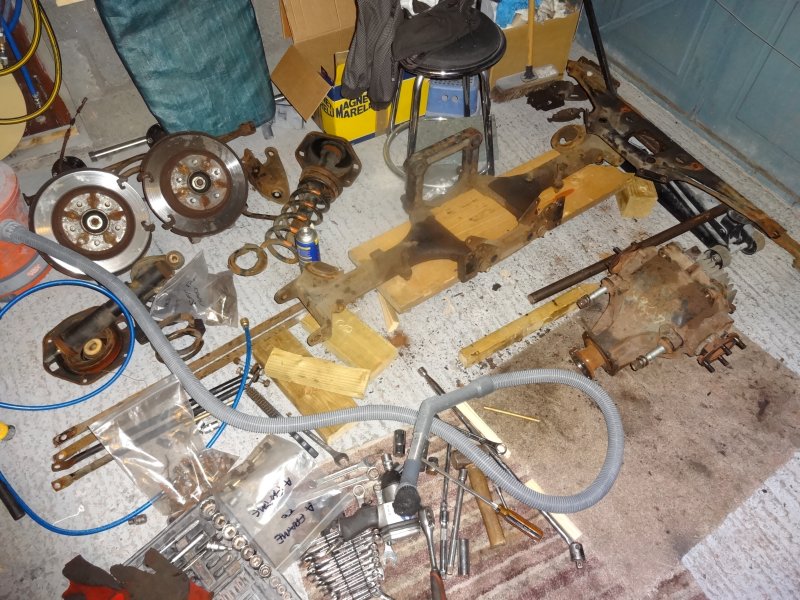
The first thing I did this morning was jack up one side of the car a couple of inches and drag the assembly out towards the rear, man it is very, very heavy.
I then started to strip off various parts. I used spring compressors to take the strain before removing first the bush bolt on one side and the top cap on the other. All the nuts and bolts were very tight and did not want to come off.
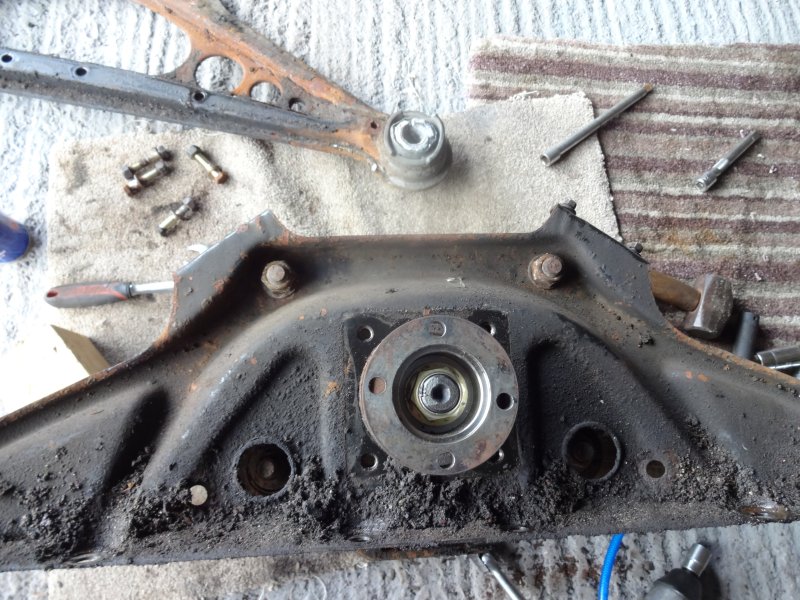
To make undoing the drive shaft bolts easier I removed the hub carrier bolts but marked their position first as this set s the toe in.
I need to use a torch to release the drive shaft bolts, very tight.
This clip needs to be removed to allow the hand brake cable to be threaded though the frame.
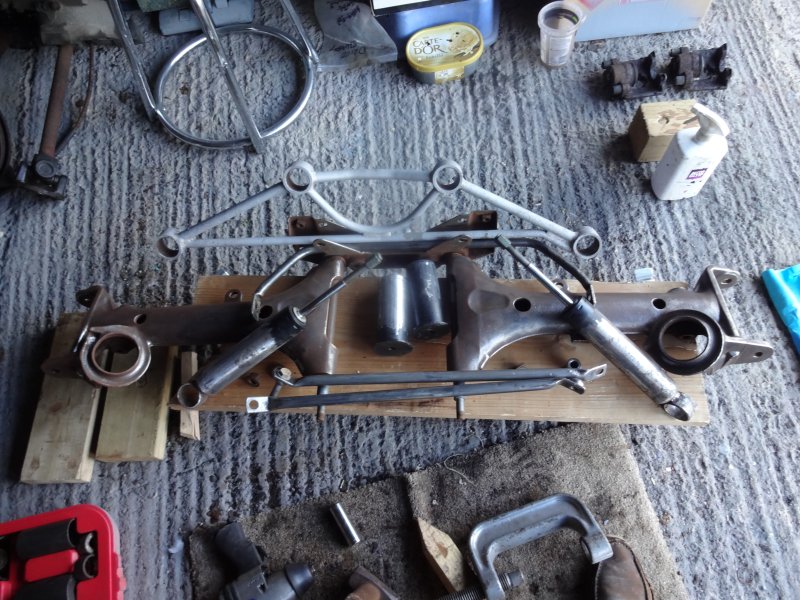
Drive shafts off.
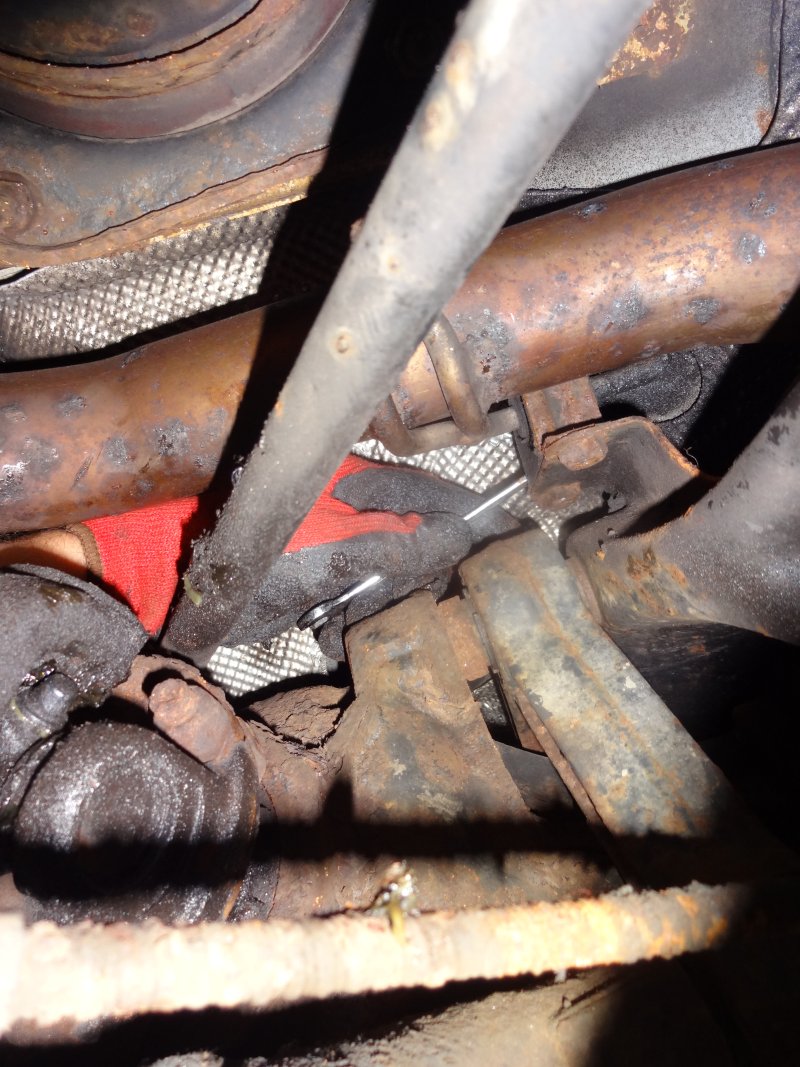
Did anyone notice the broken spring?

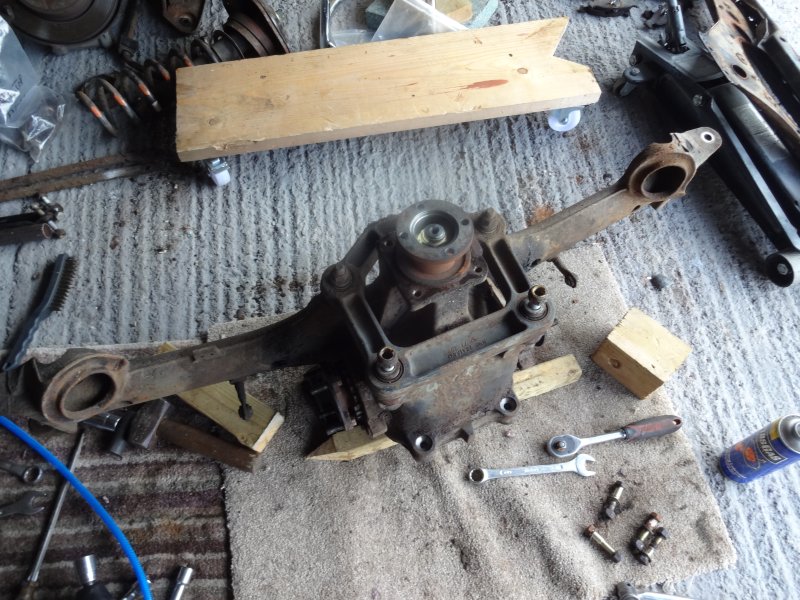
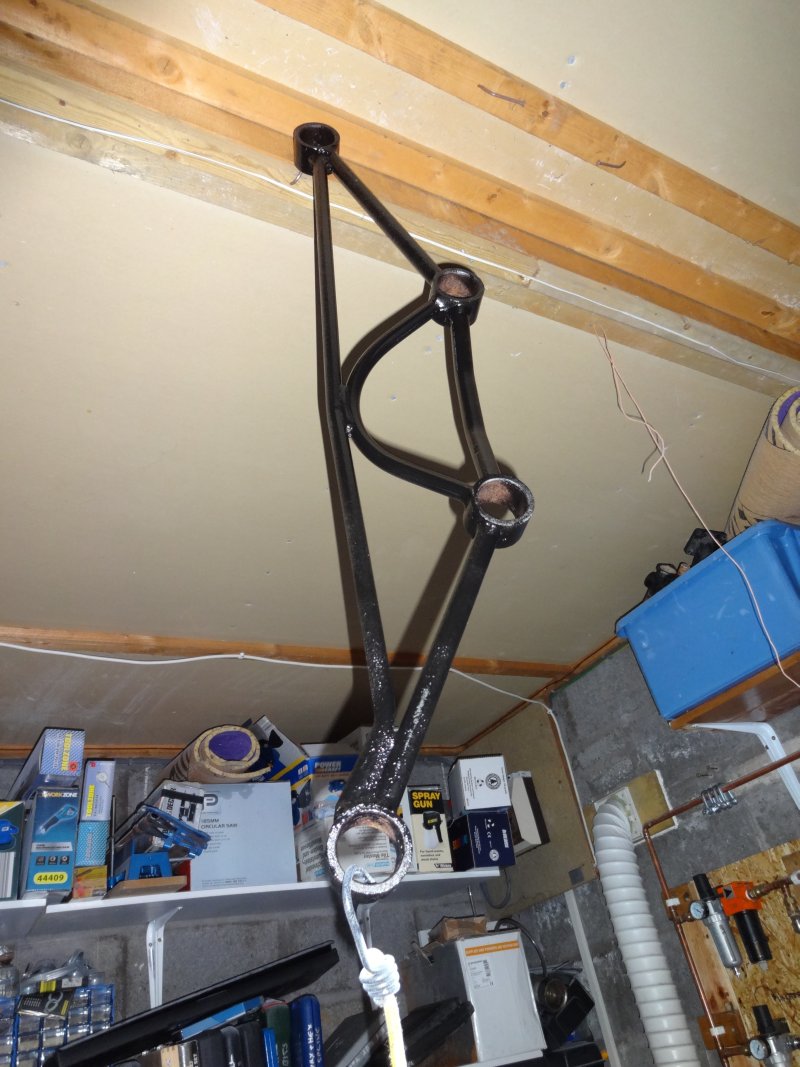
Next the braces, who needs a rowing machine when you have one of these.
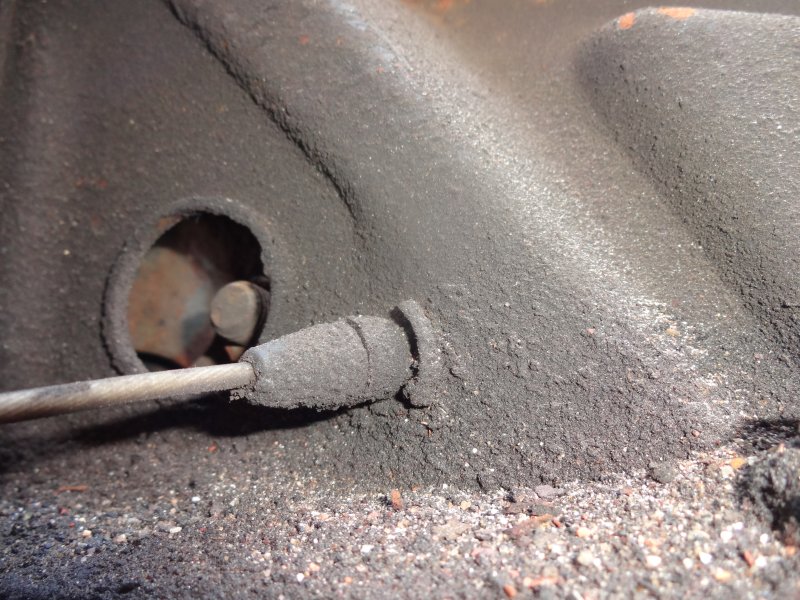
I guess this is the diff breather.
Next I started removing the bolts to separate the two frames.
What I did notice was the spacer which should be in the end slot for the brace bolts had disintegrated on both sides.
Four bolts on the bottom to come out.
And its off.

There are four bolts round the pinion and the tw0 big ones at the top to release to other frame.
And its off.
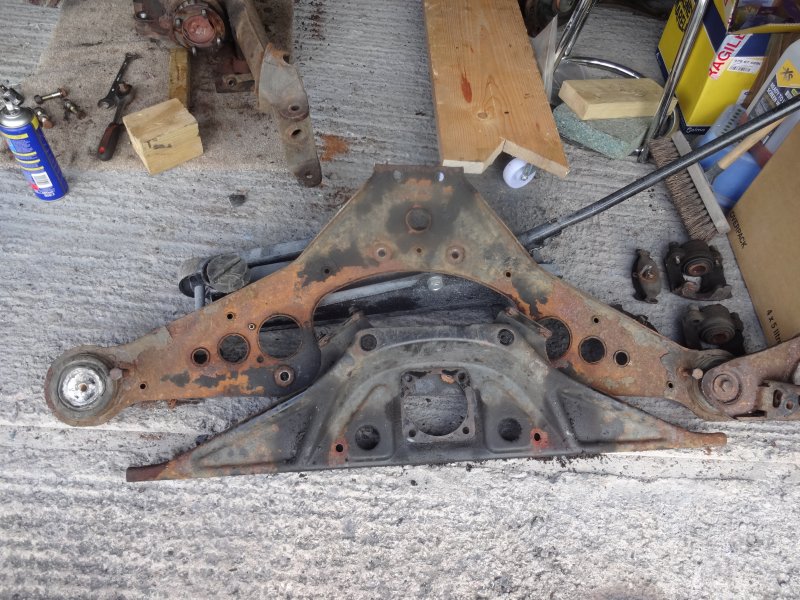
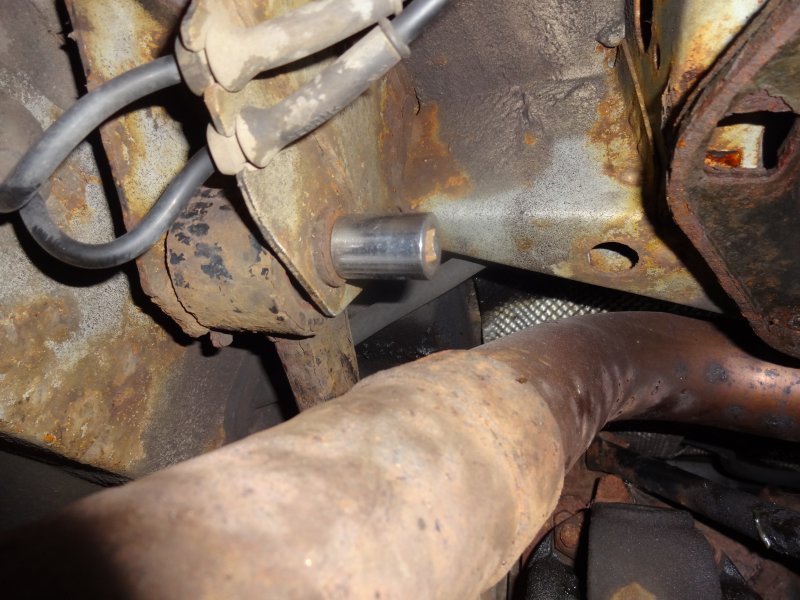
The pendulum can then be persuaded off.
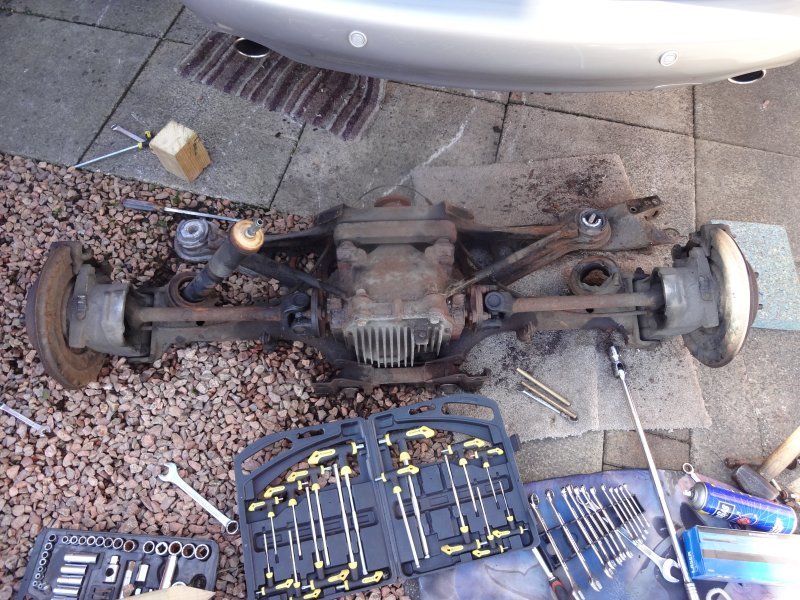
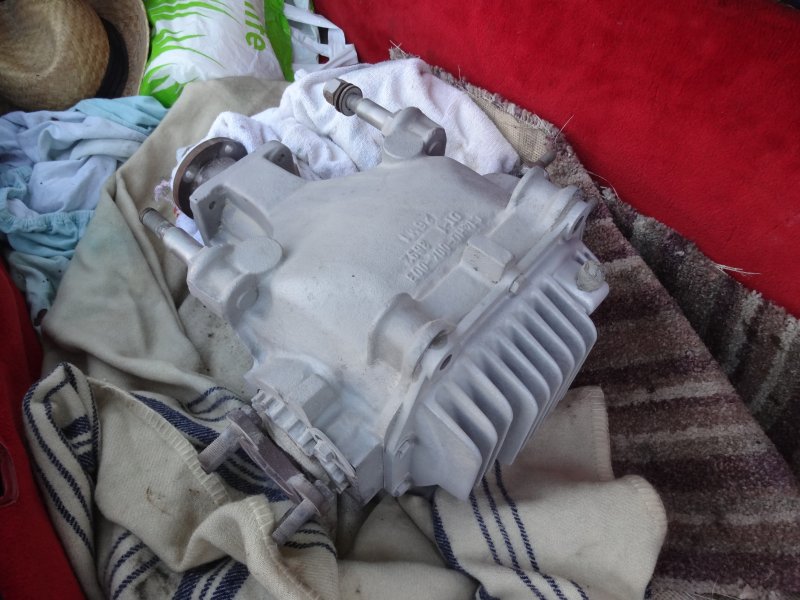
And the diff lifted out.
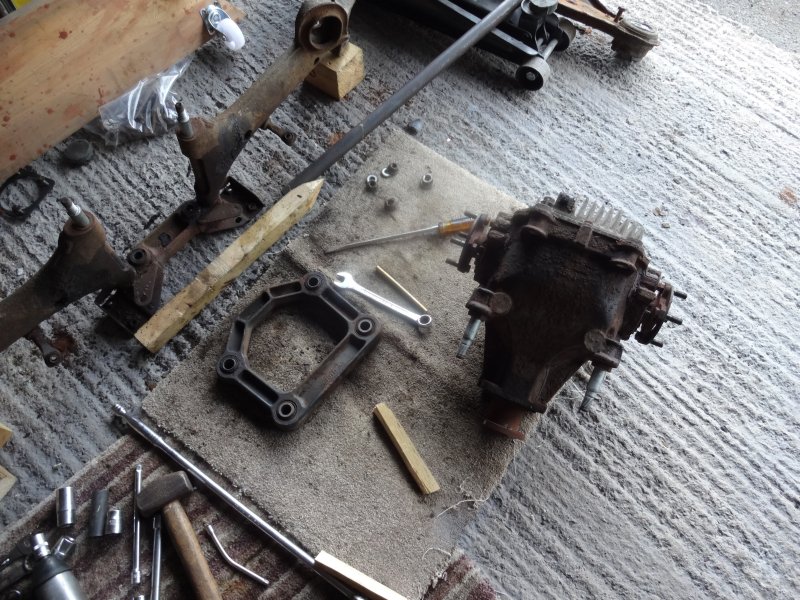
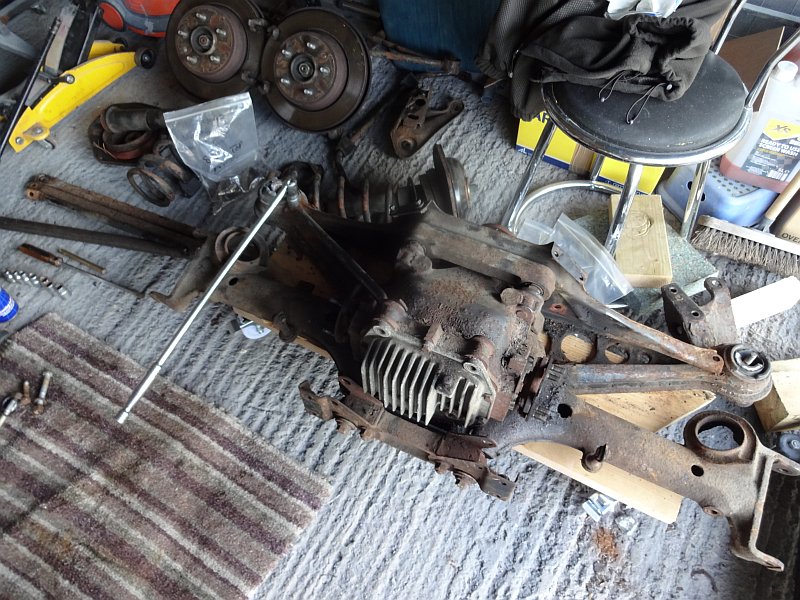
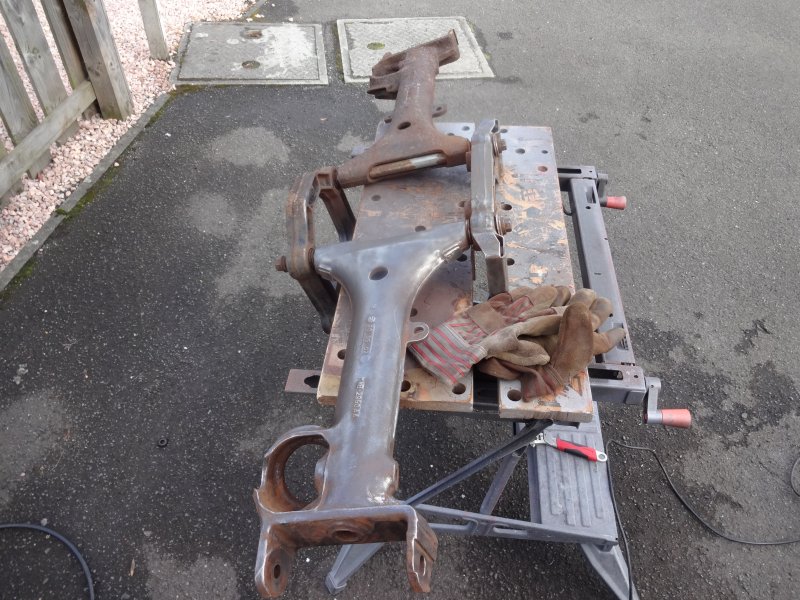
And this is what you are left with.
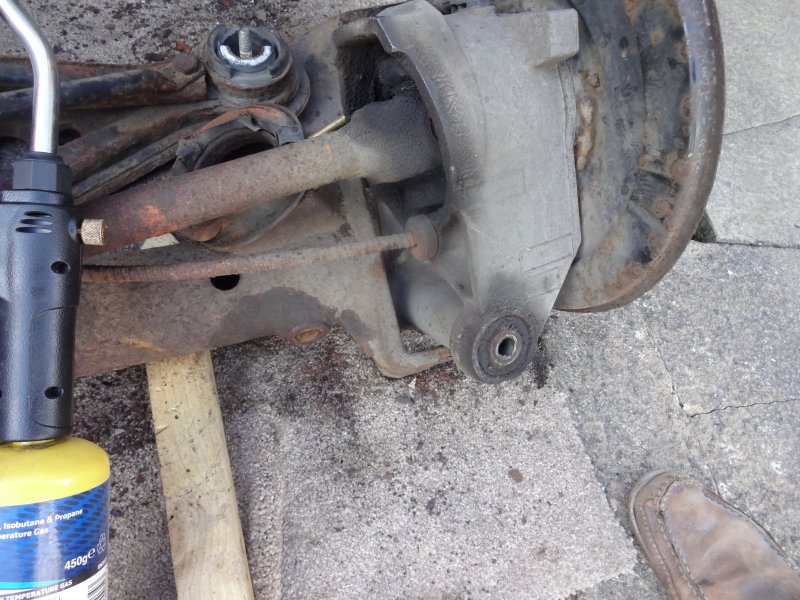
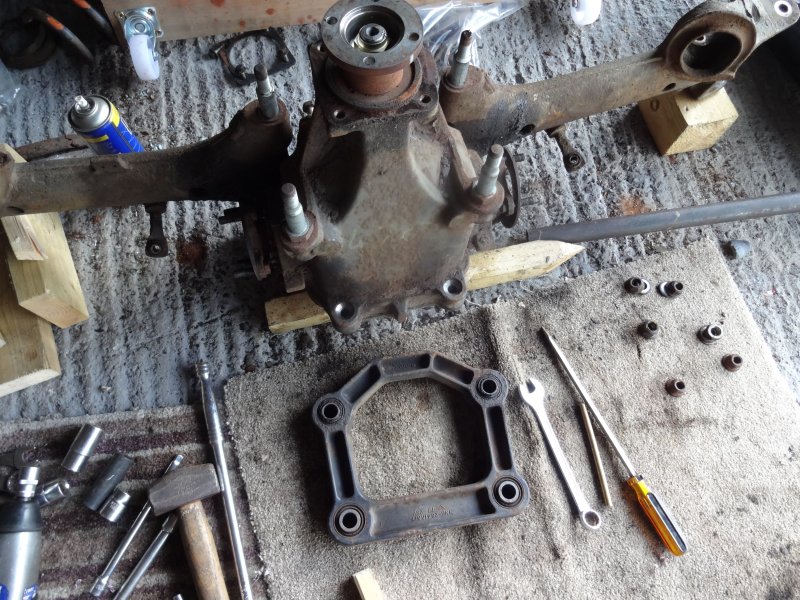
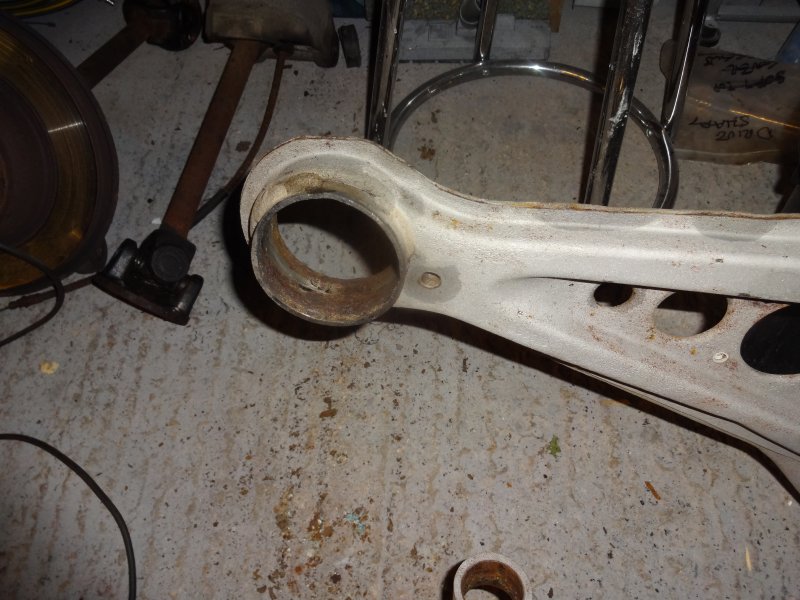
I don't think I will try to drive out the lower arm bolts as they are rusty in the middle which may damage the bearing surface.
I then started to strip off various parts. I used spring compressors to take the strain before removing first the bush bolt on one side and the top cap on the other. All the nuts and bolts were very tight and did not want to come off.
To make undoing the drive shaft bolts easier I removed the hub carrier bolts but marked their position first as this set s the toe in.
I need to use a torch to release the drive shaft bolts, very tight.
This clip needs to be removed to allow the hand brake cable to be threaded though the frame.
Drive shafts off.
Did anyone notice the broken spring?
Next the braces, who needs a rowing machine when you have one of these.
I guess this is the diff breather.
Next I started removing the bolts to separate the two frames.
What I did notice was the spacer which should be in the end slot for the brace bolts had disintegrated on both sides.
Four bolts on the bottom to come out.
And its off.
There are four bolts round the pinion and the tw0 big ones at the top to release to other frame.
And its off.
The pendulum can then be persuaded off.
And the diff lifted out.
And this is what you are left with.
I don't think I will try to drive out the lower arm bolts as they are rusty in the middle which may damage the bearing surface.
Trending Topics
 ) to you for digging into that one.
Veteran Member
Joined: Apr 2014
Posts: 4,814
Likes: 3,028
From: Jersey, Channel Islands
RD,
Hat off to you sir.
I imagine that there is very little that you wouldn't be prepared to tackle on an XK. Thanks for the pics and good luck,
Mike
P.S. I thought this was a minor rust repair not a major rear-end rebuild??
Hat off to you sir.
I imagine that there is very little that you wouldn't be prepared to tackle on an XK. Thanks for the pics and good luck,
Mike
P.S. I thought this was a minor rust repair not a major rear-end rebuild??
Last edited by michaelh; Sep 15, 2015 at 03:52 PM.
I am going to rebuild the rear end on my 2004 xk8 this winter so I really appreciate the detailed photos. I have a little thump that tells me I have a lower shock bushing that needs replacing. Hopefully I don't have quite as much rust to deal with. Good luck on your project.
Thread Starter
|
Veteran Member
Joined: Apr 2012
Posts: 1,854
Likes: 987
From: UK
Well 2.5l of Dinitrol 4941 arrived from rustbusters this morning, I plan to do a bit of rust protection with this after the welding and painting.
I dropped of a bunch of parts at the blasters this morning, first time I have used this place (AliBlast in Linlithgow), said they would do it for �30 so I may drop off some more if my needle tool does not work too well, great price.
And this afternoon spent some time under the car with a power file to get rid of some of the rusty scale and the hit the problem areas with an angle grinder.
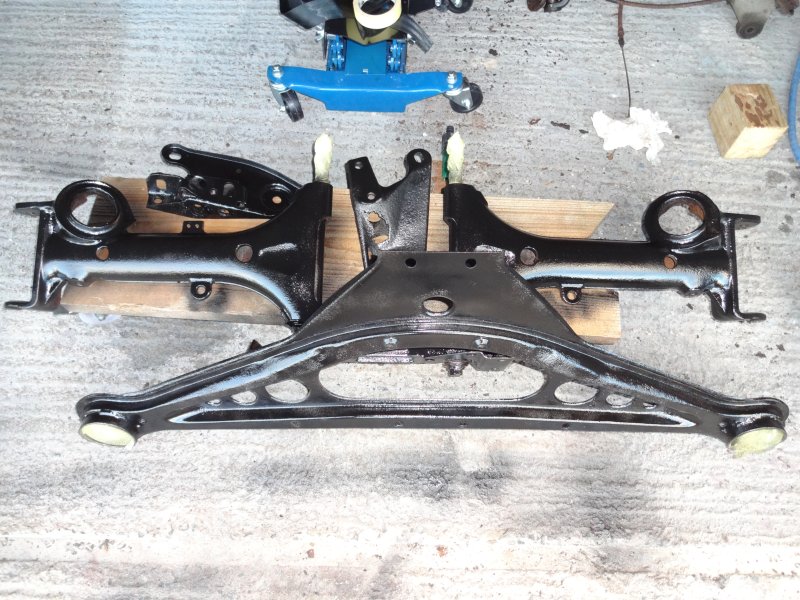
So here is what I now have, the one on the right is nice and clean, ready to weld.

But the one on the left was a bit worse, had to dig down two layers. Welding and painting tomorrow, but that plastic fuel line is a bit close!

I dropped of a bunch of parts at the blasters this morning, first time I have used this place (AliBlast in Linlithgow), said they would do it for �30 so I may drop off some more if my needle tool does not work too well, great price.
And this afternoon spent some time under the car with a power file to get rid of some of the rusty scale and the hit the problem areas with an angle grinder.
So here is what I now have, the one on the right is nice and clean, ready to weld.
But the one on the left was a bit worse, had to dig down two layers. Welding and painting tomorrow, but that plastic fuel line is a bit close!
Member
Joined: Nov 2014
Posts: 81
Likes: 90
From: Surrey
Race D. An inspiration, many thanks. It's nice to know there are others like me that just dive into these things. Live and learn right? (although another quote people throw at me is 'trial and error')
I think that after doing the front end of my XK8 this year, in order to get it through the UK MOT test, I'll be doing something very similar to you next year. These pics are excellent. So much clearer than the manual. But of course the question is, what colour are all the parts going to be painted before they go back!
I think that after doing the front end of my XK8 this year, in order to get it through the UK MOT test, I'll be doing something very similar to you next year. These pics are excellent. So much clearer than the manual. But of course the question is, what colour are all the parts going to be painted before they go back!
Thread Starter
|
Veteran Member
Joined: Apr 2012
Posts: 1,854
Likes: 987
From: UK
Paper templates to start with.

Then some weld through primer.


The first patch welded in with some 18 gauge steel.

Then the top section.


And then the other side.


Then brushed on some epoxy primer.

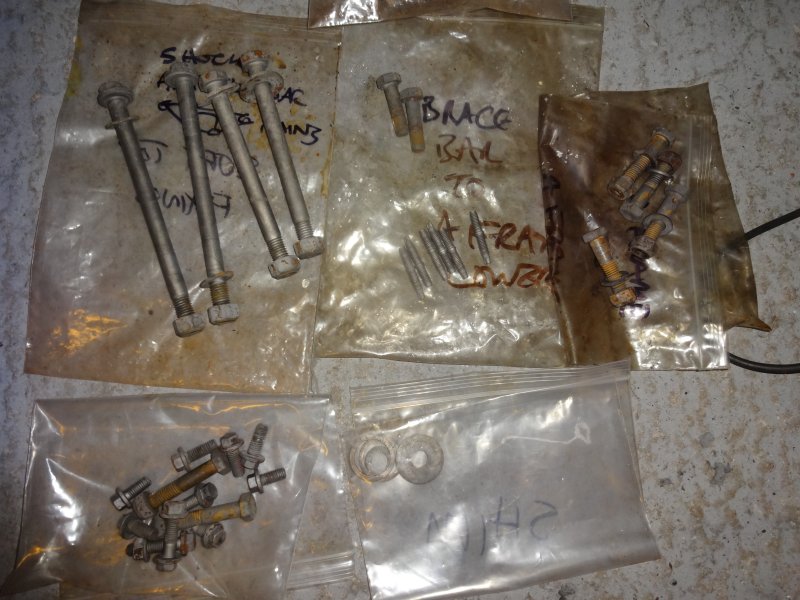
A couple of new items, the drop links came in a box saying Ford Escort drop links! I also got a couple of new bushes for the shocks as it makes sense to change them now and they are fairly cheap, and a couple of after market springs, half the price of the jag originals.
I also picked up this needle tool to do some derusting.

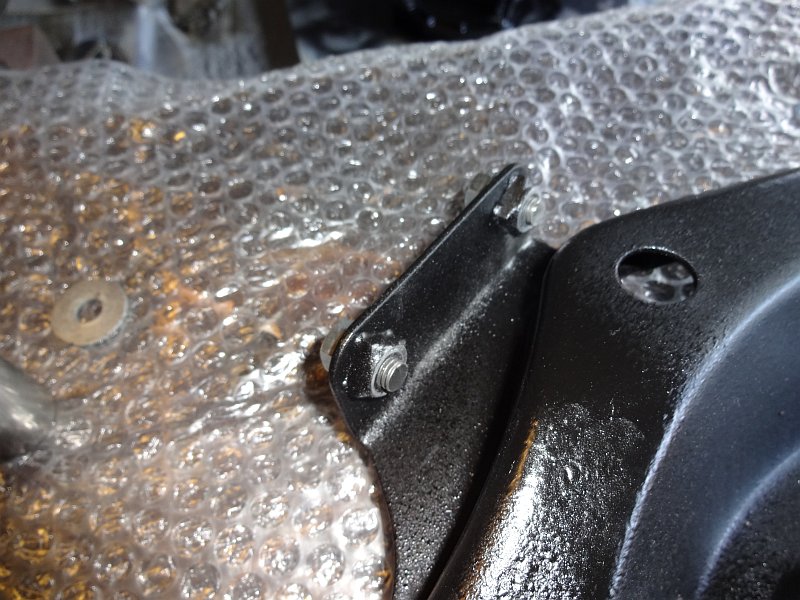
I also went back up to the sand blasters to pick up the parts, the subframe brackets were a disappointment.

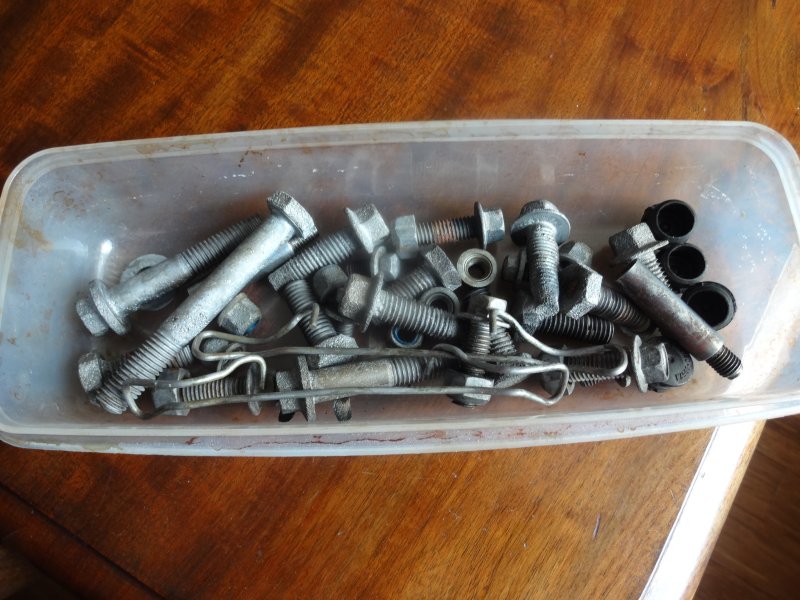
I stopped off at the Jag dealer to pick up new nuts and bolts and asked about the brackets, they are no longer available so I will need to call round the salvage yards.
The sand blaster did a great job and only charged �30 which was just as well as the new nuts and bolts cost �50, and the new tie bars �75.

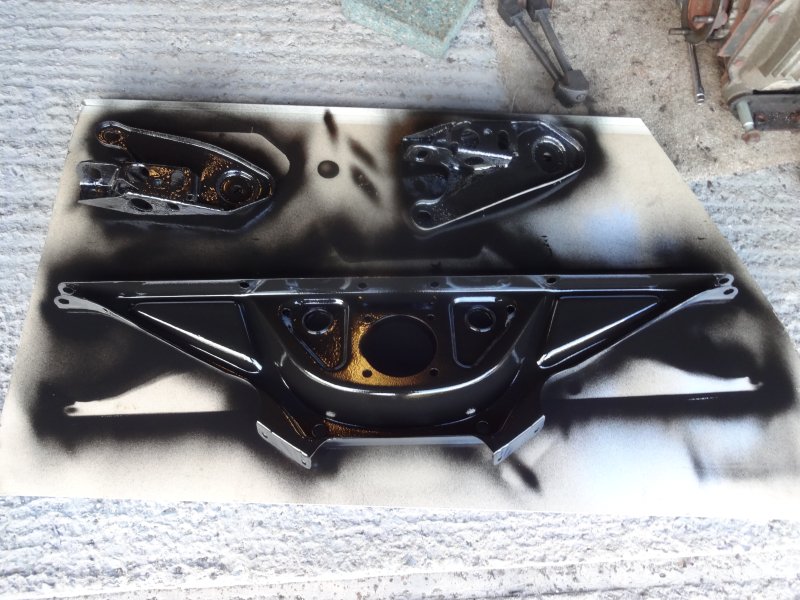
I then used up the left over epoxy on these parts, I decided to paint the brackets just in case I need to use the temporarily till I can find good ones.
Then some weld through primer.
The first patch welded in with some 18 gauge steel.
Then the top section.
And then the other side.
Then brushed on some epoxy primer.
A couple of new items, the drop links came in a box saying Ford Escort drop links! I also got a couple of new bushes for the shocks as it makes sense to change them now and they are fairly cheap, and a couple of after market springs, half the price of the jag originals.
I also picked up this needle tool to do some derusting.
I also went back up to the sand blasters to pick up the parts, the subframe brackets were a disappointment.
I stopped off at the Jag dealer to pick up new nuts and bolts and asked about the brackets, they are no longer available so I will need to call round the salvage yards.
The sand blaster did a great job and only charged �30 which was just as well as the new nuts and bolts cost �50, and the new tie bars �75.
I then used up the left over epoxy on these parts, I decided to paint the brackets just in case I need to use the temporarily till I can find good ones.
Thread Starter
|
Veteran Member
Joined: Apr 2012
Posts: 1,854
Likes: 987
From: UK
Back on to it today.
I have been cycling various parts, nuts and bolts through a bucket of citric acid, I use a cup boiler to keep it hot, it tops out at about 60 degC.
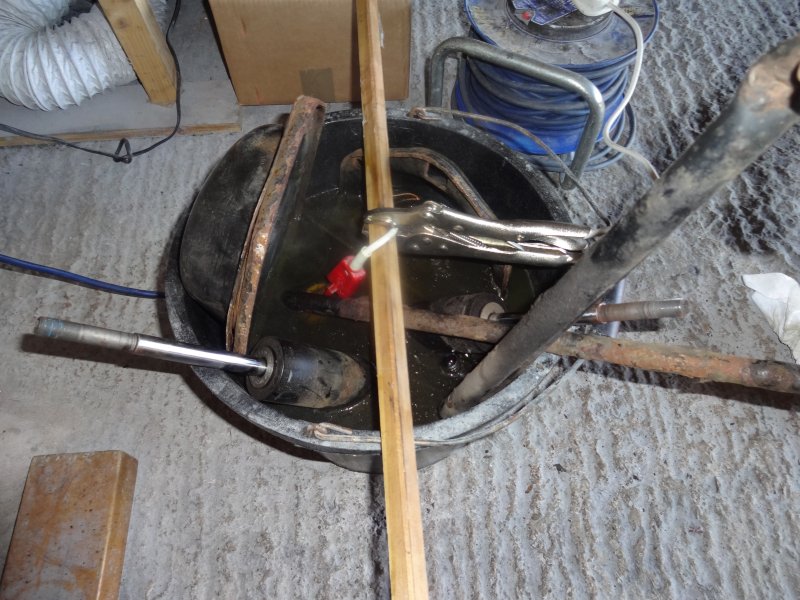
It does a great job on the nuts and bolts, this is just a few of the huge pile I seem to have.
Then used a power washer to clean up various parts and then got out the angle grinder with a wire brush.
As the main lower arm inner pivot bolts did not want to come out easily I decided to clean up the arm as best I could rather than break it down more.
Half done...
I then set about pushing out the bushes, to make the job a bit easier I dropped into my local garage and used their press to push them all out for �5.
For the big bushes they suggested a torch to burn off some of the rubber and then an air chisel to deform the bush inwards, it was then easier to push them out.
I have been cycling various parts, nuts and bolts through a bucket of citric acid, I use a cup boiler to keep it hot, it tops out at about 60 degC.
It does a great job on the nuts and bolts, this is just a few of the huge pile I seem to have.
Then used a power washer to clean up various parts and then got out the angle grinder with a wire brush.
As the main lower arm inner pivot bolts did not want to come out easily I decided to clean up the arm as best I could rather than break it down more.
Half done...
I then set about pushing out the bushes, to make the job a bit easier I dropped into my local garage and used their press to push them all out for �5.
For the big bushes they suggested a torch to burn off some of the rubber and then an air chisel to deform the bush inwards, it was then easier to push them out.
Thread Starter
|
Veteran Member
Joined: Apr 2012
Posts: 1,854
Likes: 987
From: UK
I spray painted the rear underside 0f the chassis today with Dinitrol 4941, its a firm wax that dries to the touch.
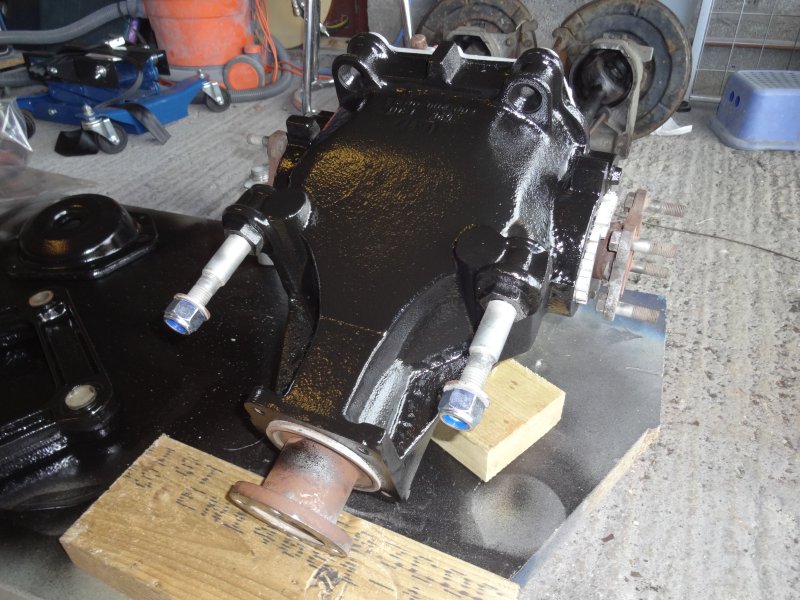
Then painted more of the suspension parts with epoxy paint.
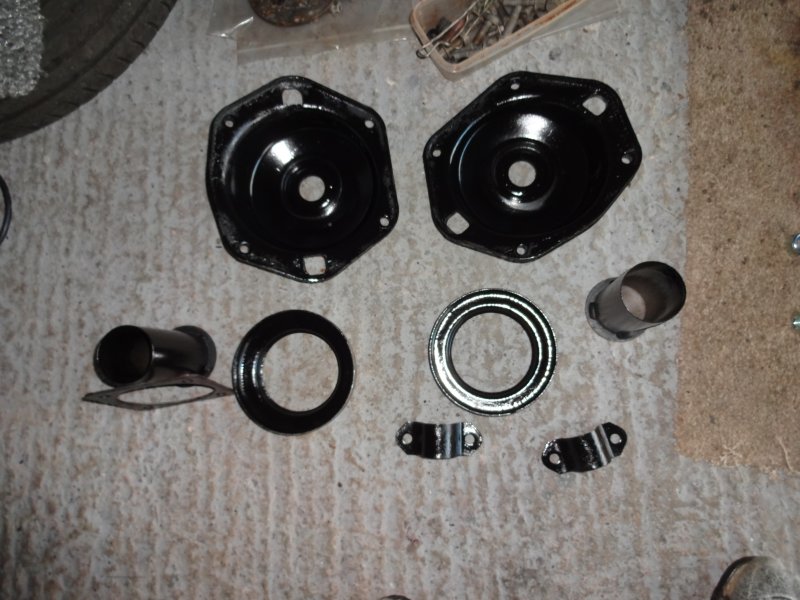
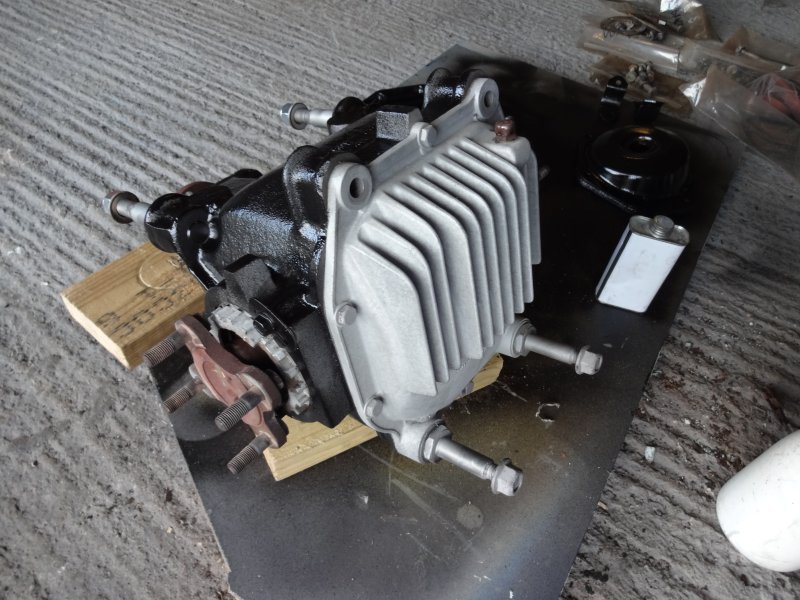
Then back to the sand blaster to pick up the diff, I would spray it with 2k clear if I thought it would not peel off.
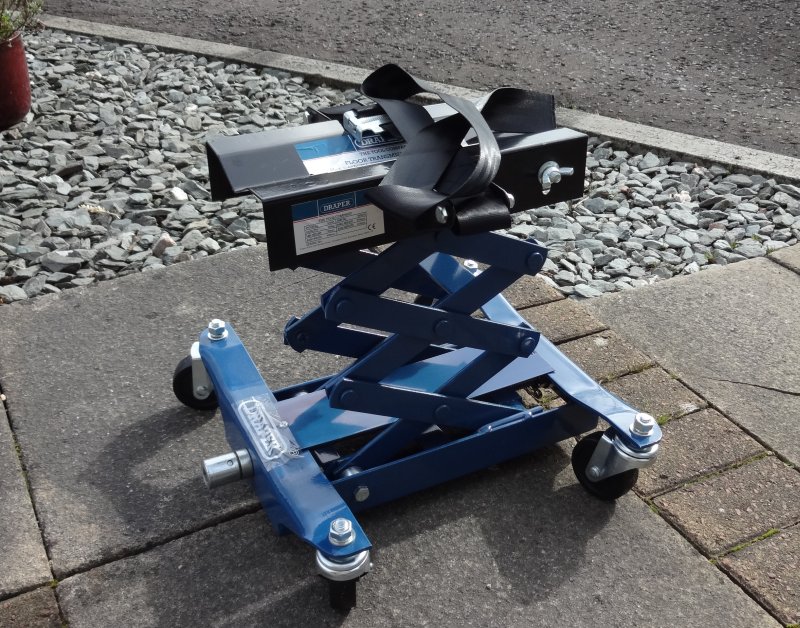
Then took delivery of a critical item.
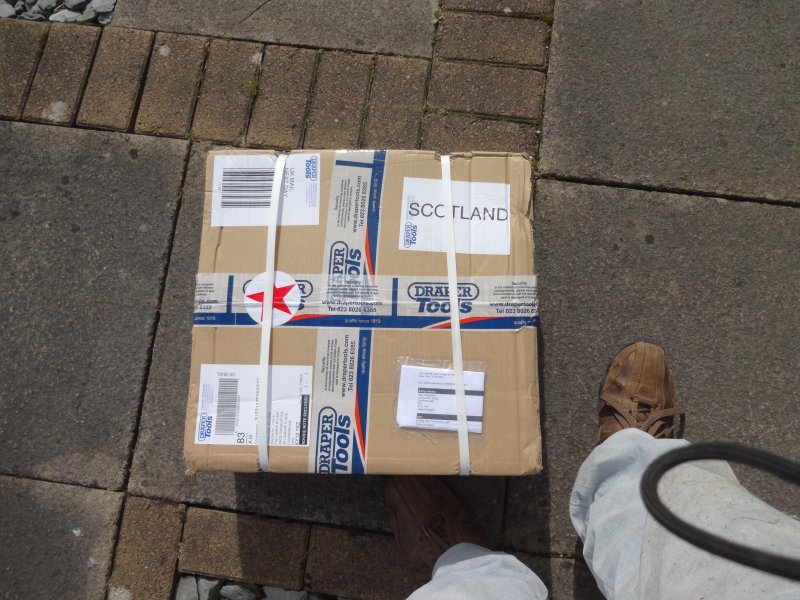
Without it there is now way I would be able to get the entire assembly back in on my own, I hope it is less then 440lb which is the limit of the lift.
Then painted more of the suspension parts with epoxy paint.
Then back to the sand blaster to pick up the diff, I would spray it with 2k clear if I thought it would not peel off.
Then took delivery of a critical item.
Without it there is now way I would be able to get the entire assembly back in on my own, I hope it is less then 440lb which is the limit of the lift.
Thread Starter
|
Veteran Member
Joined: Apr 2012
Posts: 1,854
Likes: 987
From: UK
Day 7....
I decided to weld studs into the bolt holes for the exhaust bracket carrier, should make assembly easier.
Welded in and repainted.
Then some more painting, that's the last of it.
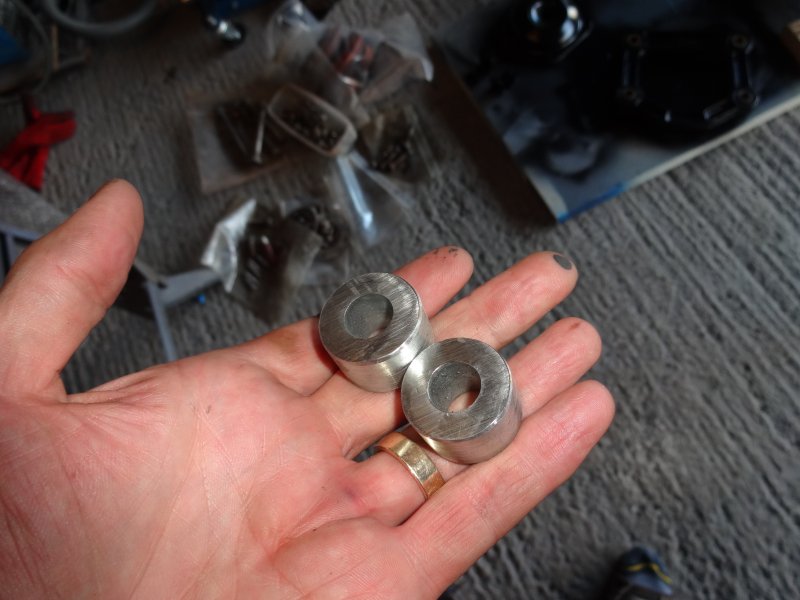
Then I needed to make a couple of spacers, PN CAC9330, as mine disintegrated when I took it apart and Jag wanted �30 for the pair.

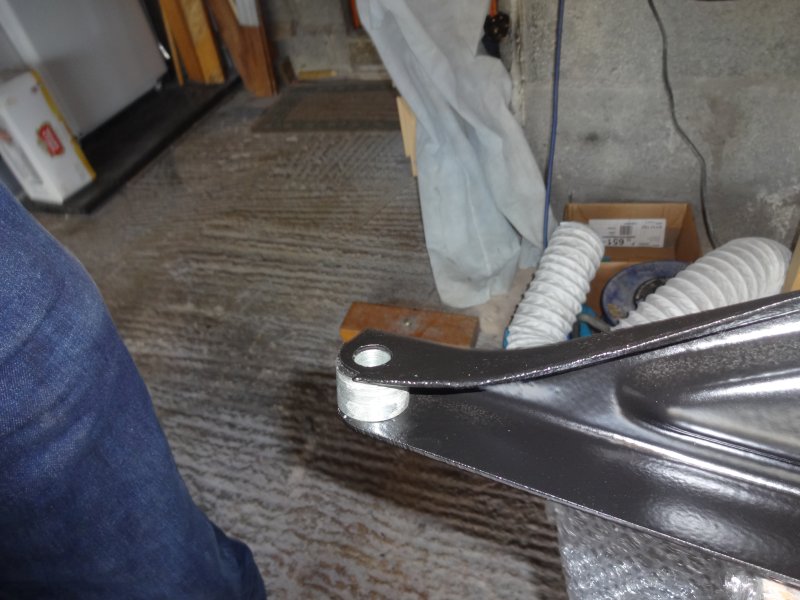
I decided to weld studs into the bolt holes for the exhaust bracket carrier, should make assembly easier.
Welded in and repainted.
Then some more painting, that's the last of it.
Then I needed to make a couple of spacers, PN CAC9330, as mine disintegrated when I took it apart and Jag wanted �30 for the pair.
