
Right Rear Toe Adjustment


Thread Starter
|
Senior Member
Joined: Jan 2012
Posts: 480
Likes: 157
From: Green Valley, AZ
Correction: The left rear toe adjustment eccentric bolt is at max position; toe setting is at the min limit. What is the most likely problem?
Bushings need replacing or wishbone (lower control arm) is bent and needs replacing?????
Thanks,
Bushings need replacing or wishbone (lower control arm) is bent and needs replacing?????
Thanks,
Last edited by Lannyl81; Mar 9, 2017 at 06:44 PM.
Senior Member
Joined: Mar 2016
Posts: 859
Likes: 322
From: Auckland NZ/ Houston, TX
Have you tried loosening the eccentric bolt enough to rotate the bolt all the way around? Sometimes being tightened and adjusted without loosening properly can give a false reading.
Otherwise, the lower arm is probably bent. I came across this issue a while back ( 10 years or so ) on an XJ ( X308 ) which has the exact same setup. Adjusting the rear toe and it would get just inside the green, then go way out. I replaced the lower arm on the car and fixed the issue.
Check the bushings first though just to make sure they are cracked or worn, but it's probably in the arm.
Veteran Member
Joined: Jun 2012
Posts: 1,245
Likes: 339
From: Gainesville, VA
"Are" there any bushings on the rear control arm? I replaced a rear hub assembly once. While doing so, I rooted around a bit and was surprised to find (what I thought was) no bushings. I surmised that Jaguar expected the rear subframe bushings to provide sufficient isolation.
Thread Starter
|
Senior Member
Joined: Jan 2012
Posts: 480
Likes: 157
From: Green Valley, AZ
JBzXJ40: Yes the eccentric bolt was loosened and the bolt turned around. Turning the bolt easily moves the rear of the tire in-out, so it is working, just not enough "out" to get the toe setting into the green.
And I suspect you meant "not" cracked or worn bushings; I will need to take a good look at the bushings to be sure, but knowing my luck it is probably a bent control arm. Not looking forward to replacing it.
scardini1: yes there are bushings in the lower control arm/wishbone, but your question has me wondering if there are three bushings or just one?
I know there is a bushing at the hub to lower control arm joint....but are there bushings where the control arm bolts to the subframe? Will have to research this more.

Veteran Member


Joined: Apr 2012
Posts: 1,854
Likes: 987
From: UK
The outer end of the rear control arm uses a bearing and the inner end has no replaceable bushes, there may be some soft metal insert where the bolt goes through the arm but I couldn't get the bolt out to investigate.
Thread Starter
|
Senior Member
Joined: Jan 2012
Posts: 480
Likes: 157
From: Green Valley, AZ
Soooo....there is a bearing in the hub where hub bolts to control arm...hmmmm...I did not take a very long look as I was just trying to get the hub to line-up with the control arm so I could get the eccentric bolt back in.
I have check a couple of exploded parts diagrams, quite unclear if there were bushings or not where that long bolt goes into the diff carrier. I did find bushings that state they were for rear lower control arms, but I think the description was incorrect; likely there were for FRONT rear lower control arm bushing.
Difficult to believe that there are no rear control arm bushings....never had a vehicle that did not have control arm bushings...????...
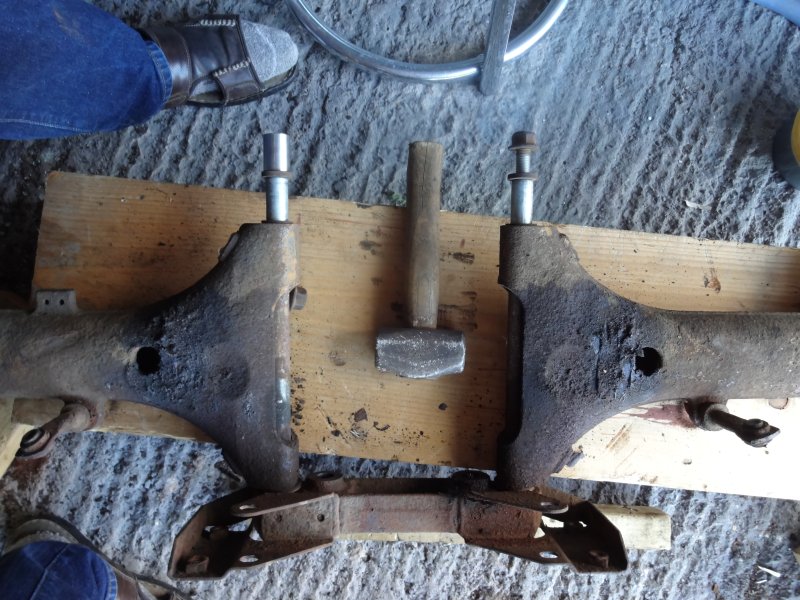
Is there room to remove the long bolt so the diff carrier can remain attached? Provided of course that the long bolt will come out. I assume that rust won in the picture above?
Wonder if I can take the control arm out and then take it someplace to bend it a bit without destroying it? I do see used ones on ebay, but have of course have no idea if they are any good or not.
With the current alignment settings with the Thrust Angle set to 0.00� the car will drive nice, but the right rear tire is going to wear due to the out of spec toe setting.
Aaaarrrrgggghhhhh!!!!!!!!
I have check a couple of exploded parts diagrams, quite unclear if there were bushings or not where that long bolt goes into the diff carrier. I did find bushings that state they were for rear lower control arms, but I think the description was incorrect; likely there were for FRONT rear lower control arm bushing.
Difficult to believe that there are no rear control arm bushings....never had a vehicle that did not have control arm bushings...????...
Is there room to remove the long bolt so the diff carrier can remain attached? Provided of course that the long bolt will come out. I assume that rust won in the picture above?
Wonder if I can take the control arm out and then take it someplace to bend it a bit without destroying it? I do see used ones on ebay, but have of course have no idea if they are any good or not.
With the current alignment settings with the Thrust Angle set to 0.00� the car will drive nice, but the right rear tire is going to wear due to the out of spec toe setting.
Aaaarrrrgggghhhhh!!!!!!!!
Veteran Member
Joined: Apr 2012
Posts: 1,854
Likes: 987
From: UK
The bits that the bolts attach to do have bushes, the item in the pic above and the yoke in the pic below, so I guess there is a chance that they are worn. Mine were fine at 130,000 miles.
But it is a hell of a job to get to them.

Full story here.
https://www.jaguarforums.com/forum/x...repair-149852/
But it is a hell of a job to get to them.
Full story here.
https://www.jaguarforums.com/forum/x...repair-149852/
Trending Topics
Thread Starter
|
Senior Member
Joined: Jan 2012
Posts: 480
Likes: 157
From: Green Valley, AZ
YUCK!...I think those bushes are fine and more likely that previous owner bent the lower control arm somehow....probably same time as when both front wheels were bent from an impact.
Anyways I will likely purchase a used control arm and go from there. I am sure it is NOT going to be a fun job getting that control arm off.
Anyways I will likely purchase a used control arm and go from there. I am sure it is NOT going to be a fun job getting that control arm off.
Senior Member
Joined: Mar 2016
Posts: 859
Likes: 322
From: Auckland NZ/ Houston, TX
I apologise, I must have been thinking about something else at the time. There are no bushings on the lower control arm of this model. You have the lower arm, and the axle acts as the upper control arm, then you have the monostrut on the back.
You should be able to put the car on jack stands. Take out the top 2 bolts for the monostrut, and the front of the diff cage, while having a floor jack under the diff. You should then be able to lower it enough to get the inner bolt out. However that inner bolt might be a chore to turn/rotate. Going to need to wd40 or penetrating oil, and a jar to put money for all the f-bombs your gonna drop. Hopefully the bolt comes out with no major issues.
You should be able to put the car on jack stands. Take out the top 2 bolts for the monostrut, and the front of the diff cage, while having a floor jack under the diff. You should then be able to lower it enough to get the inner bolt out. However that inner bolt might be a chore to turn/rotate. Going to need to wd40 or penetrating oil, and a jar to put money for all the f-bombs your gonna drop. Hopefully the bolt comes out with no major issues.
Veteran Member
Joined: Jun 2012
Posts: 1,245
Likes: 339
From: Gainesville, VA
I dunno JBz, ... that single bolt for the toe-in adjustment came out of mine easy as could be. But it may be because I drive the car so much. It had over a 130,000 miles on it when I replaced a rear hub assembly.
But I'm glad I wasn't all screwed up about those bushings.
But I'm glad I wasn't all screwed up about those bushings.
Thread Starter
|
Senior Member
Joined: Jan 2012
Posts: 480
Likes: 157
From: Green Valley, AZ
In addition to removing the top two monostrut bolts I suspect I will need to remove the exhaust mounts as well to get the rear subframe to lower a bit. Going to be ALOT of work.
scar: yeah the toe adjustment bolts came out pretty easy on both sides for me, so no problem there.
When I do all of this I am going to separate the half-shafts as well and replace the OEM 4mm shims with 6mm shims to move the camber into the "green". Will also need to add or shift the front upper control arm washers to get the caster into the "green" and add the eccentric bolts to the front lower control arms to get the camber into the "green".
Thread Starter
|
Senior Member
Joined: Jan 2012
Posts: 480
Likes: 157
From: Green Valley, AZ
I have been informed that there are bushings for the long pivot bolt of the rear control arm or wishbone. They are located in the diff carrier and require dropping of the rear cradle and them some disassembly to get the diff carrier pieces out so the bushings can be pressed out/in.
Not something I am going to do until I determine exactly what the problem is first...gee what an awesome thought right.....
I have been looking at used control arms/wishbones....quite a bit of metal there....trying to imagine what could possible bend the control arm/wishbone and not be from a major impact/crash...??
Going to be making some measurements and comparing left and right sides; hopefully I will be able to determine something.
Still open to suggestions/comments.
Thanks
Veteran Member
Joined: Jun 2012
Posts: 1,245
Likes: 339
From: Gainesville, VA
Also consider that if something "is" actually bent, it might NOT be the lower control arm. I agree - that is one stout piece of hardware. Could it be the diff carrier itself? Maybe some measurements are in order before you commit to any actions that might prove to be unnecessary (and expensive).
Last edited by scardini1; Mar 18, 2017 at 10:31 AM.
Senior Member
Joined: Mar 2016
Posts: 859
Likes: 322
From: Auckland NZ/ Houston, TX
I only mentioned the difficulty of the bolts because I've come across a lot of 308's and X100's ( early XK ) that came from up north and had some that needed some persuasion to come out. As long as they come out then that's one less thing to worry about. Just remember to put lube/grease on them before reassembly.
As long as nothing else looks obviously bent. I do agree the lower arm looks pretty stout, but I've had "one" before where setting the rear toe, it would come to just outside the green, then go way out, but couldn't physically see the bend. I have seen on a few occasions where the axles are bent as well, but that will give you a vibration, and can usually see it if you spin up rear tires while on a hoist or jack stands.
If that lower is bent, you wont see it, it wouldn't take much to through the alignment out.
Thread Starter
|
Senior Member
Joined: Jan 2012
Posts: 480
Likes: 157
From: Green Valley, AZ
I completely agree that it does not take much of a bend to through the alignment adjustability out. I hope that by taking very careful measurements between left and right sides I might determine what the problem is...although to be honest I think I have at best at 50/50 shot at this.
I would sure like some type of reassurance before I go to ALOT of work to replace a component. And since I am being honest here...I may just live with the 0.08 setting.
I would sure like some type of reassurance before I go to ALOT of work to replace a component. And since I am being honest here...I may just live with the 0.08 setting.
Veteran Member
Joined: Jun 2012
Posts: 1,245
Likes: 339
From: Gainesville, VA
Hey Lanny,
I hand set my rear alignment after swapping hub assemblies. I just put the bolt's index back where it was and crossed my fingers.
The car handles just fine.
The tires are wearing true (after tens of thousand of miles)
Guess what: I ain't touching nuttin'!
If she doesn't have any handling quirks and the tires show nothing unusual, why go nuts over a number (actually an iddy-biddy BIT of a number)? In aviation we always look for "secondary indications" to validate a abnormal situation. Why not wait until you have "secondaries".
Thread Starter
|
Senior Member
Joined: Jan 2012
Posts: 480
Likes: 157
From: Green Valley, AZ
UPDATE:
Found the problem...t'was me.
When I did the rear shocks prior to taking in for the alignment I did not see that on the right side the spring shifted out of the spring seat when I installed the spring/shock assembly.
I simply loosened everything and pushed the spring into place, went back to the alignment shop and toe is fine on both sides.
Now I just need to order a pair of 6mm shims to bring the camber into "green."