
Sway Bar Bushing Replacement

Thread Starter
|
Veteran member


Joined: Mar 2007
Posts: 11,345
Likes: 1,165
From: Oak Ridge, TN
While doing some general repairs with the car -> new idler pulley, belt tensioner w/ pulley (both DIY), and the power steering fluid leak by my local indy shop...I figured I'd drop another $10 a piece for some new sway bar bushings. This I also attempted myself.
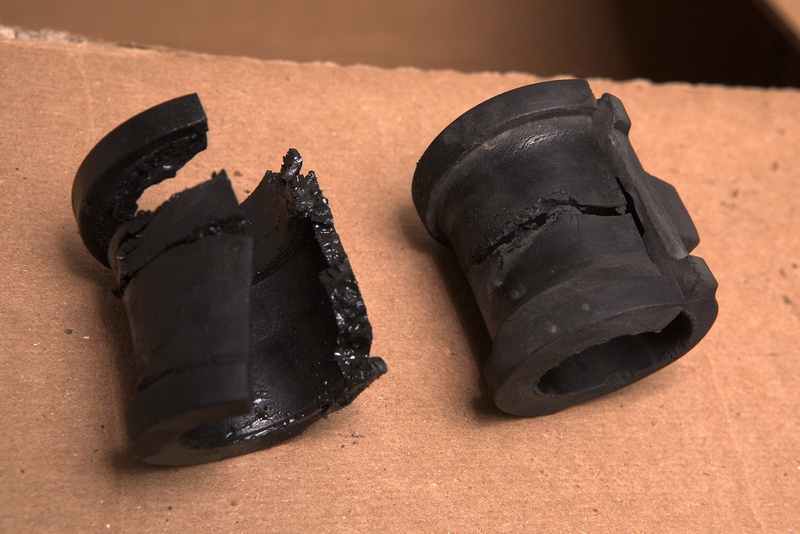
Many XJ threads lately have caused me to consider my 'clunking' that i've heard over slow bumps to be attributed to worn sway bar bushings. What I found was shown in the pic below...
The bush on the RIGHT was the driver side bushing, LEFT was the passenger side. Excessive deterioration on the passenger side bush was obviously caused by the leaking power steering fluid; it was everywhere around the area, and must've been leaking for over a year...slowly.
Here is a step by step guide in case anyone else wants to try.
The passenger side took 1 hour, the driver side 2 hours = 3 hours total. I can't believe how tight it was to get the bolts and brackets off on the driver side...absolutely NO ROOM. I had to use a small (4-inch long) 10mm spanner wrench to get the bolts off. But, I saved myself $300 labor...easy. Brutal will probably come on here and tell me he does these every day in less than a 1/2 each! lol, or I could have done it an easier way.

Thread Starter
|
Veteran member
Joined: Mar 2007
Posts: 11,345
Likes: 1,165
From: Oak Ridge, TN
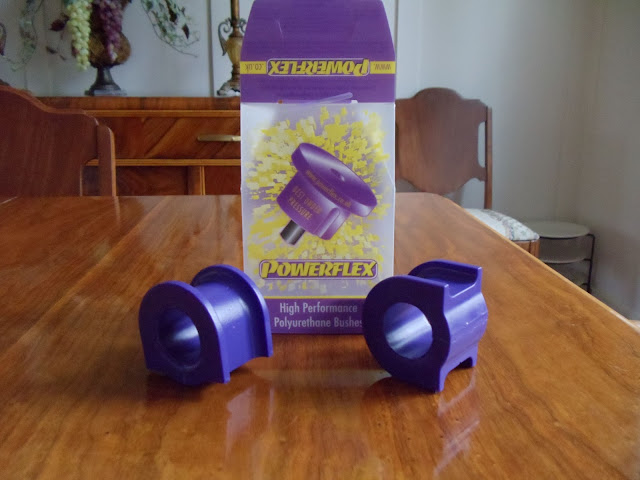
Also, if I were to do this again, I might give Energy Suspension bushings a shot, maybe last longer and perhaps stiffen up the response, if only just a hair.


Joined: Jan 2009
Posts: 526
Likes: 62
From: Motorcity
I could be mistaken as I don't have an XK here to look at but I think I remember easy access to the brackets from under the hood with a long extension. Just remove both brackets at the same time and the bar will be loose enough to put the new bushings in place without removing the end links. If someone could look under their hood and correct me if I am wrong I would appreciate it.
Trending Topics
Senior Member
Joined: Dec 2008
Posts: 286
Likes: 28
From: Florida
Just checked under the hood and you are correct. They can be seen and perhaps reached with a long socket extension. However, the trick will be to get the old ones out and the new ones in once the bracket is freed up. It looks like an extra set of hands would be a big help. I noticed that mine are starting to show signs of vertical cracking along the outer face. I have the handling up grade and the sway bar is larger in diameter with just about zero room for bushing replacement.
Thread Starter
|
Veteran member
Joined: Mar 2007
Posts: 11,345
Likes: 1,165
From: Oak Ridge, TN
I knew someone would come up with a better way. In my defense, I don't own any long extensions, but that is very nice to know for others trying this themselves in the future. Fender liners won't have to come out either, should make for a quicker time to completion too.

Member
Joined: Feb 2010
Posts: 74
Likes: 12
H20boy,
Any chance you can email the .pdf attachment directly to me? I can't seem to download it off the forum.
Thanks,
Mark R. mjrotsky@hotmail.com
Any chance you can email the .pdf attachment directly to me? I can't seem to download it off the forum.
Thanks,
Mark R. mjrotsky@hotmail.com
Thread Starter
|
Veteran member
Joined: Mar 2007
Posts: 11,345
Likes: 1,165
From: Oak Ridge, TN
I've gotten really good at doing this change over. So, going to share with you all my 'secret' method for a quick-swap. You can even do this quicker if you had more than one person doing the work.
Tools Needed
19mm spanner wrench
19mm socket
10mm socket
Socket wrench
18 inch (minimum) extension
Electrical tape
Jack stands & at least one hydraulic jack
Light (at least one)
Procedure
1. Lift the front end of the car up, so that both tires are off of the ground, at least most of the weight. Place on jack stands in the right locations to support the weight of the car.
2. Place the bonnet in the service position. If you don't know how to do this, remove each bonnet strut at the hood connection (twist n pull) and insert a large (3/8 IIRC) bolt into the hinge where it will support the bonnet. Be careful, it is HEAVY and if you do this yourself, do it slow and methodically.
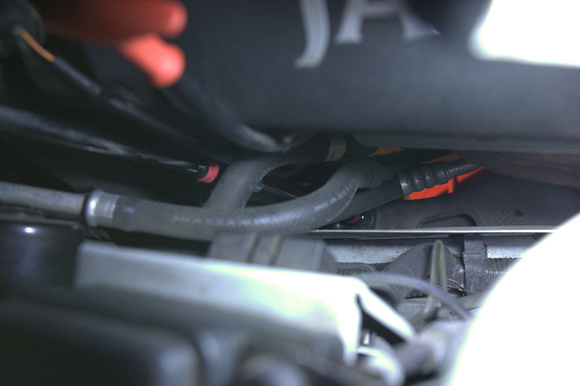
3. Place the light on the driver side next to the valve cover. Using your socket wrench, the extension and a 10 mm socket, you can reach both bolts to the sway bar bushing bracket. Loosen and let them fall out the bottom. If you want to take a precautionary measure before possibly loosing it in the rear lower control arm, put some electrical tape inside and around the end of the 10mm socket, it will 'grip' the head of the bolt and allow you to pull it up out of the engine bay w/ the extension and socket.


4. Go around to the other side and do the same thing. You will notice it is VERY easy to access on the passenger side.


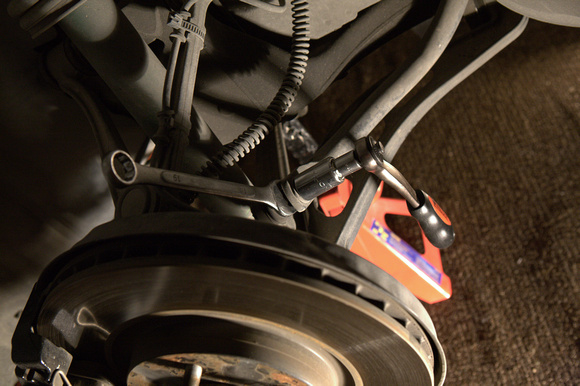
5. Turn your wheels to the right (passenger side on US vehicle) and get under the car. Disconnect the passenger side sway bar end link from the sway bar using the 19mm spanner to hold the upper bolt, and the 19mm socket and wrench to remove the upper retaining nut and washer. Slide the sway bar forward and the end link back to separate the two. (shown here w/o the wheel for better photographing, but you can seriously just leave it on)
6. While under that side, you can remove the bushing bracket and raise the sway bar from its resting position. Remove the old bushing by reaching from one side and the other to slide it along the bar where you can open the split side and pull it from the bar.
7. Clean the bar and area of the bushing. If you had any power steering fluid leak (like mine) or coolant in the area, you should remove all leftover fluid so it does not compromise the new bushing.
8. Slide on the new bushing, make sure the new split (located on the side) faces forward, not back. The old bushing split on the bottom, this is a new improvement to the factory bushing.
9. Set the bushing in the original spot, place the bracket above it, but do not screw in the bolts yet.
10. Connect the sway bar end link and finger tighten the washer and nut.
11. From the top of the engine bay, use the 10mm socket again (make sure tape is on the socket) place your bolt in the socket, and down it goes. If you worry about it coming out later, you can add a bit of blue loctite to the threads. You can line it up and insert each bolt into the bracket. Tighten so it will not come apart, but do not fully torque it down.
12. Using the 19mm spanner and 19mm socket, tighten the sway bar end link to the sway bar.
13. Turn the wheel to the left, and proceed to the driver side and repeat Steps 5-12 again.
14. Make sure you didn't miss any bolts (or washer) and all parts/tools are removed from under the car and in the engine bay.
15. Return the bonnet to the normal position and close.
16. Lower the car back to the ground. Now tighten all of the bolts for the sway bar bushings. If you do not lower the car first, there is a possibility the sway bar will not rotate correctly with the weight of the car, and the sway bar and its end links may be at the incorrect angle in the suspension at the end. Not to mention it could prematurely weaken/damage your newly installed bushing.
17. Go take a test drive...enjoy the clunk-free silence and soft feel of the suspension.
I may add some photos later that I took, just for some eye candy.
Tools Needed
19mm spanner wrench
19mm socket
10mm socket
Socket wrench
18 inch (minimum) extension
Electrical tape
Jack stands & at least one hydraulic jack
Light (at least one)
Procedure
1. Lift the front end of the car up, so that both tires are off of the ground, at least most of the weight. Place on jack stands in the right locations to support the weight of the car.
2. Place the bonnet in the service position. If you don't know how to do this, remove each bonnet strut at the hood connection (twist n pull) and insert a large (3/8 IIRC) bolt into the hinge where it will support the bonnet. Be careful, it is HEAVY and if you do this yourself, do it slow and methodically.
3. Place the light on the driver side next to the valve cover. Using your socket wrench, the extension and a 10 mm socket, you can reach both bolts to the sway bar bushing bracket. Loosen and let them fall out the bottom. If you want to take a precautionary measure before possibly loosing it in the rear lower control arm, put some electrical tape inside and around the end of the 10mm socket, it will 'grip' the head of the bolt and allow you to pull it up out of the engine bay w/ the extension and socket.
4. Go around to the other side and do the same thing. You will notice it is VERY easy to access on the passenger side.
5. Turn your wheels to the right (passenger side on US vehicle) and get under the car. Disconnect the passenger side sway bar end link from the sway bar using the 19mm spanner to hold the upper bolt, and the 19mm socket and wrench to remove the upper retaining nut and washer. Slide the sway bar forward and the end link back to separate the two. (shown here w/o the wheel for better photographing, but you can seriously just leave it on)
6. While under that side, you can remove the bushing bracket and raise the sway bar from its resting position. Remove the old bushing by reaching from one side and the other to slide it along the bar where you can open the split side and pull it from the bar.
7. Clean the bar and area of the bushing. If you had any power steering fluid leak (like mine) or coolant in the area, you should remove all leftover fluid so it does not compromise the new bushing.
8. Slide on the new bushing, make sure the new split (located on the side) faces forward, not back. The old bushing split on the bottom, this is a new improvement to the factory bushing.
9. Set the bushing in the original spot, place the bracket above it, but do not screw in the bolts yet.
10. Connect the sway bar end link and finger tighten the washer and nut.
11. From the top of the engine bay, use the 10mm socket again (make sure tape is on the socket) place your bolt in the socket, and down it goes. If you worry about it coming out later, you can add a bit of blue loctite to the threads. You can line it up and insert each bolt into the bracket. Tighten so it will not come apart, but do not fully torque it down.
12. Using the 19mm spanner and 19mm socket, tighten the sway bar end link to the sway bar.
13. Turn the wheel to the left, and proceed to the driver side and repeat Steps 5-12 again.
14. Make sure you didn't miss any bolts (or washer) and all parts/tools are removed from under the car and in the engine bay.
15. Return the bonnet to the normal position and close.
16. Lower the car back to the ground. Now tighten all of the bolts for the sway bar bushings. If you do not lower the car first, there is a possibility the sway bar will not rotate correctly with the weight of the car, and the sway bar and its end links may be at the incorrect angle in the suspension at the end. Not to mention it could prematurely weaken/damage your newly installed bushing.
17. Go take a test drive...enjoy the clunk-free silence and soft feel of the suspension.
I may add some photos later that I took, just for some eye candy.
Last edited by H20boy; Jan 29, 2013 at 09:13 AM. Reason: revised step 11 and 16 to include lowering before tightening fully
Senior Member
Joined: Mar 2010
Posts: 590
Likes: 18
From: Snohomish, WA
Also, if I were to do this again, I might give Energy Suspension bushings a shot, maybe last longer and perhaps stiffen up the response, if only just a hair.
Thread Starter
|
Veteran member
Joined: Mar 2007
Posts: 11,345
Likes: 1,165
From: Oak Ridge, TN
Midlife, can you show a pic of the powerflex bushings, I'd like to see the shape/size compared to the OEMs. (I understand you can't do a side by side just yet)
Dave, the XK8 is a 1" bar, midlife may be able to measure his XJR since his is 'up in the air' right now. I think its a bit beefier. XJR/XKR very similar suspension components, I would not doubt it if it ends up the same bar diameter. If in doubt, just get the OEM bushings from the dealer.
Dave, the XK8 is a 1" bar, midlife may be able to measure his XJR since his is 'up in the air' right now. I think its a bit beefier. XJR/XKR very similar suspension components, I would not doubt it if it ends up the same bar diameter. If in doubt, just get the OEM bushings from the dealer.
Senior Member
Joined: Mar 2010
Posts: 590
Likes: 18
From: Snohomish, WA
...
The bush on the RIGHT was the driver side bushing, LEFT was the passenger side. Excessive deterioration on the passenger side bush was obviously caused by the leaking power steering fluid; it was everywhere around the area, and must've been leaking for over a year...slowly.
...
The bush on the RIGHT was the driver side bushing, LEFT was the passenger side. Excessive deterioration on the passenger side bush was obviously caused by the leaking power steering fluid; it was everywhere around the area, and must've been leaking for over a year...slowly.
...
http://picasaweb.google.com/lh/photo...eat=directlink
PS. how do you post photos within the thread instead of linking out?
Thread Starter
|
Veteran member
Joined: Mar 2007
Posts: 11,345
Likes: 1,165
From: Oak Ridge, TN
like this
Just right click on your image on your album, 'copy image location' (copy link location for inserted thumnails though), then return to your post and use the insert image icon ...CTRL+V to paste, and hit ok.
Just right click on your image on your album, 'copy image location' (copy link location for inserted thumnails though), then return to your post and use the insert image icon
...CTRL+V to paste, and hit ok.
Last edited by H20boy; Aug 10, 2010 at 03:35 PM.